

Platform Engineering With Pulumi [Episode 2] - DZone Cloud
source link: https://dzone.com/articles/platform-engineering-with-pulumi-part-2-build-deploy-react
Go to the source link to view the article. You can view the picture content, updated content and better typesetting reading experience. If the link is broken, please click the button below to view the snapshot at that time.

Platform Engineering With Pulumi (Part 2): Build and Deploy a React.js Application
In this blog, we will be developing a React.js application and deploying it on AWS, and modifying the Pulumi code to create the required cloud resources.
Join the DZone community and get the full member experience.
Join For FreeIn Chapter 1 of this blog, we built an AWS landing zone for our React.js/Node.js application. In this episode, we will build the application and deploy it manually. In the next chapter, we will use GitOps based automated deployment of both the Infrastructure and application code.
The app that we will be building is a very simple web application, that creates and fetches contact details to/from DynamoDB.
In Chapter 1, we already created a DynamoDB with Pulumi. Here is the snippet of the code, that creates the DynamoDB:
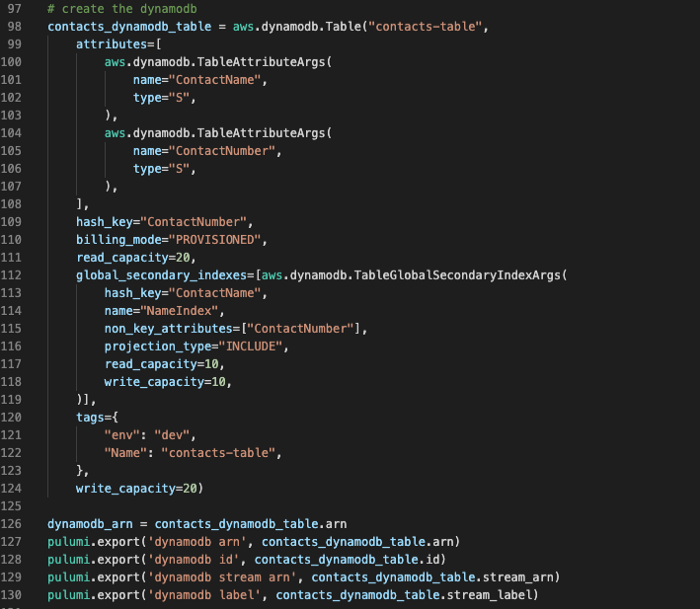
The above Pulumi code in Python creates a table called contacts-table with 2 attributes ContactName and ContactNumber, with other important configurations such as hash_key, secondary_index tags etc.
Now let's build and deploy our application, on the landing zone we created with Pulumi.
Node API
To access and perform the add and fetchAll operations on the Contacts database, let's build a simple express Node.js application. You can find the source code here.
We could have used Next.js to do both API and App, but I wanted to demonstrate deploying multiple tiers (in a typical tiered web architecture). So please play along.
In this Node.js application, we will expose 2 endpoints:
/fetchAllContacts: This will connect to DynamoDB and fetch all the contacts and returns as a JSON response./addContact: This endpoint accepts the ContactName and ContactNumber as parameters and adds the record to DynamoDB.
The use case and code is very simple, as our focus is more on the IaC and GitOps, I have kept the application very simple, with no security/login and serious exception and log handling, etc.
Let’s walk through the code quickly:
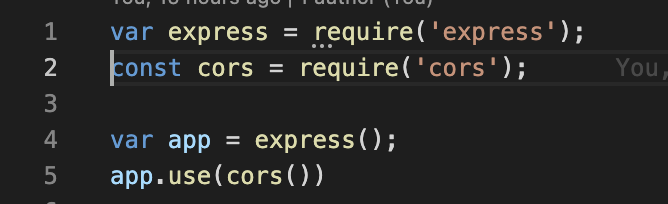
Line 1–5: We are importing express, to create the endpoints and cors. For the React.js application to call these endpoints, the URL domains will be different, as the ports are going to be different. So we will need to configure Cross-Origin Resource Sharing.
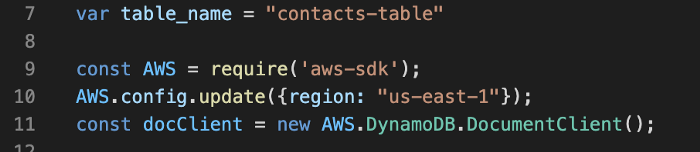
Line 7–11: In the above code, we are initializing the aws sdk, and setting the default region, and creating a DynamoDB Client object.
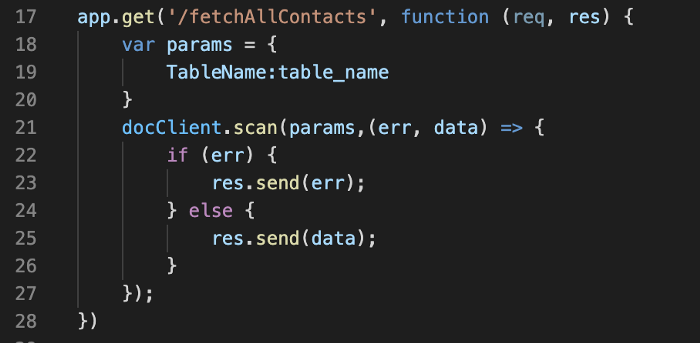
Line 17–28: We are creating an endpoint /fetchAllContacts using express, and fetching all the records from DynamoDB, using Scan. This fetches all the contacts.

Line 30–49: We are extracting the contactName and contactNumber from the request object and adding it to the DynamoDB table.
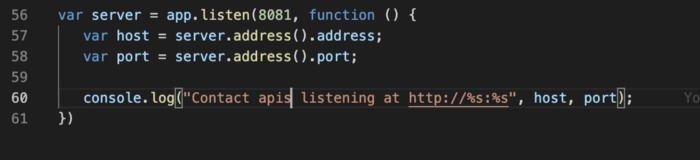
Line 56–61: We are then running the Node.js application listening on a port.
Please note that in Episode 1, we opened port 80
SecurityGroupIngress. In the recent code, this is edited to open8081for the Node.js applicaton and8082for the React.js one. Please refer to the latest Pulumi code on my GitHub.
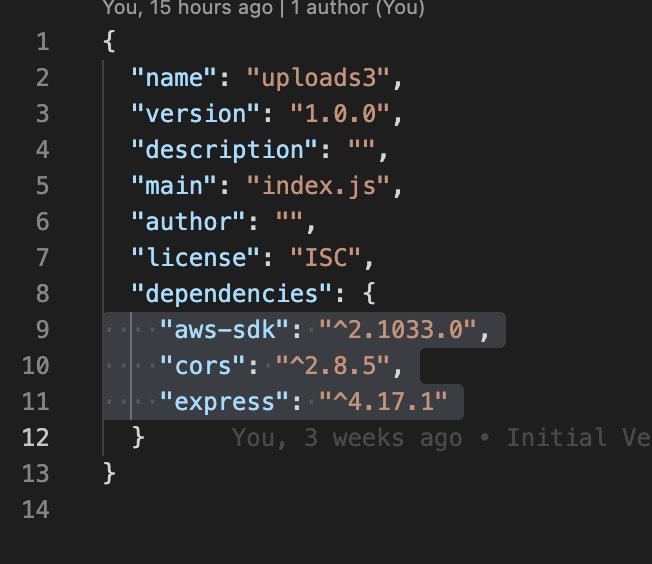
To run the application we will have to install the dependencies and update the package.json, here are the commands:
npm install aws-sdk --savenpm install cors --savenpm install express --save
The application can be tested from the local machine by configuring AWS using aws configure and pointing it to your account, and running the Node.js application. This is not covered in the blog (to keep the blog short).
Once the application is tested, the application code can be copied to the EC2 instance by running the scp command. Here are the commands, that I executed to copy the relevant files:
scp -i rsa /Users/vijaykumarab/AB-Home/Developer/contactlist-blog/contactlist-blog-app/package.json [email protected]:/home/ec2-user/api/package.jsonscp -i rsa /Users/vijaykumarab/AB-Home/Developer/contactlist-blog/contactlist-blog-app/index.js [email protected]:/home/ec2-user/api/index.js
To run the application on EC2, log in to the EC2 and run npm install to install dependencies, and run the node app (node index.js) to test if the APIs are working.
Ensure that the right ports are opened. I used export PORT=8081, before I run the node index.js and updated my Pulumi code to open that port. Please refer to the latest code on my GitHub.
Now that we have the API running. Let's build a simple React.js application to access this API, and display the results.
React.js App
In the React.js app, we are building a simple SPA (Single Page Application). You can refer to the complete code on my GitHub. Let's quickly walk you through the application code.
To keep it simple, I am using Material UI (my personal preference is Tailwind CSS).
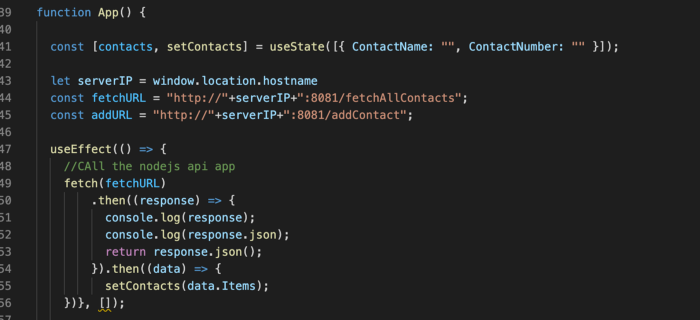
Line 11–17: In the above code, we are using useEffect() to fetch all the records from DynamoDB, and when the records are fetched, calling the setContacts, to refresh the page to force a render, using useState() hook.
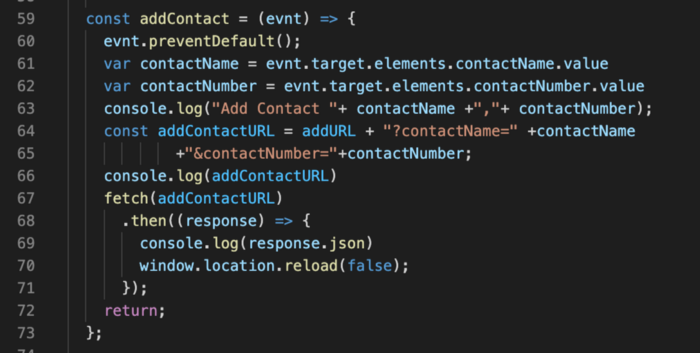
Line 59–73: In the above code, we are defining a JavaScript Method to add a contact. This picks the values provided in the form (the code is below) and calls theaddContact endpoint to add the contact. It then refreshes the page (There are better ways to refresh the page. But to keep the code quick and simple, I am using location.reload(), which is not a good practice. Ideally, we should be using a state)
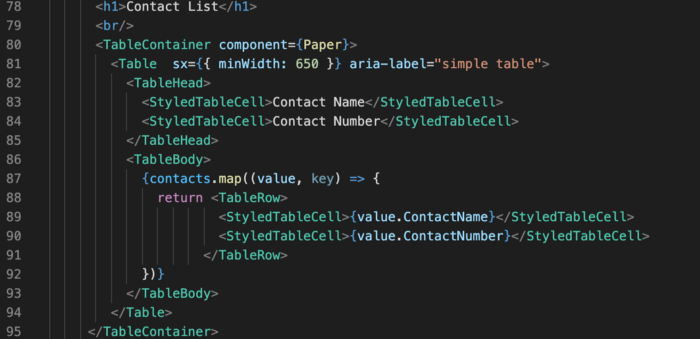
Line 78–95: In the above code, we are rendering the fetches contacts as a table.
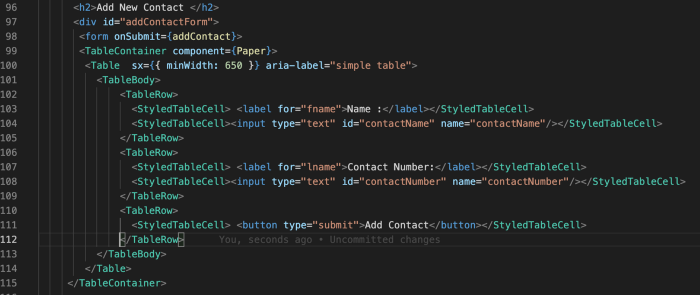
Line 96–115: In the above code, we are rendering a form, that accepts Contact Name and Contact Number, and calls the addContact() method.
To deploy the code, let's copy the React.js code using SCP. The following are the commands, I executed:
scp -i rsa -r /Users/vijaykumarab/AB-Home/Developer/contactlist-blog/contactlist-blog-react-app/src [email protected]:/home/ec2-user/contacts-app/srcscp -i rsa -r /Users/vijaykumarab/AB-Home/Developer/contactlist-blog/contactlist-blog-react-app/public [email protected]:/home/ec2-user/contacts-appscp -i rsa -r /Users/vijaykumarab/AB-Home/Developer/contactlist-blog/contactlist-blog-react-app/package.json [email protected]:/home/ec2-user/contacts-app
Before we build the application, let's install nvm, pm2 and serve.
Login to EC2.
And execute the following command to install nvm (please refer to the latest documentation on nvm):
curl -o- https://raw.githubusercontent.com/nvm-sh/nvm/v0.34.0/install.sh | bash. ~/.nvm/nvm.sh
Execute nvm install nodeto install node. To check if the node is installed, run node --version.
To install pm2 and serve execute the following commands:
sudo npm install -g pm2sudo npm install -g serve
Once all the packages are installed successfully, let's install the application dependencies, and build our React.js app, by executing the following commands:
cd contacts-appnpm installnpm run build
I faced a strange problem when I try to run the npm run build. I was getting Error: error:0308010C:digital envelope routines::unsupported
I found the workdaround from (https://stackoverflow.com/questions/69692842/error-message-error0308010cdigital-envelope-routinesunsupported). Thanks to Peter Mortensen
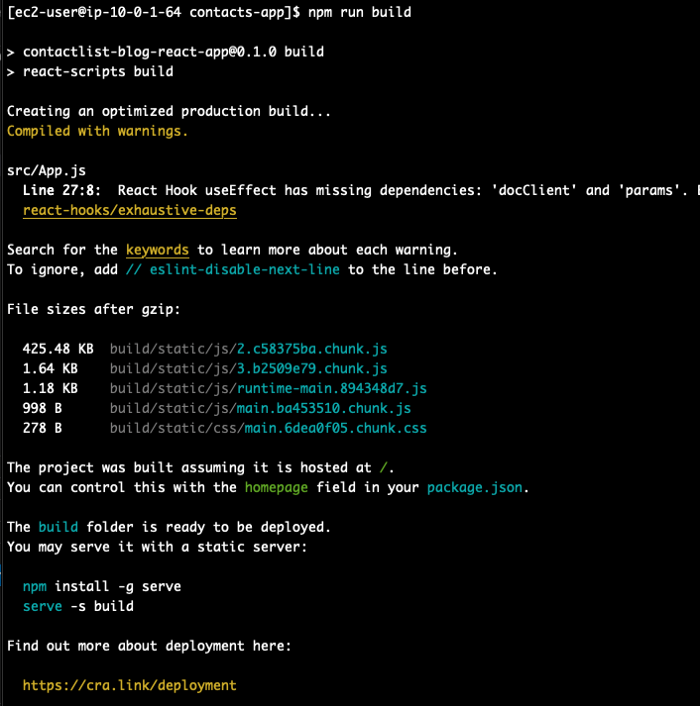
The above screenshot shows the code compile. Let’s now run the application using pm2, by running the following commands:
pm2 serve build/ 8082 — name “contactlist-app” — spa
To check if our application is running let's run pm2 list.

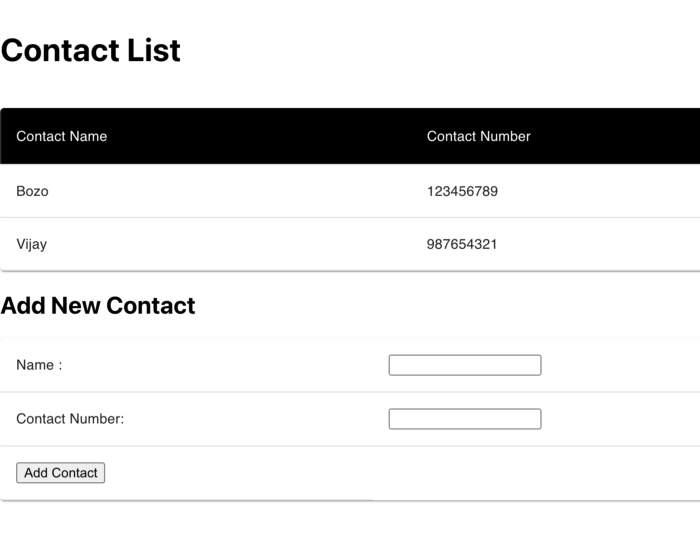
Let's now go to the browser and check if the application is running. Following is the screenshot I got on my browser:
As you can see, manual deployment is very painful and messy. In the next chapter, we will automate all of this using GitActions and AWS CodeDeploy, so that when we push any changes to the Git (or do pull requests), the code automatically gets deployed.
You can access the complete source code on my GitHub.
You can find the API code (express code) here and the React.js app code here.
Hope this was helpful, let’s meet in the next blog... until then stay safe, and have fun. Take care!
Recommend
About Joyk
Aggregate valuable and interesting links.
Joyk means Joy of geeK