

ABP VNext框架中Winform终端的开发和客户端授权信息的处理
source link: https://www.cnblogs.com/wuhuacong/p/15724012.html
Go to the source link to view the article. You can view the picture content, updated content and better typesetting reading experience. If the link is broken, please click the button below to view the snapshot at that time.
在ABP VNext框架中,即使在它提供的所有案例中,都没有涉及到Winform程序的案例介绍,不过微服务解决方案中提供了一个控制台的程序供了解其IDS4的调用和处理,由于我开发过很多Winform项目,以前基于ABP框架基础上开发的《ABP快速开发框架》中就包含了Winform客户端,因此我对于ABP VNext在Winform上的使用也比较关心,花了不少时间来研究框架的相关的授权和窗体构建处理上,因此整理了该随笔内容,主要用于介绍ABP VNext框架中Winform终端的开发和客户端授权信息的处理。
1、ABP VNext框架中Winform终端的开发
不管对于那种终端项目,需要应用ABP VNext模块的,都需要创建一个模块类,继承于AbpModule,然后引入相关的依赖模块,并配置Servcie信息,如下是Winform项目中的Module类,如下所示。
namespace Winform.TestApp
{
    [DependsOn(
        typeof(MicroBookStoreHttpApiClientModule),
        typeof(AbpHttpClientIdentityModelModule)
        )]
    public class WinformApiClientModule : AbpModule
    {
        public override void ConfigureServices(ServiceConfigurationContext context)
        {
        }
    }
}
ABP VNext模块的初始化,根据依赖关系进行相关的初始化,我们在创建Winform项目(基于.net Core开发)的时候,需要在Main函数中创建一个应用接口,如下所示。
 // 使用 AbpApplicationFactory 创建一个应用
 var app = AbpApplicationFactory.Create<WinformApiClientModule>();
 // 初始化应用
 app.Initialize();
这个app接口对象非常重要,需要用它创建一些接口服务,如下所示。
var service = app.ServiceProvider.GetService<IService1>();
不过由于这个app对象需要在整个应用程序的生命周期中都可能会用到,用来构建一些用到的接口对象等,那么我们就需要创建一个静态类对象用来存储相关的应用接口信息,需要用到它的时候就可以直接使用了,否则丢掉了就没法构建接口使用了。
首先我们创建一个用于存储全局信息类GlobalControl,如下所示。
    /// <summary>
    /// 应用程序全局对象
    /// </summary>
    public class GlobalControl
    {
        public MainForm? MainDialog { get; set; } = null;
        public IAbpApplicationWithInternalServiceProvider? app { get; set; }

        /// <summary>
        /// 创建指定类型窗口实例
        /// </summary>
        /// <typeparam name="T"></typeparam>
        /// <returns></returns>
        public T CreateForm<T>() where T :Form
        {
            if (app == null) return null;
            else
            {
                var form = app.ServiceProvider.GetService<T>();
                return form;
            }
        }

        /// <summary>
        /// 创建服务类的接口实例
        /// </summary>
        /// <typeparam name="T"></typeparam>
        /// <returns></returns>
        public T GetService<T>() where T : class
        {
            if (app == null) return null;
            else
            {
                var service = app.ServiceProvider.GetService<T>();
                return service;
            }
        }
这样我们在Main方法中创建的时候,构建一个静态的类对象,用于存储我们所需要的信息,这样上面提到的应用接口对象,就可以存储起来,
    public static class Portal
    {
        /// <summary>
        /// 应用程序的全局静态对象
        /// </summary>
        public static GlobalControl gc = new GlobalControl();

        /// <summary>
        ///  The main entry point for the application.
        /// </summary>
        [STAThread]
        static void Main()
        {
            Log.Logger = new LoggerConfiguration()
                .MinimumLevel.Debug()
                .Enrich.FromLogContext()
                .WriteTo.Console()
                .WriteTo.File("logs/myapp.txt", rollingInterval: RollingInterval.Day)
                .CreateLogger();

            // 使用 AbpApplicationFactory 创建一个应用
            var app = AbpApplicationFactory.Create<WinformApiClientModule>();
            // 初始化应用
            app.Initialize();
            gc.app = app;

            Application.SetHighDpiMode(HighDpiMode.SystemAware);
            Application.EnableVisualStyles();
            Application.SetCompatibleTextRenderingDefault(false);

            var form = app.ServiceProvider.GetService<MainForm>();
            gc.MainDialog = form;
            Application.Run(gc.MainDialog);
        }
    }
上面标注红色的部分就是把这个重要的app存放起来,便于后期的使用。
而我们注意到,我们创建窗体的时候,不是使用
var form = new MainForm();
的方式构建,而是使用接口构建的方式。
var form = app.ServiceProvider.GetService<MainForm>();
和我们前面提到的方式构建接口是一样的。
var service = app.ServiceProvider.GetService<IService1>();
这个是为什么呢?因为我们需要通过构造函数注入接口方式,在窗体中引用相关的接口服务。
由于没有默认构造函数,因此不能再通过new的方式构建了,需要使用ABP VNext的常规接口解析的方式获得对应的窗体对象了。
注意:这里窗体需要继承自 ITransientDependency 接口,这样才可以通过接口的方式构建,否则是不行的。
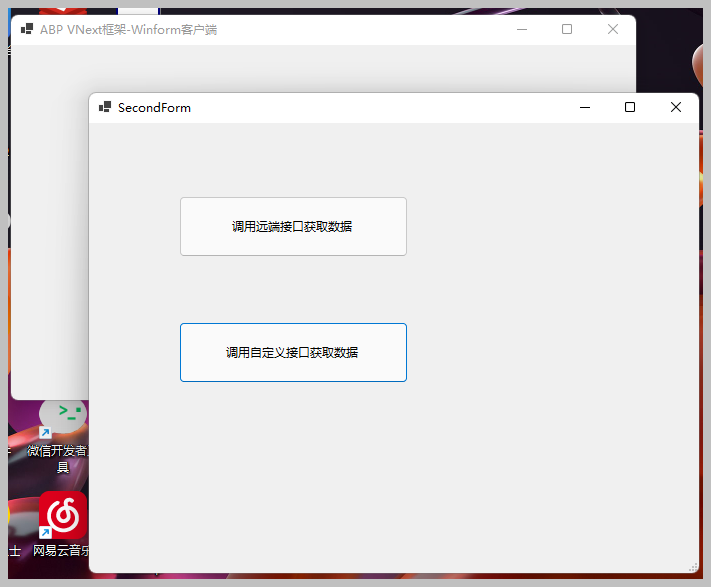
如果我们在主窗体或者其他界面事件中调用其他窗口,也是类似,如下调用所示。
        private void button2_Click(object sender, EventArgs e)
        {
            var form2 = Portal.gc.CreateForm<SecondForm>();
            form2.ShowDialog();
        }
这个地方就是用到了静态对象GlobalControl里面的方法构建,因为里面在程序启动的时候,已经存储了app应用接口对象了,可以用它来构建相关的接口或者窗体对象。
当然,这里的SecondForm也是不能使用New的方式构建窗体对象,也需要使用服务构建的标准方式来处理,毕竟它的默认构造函数用于接口的注入处理了。
程序看起来效果如下所示,可以正常打开窗体了。
2、Winform客户端授权信息的处理
在ABP VNext微服务的解决方案中,有一个控制台调用服务接口的测试项目,如下所示。
它主要就是介绍如何配置IdentityServer4(也叫IDS4)的授权规则来获得动态客户端的接口调用服务的。
它的配置是通过appsettings.json中配置好IdentityServer4终端的节点信息,用来在客户端调用类中进行相关的授权处理(获得令牌)的,因为我们调用服务接口需要令牌信息,而这些都是封装在内部里面的。
appsettings.json的配置信息如下所示,这个IDS4认证是采用client_credentials方式认证的。
而在构建ABP VNext项目模板的时候,也提供了一个类似控制台的测试项目,如下所示。
这个里面的appsettings.json是使用用户名密码的方式进行认证的,授权方式是密码方式。
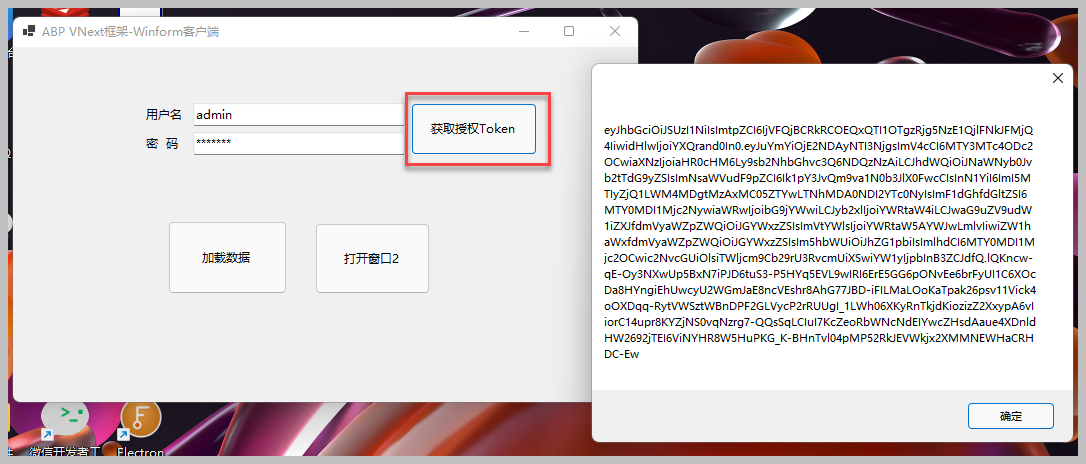
看到这些信息,你可能注意到了用户名密码都在里面。
我在想,如果每次让用户使用Winform程序的时候,来修改一下这个appsettings.json,那肯定是不友好的,如果把IDS4信息动态构建,传入接口使用,是不是就可以不用配置文件了呢?
通过分析ABP VNExt框架的类库,你可以看到IDS的授权认证处理是在IdentityModelAuthenticationService 接口实现类里面,它通过下面接口获得通信令牌信息。
public async Task<string> GetAccessTokenAsync(IdentityClientConfiguration configuration)
我们传入对应的IDS4的配置对象即可获得接口的令牌信息。
我们通过IIdentityModelAuthenticationService 接口获得令牌信息,缓存起来可以,但是每次调用的时候,如何设定HttpClient的令牌头部信息呢,通过分析 IdentityModelAuthenticationService 类的代码知道,如果我们在appsetting.json配置了IDS4的标准配置,它就可以根据配置信息获得令牌信息的缓存,并设置到调用的HttpClient里面,如果我们采用刚才说的动态配置对象的传入获得token,没有IDS4配置文件信息它是没法提取出令牌缓存信息的。
        public async Task<bool> TryAuthenticateAsync(HttpClient client, string identityClientName = null)
        {
            var accessToken = await GetAccessTokenOrNullAsync(identityClientName);
            if (accessToken == null)
            {
                return false;
            }

            SetAccessToken(client, accessToken);
            return true;
        }
那有没有其他方式可以动态设定令牌信息或者类似的操作呢?
有!我们注意到,IRemoteServiceHttpClientAuthenticator 接口就是用来解决终端授权处理的接口,它的接口定义如下所示。
namespace Volo.Abp.Http.Client.Authentication
{
    public interface IRemoteServiceHttpClientAuthenticator
    {
        Task Authenticate(RemoteServiceHttpClientAuthenticateContext context);
    }
}
我们参考项目Volo.Abp.Http.Client.IdentityModel.Web的思路
这个项目使用了自定义的接口实现类HttpContextIdentityModelRemoteServiceHttpClientAuthenticator,替换默认的IdentityModelRemoteServiceHttpClientAuthenticator类,我们来看看它的具体实现
namespace Volo.Abp.Http.Client.IdentityModel.Web
{
    [Dependency(ReplaceServices = true)]
    public class HttpContextIdentityModelRemoteServiceHttpClientAuthenticator : IdentityModelRemoteServiceHttpClientAuthenticator
    {
        public IHttpContextAccessor HttpContextAccessor { get; set; }

        public HttpContextIdentityModelRemoteServiceHttpClientAuthenticator(
            IIdentityModelAuthenticationService identityModelAuthenticationService)
            : base(identityModelAuthenticationService)
        {
        }

        public override async Task Authenticate(RemoteServiceHttpClientAuthenticateContext context)
        {
            if (context.RemoteService.GetUseCurrentAccessToken() != false)
            {
                var accessToken = await GetAccessTokenFromHttpContextOrNullAsync();
                if (accessToken != null)
                {
                    context.Request.SetBearerToken(accessToken);
                    return;
                }
            }

            await base.Authenticate(context);
        }

        protected virtual async Task<string> GetAccessTokenFromHttpContextOrNullAsync()
        {
            var httpContext = HttpContextAccessor?.HttpContext;
            if (httpContext == null)
            {
                return null;
            }

            return await httpContext.GetTokenAsync("access_token");
        }
    }
}
这里看到,它主要就是从httpContext中获得access_token的头部信息,然后通过SetBearerToken的接口设置到对应的HttpRequest请求中去的,也就是先获得令牌,然后设置请求对象的令牌,从而完成了授权令牌的信息处理。
我们如果是Winform或者控制台,那么调用请求类是HttpClient,我们可以模仿项目 Volo.Abp.Http.Client.IdentityModel.Web 这个方式创建一个项目,然后通过依赖方式来替换默认授权处理接口的实现;也可以通过在本地项目中创建一个IdentityModelRemoteServiceHttpClientAuthenticator的子类来替换默认的,如下所示。
namespace Winform.TestApp
{
    public class MyIdentityModelRemoteServiceHttpClientAuthenticator : IdentityModelRemoteServiceHttpClientAuthenticator
    {
在ABP VNext框架类IdentityModelAuthenticationService中获得令牌的时候,就会设置获得的令牌到分布式缓存中,它的键是IdentityClientConfiguration对象的键值生成的,如下代码逻辑所示。
那么我们只需要在自定义的 MyIdentityModelRemoteServiceHttpClientAuthenticator 类中根据键获得缓存就可以设置令牌信息了。
通过上面的处理,我们就可以动态根据账号密码获得令牌,并根据配置信息的键从缓存中获得令牌,设置到对应的对象上去,完成了令牌的信息设置,这样ABP VNext动态客户端的代理接口类,就可以正常调用获得数据了。
数据记录展示如下。
这样,整个测试的例子就完成了多个Winform窗体的生成和调用展示,并通过令牌的处理,完成了客户端的IDS4授权,可以正常调用动态客户端的接口类,完美解决了相关的技术点了。
Recommend
About Joyk
Aggregate valuable and interesting links.
Joyk means Joy of geeK