

Virtual Reality and Augmented Reality in the Browser
source link: https://dzone.com/articles/virtual-reality-and-augmented-reality-in-the-brows
Go to the source link to view the article. You can view the picture content, updated content and better typesetting reading experience. If the link is broken, please click the button below to view the snapshot at that time.

Introduction
This article about Progressive web apps is about implementing Virtual Reality (VR) and Augmented Reality (AR) in your web app. For this, we use A-Frame and the WebXR Web API.
VR moves users to another world and lets them experience it as if they were themselves in this virtual world. AR, on the other hand, offers the possibility to blend the real and virtual worlds into one another. Both VR and AR offer unique opportunities for behavioral change, knowledge transfer, training, and research. For example, think of VR live streaming, social VR, and art. All this is now also possible in the browser!
What Is A-Frame?
![]()
A-Frame is a web framework for building VR experiences and AR experiences. A-Frame is based on HTML. At its core, it is a powerful entity framework that provides an extensible and reusable structure. A-Frame is built on top of WebXR and Three.js, and developers have unlimited access to JavaScript, DOM APIs, three.js, WebXR, and WebGL. In this context, WebXR is a Web API for creating VR/AR experiences in your browser. Three.js is a VR/AR framework and WebGL takes care of the rendering.
Where Do You Start?
To start learning A-Frame, visit A-Frame School.
A-Frame applications can be developed from an HTML file without installing anything! A good way to try out A-Frame is to use the 'starter example' on Glitch: https://glitch.com/~aframe. Glitch is an online IDE for JavaScript and Node.js.
ECS in A-Frame
A-frame is based on the Entity-component-system (ECS) architecture.
ECS architecture is a common pattern in 3D and game development that follows the 'composition over inheritance principle. That is, each entity is composed of components (see section: Abstract examples of Entities).
Entities are container objects to which components can be linked. And components are reusable modules that can be linked to entities to provide entities with functionality.
All logic is implemented through components and we define different types of entities by configuring and mixing components. A-Frame has APIs that represent every part of ECS:
- Entities are represented by the <a-entity> element
- Components are represented by the HTML attributes on the <a-entity>'s.
Abstract Examples of Entities:
Below you see some abstract examples of how you can compose an entity with components. "Sphere" (or sphere) in this example is an entity. And 'Position', 'Geometry' and 'Material' are the components of this entity.
Sphere = Position + Geometry + Material

Ball = Position + Velocity + Physics + Geometry + Material
Syntax Entity in A-Frame
In accordance with the previous example, the syntax of an entity for a 'Sphere' looks like this (Listing 1).
<a-entity geometry="primitive: sphere; radius: 1.5"
material="color: white; shader: flat; src: glow.jpg"
position="0 0 -5"></a-entity>
Listing 1
So, to draw this sphere you define an <a-entity> and add components as HTML attributes. Most components have multiple properties represented by a syntax similar to CSS.
Primitives
A-Frame provides a handful of elements such as <a-box> or <a-sky> called primitives. Primitives are A-Frame's easy-to-use HTML elements that wrap the underlying entity components. They are made to make developing appealing to beginners. Listing 2 shows an example of the primitive <a-box>.
The <a-box> primitive below consists under the hood of an <a-entity> with geometry and material components.
Primitive:
<a-box color="red" width="3"></a-box>
Entity:
<a-entity geometry="primitive: box; width: 3" material="color: red"></a-entity>
Listing 2
Build a VR-Scene in De Browser
Let's start building a basic A-Frame VR scene with entities and animations (Figure 1).
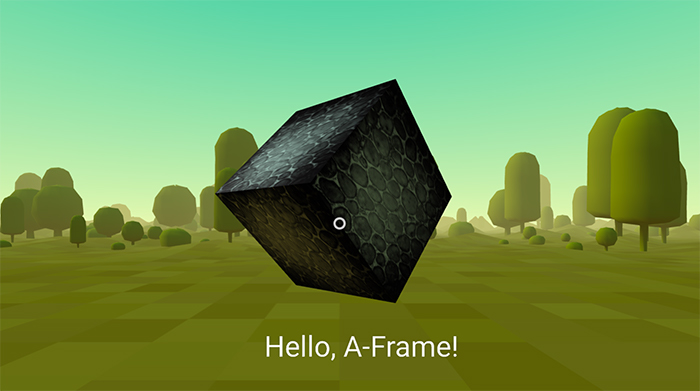
Figure 1
The first step is to create a folder for this project.
Next, create an index.html document in this 'project folder' and place the following HTML from Listing 3:
<html>
<head>
<script src="https://aframe.io/releases/1.2.0/aframe.min.js"></script>
</head>
<body>
<a-scene>
</a-scene>
</body>
</html>
Listing 3
You first include a recent version of A-Frame as a script tag in the <head>. For the latest version go to this link.
Then you include the <a-scene> tag in the <body>.
What Is a Scene?
A scene is a place where everything happens. All entities and components must be added to the scene to be rendered. In A-Frame, the scene is represented by an <a-scene> entity.
<a-scene> handles all three.js and WebXR boilerplate for us, such as setting up WebGL (it takes care of the rendering), the canvas, the camera, the light, the renderer, the render loop, and out-of-the-box WebXR -support on platforms like HTC Vive, Oculus Rift, Samsung GearVR
The scene entity inherits from the Entity class, so it inherits all its properties, the ability to link components, and the behavior to wait for all its child entities and nodes (e.g. <a-assets> and <a-entity> ) to load before starting the render loop.
Add an Entity
Within our <a-scene> you add 3D entities using one of A-Frame's default primitives, such as <a-box>. In Listing 4 the color of an <a-box> is defined.
<a scene>
<a-box color="red"></a-box>
</a scene>
Listing 4
 Figure 2
However, because the default camera and the <a-box> are in the default position on the 0 0 0 origin, you won't be able to see the box unless you move it. You can do this by using the 'position component' to transform the box into 3D space.
Transforming an Entity in 3D
Let's look at 3D space first. A-Frame uses a right-handed coordinate system (Figure 3). With the default camera orientation: positive X-axis extends to the right, positive Y-axis extends upwards, and positive Z-axis extends out of the screen toward us:

Figure 3
Making Our <a-box> Visible to the Camera
Let's make the box visible to the camera, rotate, and scale it. To make it visible you can slide the box 5 meters back on the negative Z-axis with the position component. You should also move the box 2 meters up on the positive Y-axis so that the box does not intersect the ground.
You also adjust rotation and scale, which also use the same right-handed coordinate system. This will angle our box and double its size (listing 5).
<a-scene>
<a-box color="red" position="0 2 -5" rotation="0 45 45" scale="2 2 2">
</a-box>
</a-scene>
Listing 5
The distance unit of A-Frame is in 'meters' because the WebXR API returns positions in meters. When designing a scene for VR, it is important to consider the real-world scale of the entities. A box with height="10" may look normal on your desktop, but in VR the box will appear huge.
The unit of rotation is in 'degrees,' although it is internally converted to radians when transitioning to three.js.
Parent and Child Transformations
A-Frame HTML represents a 3D scene graph. In a scene graph, entities can have a single parent and multiple children. Child entities (childs) inherit transformations (i.e. position, rotation, and scale) from their parent entity (the parent).
For example, we can have a "sphere" as a child of a box in Listing 6:
<a-scene>
<a-box position="0 2 0" rotation="0 45 45" scale="2 4 2">
<a-sphere position="1 0 3"></a-sphere>
</a-box>
</a-scene>
Listing 6
If we calculate the position of the sphere, it would be 1 2 3. This is achieved by assembling the parent position of the sphere with its own position. Likewise, the sphere will inherit the rotation and scale of the box.
Add an Environment With an Environment Component
A-Frame allows developers to create reusable components that others can easily use.
An example is the environment component. This component generates a variety of environments for us with a single line of HTML. The environment component is an easy way to start up our VR application visually and offers more than a dozen environments with numerous parameters.
First, add the environment component with a script tag. Unpkg.com is used for this. Via unpkg.com you get the most current CDN link to the relevant npm module (listing 7).
<head>
<script src="https://aframe.io/releases/1.2.0/aframe.min.js"></script>
<script src="https://unpkg.com/aframe-environment-component/dist/aframe-environment-component.min.js">
</script>
</head>
Listing 7
Then, add an a-entity within the <scene> tag to which the environment component is linked (listing 8). You can specify a preset environment (for example, preset: forest). And many other parameters such as the 'number of trees' through 'dressing amount':
<a-scene>
<a-box color="red" position="0 2 -5" rotation="0 45 45"
scale="2 2 2"></a-box>
<!-- Out of the box environment! -->
<a-entity environment="preset: forest; dressingAmount: 500"></a-entity>
</a-scene>
Listing 8
Presets are a combination of parameter values that define a particular style, they are a starting point that you can customize.
You can adjust these parameters using the inspector (ctrl + alt + i). The Inspector (figure 4) is a tool for inspecting and adjusting your entities/components. The Inspector is similar to the browser's DOM inspector but is tailored for 3D and A-Frame.
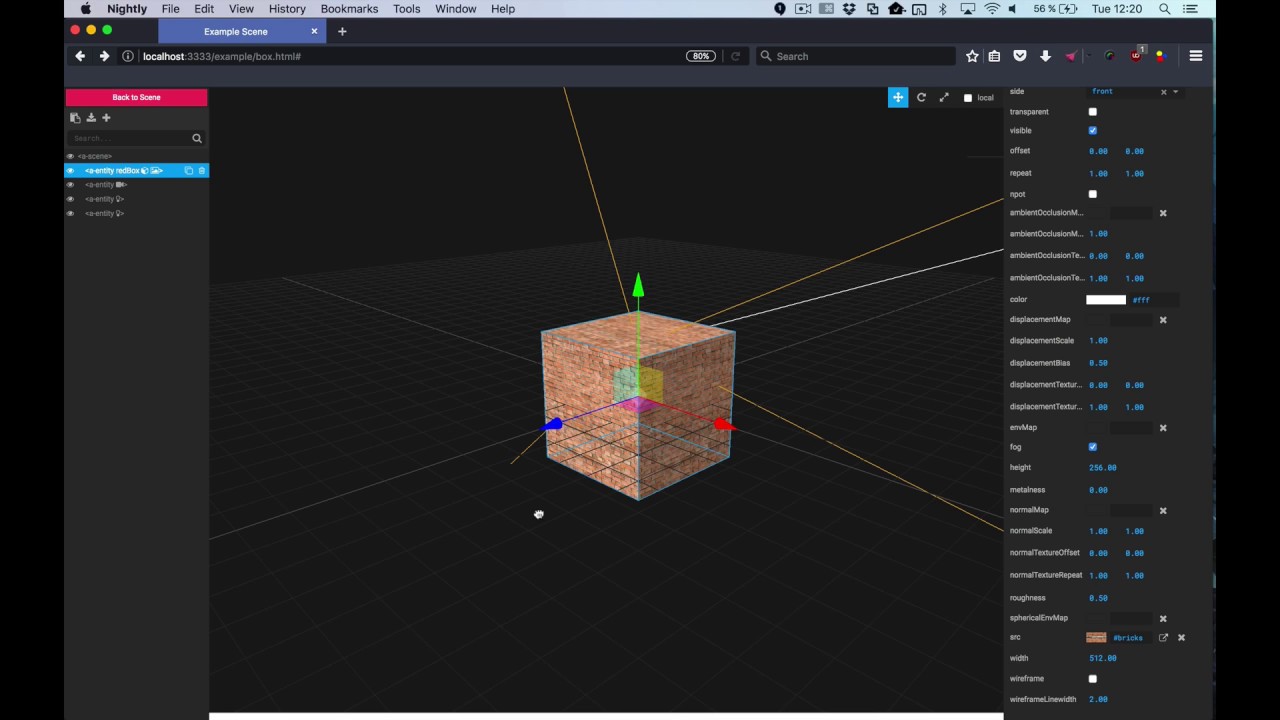
Figure 4
Tip!
If you are using the inspector and are happy with the parameter values chosen for your entities, open your browser's dev tools (F12) and copy the latest parameters from the console.
Adding an Asset Management System
You can apply a texture to the box using an <img> element.
Asset Management makes it possible to load and cache images and videos before rendering the scene. Preloading and caching improve performance. Below is an example of how Asset Management is applied to an image:
<a-scene>
<a-assets>
<img id="boxTexture" src="https://i.imgur.com/mYmmbrp.jpg">
</a-assets>
<a-box src="#boxTexture" position="0 2 -5" rotation="0 45 45" scale="2 2 2">
<a-sphere position="1 0 3"></a-sphere>
</a-box>
<a-entity environment="preset: forest; dressingAmount: 500"></a-entity>
</a-scene>
Listing 9
Listing 9 defines an <a-assets> tag, within which <img> with the image texture is defined. This img also has an id="boxTexture" (figure 5).

Figure 5
Finally, this id is referenced in the box by means of the src="#boxTexture"
Add Animation
You can animate the box and the sphere using an animation component (listing 10).
To make the box move up and down, set the following:
- To move the box on the Y-axis between 2 and 2.2 meters, set with property: object3D.position.y; to: 2.2.
- The direction (dir) is alternate. I.e. that alternately goes up and down.
- The duration indicates how long a cycle lasts (2000 milliseconds).
- And, loop specifies that the animation repeats indefinitely.
<a-scene>
<a-assets>
<img id="boxTexture" src="https://i.imgur.com/mYmmbrp.jpg">
</a-assets>
<a-box src="#boxTexture" position="0 2 -5" rotation="0 45 45" scale="2 2 2"
animation="property: object3D.position.y; to: 2.2; dir: alternate; dur: 2000; loop: true">
<a-sphere position="1 0 3"></a-sphere>
</a-box>
<a-entity environment="preset: forest; dressingAmount: 500"></a-entity>
</a-scene>
Listing 10
The end result of the above can be found in Glitch (figure 6).
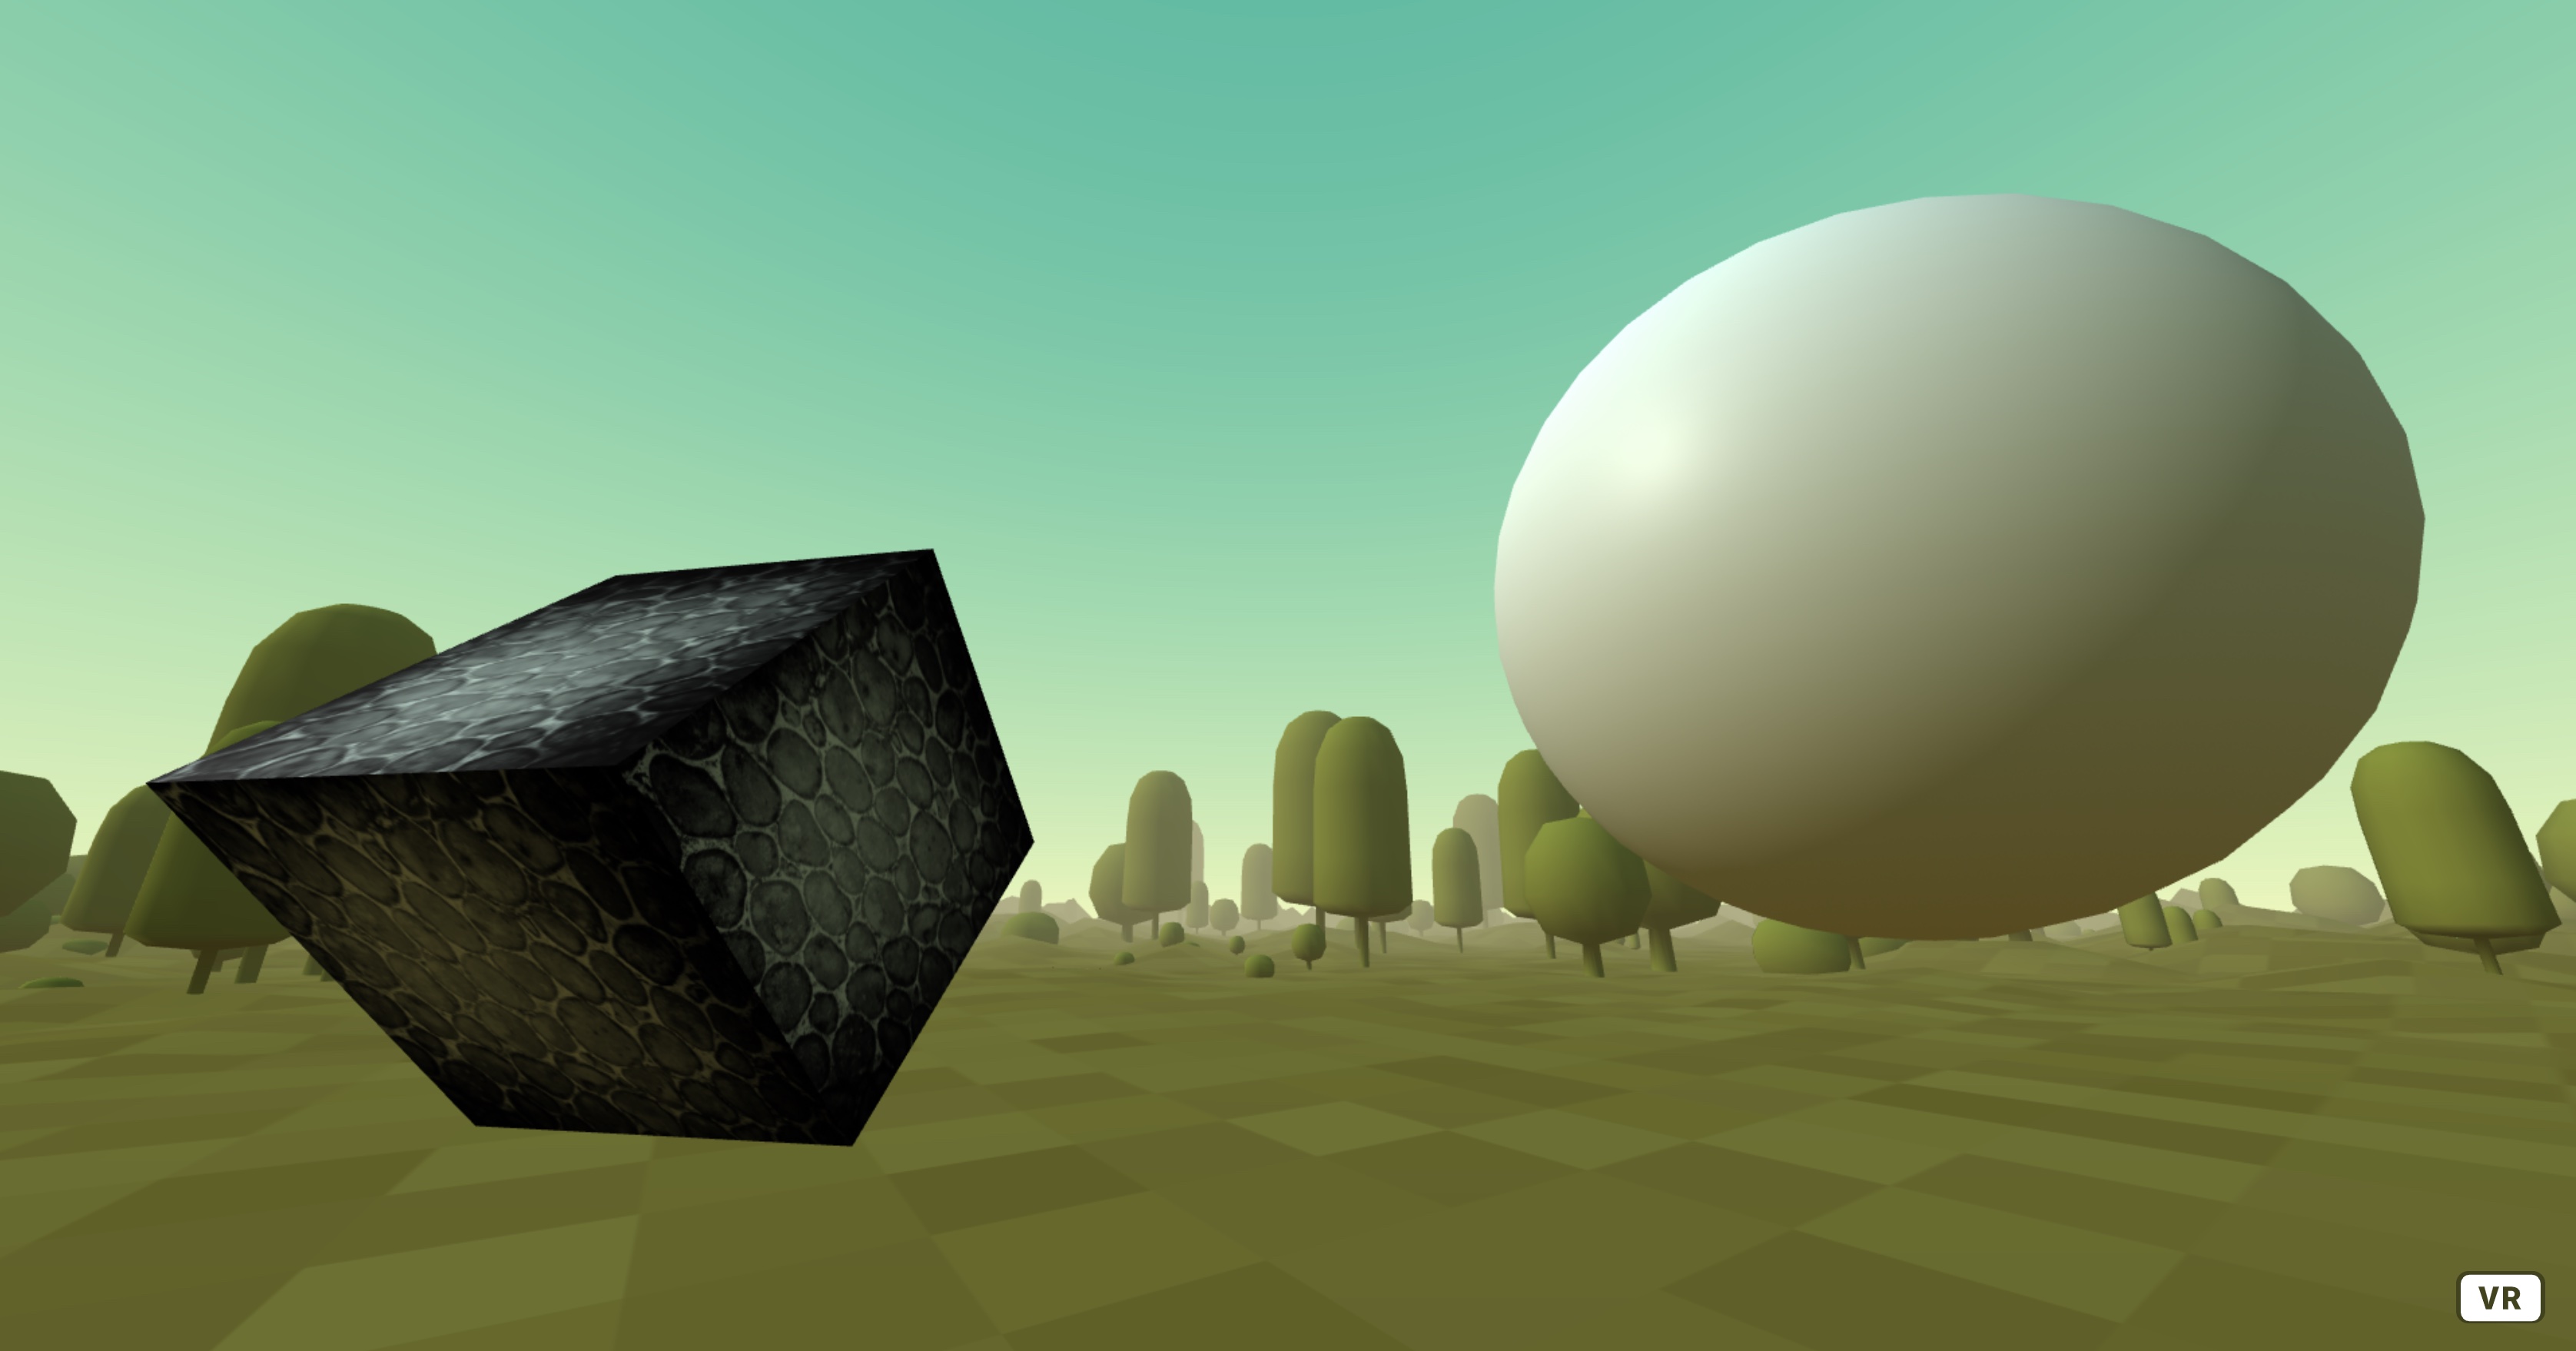
Figure 6
Augmented Reality
By A-Frame it is also possible to implement AR experiences.
The starting point for an AR implementation is the 'starter example' on 'Glitch' (https://glitch.com/~aframe) (see figure 7).
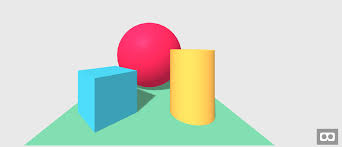
Figure 7
This example has been expanded for an AR 'hit testing' application. The result can be found in Listing 11. What is in bold indicates what has been added.
This implementation can also be found at: https://glitch.com/edit/#!/ar-basic-hittest
And you can test the final version on your mobile using this URL.
You use your camera for AR!
What Is Hit Testing in AR?
With hit-testing, you can place virtual objects in line with real-world objects, such as the floor, tables, and walls. With the example below you can place the objects in figure 7 inline with, for example, the table, by aiming at the table via your camera (with a reticle) and then touching this table (hit-testing).
<html>
<head>
</head>
<body>
<a-scene webxr="optionalFeatures: hit-test">
<a-entity id="world" scale="0.1 0.1 0.1">
<a-box color="#4CC3D9" position="-1 0.5 0" rotation="0 45 0"></a-box>
<a-sphere color="#EF2D5E" position="0 1.25 -2" radius="1.25"></a-sphere>
<a-cylinder color="#FFC65D" height="1.5" position="1 0.75 -0"
radius="0.5"></a-cylinder>
<a-plane color="#7BC8A4" height="4" position="0 0 -1" rotation="-90 0 0"
width="4"></a-plane>
</a-entity>
<a-entity ar-hit-test="target:#world;">
<a-plane height="0.2" material="transparent:true" rotation="-90 0 0"
src="./arrow.png" width="0.2"></a-plane>
</a-entity>
</a-scene>
</body>
</html>
...
Listing 11
Explanation
To do a hit testing in AR you first need to include the ar-components.js in your script tag. You can copy this library from the final Glitch implementation.
In the scene tag, you indicate that you want to use the WebXR feature: hit test.
Then a realistic scale of the objects is applied via the a-entity.
Finally, a new entity is defined with the component: ar-hit-test. This component makes it possible to place the virtual objects inline on a real object that you see through your camera (Figure 8). To support hit-testing, define a reticle in a 20cm square. You do this through the a-plane component.
Last, but Not Least
Many applications are possible with VR and AR in A-Frame. For example, you can make an 'AR basketball game' with hit testing. An example of this can be found under Medium: 'making an ar-game with A-Frame. For more examples and documentation, go to this link.
Recommend
About Joyk
Aggregate valuable and interesting links.
Joyk means Joy of geeK