

Running Face Recognition on Kubernetes
source link: https://www.codeproject.com/Articles/5305706/Running-Face-Recognition-on-Kubernetes
Go to the source link to view the article. You can view the picture content, updated content and better typesetting reading experience. If the link is broken, please click the button below to view the snapshot at that time.

Introduction
Face recognition is one area of artificial intelligence (AI) where the modern approaches of deep learning (DL) have had great success during the last decade. The best face recognition systems can recognize people in images and video with the same precision humans can – or even better.
Our series of articles on this topic is divided into two parts:
- Face detection, where the client-side application detects human faces in images or in a video feed, aligns the detected face pictures, and submits them to the server.
- Face recognition (this part), where the server-side application performs face recognition.
We assume that you are familiar with DNN, Python, Keras, and TensorFlow. You are welcome to download this project code ...
In one of the previous articles, we learned how to run the face identification server in a Docker container. Containerization allows us to develop and test the application in a predefined environment and then deploy the software with ease. In this article, we’ll run our face recognition web server in a local Kubernetes cluster.
Kubernetes is a set of services designed to manage an orchestrated cluster of Docker containers. Kubernetes simplifies the software deployment, network routing, and server load balancing. This is what you would want to use when deploying a facial recognition system in a production environment, where you need to scale the face identification server to serve many client applications (edge devices running face detection).
Modifying the Container for Kubernetes
To run our AI face recognition container on Kubernetes, we need to modify it slightly. When the container starts, it must run the server-side Python application we created. Let’s create a new Docker image using Dockerfile. Dockerfile is a set of instructions for creating an image from an existing one. In our case, the file contains only four lines:
FROM sergeylgladkiy/fr:v1

RUN rm /home/pi_fr/rec/*

EXPOSE 50

CMD ["python", "/home/pi_fr/pi_fr_facenet.run_align_dock_flask.lnx.py", "0.0.0.0", "50"]
- Line 1: Specify the base image.
- Line 2: Clean up the /home/pi_fr/rec/ directory.
- Line 3: Make the container use port 50.
- Line 4: Run the Python application with the specified parameters.
Now we can build a new image via the command line. Put the created Dockerfile in the current directory of the terminal and execute the following command:
docker build -t "frrun:v1" .
This creates the image named frrun with the tag v1. At the start of the container, the Python code is executed, and the face recognition web server gets ready to receive face images.
Installing Kubernetes
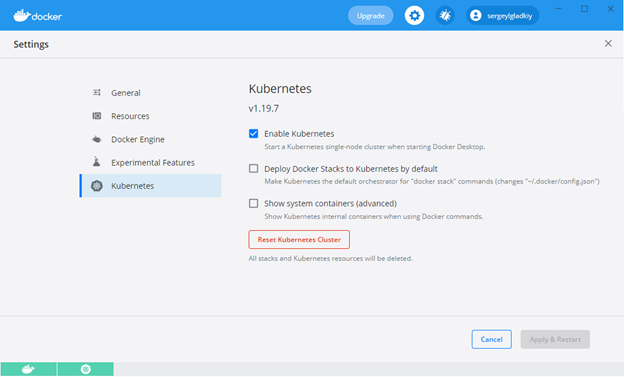
The next step is to install Kubernetes. Go to the Settings/Kubernetes tab in Docker Desktop and select the Enable Kubernetes check box.
Because we are going to run a web application, we must create a service and a deployment for Kubernetes. We can put both of these into a single YAML file:
apiVersion: v1
kind: Service
metadata:
  name: face-rec-service
spec:
  selector:
    app: face-rec
  ports:
  - protocol: "TCP"
    port: 5050
    targetPort: 50
  type: LoadBalancer

---
apiVersion: apps/v1
kind: Deployment
metadata:
  name: face-rec
spec:
  selector:
    matchLabels:
      app: face-rec
  replicas: 2
  template:
    metadata:
      labels:
        app: face-rec
    spec:
      containers:
      - name: face-rec
        image: frrun:v1
        imagePullPolicy: Never
        ports:
        - containerPort: 50
The YAML file describes the load-balanced face-rec-service service with the appropriate ports and the face-rec deployment that runs two container replicas based on the frrun:v1 image.
Running the Container on Kubernetes
Now we can run our system on Kubernetes with the following command:
kubectl apply -f C:\PI_FR\fr_deploy.yaml
After issuing the command, look at the Containers/Apps tab. You’ll see running Kubernetes pods.

Let’s test how our load-balanced service works and manages the deployed face recognition web application. We’ll run client applications on two PCs. Each client application will detect faces in a video file and send the face images to the same IP address. We can see the recognition results in the logs provided for each of the two containers. Once the process has finished, we can run terminals for the containers and analyze the results. Here are the lists of resulting images for the two containers.


The results show how the load balancer distributes the requests almost evenly across two pods: the first container received and processed 252 face images while the second container did 223. You can see how easy it is to manage our servers with Kubernetes and scale the system to any number of client applications.
Next Step
In the next article, we’ll discuss some aspects of developing a facial recognition system from scratch. Stay tuned!
Recommend
About Joyk
Aggregate valuable and interesting links.
Joyk means Joy of geeK