

Flutter Android 端 Activity/Fragment 流程源码分析
source link: https://segmentfault.com/a/1190000040555865
Go to the source link to view the article. You can view the picture content, updated content and better typesetting reading experience. If the link is broken, please click the button below to view the snapshot at that time.

Flutter 系列文章连载~
前面文章我们分析了 flutter 在 android 端编译命令相关流程,我们接下来需要先分析一下 Flutter Android 端 framework 平台实现代码(非 native engine 引擎部分),下面以一个纯 Flutter App 为例展开分析。
工程结构及 API 变更
对于一个纯 flutter app 来说,当我们在 yaml 依赖中添加两个 flutter plugin 依赖,然后铜过 Android Studio 导入安卓工程后可以看到如下结构: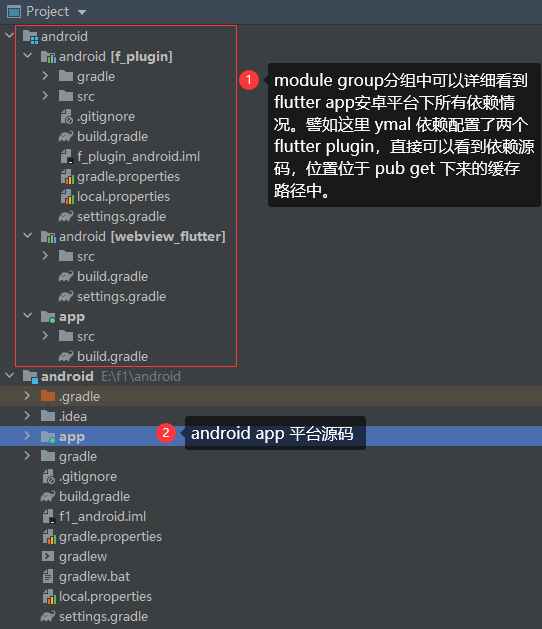
gradle sync 后对应的安卓依赖如下: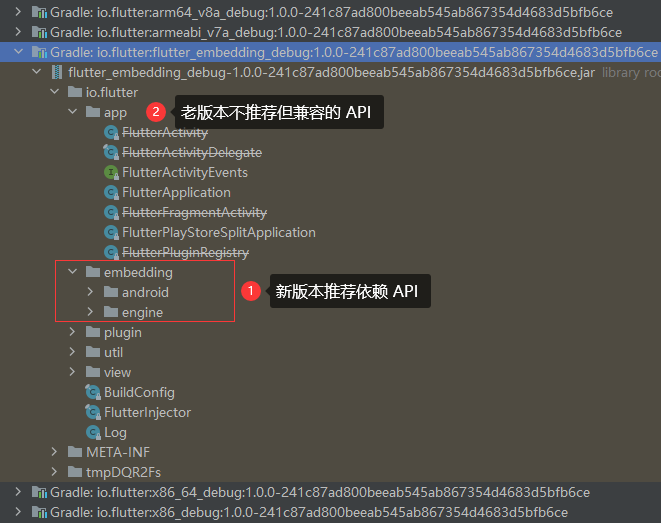
可以看到,上面依赖就是我们《Flutter Android 工程结构及应用层编译源码深入分析》一文中分析 Flutter Android App 编译流程中提到过的动态追加依赖。
对于 Android 平台来说,Flutter 依赖其实蛮简单的,我们以启用 androidx 为例展示 release 模式下的依赖关系,如下:
releaseRuntimeClasspath - Resolved configuration for runtime for variant: release
+--- io.flutter:flutter_embedding_release:1.0.0-241c87ad800beeab545ab867354d4683d5bfb6ce
|    +--- androidx.lifecycle:lifecycle-common:2.2.0
|    |    \--- androidx.annotation:annotation:1.1.0
|    +--- androidx.lifecycle:lifecycle-common-java8:2.2.0
|    |    +--- androidx.lifecycle:lifecycle-common:2.2.0 (*)
|    |    \--- androidx.annotation:annotation:1.1.0
|    +--- androidx.lifecycle:lifecycle-runtime:2.2.0
|    |    +--- androidx.lifecycle:lifecycle-common:2.2.0 (*)
|    |    +--- androidx.arch.core:core-common:2.1.0
|    |    |    \--- androidx.annotation:annotation:1.1.0
|    |    \--- androidx.annotation:annotation:1.1.0
|    +--- androidx.fragment:fragment:1.1.0
|    |    +--- androidx.annotation:annotation:1.1.0
|    |    +--- androidx.core:core:1.1.0
|    |    |    +--- androidx.annotation:annotation:1.1.0
|    |    |    +--- androidx.lifecycle:lifecycle-runtime:2.0.0 -> 2.2.0 (*)
|    |    |    +--- androidx.versionedparcelable:versionedparcelable:1.1.0
|    |    |    |    \--- androidx.collection:collection:1.0.0 -> 1.1.0
|    |    |    |         \--- androidx.annotation:annotation:1.1.0
|    |    |    \--- androidx.collection:collection:1.0.0 -> 1.1.0 (*)
|    |    +--- androidx.collection:collection:1.1.0 (*)
|    |    +--- androidx.viewpager:viewpager:1.0.0
|    |    |    +--- androidx.annotation:annotation:1.0.0 -> 1.1.0
|    |    |    +--- androidx.core:core:1.0.0 -> 1.1.0 (*)
|    |    |    \--- androidx.customview:customview:1.0.0
|    |    |         +--- androidx.annotation:annotation:1.0.0 -> 1.1.0
|    |    |         \--- androidx.core:core:1.0.0 -> 1.1.0 (*)
|    |    +--- androidx.loader:loader:1.0.0
|    |    |    +--- androidx.annotation:annotation:1.0.0 -> 1.1.0
|    |    |    +--- androidx.core:core:1.0.0 -> 1.1.0 (*)
|    |    |    +--- androidx.lifecycle:lifecycle-livedata:2.0.0
|    |    |    |    +--- androidx.arch.core:core-runtime:2.0.0
|    |    |    |    |    +--- androidx.annotation:annotation:1.0.0 -> 1.1.0
|    |    |    |    |    \--- androidx.arch.core:core-common:2.0.0 -> 2.1.0 (*)
|    |    |    |    +--- androidx.lifecycle:lifecycle-livedata-core:2.0.0
|    |    |    |    |    +--- androidx.lifecycle:lifecycle-common:2.0.0 -> 2.2.0 (*)
|    |    |    |    |    +--- androidx.arch.core:core-common:2.0.0 -> 2.1.0 (*)
|    |    |    |    |    \--- androidx.arch.core:core-runtime:2.0.0 (*)
|    |    |    |    \--- androidx.arch.core:core-common:2.0.0 -> 2.1.0 (*)
|    |    |    \--- androidx.lifecycle:lifecycle-viewmodel:2.0.0 -> 2.1.0
|    |    |         \--- androidx.annotation:annotation:1.1.0
|    |    +--- androidx.activity:activity:1.0.0
|    |    |    +--- androidx.annotation:annotation:1.1.0
|    |    |    +--- androidx.core:core:1.1.0 (*)
|    |    |    +--- androidx.lifecycle:lifecycle-runtime:2.1.0 -> 2.2.0 (*)
|    |    |    +--- androidx.lifecycle:lifecycle-viewmodel:2.1.0 (*)
|    |    |    \--- androidx.savedstate:savedstate:1.0.0
|    |    |         +--- androidx.annotation:annotation:1.1.0
|    |    |         +--- androidx.arch.core:core-common:2.0.1 -> 2.1.0 (*)
|    |    |         \--- androidx.lifecycle:lifecycle-common:2.0.0 -> 2.2.0 (*)
|    |    \--- androidx.lifecycle:lifecycle-viewmodel:2.0.0 -> 2.1.0 (*)
|    \--- androidx.annotation:annotation:1.1.0
+--- io.flutter:armeabi_v7a_release:1.0.0-241c87ad800beeab545ab867354d4683d5bfb6ce
+--- io.flutter:arm64_v8a_release:1.0.0-241c87ad800beeab545ab867354d4683d5bfb6ce
\--- io.flutter:x86_64_release:1.0.0-241c87ad800beeab545ab867354d4683d5bfb6ce
可以看到依赖主要都是 androidx,还是蛮香的。
Flutter Android 端源码主要依赖于 gradle maven 下载,也就是上图中的io.flutter:flutter_embedding_XXX代码,另一个 ABI 依赖是libflutter.so引擎依赖。
本文以 Flutter 2.2.3 版本为例分析,由于新旧版本的 Android 入口存在差异,譬如新版本不再默认使用FlutterApplication配合io.flutter.app.FlutterActivity模式,而是直接使用io.flutter.embedding.android.FlutterActivty,所以我们的入口要从新的看起(注意新旧同类名不同包名的区别)。相关新旧版本迁移变更可以参考官方说明的Upgrading-pre-1.12-Android-projects。
FlutterActivity 相关分析
Android App 中默认 Flutter UI 界面呈现在平台层的实现都继承自io.flutter.embedding.android.FlutterActivity,主题默认也是一个全屏无 ActionBar 形式,源码如下:
public class FlutterActivity extends Activity
    implements FlutterActivityAndFragmentDelegate.Host, LifecycleOwner {
  ......
}
依据这个继承关系可以看到,FlutterActivity 直接继承自 Activity,而不是兼容包的 AppCompatActivity,这对于有历史包袱的 App 来说是一件好事,也秉承了一个优质 SDK 去依赖的优质特点。同时其实现了两个接口,LifecycleOwner 为标准 AAC 框架成员,我们不再解释;重点看下FlutterActivityAndFragmentDelegate.Host,源码如下:
class FlutterActivityAndFragmentDelegate implements ExclusiveAppComponent<Activity> {
  ......
  //这里的一堆extends接口不多解释,注释都很明确
  interface Host
      extends SplashScreenProvider,
          FlutterEngineProvider,
          FlutterEngineConfigurator,
          PlatformPlugin.PlatformPluginDelegate {
    //1、获取宿主Activity或Fragment的context。
    //对应上面FlutterActivity实现此接口就是返回他自己的context,也就是this。
    @NonNull
    Context getContext();
    //2、是否可以通过deeplink调起initial route路由。
    //主要是在AndroidManifest.xml中Activity配置flutter_deeplinking_enabled meta值。
    //参见官方文档 https://flutter.dev/docs/development/ui/navigation/deep-linking
    @Nullable
    boolean shouldHandleDeeplinking();
    //3、获取宿主Activity或Fragment的attached Activity。
    //对应上面FlutterActivity实现此接口就是返回他自己,也就是this。
    @Nullable
    Activity getActivity();
    //4、获取宿主Activity或Fragment的Lifecycle。
    @NonNull
    Lifecycle getLifecycle();
    //5、获取宿主启动Flutter携带的参数,通过intent解析,譬如enable-dart-profiling等。
    @NonNull
    FlutterShellArgs getFlutterShellArgs();
    //6、获取静态缓存的EngineId,如果没有就返回空,通过intent的cached_engine_id参数传递。
    @Nullable
    String getCachedEngineId();
    //7、当FlutterActivity destory后是否销毁引擎实例,默认要销毁。
    //当FlutterEngine属于Activity自己则需要销毁返回true,当FlutterEngine属于静态缓存的,则不用销毁,这里应该返回false。
    boolean shouldDestroyEngineWithHost();
    //8、当FlutterEngine已经attach到另一个Activity时这个Activity就需要与FlutterEngine断开。
    void detachFromFlutterEngine();
    //9、获取dart主入口,默认时main。
    //可以在AndroidManifest.xml中给Activity设置io.flutter.Entrypoint的meta自定义。
    @NonNull
    String getDartEntrypointFunctionName();
    //10、返回app bundle dart代码存在的路径。
    @NonNull
    String getAppBundlePath();
    //11、获取初始路由地址。
    //默认先从intent中解析route的值,没有就去meta-data解析io.flutter.InitialRoute的值,没有就返回null。
    @Nullable
    String getInitialRoute();
    //12、获取渲染模式,用在FlutterView呈现FlutterEngine引擎渲染效果。
    @NonNull
    RenderMode getRenderMode();
    //13、获取Transparency模式,用在FlutterView呈现FlutterEngine引擎渲染效果。
    @NonNull
    TransparencyMode getTransparencyMode();
    //14、提供一个Flutter开屏图片,默认有配置。
    //通过meta-data配置io.flutter.embedding.android.SplashScreenDrawable可生效。
    @Nullable
    SplashScreen provideSplashScreen();
    //15、返回一个用来渲染FlutterView的FlutterEngine引擎。
    //如果返回null则框架会自动新建一个FlutterEngine引擎实例,默认就是自动新建,我们可以重写复用等。
    @Nullable
    FlutterEngine provideFlutterEngine(@NonNull Context context);
    //16、创建和配置platform plugin。
    @Nullable
    PlatformPlugin providePlatformPlugin(
        @Nullable Activity activity, @NonNull FlutterEngine flutterEngine);
    void configureFlutterEngine(@NonNull FlutterEngine flutterEngine);
    void cleanUpFlutterEngine(@NonNull FlutterEngine flutterEngine);
    boolean shouldAttachEngineToActivity();
    void onFlutterSurfaceViewCreated(@NonNull FlutterSurfaceView flutterSurfaceView);
    void onFlutterTextureViewCreated(@NonNull FlutterTextureView flutterTextureView);
    void onFlutterUiDisplayed();
    void onFlutterUiNoLongerDisplayed();
    boolean shouldRestoreAndSaveState();
  }
}可以看到FlutterActivityAndFragmentDelegate.Host是 Flutter Android 平台层实现与标准 Activity/Fragment 之间的一个接口约定层,FlutterActivity 实现了这个接口的一系列方法,这些接口的含义上面也列举了,所以我们下面重心回到标准 Android Activity 生命周期线,如下:
public class FlutterActivity extends Activity
    implements FlutterActivityAndFragmentDelegate.Host, LifecycleOwner {
  ......
  //步骤1、重点!关联Activity、Fragment与Flutter的接口桥梁委托实现
  protected FlutterActivityAndFragmentDelegate delegate;
  ......
  @Override
  protected void onCreate(@Nullable Bundle savedInstanceState) {
      //步骤2、将清单文件中标准配置的主题切换回普通主题。很巧妙的让launch app和initialized后activity主题发生变化。
      //普通主题通过io.flutter.embedding.android.NormalTheme的meta-data配置。
      //清单标准配置的是一个图标、启动后执行到这里被换成标准纯背景色,两个主题不要对窗体size进行差异配置,不然会抖动。
    switchLaunchThemeForNormalTheme();

    super.onCreate(savedInstanceState);
    //步骤3、创建一个委托代理类实例,然后调用他的一系列方法。
    delegate = new FlutterActivityAndFragmentDelegate(this);
    delegate.onAttach(this);
    delegate.onRestoreInstanceState(savedInstanceState);
    //步骤4、标准AAC操作,不解释。
    lifecycle.handleLifecycleEvent(Lifecycle.Event.ON_CREATE);
    //步骤5、从Activity的Intent中解析background_mode字段看是transparent还是opaque。
    //透明则通过getWindow().setBackgroundDrawable设置为透明,否则保持NormalTheme的暗黑适配纯色背景。
    configureWindowForTransparency();
    //步骤6、创建一个View让Activity显示,这就是Flutter的View容器。
    setContentView(createFlutterView());
    //步骤7、官方对全屏状态栏的兼容配置。。。
    configureStatusBarForFullscreenFlutterExperience();
  }
  ......

  //步骤8、创建并返回一个View用来给Activity显示。
  @NonNull
  private View createFlutterView() {
    return delegate.onCreateView(
        null /* inflater */, null /* container */, null /* savedInstanceState */);
  }

  //步骤9、官方对全屏状态栏的兼容配置。
  //这些flag不用解释了吧,标准安卓操作。
  //记住这个坑即可,我们如果想修改FlutterActivity的这玩意就在他之后覆盖即可。
  private void configureStatusBarForFullscreenFlutterExperience() {
    if (Build.VERSION.SDK_INT >= Build.VERSION_CODES.LOLLIPOP) {
      Window window = getWindow();
      window.addFlags(WindowManager.LayoutParams.FLAG_DRAWS_SYSTEM_BAR_BACKGROUNDS);
      window.setStatusBarColor(0x40000000);
      window.getDecorView().setSystemUiVisibility(PlatformPlugin.DEFAULT_SYSTEM_UI);
    }
  }

  //步骤10、生命周期回调处理,AAC调用、delegate对应方法触发等
  @Override
  protected void onStart() {
    super.onStart();
    lifecycle.handleLifecycleEvent(Lifecycle.Event.ON_START);
    //判断delegate是否不为null
    if (stillAttachedForEvent("onStart")) {
      delegate.onStart();
    }
  }

  //步骤11、同步骤10的一堆回调类似触发,省略实现。。。
  @Override
  protected void onResume() {......}
  @Override
  public void onPostResume() {......}
  @Override
  protected void onPause() {......}
  @Override
  protected void onStop() {......}
  @Override
  protected void onSaveInstanceState(Bundle outState) {......}
  @Override
  protected void onDestroy() {......}
  @Override
  protected void onActivityResult(int requestCode, int resultCode, Intent data) {......}
  @Override
  protected void onNewIntent(@NonNull Intent intent) {......}
  @Override
  public void onBackPressed() {......}
  @Override
  public void onRequestPermissionsResult(int requestCode, @NonNull String[] permissions, @NonNull int[] grantResults) {......}
  @Override
  public void onUserLeaveHint() {......}
  @Override
  public void onTrimMemory(int level) {......}
  ......
  //步骤12、一堆前面介绍的FlutterActivityAndFragmentDelegate.Host接口实现方法。
  ......
}
FlutterActivityAndFragmentDelegate 相关分析
上一小节我们看到 FlutterActivity 中的核心就是与 FlutterActivityAndFragmentDelegate 实例进行交互,那我们就继续看看这个实例对应的源码,重点先放到 FlutterActivity 中调用的实例化、onAttach、onRestoreInstanceState 上。如下:
class FlutterActivityAndFragmentDelegate implements ExclusiveAppComponent<Activity> {
  private static final String TAG = "FlutterActivityAndFragmentDelegate";
  private static final String FRAMEWORK_RESTORATION_BUNDLE_KEY = "framework";
  private static final String PLUGINS_RESTORATION_BUNDLE_KEY = "plugins";

  //步骤1、host实例就是FlutterActivity或FlutterFragment
  @NonNull private Host host;
  @Nullable private FlutterEngine flutterEngine;
  @Nullable private FlutterSplashView flutterSplashView;
  @Nullable private FlutterView flutterView;
  @Nullable private PlatformPlugin platformPlugin;
  private boolean isFlutterEngineFromHost;

  //步骤2、前面小节FlutterActivity的onCreate中实例化,host为FlutterActivity自己的this。
  FlutterActivityAndFragmentDelegate(@NonNull Host host) {
    this.host = host;
  }

  //步骤3、前面小节FlutterActivity的onCreate中调用
  void onAttach(@NonNull Context context) {
    //确保host不为空,否则抛出异常。
    ensureAlive();

    //步骤4、flutterEngine为空就创建。
    if (flutterEngine == null) {
      setupFlutterEngine();
    }
    //步骤5、前面小节FlutterActivity中接口实现,默认为true。
    if (host.shouldAttachEngineToActivity()) {
      //步骤6、flutterEngine与FlutterActivity进行attach关联。
      Log.v(TAG, "Attaching FlutterEngine to the Activity that owns this delegate.");
      flutterEngine.getActivityControlSurface().attachToActivity(this, host.getLifecycle());
    }

    //步骤7、通过host获取PlatformPlugin实例。
    platformPlugin = host.providePlatformPlugin(host.getActivity(), flutterEngine);
    //步骤8、给host配置flutterEngine。
    host.configureFlutterEngine(flutterEngine);
  }

  //步骤9、前面小节FlutterActivity的onCreate中调用
  void onRestoreInstanceState(@Nullable Bundle bundle) {
    Log.v(
        TAG,
        "onRestoreInstanceState. Giving framework and plugins an opportunity to restore state.");
    ensureAlive();
    //步骤10、这两个变量都是在Activity的onSaveInstanceState方法进行set操作赋值的。
    Bundle pluginState = null;
    byte[] frameworkState = null;
    if (bundle != null) {
      //说明来自异常终止恢复Activity
      pluginState = bundle.getBundle(PLUGINS_RESTORATION_BUNDLE_KEY);
      frameworkState = bundle.getByteArray(FRAMEWORK_RESTORATION_BUNDLE_KEY);
    }
    //步骤11、存放时也是这个规则,优先判断intent中的enable_state_restoration配置。
    //不存在就看getCachedEngineId是不是不为null,是就不会要恢复,即此条件false,反之恢复。
    if (host.shouldRestoreAndSaveState()) {
      flutterEngine.getRestorationChannel().setRestorationData(frameworkState);
    }
    //步骤12、FlutterActivity默认实现是true。
    if (host.shouldAttachEngineToActivity()) {
      flutterEngine.getActivityControlSurface().onRestoreInstanceState(pluginState);
    }
  }
  ......
}
看完上面这段,接下来我们继续把目光挪到 FlutterActivityAndFragmentDelegate 的 onCreateView 方法上,这个方法的返回值在前面 FlutterActivity 的 onCreate 中被 setContent 设置为 Activity 的 View。如下:
class FlutterActivityAndFragmentDelegate implements ExclusiveAppComponent<Activity> {
  ......
  //步骤13、FlutterActivity中调用时参数均为null,返回一个androd view实例。
  @NonNull
  View onCreateView(
      LayoutInflater inflater, @Nullable ViewGroup container, @Nullable Bundle savedInstanceState) {
    Log.v(TAG, "Creating FlutterView.");
    //确保host属性不为null。
    ensureAlive();
    //步骤14、依据前面FlutterActivity的intent参数background_mode决定模式,默认surface模式。
    //FlutterActivity默认背景是opaque、可以设置为transparent。
    //当FlutterActivity的window背景不透明则RenderMode为surface模式、反之texture模式。
    if (host.getRenderMode() == RenderMode.surface) {
      //步骤15、创建一个FlutterSurfaceView。
      //然后通过host接口调用FlutterActivity的onFlutterSurfaceViewCreated方法,默认空实现。
      //getTransparencyMode模式和FlutterActivity的window背景模式完全一样逻辑。
      FlutterSurfaceView flutterSurfaceView =
          new FlutterSurfaceView(
              host.getActivity(), host.getTransparencyMode() == TransparencyMode.transparent);
      host.onFlutterSurfaceViewCreated(flutterSurfaceView);

      //步骤15、创建一个FlutterView包含FlutterSurfaceView。
      flutterView = new FlutterView(host.getActivity(), flutterSurfaceView);
    } else {
      //步骤16、创建一个FlutterTextureView。
      //然后通过host接口调用FlutterActivity的onFlutterSurfaceViewCreated方法,默认空实现。
      FlutterTextureView flutterTextureView = new FlutterTextureView(host.getActivity());
      host.onFlutterTextureViewCreated(flutterTextureView);

      //步骤17、创建一个FlutterView包含FlutterTextureView。
      flutterView = new FlutterView(host.getActivity(), flutterTextureView);
    }

    //步骤18、添加监听,当flutter渲染首帧时回调。
    flutterView.addOnFirstFrameRenderedListener(flutterUiDisplayListener);
    //步骤19、创建一个FlutterSplashView开屏view
    flutterSplashView = new FlutterSplashView(host.getContext());
    if (Build.VERSION.SDK_INT >= Build.VERSION_CODES.JELLY_BEAN_MR1) {
      flutterSplashView.setId(View.generateViewId());
    } else {
      //这里不得不吐槽官方,不过确实没好的办法,直接写死了一个随机id,有可能冲突,且一个view树只能有一个FlutterSplashView了。
      flutterSplashView.setId(486947586);
    }
    //步骤20、显示开屏图标,即io.flutter.embedding.android.SplashScreenDrawable配置的drawable图。
    flutterSplashView.displayFlutterViewWithSplash(flutterView, host.provideSplashScreen());
    //步骤21、FlutterView与flutterEngine关联attach。
    Log.v(TAG, "Attaching FlutterEngine to FlutterView.");
    flutterView.attachToFlutterEngine(flutterEngine);
    //返回被开屏view包裹的FlutterView。
    return flutterSplashView;
  }

  //步骤22、一组回调监听定义,回调中本质是触发调用对应FlutterActivity或FlutterFragment的FlutterActivityAndFragmentDelegate.Host实现方法。
  @NonNull
  private final FlutterUiDisplayListener flutterUiDisplayListener =
      new FlutterUiDisplayListener() {
        @Override
        public void onFlutterUiDisplayed() {
          //本质在FlutterActivity中调用Activity 5.0以上的reportFullyDrawn()安卓官方方法。
          host.onFlutterUiDisplayed();
        }

        @Override
        public void onFlutterUiNoLongerDisplayed() {
          //本质在FlutterActivity中调用,默认空实现。
          host.onFlutterUiNoLongerDisplayed();
        }
      };
  ......
}
接着继续看 FlutterActivity 生命周期及事件相关方法对 FlutterActivityAndFragmentDelegate 相关方法的调用,如下:
class FlutterActivityAndFragmentDelegate implements ExclusiveAppComponent<Activity> {
  ......
  void onStart() {
    ......
    doInitialFlutterViewRun();
  }

  //步骤23、开始在FlutterView中执行dart程序。
  private void doInitialFlutterViewRun() {
    ......
    //步骤24、判断是否dart已经运行中。
    //这个情况只会发生在config change后我们没有保留Fragment实例的场景,尽量不要这样。
    if (flutterEngine.getDartExecutor().isExecutingDart()) {
      return;
    }
    //步骤25、各种优先级获取初始跳转dart的路由地址。
    String initialRoute = host.getInitialRoute();
    if (initialRoute == null) {
      initialRoute = maybeGetInitialRouteFromIntent(host.getActivity().getIntent());
      if (initialRoute == null) {
        initialRoute = DEFAULT_INITIAL_ROUTE; //值为 /
      }
    }
    //过滤这个tag可以调试flutter初始路由跳转信息。
    Log.v(
        TAG,
        "Executing Dart entrypoint: "
            + host.getDartEntrypointFunctionName()
            + ", and sending initial route: "
            + initialRoute);

    //步骤26、通过引擎的NavigationChannel设置初始路由信息。
    flutterEngine.getNavigationChannel().setInitialRoute(initialRoute);
    //步骤27、按照优先级获取appBundlePath,默认从host获取,无则从FlutterLoader获取。
    String appBundlePathOverride = host.getAppBundlePath();
    if (appBundlePathOverride == null || appBundlePathOverride.isEmpty()) {
      appBundlePathOverride = FlutterInjector.instance().flutterLoader().findAppBundlePath();
    }

    //步骤28、配置dart的entrypoint并且执行,默认入口函数名为main,可通过meta-data的io.flutter.Entrypoint修改。
    DartExecutor.DartEntrypoint entrypoint =
        new DartExecutor.DartEntrypoint(
            appBundlePathOverride, host.getDartEntrypointFunctionName());
    flutterEngine.getDartExecutor().executeDartEntrypoint(entrypoint);
  }
  ......
  //步骤29、FlutterActivity的onResume调用它。
  void onResume() {
    ......
    //调用引擎的LifecycleChannel触发方法。
    flutterEngine.getLifecycleChannel().appIsResumed();
  }

  //步骤30、雷同onResume不做说明,都是调用flutterEngine.getLifecycleChannel()的对应方法。
  void onPause() {......}
  void onStop() {......}
  void onUserLeaveHint() {......}
  ......
  void onPostResume() {
    ......
    if (flutterEngine != null) {
      if (platformPlugin != null) {
        //步骤31、即FlutterActivity中providePlatformPlugin方法返回的PlatformPlugin实例。
        platformPlugin.updateSystemUiOverlays();
      }
    } else {
      Log.w(TAG, "onPostResume() invoked before FlutterFragment was attached to an Activity.");
    }
  }
  ......
  //步骤32、返回按钮触发,通过NavigationChannel通道退栈route。
  void onBackPressed() {
    ensureAlive();
    if (flutterEngine != null) {
      Log.v(TAG, "Forwarding onBackPressed() to FlutterEngine.");
      flutterEngine.getNavigationChannel().popRoute();
    } else {
      Log.w(TAG, "Invoked onBackPressed() before FlutterFragment was attached to an Activity.");
    }
  }

  //步骤33、动态权限申请返回处理,转发到感兴趣的Flutter Plugin去。
  void onRequestPermissionsResult(
      int requestCode, @NonNull String[] permissions, @NonNull int[] grantResults) {
    ensureAlive();
    if (flutterEngine != null) {
      ......
      flutterEngine
          .getActivityControlSurface()
          .onRequestPermissionsResult(requestCode, permissions, grantResults);
    } else {
      Log.w(
          TAG,
          "onRequestPermissionResult() invoked before FlutterFragment was attached to an Activity.");
    }
  }

  //步骤34、activity result返回处理,转发到感兴趣的Flutter Plugin去。
  void onActivityResult(int requestCode, int resultCode, Intent data) {
    ensureAlive();
    if (flutterEngine != null) {
      ......
      flutterEngine.getActivityControlSurface().onActivityResult(requestCode, resultCode, data);
    } else {
      Log.w(TAG, "onActivityResult() invoked before FlutterFragment was attached to an Activity.");
    }
  }

  //步骤35、通过SystemChannel发送低内存消息。
  void onLowMemory() {
    Log.v(TAG, "Forwarding onLowMemory() to FlutterEngine.");
    ensureAlive();
    flutterEngine.getDartExecutor().notifyLowMemoryWarning();
    flutterEngine.getSystemChannel().sendMemoryPressureWarning();
  }
  ......
}
通过这一小节的代码段分析,我们可以看出来 Flutter 在平台 SDK 层包装都是 FlutterActivityAndFragmentDelegate 来负责的,FlutterActivityAndFragmentDelegate 和核心是 FlutterView 和 FlutterEngine 的创建关联与管理调度。
FlutterFragment 相关分析
分析完上面 FlutterActivity 相关流程,我们接着看看 FlutterFragment,继承自androidx.fragment.app.Fragment,言外之意就是说 Activity 也得最好是用配套的 FlutterFragmentActivity。关于 FlutterFragmentActivity 我们会在下一个小节分析,这里重点关注 FlutterFragment。
其实官方注释也明确说明了,他们不是特别优先推荐使用 FlutterFragment,建议尽可能优选 FlutterActivity。因为使用 FlutterFragment 如果配合的 Activity 不是 FlutterFragmentActivity,需要我们自己去关联一些 Activity 与 FlutterFragment 的方法,这些方法在 FlutterFragment 的源码中都以@ActivityCallThrough进行了注释声明,让使用变的没那么方便,譬如:
- onPostResume()
- onBackPressed()
- onRequestPermissionsResult(int, String[], int[])} ()
- onNewIntent(Intent)} ()
- onUserLeaveHint()
如上 FlutterFragment 中的方法都需要主动与 Acitivty 关联调用(FlutterFragmentActivity 已实现)。下面是 FlutterFragment 的主要源码:
//步骤36、FlutterFragment也实现了前面分析的FlutterActivityAndFragmentDelegate.Host接口,含义不解释。
public class FlutterFragment extends Fragment
    implements FlutterActivityAndFragmentDelegate.Host, ComponentCallbacks2 {
  ......
  @Override
  public void onAttach(@NonNull Context context) {
    super.onAttach(context);
    //步骤37、与FlutterActivity的区别在于FlutterFragment在他自己的onAttach中实例化FlutterActivityAndFragmentDelegate并调用onAttach方法。
    delegate = new FlutterActivityAndFragmentDelegate(this);
    delegate.onAttach(context);
  }

  @Override
  public void onCreate(@Nullable Bundle savedInstanceState) {
    super.onCreate(savedInstanceState);
    //步骤38、与FlutterActivity类似,不做过多分析说明。
    delegate.onRestoreInstanceState(savedInstanceState);
  }

  @Nullable
  @Override
  public View onCreateView(
      LayoutInflater inflater, @Nullable ViewGroup container, @Nullable Bundle savedInstanceState) {
    //步骤39、与FlutterActivity类似,只不过是在FlutterFragment对应生命周期回调。
    return delegate.onCreateView(inflater, container, savedInstanceState);
  }
  ......
  //步骤39、与FlutterActivity类似,只是这个方法不是Fragment自己框架回调,需要依赖在Activity中调用。
  //譬如FlutterFragmentActivity中对应同名方法的实现。
  //注意这里的@ActivityCallThrough注解就是这个含义。
  @ActivityCallThrough
  public void onPostResume() {
    delegate.onPostResume();
  }
  ......
}
可以看到,FlutterFragment 和 FlutterActivity 基本没啥区别,核心都是实现了FlutterActivityAndFragmentDelegate.Host接口,在自己生命周期内先实例化一个 FlutterActivityAndFragmentDelegate,接着调用其一系列方法进行交互,前面 FlutterActivity 已经解释过了,这里不多解释。
FlutterFragmentActivity 相关分析
通过上面 FlutterFragment 源码我们可以看到,FlutterFragmentActivity 可以说是 FlutterFragment 的一个承载 Activity,这个 Activity 继承自androidx.fragment.app.FragmentActivity,所以使用 FlutterFragment 及 FlutterFragmentActivity 对你应用的基类 Activity 还是有一点限制的,没有前面介绍的 FlutterActivity 香。
由于 FlutterFragmentActivity 继承自androidx.fragment.app.FragmentActivity,所以相比 FlutterActivity 来说,AAC 架构那套就不用自己显式关联了,因为androidx.fragment.app.FragmentActivity内部已做好关联处理。
//步骤40、这里implements的一堆其实FlutterActivityAndFragmentDelegate.Host都有implements,算是Host的子集吧。
//本质和FlutterActivityAndFragmentDelegate.Host对于实现方干的一样的事。
public class FlutterFragmentActivity extends FragmentActivity
    implements SplashScreenProvider, FlutterEngineProvider, FlutterEngineConfigurator {
  @Override
  protected void onCreate(@Nullable Bundle savedInstanceState) {
    //步骤41、这里和FlutterActivity完全一样,只是不用实例化一个FlutterActivityAndFragmentDelegate,因为其内部的FlutterFragment会做这些事。
    switchLaunchThemeForNormalTheme();
    super.onCreate(savedInstanceState);
    configureWindowForTransparency();
    //步骤42、这里区别是调用createFragmentContainer生成了一个View设置给Activity的content。
    setContentView(createFragmentContainer());
    //步骤43、这里和FlutterActivity完全一样。
    configureStatusBarForFullscreenFlutterExperience();
    //步骤44、与FlutterActivity不一样,这里检验的是FlutterFragment是否添加OK。
    ensureFlutterFragmentCreated();
  }

  //步骤45、上面步骤42设置的View,用来放置FlutterFragment的容器View,本质是一个FrameLayout且MATCH_PARENT。
  @NonNull
  private View createFragmentContainer() {
    FrameLayout container = provideRootLayout(this);
    container.setId(FRAGMENT_CONTAINER_ID);
    container.setLayoutParams(
        new ViewGroup.LayoutParams(
            ViewGroup.LayoutParams.MATCH_PARENT, ViewGroup.LayoutParams.MATCH_PARENT));
    return container;
  }

  protected FrameLayout provideRootLayout(Context context) {
    return new FrameLayout(context);
  }

  //步骤46、确保给Activity上attach一个FlutterFragment,不存在就创建一个通过FragmentManager添加。
  private void ensureFlutterFragmentCreated() {
    FragmentManager fragmentManager = getSupportFragmentManager();
    flutterFragment = (FlutterFragment) fragmentManager.findFragmentByTag(TAG_FLUTTER_FRAGMENT);
    if (flutterFragment == null) {
      flutterFragment = createFlutterFragment();
      fragmentManager
          .beginTransaction()
          .add(FRAGMENT_CONTAINER_ID, flutterFragment, TAG_FLUTTER_FRAGMENT)
          .commit();
    }
  }

  //步骤47、创建一个FlutterFragment。
  //如果我们自定义FlutterFragmentActivity子类,可以重写这个方法实现自己的自定义FlutterFragment。
  @NonNull
  protected FlutterFragment createFlutterFragment() {
    final BackgroundMode backgroundMode = getBackgroundMode();
    final RenderMode renderMode = getRenderMode();
    final TransparencyMode transparencyMode =
        backgroundMode == BackgroundMode.opaque
            ? TransparencyMode.opaque
            : TransparencyMode.transparent;
    //步骤48、依据是否Engine缓存决定怎么创建FlutterFragment。
    if (getCachedEngineId() != null) {
      ......
      return FlutterFragment.withCachedEngine(getCachedEngineId())
          .renderMode(renderMode)
          .transparencyMode(transparencyMode)
          .handleDeeplinking(shouldHandleDeeplinking())
          .shouldAttachEngineToActivity(shouldAttachEngineToActivity())
          .destroyEngineWithFragment(shouldDestroyEngineWithHost())
          .build();
    } else {
      ......
      return FlutterFragment.withNewEngine()
          .dartEntrypoint(getDartEntrypointFunctionName())
          .initialRoute(getInitialRoute())
          .appBundlePath(getAppBundlePath())
          .flutterShellArgs(FlutterShellArgs.fromIntent(getIntent()))
          .handleDeeplinking(shouldHandleDeeplinking())
          .renderMode(renderMode)
          .transparencyMode(transparencyMode)
          .shouldAttachEngineToActivity(shouldAttachEngineToActivity())
          .build();
    }
  }
  ......
  //步骤49、调用flutterFragment对应生命周期回调。
  //可以看到,使用FlutterFragmentActivity配合FlutterFragment的好处就是这些FlutterFragment的@ActivityCallThrough都帮你调用好了。
  @Override
  public void onPostResume() {
    super.onPostResume();
    flutterFragment.onPostResume();
  }
  ......
}
到此我们其实就知道 FlutterActivity 和 FlutterFragment 的大致实现,相信你通过上面分析对 Flutter App 在安卓端的承载有一定认识,通常一个 engine 的整个 Flutter Dart 无论页面栈多少级,终归在安卓端都是一个 Activity 或者 Fragment 承载,抑或 View,端侧仅仅算是一个容器而已。
这也就是为什么我们在 Android 平台上查看一个标准 Flutter App 的 Activity 堆栈默认只有继承自 FlutterActivity 的一个 Activity,其内部 View 层级如下的原因: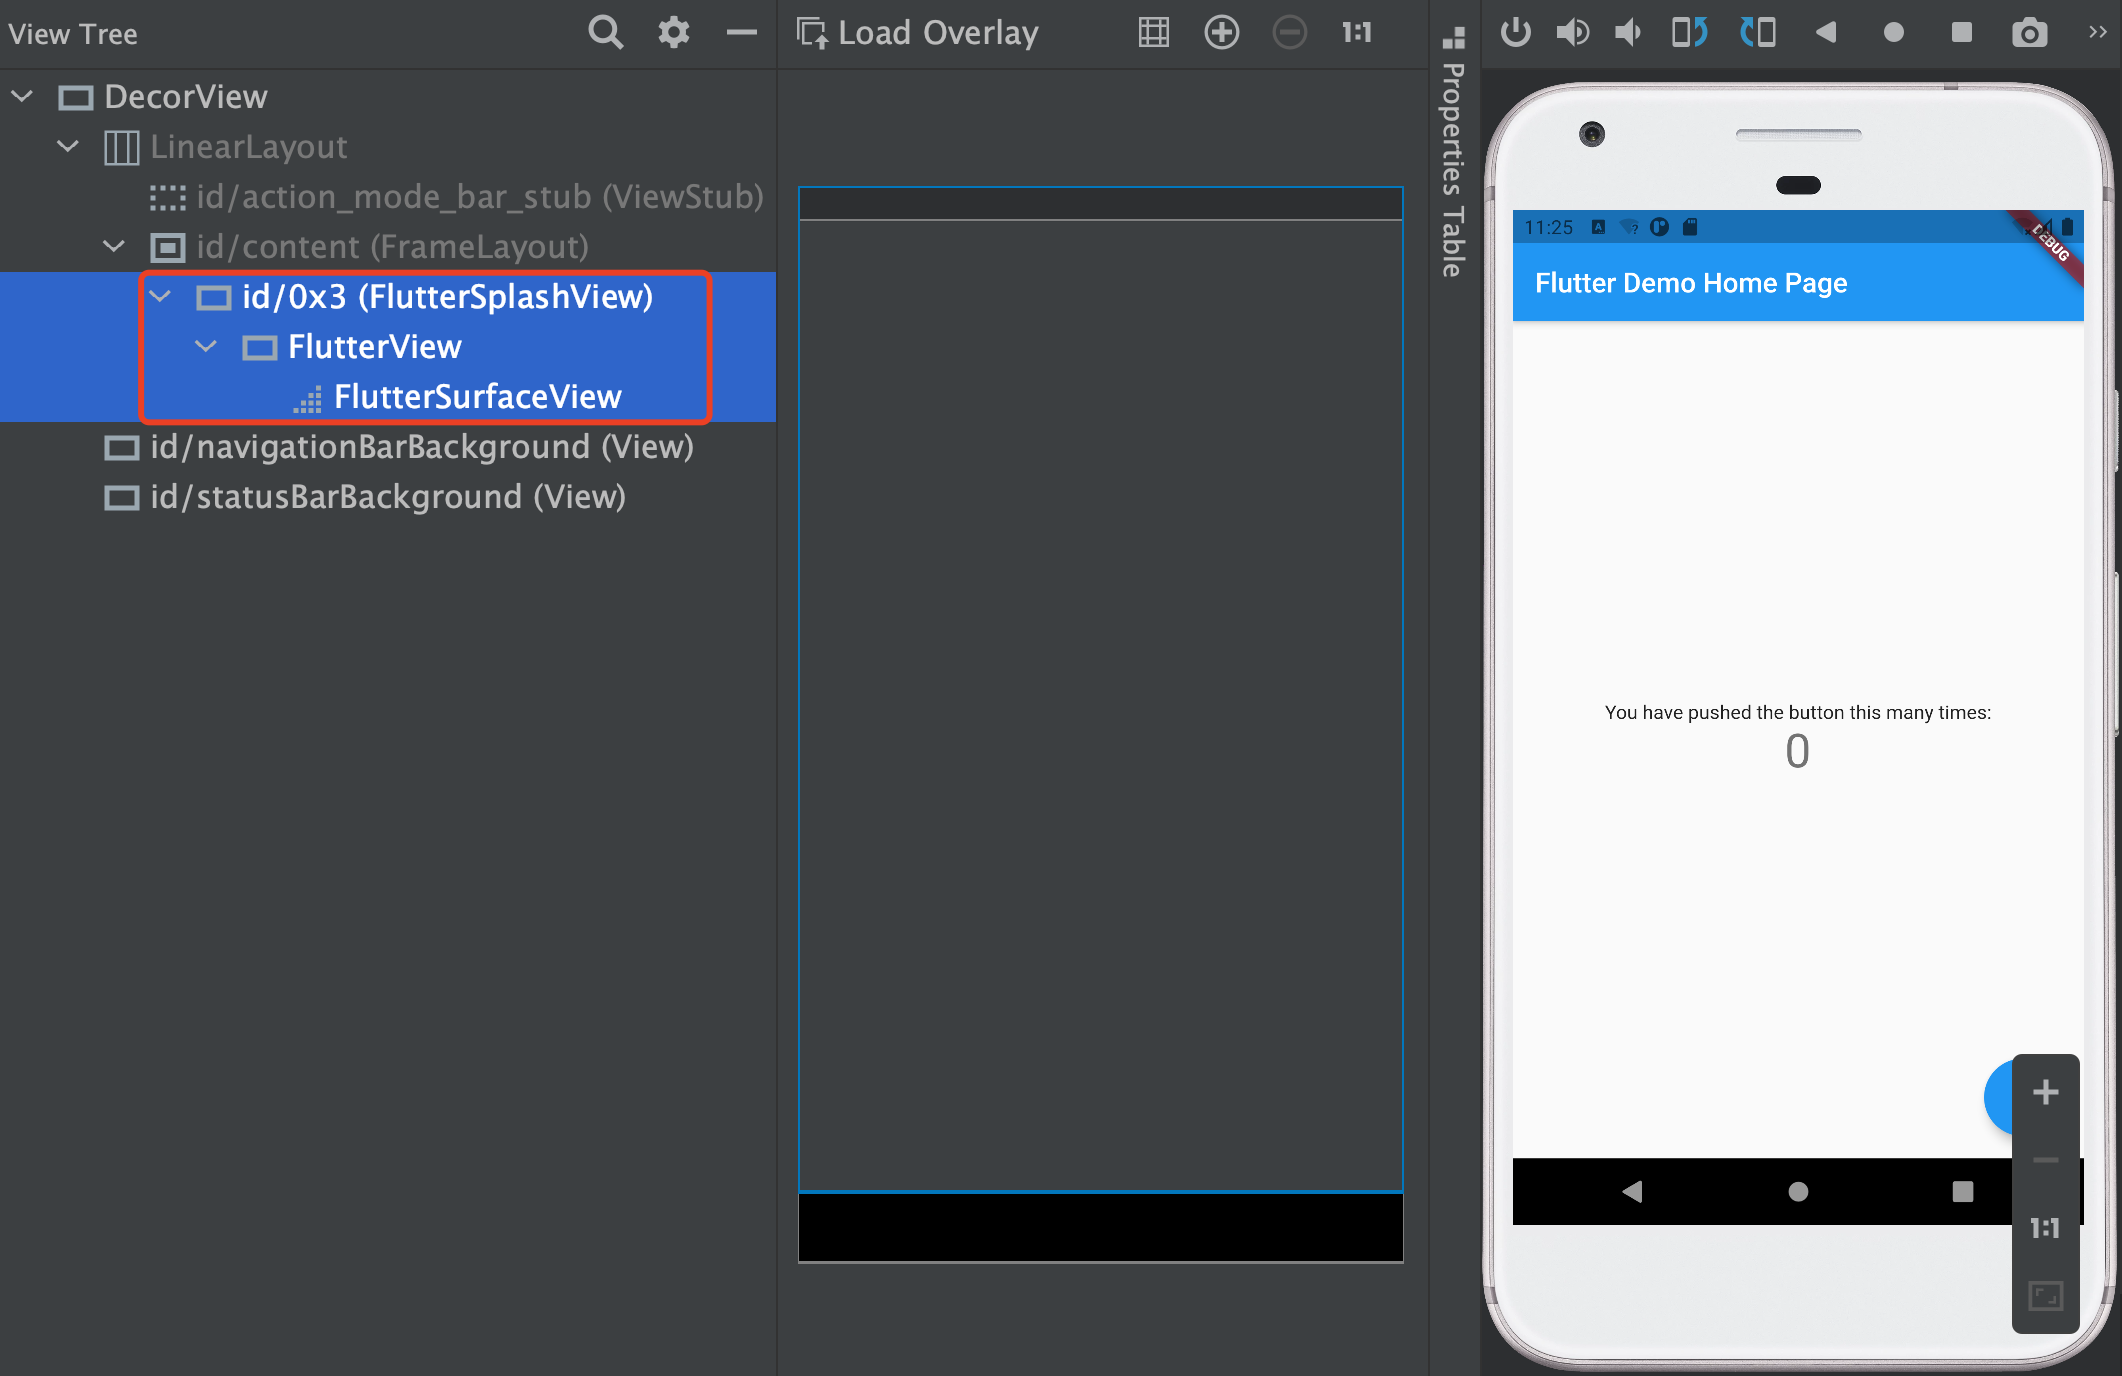
关于本文更多样例可以参见官方文档:
这里不做过多演示。
Recommend
About Joyk
Aggregate valuable and interesting links.
Joyk means Joy of geeK