

Dynamic User Creation with MySQL on Kubernetes and Hashicorp Cloud Platform Vaul...
source link: https://www.percona.com/blog/dynamic-user-creation-with-mysql-on-kubernetes-and-hashicorp-cloud-platform-vault/
Go to the source link to view the article. You can view the picture content, updated content and better typesetting reading experience. If the link is broken, please click the button below to view the snapshot at that time.

You may have already seen this document which describes the integration between HashiCorp Vault and Percona Distribution for MySQL Operator to enable data-at-rest encryption for self-managed Vault deployments. In April 2021, HashiCorp announced a fully managed offering, HashiCorp Cloud Platform Vault (HCP Vault), that simplifies deployment and management of the Vault.
With that in mind, I’m going to talk about the integration between Percona and HCP Vault to provide dynamic user creation for MySQL.
Without dynamic credentials, organizations are susceptible to a breach due to secrets sprawl across different systems, files, and repositories. Dynamic credentials provide a secure way of connecting to the database by using a unique password for every login or service account. With Vault, these just-in-time credentials are stored securely and it is also possible to set a lifetime for them.
My goal would be to provision users on my MySQL cluster deployed in Kubernetes with dynamic credentials through Hashicorp Vault.

- Percona Operator deploys Percona XtraDB Cluster and HAProxy
- HashiCorp Vault connects to MySQL through HAProxy and creates users with specific grants
- Application or user can connect to myapp database using dynamic credentials created by vault
Before You Begin
Prerequisites
- HCP Vault account
- Kubernetes cluster
Networking
Right now HCP deploys Vault in Hashicorp’s Amazon account in a private Virtual Private Network. For now to establish a private connection between the Vault and your application you would need to have an AWS account, VPC, and either a peering or Transit Gateway connection:

For the sake of simplicity in this blog post, I’m going to expose the Vault publicly, which is not recommended for production but allows me to configure Vault from anywhere.
More clouds and networking configurations are on the way. Stay tuned to HashiCorp news.
Set it All Up
MySQL
To deploy Percona Distribution for MySQL on Kubernetes please follow our documentation. The only requirement is to have HAProxy exposed via a public load balancer. The following fields should be set correctly in the Custom Resource – deploy/cr.yaml:
For simplicity, I have shared two required YAMLs in this GitHub repository. Deploying them would provision the Percona XtraDB Cluster on Kubernetes exposed publicly:
Once the cluster is ready, get the public address:
Remember the ENDPOINT address, we will need to use it below to configure HCP Vault.
Create the User and the Database
I’m going to create a MySQL user which is going to be used by HCP Vault to create users dynamically. Also, an empty database called ‘myapp’ to which these users are going to have access.
Get the current root password from the Secret object:
Connect to MySQL directly or by executing into the container:
Create the database user and the database:
Hashicorp Cloud Platform Vault
Setting up Vault on HCP is a few-click process that is described here.
As I mentioned before, for the sake of simplicity HCP Vault is going to be publicly accessible. To do that, go to your Vault cluster in HCP UI, click Manage and Edit Configuration:
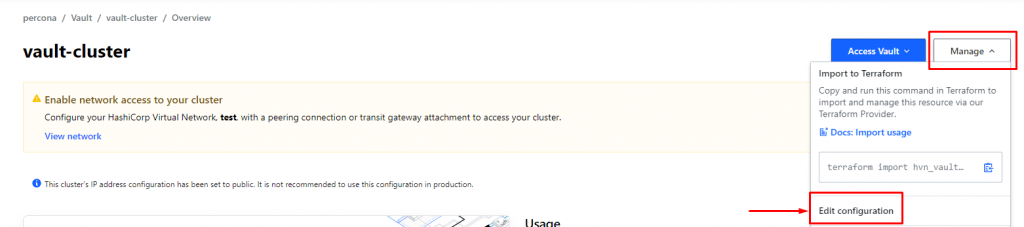
Enable the knob to expose the cluster publicly:

Now let’s get the Admin token for Vault. Navigate to your overview dashboard of your Vault cluster and click Generate token:

Vault CLI
The Vault is publicly accessible and you have the Admin token. Let’s configure it with the vault CLI tool. Install it by following the manual here.
Try to log in:
Connecting the Dots
It is time to connect Vault with the MySQL database in Kubernetes and start provisioning users. We are going to rely on Vault’s Databases Secrets engine.
1. Enable database secrets engine:
2. Point Vault to MySQL and store the configuration:
3. Create the role:
This role does the following:
- Creates the user with a random name and password
- The user has grants to myapp database
- By default, the user exists for one hour, but time-to-live can be extended to 24 hours.
Now to create the temporary user just execute the following:
It is now possible to connect to myapp database using the credentials provided above.
Conclusion
Dynamic credentials can be an essential part of your company’s security framework to avoid a breach due to secrets sprawl, data leaks, and maintain data integrity and consistency. You can similarly integrate HashiCorp Vault with any Percona Kubernetes Operator – for MongoDB, MySQL, and PostgreSQL.
We encourage you to try it out to keep your data safe. Let us know if you faced any issues by submitting the topic to our Community Forum.
Percona Distribution for MySQL Operator
The Percona Distribution for MySQL Operator simplifies running Percona XtraDB Cluster on Kubernetes and provides automation for day-1 and day-2 operations. It’s based on the Kubernetes API and enables highly available environments. Regardless of where it is used, the Operator creates a member that is identical to other members created with the same Operator. This provides an assured level of stability to easily build test environments or deploy a repeatable, consistent database environment that meets Percona expert-recommended best practices.
Hashicorp Vault
Hashicorp Vault is an identity-based security solution that secures, stores, and tightly controls access to tokens, passwords, and other secrets with both open-source and enterprise offerings for self-managed security automation. In April 2021, HashiCorp announced a fully managed offering, HashiCorp Cloud Platform Vault (HCP Vault), that simplifies deployment and management of the Vault.
Recommend
About Joyk
Aggregate valuable and interesting links.
Joyk means Joy of geeK