

Tag input assistant for <select> elements in Rust/wasm
source link: https://nessuent.xyz/posts/2021-08-14_tag-wasm-rust.html
Go to the source link to view the article. You can view the picture content, updated content and better typesetting reading experience. If the link is broken, please click the button below to view the snapshot at that time.

Tag input assistant for <select> elements in Rust/wasm
by epilys on 2021-08-14
Edit: Desktop-only live demo here
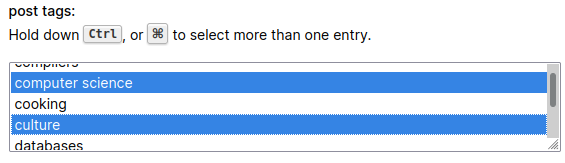
Choosing multiple options with the plain HTML <select> element limits you to what the browser chooses to display it as. This is necessary because it has to be accessible to assistive technologies that would choose to render it differently. Here’s how <select> looks in my browser (Firefox):
In the post submission form of the https://sic.pm link aggregator community you can select tags to categorise your post. I wrote a small “input assistant” module in Rust and Webassembly that enhances but not replaces the <select> element. The dynamic usage is not required since the <select> element works always even with javascript disabled. Here’s the finished result:
The code is AGPL-3.0 licensed and is located here.
Project setup
I followed the hello world example from the official rustwasm guide. It uses the wasm-pack tool to compile your Rust project to a wasm module. I chose not to use npm and any javascript other than what’s strictly necessary.
The browser and javascript APIs are exposed to Rust via the js-sys and web-sys crates, so we can do what we would normally do in Javascript: set up event callbacks and manipulate the DOM. For inspiration, I followed the general idea outlined in this logrocket.com guide: Building a tag input field component for React.
The web-sys crate exposes each API as different crate features. By default, it has none. We explicitly enable the features we end up needing:
[dependencies]
wasm-bindgen = "0.2.63"
js-sys = "0.3.52"
web-sys = { version = "0.3.52", features = ["Document", "Text", "Window", "HtmlElement", "Element", "console", "HtmlInputElement", "KeyboardEvent", "Node", "NodeList", "HtmlOptionElement", "EventTarget", "HtmlSpanElement", "HtmlSelectElement"] }
Design considerations
We will need a way to track the state of the <select> field so we create a State struct singleton that we put behind a Mutex and then an Arc. This way when registering the event callbacks we can pass around a cloned state reference and access it from there. Every callback will have its own Arc<Mutex<State>>.
(Note: this is the general design pattern I followed when porting my terminal e-mail client meli to wasm for an interactive web demo. The terminal is simulated by rendering an <svg> element with each terminal cell.)
We need a way to know what options are valid. One could just read the options from <select> but I chose to read them from a json script element in order to include associated colors for each tag. The json <script> element should contain a dictionary of valid options as keys and hex colors as values and render as:
Finally, a <datalist> element will be used to enable autocomplete for the input.
Implementation
The State definition:
with the following methods:
The following elements are rendered in the DOM just before the <select> element:
The following events will be monitored:
onclickevent for the outer container<div>, that will focus theinputelement inside.oninputevent for the<select>, so that we can synchroniseStatewhen it changesonkeydownevent for<input>so that we can detect when a tag name is terminated (I chose the comma character or Enter/Return) or when Backspace is pressed on an empty input which will “pop” the previous tagonkeyupevent for<input>so we can track when a key is released. If Backspace is pressed and released, the user has pressed it repeatedly.
Finally, we’ll add a little ‘x’ button to each tag to enable quick removal and register onclick and onkeydown for it. This is where State.remove_tag_cb is needed: we keep one copy of the callback and register it for every rendered tag.
Setting up the module from Javascript
We register a setup function in the module by annotating it with #[wasm_bindgen]:
Interacting with the DOM
The browser API symbols in web_sys are generally the equivalent Javascript symbols but not in snake-case. This part is mostly the tedious process of setting up elements, attributes and callbacks:
To create a callback from Rust, we wrap a closure in Callback and we forget about it, meaning that we tell Rust not to call Drop on it because otherwise when it’s called from the browser it won’t exist.
Casting javascript objects and elements with JsCast is necessary to call the appropriate functions from each interface. The casting can be unchecked or checked on runtime.
Putting it all together
We build the module by running wasm-pack build --target web --release
This creates a pkg directory with a .wasm module and a .js file which does the loading and symbol export for us.
In the HTML page we dynamically import the module to avoid any errors showing up if it’s missing or something doesn’t work. We can just print a warning instead, since the <select> element still works. This is the graceful degradation part of this design: the user experience is not limited by the enhanced workflow.
Recommend
About Joyk
Aggregate valuable and interesting links.
Joyk means Joy of geeK