

使用 OpenCV 和 K-Means 聚类进行图像分割
source link: https://mathpretty.com/13919.html
Go to the source link to view the article. You can view the picture content, updated content and better typesetting reading experience. If the link is broken, please click the button below to view the snapshot at that time.

使用 OpenCV 和 K-Means 聚类进行图像分割
摘要本文介绍使用 OpenCV 中的 K-Means 来对图像颜色进行聚类(减少图像颜色),根据聚类结果对图像进行分块,或是替换某种颜色。
图像分割是将一张图像分割为不同的区域,这样做可以使得图像变得更简单,方便后面的处理。例如在图像分类领域,图像中不止包含一个 object,于是可以使用图像分割对其进行分割。
在这个教程中,我们使用 K-Means 根据图像的颜色对其进行聚类(哪些颜色可以归为一类,例如现在图像中包含颜色「红色,粉红色,蓝色」,那么「红色,粉红色」可以为一类,「蓝色」为一类),接着按照聚类的结果对图像进行分割(比如可以使用遮罩遮住「蓝色」的区别,这样就只有「红色,粉红色」的区域了)。
在接着看下去之前,我们需要确保安装了以下的 python 库。
- pip3 install opencv-python numpy matplotlib
How to Use K-Means Clustering for Image Segmentation using OpenCV in Python
通过 OpenCV 中 K-Means 简化图像颜色与分块
准备工作(库与图像)
我们首先导入需要使用的库:
- import cv2
- import numpy as np
- import matplotlib.pyplot as plt
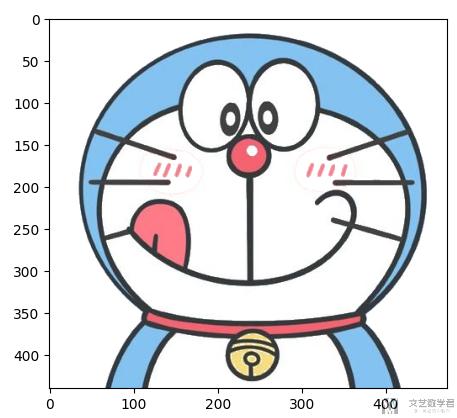
接着选择一张图片来进行展示,我们这里就使用「机器猫」来作为展示(也可以替换为其他图片):

使用 K-Means 进行聚类(减少图像颜色)
我们使用 OpenCV 导入图片,看一下图像的大小为 4404733:
- # read the image
- image = cv2.imread("./cat.png")
- print('image shape: {}'.format(image.shape))
- # (440, 473, 3)
为了之后的显示需要,我们将图像转换为 RGB 格式(进行这一步的原因,可以参考链接,图像处理-matplotlib显示opencv图像):
- # convert to RGB
- image = cv2.cvtColor(image, cv2.COLOR_BGR2RGB)
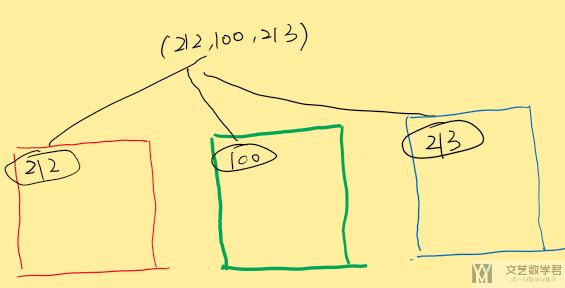
为了进行聚类,我们将 image 转换为一个二维向量(cv2.kmeans 将一个「二维向量」作为输入),这个二位向量大小是 N*3。如下图所示,我们将一个像素的 RGB 放在一起:

再解释一下如下图所示,原始图像有三个 channel(分别是 RGB),我们在每一个 channel 中相同位置的数取出合并在一起。
按照上面的思路,我们对图像进行 reshape,接着转换为 float 类型:
- # reshape the image to a 2D array of pixels and 3 color values (RGB)
- pixel_values = image.reshape((-1, 3))
- # convert to float
- pixel_values = np.float32(pixel_values)
- print(pixel_values.shape)
- # (208120, 3)
上面最终的大小为 208120,也就是 440*473=208120。之后我们会对上面的数据进行聚类,上面每一个数据其实就是一种颜色,如果我们聚类结果为 3,那么原始图像就会被压缩为三种颜色。
在使用 K-Means 算法的时候,我们需要知道算法的停止条件。在这里为了希望迭代次数不超过 100,或是 clusters 中心移动的值非常小(这里是 0.2),下面是定义的停止条件:
- # define stopping criteria --> 定义聚类停止的条件
- criteria = (cv2.TERM_CRITERIA_EPS + cv2.TERM_CRITERIA_MAX_ITER, 100, 0.2)
上面的图像主要有 5 中颜色,我们因此将图像颜色聚类为 5 种:
- # 进行聚类
- _, labels, (centers) = cv2.kmeans(data=pixel_values, K=k,
- bestLabels=None, criteria=criteria,
- attempts=10,
- flags=cv2.KMEANS_RANDOM_CENTERS)
- # centers --> 是 rgb 的颜色, 这里聚成 5 个类别,所以 centers 会有 5 个 RGB 的值;
- # labels --> 每个 pixel 的 label,会告诉你这个 pixel 对应的
我们再对上面的代码进行解释:
labels是每一个 pixel 所属的类,这里有 5 种颜色,所以 label 的取值是从 0-4,代表五种颜色;centers表示五类中心点,在这里就是 5 种颜色的 RGB 值;cv2.KMEANS_RANDOM_CENTERS表示聚类中间点初始是随机的;
下面是 centers 的输出,可以看到这里就是五个值:
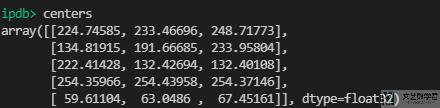
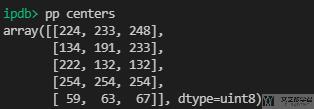
这里也注意到,centers 是 float 类型,对于图像来说,我们需要首先转换为 int8 数据类型:
- centers = np.uint8(centers)
转换后 centers 如下所示:
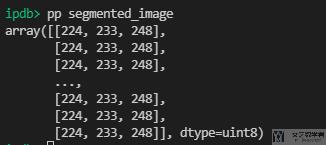
接着我们根据 label,将 label 中的数字转换为对应的 RGB 值,并使用 reshape 转换为图像的大小:
- # flatten the labels array
- labels = labels.flatten()
- # convert all pixels to the color of the centroids
- segmented_image = centers[labels.flatten()]
- # reshape back to the original image dimension
- segmented_image = segmented_image.reshape(image.shape)
这里 segmented_image 是按照 pixel 转换后的 RGB 值,只需要进行 reshape 就是图像了。下图是 reshape 之前的 segmented_image 的样子:
到这里就完成了图像颜色的简化,我们将最终的结果显示一下:
- # show the image
- plt.imshow(segmented_image)
- plt.show()
可以看到简化之后图像的颜色就明显变少了,左侧是原始的图像,右侧是进行简化后的图像:

到这里为止我们就完成了使用 OpenCV 中的 K-Means 完成颜色的聚类和简化。
遮挡住某种颜色
上面我们将图像分为了五种颜色,接下来我们想要替换机器猫的背景颜色(也就是淡蓝色的部分,这个颜色对应上面的 label=1)。
上面在聚类的时候我们已经获得了 label=1 的全部位置,我们只需要将图像中对应的位置改变 rgb 值即可。下面我们将背景替换为「白色」:
- # disable only the cluster number 2 (turn the pixel into black)
- masked_image = np.copycopy(image)
- # convert to the shape of a vector of pixel values
- masked_image = masked_image.reshape((-1, 3))
- # color (i.e cluster) to disable
- masked_image[labels == 0] = [255, 255, 255] # 替换颜色
- # convert back to original shape
- masked_image = masked_image.reshape(image.shape)
- # show the image
- plt.imshow(masked_image)
- plt.show()
最终的效果如下所示,可以看到背景颜色被换成了白色(但是好像影响到了腮红部分,那里聚类结果也是淡蓝色的):
- 微信公众号
- 关注微信公众号
-

- QQ群
- 我们的QQ群号
-

Recommend
About Joyk
Aggregate valuable and interesting links.
Joyk means Joy of geeK