

Handling Device Battery Information With Xamarin Essentials
source link: https://www.telerik.com/blogs/handling-device-battery-information-xamarin-essentials
Go to the source link to view the article. You can view the picture content, updated content and better typesetting reading experience. If the link is broken, please click the button below to view the snapshot at that time.

Handling Device Battery Information With Xamarin Essentials
Today we’ll learn about working with a device’s battery—including charge status, power source and energy-saving mode.
Howdy! 🙋 Hoping you are doing well! In this post we will be learning about our device battery with Xamarin Essentials.
Let’s imagine the following scenario. We have to develop a requirement that, as a key point, needs to execute a process depending on the following points:
🎯 Battery charge status (if it’s charging or if it’s full)
🎯 The battery power source (USB, alternating current, among others)
🎯 Whether or not it’s in energy-saving mode
Depending on these results, we need an event which helps us to execute our action.
A scenario like this is when Xamarin Essentials comes in to help us! We can find out all of the points above and handle the event using its Battery class. Let’s see how to do it!
What Exactly Does Battery Class Tell Us?
The Battery class allows us to know the information of the battery and identify the changes in it. It also provides information about the device’s energy-saver status. It’s important to know that the last one indicates that it’s supplying energy in low mode; therefore, we shouldn’t run applications in the background when this occurs, helping to keep our integrations as economical as possible to extend the battery life.
🔧 Platform Settings
📗 On Android
We have different ways to manage platform settings. Here are some of them:
- Open the AssemblyInfo.cs located inside the Properties folder and add the following code:
[assembly: UsesPermission(Android.Manifest.Permission.BatteryStats)]
- Open AndroidManifest.xml ➡ Required permissions ➡ Check BatteryStats option.
⚠ iOS and UWP don’t require additional setup. But for iOS, the device must be used to test APIs.
Let’s Continue With the Battery Information
🕵 Knowing the Available Battery States
We have six battery states, which are classified as the following:
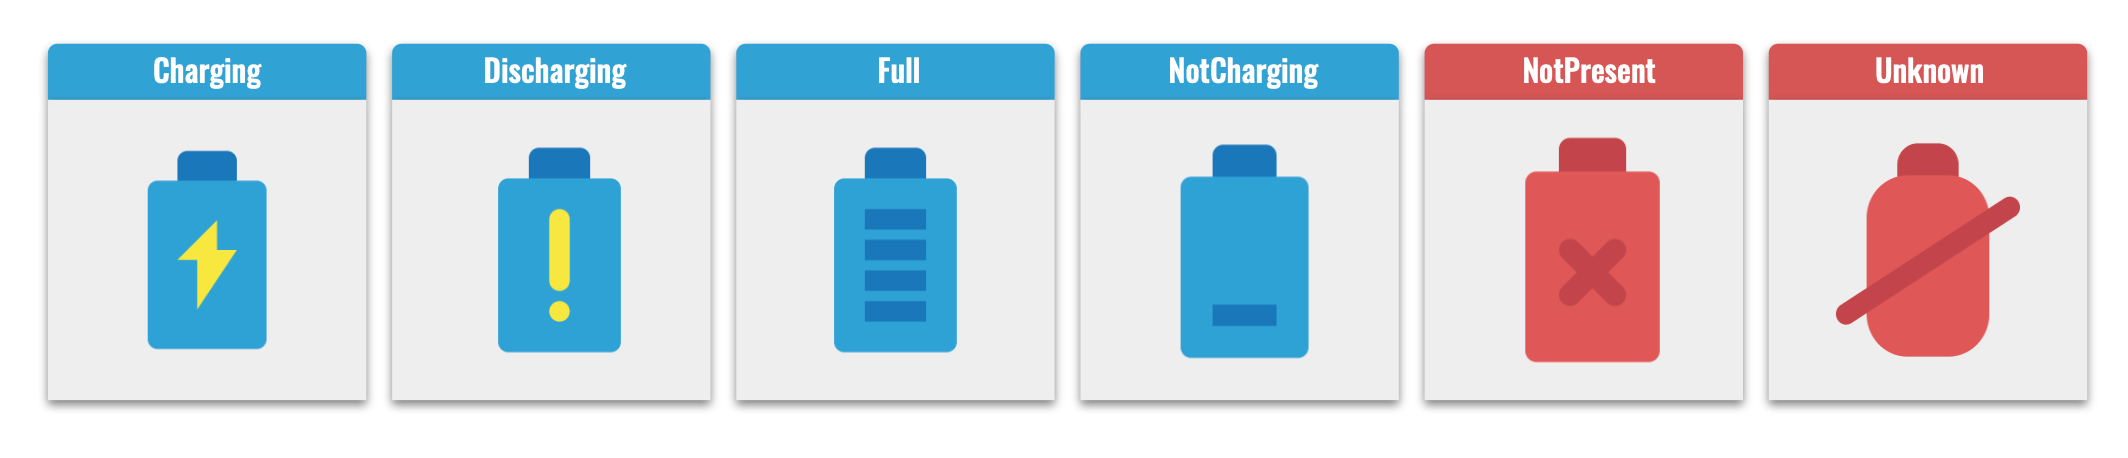
Let’s see a description of each one:
ID State Description 1 Charging Battery is actively being charged by a power source. 2 Discharging Battery is not plugged in and is discharging. 3 Full Battery is full. 4 NotCharging Battery is not charging or discharging, but is in a between state. 5 NotPresent Battery doesn’t exists on the device. 6 Unknown Battery couldn’t be determined.🔧 Code example:
var state = Battery.State;
switch (state)
{
    case BatteryState.Charging:
        // Your code here
        break;
    case BatteryState.Full:
        // Your code here
        break;
}
🧩 Knowing the Battery Level
Also you can know the level of your battery. It gets the current charge level of the device from 0.0 to 1.0 when on AC or no battery. You can do it with the following example code.
var level = Battery.ChargeLevel;
🎯 Battery Power Source Information
Another great bit of information from this amazing API is that it allows us to obtain power source information. These are the possible sources:
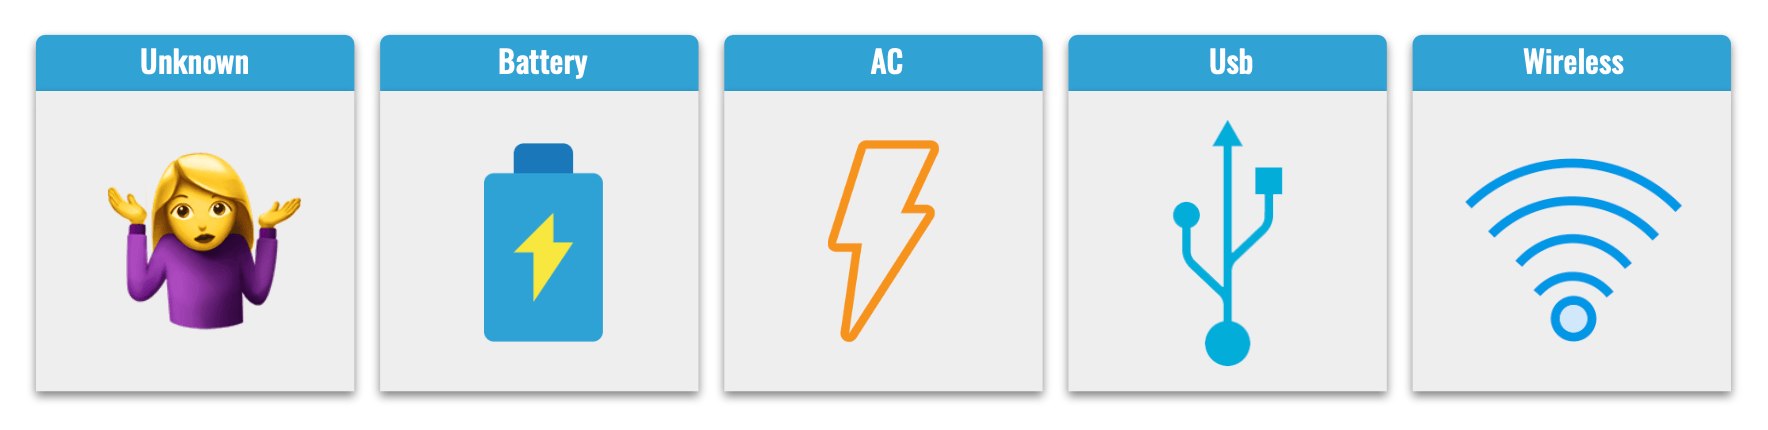
Let’s see the description of each one:
ID State Description 0 Unknown Power source can’t be determined. 1 Battery Power source is the battery and it’s not being charged. 2 AC Power source is an AC charger. (⚠ On iOS & UWP: Only will returnAC or Battery for PowerSource.)
3
Usb
Power source is a USB port.
4
Wireless
Power source is Wireless.
🔧 Code example:
var source = Battery.PowerSource;
switch (source)
{
    case BatteryPowerSource.Usb:
        // Your code here
        break;
    case BatteryPowerSource.Wireless:
        // Your code here
        break;
}
Triggering an Event When Properties Change
Every time some of the battery properties change, the Battery_BatteryInfoChanged event is triggered in which you can implement a desired action.
public class BatteryTest
{
    public BatteryTest()
    {
        Battery.BatteryInfoChanged += Battery_BatteryInfoChanged;
    }

    void Battery_BatteryInfoChanged(object sender, BatteryInfoChangedEventArgs   e)
    {
         // Add the code that you need here - Maybe the charge level, state or the power source!
    }
}
💪 Energy Saver Status
Normally, the devices have a power-saving mode that is generally activated automatically by having a 20% charge on the battery. Let’s see how to identify it and how to execute or not actions when it’s detected. As we saw at the beginning of the post, it’s important to work so that our applications collaborate with saving resources once this mode is active.
You obtain the current energy-saver status using the Battery.EnergySaverStatus property:
var status = Battery.EnergySaverStatus;
It returns three results which help us to identify the status. They are the following:
Value Description On EnergySaverStatus is activated. Off EnergySaverStatus is deactivated. Unknown EnergySaverStatus Unknown.And finally, your application should have an event handler. The Battery class contains an event that is triggered when the energy-saver status changes:
public class EnergySaverHelper
{
    public EnergySaverHelper()
    {
        // Subscribe to changes of energy-saver status
        Battery.EnergySaverStatusChanged += OnEnergySaverStatusChanged;
    }

    private void OnEnergySaverStatusChanged(EnergySaverStatusChangedEventArgs e)
    {
        // Add the code that you need heren- For example: You can get the energy saver status.
        var status = e.EnergySaverStatus;
    }
}
And done! Your app has the Battery information ready! 💚
Thanks for reading! 💚💕
🔗 Reference: https://docs.microsoft.com/en-us/xamarin/essentials/battery?context=xamarin%2Fxamarin-forms&tabs=uwp
See you next time! 🤓
Recommend
About Joyk
Aggregate valuable and interesting links.
Joyk means Joy of geeK