

The 1-2-3 for PostgreSQL Logical Replication Using an RDS Snapshot
source link: https://www.percona.com/blog/postgresql-logical-replication-using-an-rds-snapshot/
Go to the source link to view the article. You can view the picture content, updated content and better typesetting reading experience. If the link is broken, please click the button below to view the snapshot at that time.

We have several PostgreSQL versions that support logical decoding to replicate data changes from a source database to a target database, which is a cool and very powerful tool that gives the option to replicate all the tables in a database, only one schema, a specific set of tables or even only some columns/rows, also is a helpful method for version upgrades since the target database can run on a different (minor or major) PostgreSQL version.
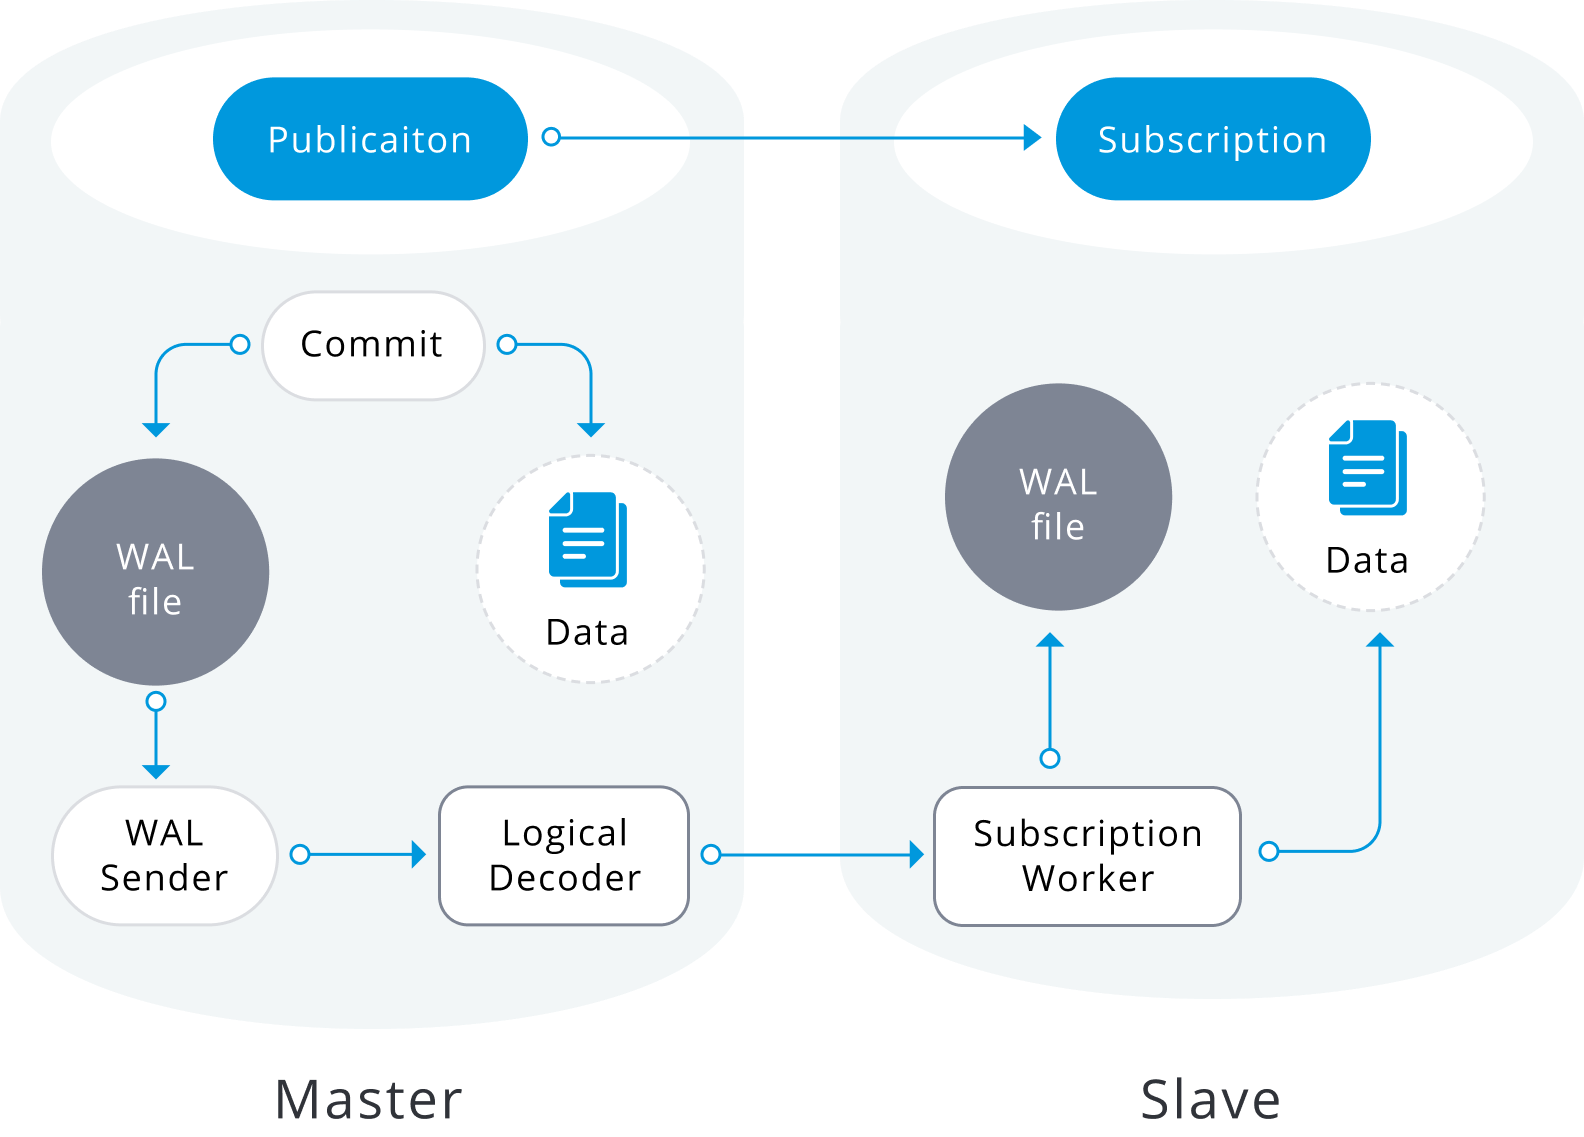
Image from: https://severalnines.com/sites/default/files/blog/node_5443/image2.png
There are some cases when the databases have been hosted in the AWS Relational Database Service (RDS) which is the fully auto-managed solution offered by Amazon Web Services, there is no secret that choosing this option for our database backend comes with a level of vendor lock-in, and even when RDS offers some build-in replica solutions such as Multi-AZ or read-replicas sometimes we can take advantage of the benefits from logical replication.
In this post I will describe the simplest and basic steps I used to implement this replica solution avoiding the initial copy data from the source database to the target, creating the target instance from an RDS snapshot. Certainly, you can take advantage of this when you work with a big/huge data set and the initial copy could lead to high timeframes or network saturation.
NOTE: The next steps were tested and used for a specific scenario and they are not intended to be an any-size solution, rather give some insight into how this can be made and most importantly, to stimulate your own creative thinking.
The Scenario
Service Considerations
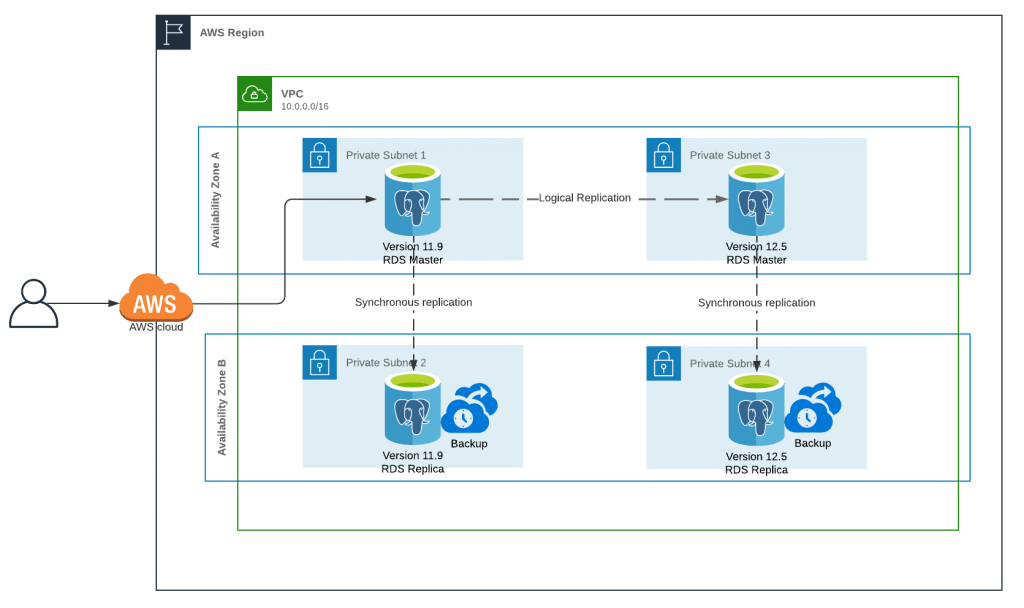
In this exercise, I wanted to perform a version upgrade from PostgreSQL v11.9 to PostgreSQL v12.5, we can perform a direct upgrade using the build-in option RDS offers, but that requires a downtime window that can vary depending on some of the next:
- Is Multi-AZ enabled?
- Are the auto backups enabled?
- How transactional is the source database?
During the direct upgrade process, RDS takes a couple of new snapshots of the source instance, firstly at the beginning of the upgrade and finally when all the modifications are done, depending on how old is the previous backup and how many changes have been made on the datafiles the pre backup could take some time. Also, if the instance is Multi-AZ the process should upgrade both instances, which adds more time for the upgrade, during most of these actions the database remains inaccessible.
The next is a basic diagram of how an RDS Multi-AZ instance looks, all the client requests are sent to the master instance, while the replica is not accessible and some tasks like the backups are executed on it.

Therefore, I choose logical replication as the mechanism to achieve the objective, we can aim for a quicker switch-over if we create the new instance in the desired version and just replicate all the data changes, then we need a small downtime window just to move the traffic from the original instance to the upgraded new one.


Prerequisites
To be able to perform these actions we would need:
- An AWS user/access that can operate the DB instances, take DB snapshots and upgrade and restore them.
- The AWS user also should be able to describe and create DB PARAMETER GROUPS.
- A DB user with enough privileges to create the PUBLICATION on source and SUBSCRIPTION on target also is advisable to create a dedicated replication user with the minimum permissions.
The 1-2-3 Steps
Per the title of this post, the next is the list of steps to set up a PostgreSQL logical replication between a PostgreSQL v11.9 and a v12.5 using an RDS snapshot to initialize the target database.
- Verify the PostgreSQL parameters for logical replication
- Create the replication user and grant all the required privileges
- Create the PUBLICATION
- Create a REPLICATION SLOT
- Create a new RDS snapshot
- Upgrade the RDS snapshot to the target version
- Restore the upgraded RDS snapshot
- Get the LSN position
- Create the SUBSCRIPTION
- Advance the SUBSCRIPTION
- Enable the SUBSCRIPTION
Source Database Side
1. Verify the PostgreSQL parameters for logical replication
We require the next PostgreSQL parameters for this exercise
NOTE: The parameter track_commit_timestamp can be optional since in some environments is not advisable for the related overhead, but it would help to track and resolve any conflict that may occur when the subscriptions are started.
2. Create the replication user and grant all the required privileges
3. Create the PUBLICATION
4. Create a REPLICATION SLOT
AWS RDS Steps
5. Create a new RDS snapshot
6. Upgrade the RDS snapshot to the target version
7. Restore the upgraded RDS snapshot
Since we are moving from version 11.9 to 12.5 we may need to create a new DB parameter group if we are using some custom parameters.
From the instance describe we can verify the current parameter group
Then we can validate the custom parameters
We need to create a new parameter group in the target version
Finally, we need to modify the parameters we got before in the new parameter group
Now we can use the new parameter group to restore the upgraded snapshot
8. Get the LSN position from the target instance log
To list all the database logs for the new DB instance
We should pick the latest database log
From the retrieved log portion we need to find the value after for the log entry redo done at:
Target Database Side
9. Create SUBSCRIPTION
10. Advance the SUBSCRIPTION
We need to get the subscription id
Now advance the subscription to the LSN we got in step 8
11. Enable the SUBSCRIPTION
Once we are done with all the steps the data changes should flow from the source database to the target, we can check the status at the pg_stat_replication view.
Conclusion
Choosing DBaaS from cloud vendors bring some advantages and can speed up some implementations, but they come with some costs, and not all the available tools or solutions fits all the requirements, that is why always is advisable to try some different approaches and think out of the box, technology can go so far as our imagination.
Recommend
About Joyk
Aggregate valuable and interesting links.
Joyk means Joy of geeK