

VLAN 路由实验
source link: http://www.dengfm.com/15262705218309.html
Go to the source link to view the article. You can view the picture content, updated content and better typesetting reading experience. If the link is broken, please click the button below to view the snapshot at that time.

VLAN 路由实验
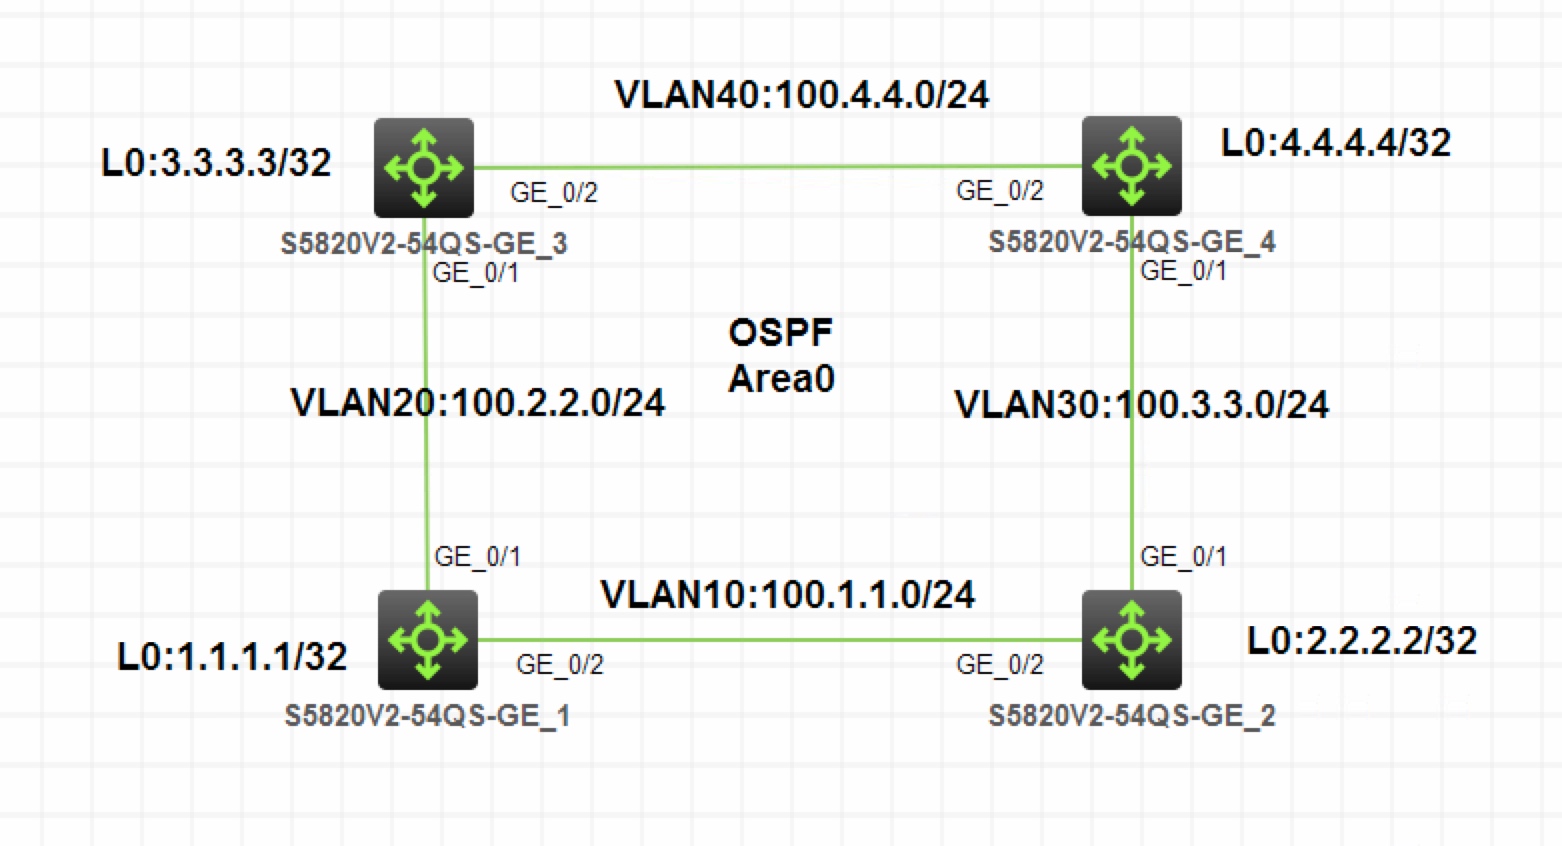
图 1-1
注:如无特别说明,描述中的 R1 或 SW1 对应拓扑中设备名称末尾数字为 1 的设备,R2 或 SW2 对应拓扑中设备名称末尾数字为 2 的设备,以此类推;另外,同一网段中,IP 地址的主机位为其设备编号,如 R3 的 g0/0 接口若在
192.168.1.0/24网段,则其 IP 地址为192.168.1.3/24,以此类推
- 按照图示创建 Vlan,所有接口配置为 Access 类型加入相应互联 VLAN
- 按照图示配置 IP 地址
- 配置 OSPF,实现全网互通
按照图示创建 Vlan,所有接口配置为 Access 类型加入响应互联 VLAN
分析:根据需求,每台交换机上只需要创建本端的互联 VLAN 即可,并把相应接口加入到对应的互联 VLAN。如果接口配置为 Trunk 的话,可能会造成 Vlan1 和其他 Vlan 存在环路而被 STP 阻塞端口,导致路由不通
步骤 1:在 SW1 上创建 Vlan10 和 Vlan20,G1/0/1 口加入到 Vlan20,G1/0/2 口加入到 Vlan10。命令略步骤 2:在 SW2 上创建 Vlan10 和 Vlan30,G/0/1 口加入到 Vlan30,G1/0/2 口加入到 Vlan10。命令略
步骤 3:在 SW3 上创建 Vlan20 和 Vlan40,G/0/1 口加入到 Vlan20,G1/0/2 口加入到 Vlan40。命令略
步骤 4:在 SW4 上创建 Vlan30 和 Vlan40,G/0/1 口加入到 Vlan30,G1/0/2 口加入到 Vlan40。命令略
按照图示配置 IP 地址
步骤 1:创建 Vlan10 和 Vlan20 的三层接口,并配置 IP 地址
[SW1]interface Vlan-interface 10
[SW1-Vlan-interface10]ip address 100.1.1.1 24
[SW1]interface Vlan-interface 20
[SW1-Vlan-interface20]ip address 100.2.2.1 24
步骤 2:SW2,SW3,SW4 配置方法同 SW1,步骤略
配置 OSPF,实现全网互通
步骤 1:在 SW1 上配置 OSPF
[SW1]ospf router-id 1.1.1.1
[SW1-ospf-1]area 0
[SW1-ospf-1-area-0.0.0.0]network 100.1.1.0 0.0.0.255
[SW1-ospf-1-area-0.0.0.0]network 100.2.2.0 0.0.0.255
[SW1-ospf-1-area-0.0.0.0]network 1.1.1.1 0.0.0.0
步骤 2:SW2,SW3,SW4 配置 OSPF 方法同 SW1,步骤略
Recommend
About Joyk
Aggregate valuable and interesting links.
Joyk means Joy of geeK