

在kubernetes上一键式部署company
source link: http://servicecomb.apache.org/cn/docs/company-on-kubernetes/
Go to the source link to view the article. You can view the picture content, updated content and better typesetting reading experience. If the link is broken, please click the button below to view the snapshot at that time.

在kubernetes上一键式部署company
1 分钟 阅读
Linux Con Workshop Demo 博文介绍了如何使用微服务开源开发框架ServiceComb快速开发company示例,将典型的企业级应用company示例进行快速微服务化。
现在,github上已经提供了在kubernetes集群上一键式部署的功能。本文将着重讲解相应的yaml文件和服务间通信,这对于开发者基于Company 模型进行微服务开发并且部署到云上将会有所帮助。
Run Company on Kubernetes Cluster 提供了详细的使用方法,读者只需通过以下3条指令,就可将company在kubernetes集群上部署起来,
git clone https://github.com/ServiceComb/ServiceComb-Company-WorkShop.git

cd ServiceComb-Company-WorkShop/kubernetes/

bash start.sh
Yaml文件解读
以作者的实际环境为例:
root@zenlin:~/src/LinuxCon-Beijing-WorkShop/kubernetes# kubectl get pod -owide
NAME                                      READY     STATUS    RESTARTS   AGE       IP            NODE
company-beekeeper-3737555734-48sxf        1/1       Running   0          17s       10.244.2.49   zenlinnode2
company-bulletin-board-4113647782-th91w   1/1       Running   0          17s       10.244.1.53   zenlinnode1
company-doorman-3391375245-g0p8c          1/1       Running   0          17s       10.244.1.55   zenlinnode1
company-manager-454733969-0c1g8           1/1       Running   0          16s       10.244.2.50   zenlinnode2
company-worker-1085546725-x7zl4           1/1       Running   0          17s       10.244.1.54   zenlinnode1
zipkin-508217170-0khr3                    1/1       Running   0          17s       10.244.2.48   zenlinnode2
可以看到,一共启动了6个pod,分别为,公司经理(company-manager)、门卫(company-doorman)、公告栏(company-bulletin-board)、技工(company-worker)、养蜂人(company-beekeeper)、调用链跟踪(zipkin),K8S集群分别为他们分配对应的集群IP。
root@zenlin:~/src/LinuxCon-Beijing-WorkShop/kubernetes# kubectl get svc -owide
NAME                     CLUSTER-IP      EXTERNAL-IP   PORT(S)          AGE       SELECTOR
company-bulletin-board   10.99.70.46     <none>        30100/TCP        12m       io.kompose.service=company-bulletin-board
company-manager          10.100.61.227   <nodes>       8083:30301/TCP   12m       io.kompose.service=company-manager
zipkin                   10.104.92.198   <none>        9411/TCP         12m       io.kompose.service=zipkin
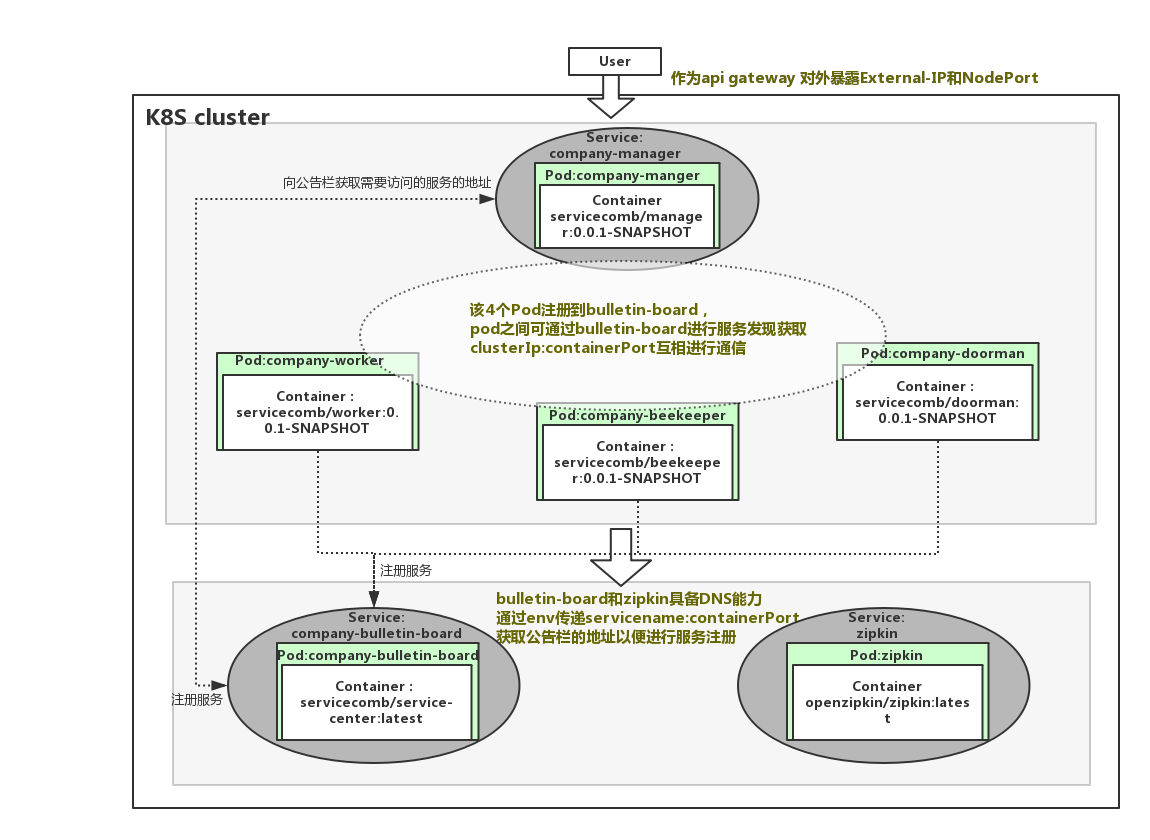
仅启动了3个service,调用链跟踪(zipkin)、公告栏(company-bulletin-board)以及经理(company-manager),这是因为,调用链跟踪和公告栏需要在集群内被其他服务通过域名来调用,而经理需要作为对外作为网关,统一暴露服务端口。
查看company-bulletin-board-service.yaml文件,
    apiVersion: v1
    kind: Service
    metadata:
      creationTimestamp: null
      labels:
    	io.kompose.service: company-bulletin-board
      name: company-bulletin-board
    spec:
      ports:
    - name: "30100"
      port: 30100
      targetPort: 30100
        selector:
      io.kompose.service: company-bulletin-board
      status:
        loadBalancer: {}
该文件定义了公告栏对应的service,给service定义了name、port和targetPort,这样通过kubectl expose创建的service会在集群内具备DNS能力,在其他服务刚启动还未注册到公告栏(服务注册发现中心)时,就是使用该能力来访问到公告栏并注册服务的。
对于label和selector的作用,在一个service启动多个pod的场景下将会非常有用,当某个pod崩溃时,服务的selector将会自动将死亡的pod从endpoints中移除,并且选择新的pod加入到endpoints中。
查看company-worker-deployment.yaml 文件,
apiVersion: extensions/v1beta1
kind: Deployment
metadata:
  creationTimestamp: null
  labels:
	io.kompose.service: company-worker
  name: company-worker
spec:
  replicas: 1
  strategy: {}
  template:
	metadata:
  	creationTimestamp: null
  	labels:
    	io.kompose.service: company-worker
spec:
  containers:
  - env:
    - name: ARTIFACT_ID
      value: worker
    - name: JAVA_OPTS
      value: -Dcse.service.registry.address=http://company-bulletin-board:30100 -Dservicecomb.tracing.collector.adress=http://zipkin:9411
    image: servicecomb/worker:0.0.1-SNAPSHOT
    name: company-worker
    ports:
    - containerPort: 7070
    - containerPort: 8080
    resources: {}
  restartPolicy: Always
status: {}
该yaml文件定义了副本数为1(replicas: 1)的pod,可以通过修改该副本数控制所需启动的pod的副本数量(当然也可以使用K8S的弹性伸缩能力去实现按需动态水平伸缩,弹性伸缩部分将在后面的博文中提供)。前面我们提到过company-bulletin-board具备了DNS的能力,故现在可以通过该Deployment中的env传递cse.service.registry.address的值给pod内的服务使用,如: -Dcse.service.registry.address=http://company-bulletin-board:30100,kube-dns将会自动解析该servicename。
对于kubernetes如何实现服务间通信,可以阅读connect-applications-service。
其他的deployment.yaml以及service.yaml都跟以上大同小异,唯一例外的是company-manager服务,我们可以看到在company-manager-service.yaml中看到定义了nodePort,这将使能company-manager对集群外部提供公网IP和服务端口,如下:
spec:
  ports:
  - name: "8083"
  	port: 8083
  	targetPort: 8080
  	nodePort: 30301
  	protocol: TCP
  type: NodePort
可以通过以下方法获得公网IP和服务端口:
kubectl get svc company-manager -o yaml | grep ExternalIP -C 1
kubectl get svc company-manager -o yaml | grep nodePort -C 1
接下来你就可以使用公网IP和服务端口访问已经部署好的company了,在github.com/ServiceComb/ServiceComb-Company-WorkShop/kubernetes上详细提供了通过在集群内访问和集群外访问的方法。
通过详细阅读所有的deployment.yaml和service.yaml,可以整理出以下的模型:
另外,经典的航空订票系统Acmeair也已经支持在kubernetes上一键式部署基于ServiceComb框架开发的版本,点击访问Run Acmeair on Kubernetes获取 。
Recommend
About Joyk
Aggregate valuable and interesting links.
Joyk means Joy of geeK