

单片机很好玩10,温敏电阻和ADC制作温度传感器
source link: https://blog.popkx.com/mcu-is-fun-10-temperature-sensor-and-adc-make-temperature-sensor/
Go to the source link to view the article. You can view the picture content, updated content and better typesetting reading experience. If the link is broken, please click the button below to view the snapshot at that time.

单片机很好玩10,温敏电阻和ADC制作温度传感器
第 7 节介绍了使用 DHT11 温湿度传感器制作温度警报器的方法。相信有的朋友应该看出,警报器是基于一个温度“阈值”的,即只要温度高于 15 摄氏度,就发出警报,整个系统并不关心其他温度值。
使用低成本的热敏电阻
可以看出,按照第7节的方法使用 DHT11 制作温度警报器,其实有些浪费资源,因为 DHT11 能够测量温湿度的绝对值,而系统并没有用到这个功能,仅仅使用了 DHT11 在 15 摄氏度这个点的状态。
那么,更合适的制作温度警报器的方法是什么呢?经过上一节的介绍,我们已经能够使用单片机的 ADC 外设测量电压了,只要再使用一个热敏电阻,就能够解决第7节的需求了。很明显,热敏电阻的价格比 DHT11 的价格便宜多了。
热敏电阻,顾名思义,就是它的阻值会随着温度变化。如下图:

将热敏电阻串入电路,只要使用单片机的 ADC 外设测量热敏电阻两端电压,就可以知道环境温度的相对变化量了。记录温度为 15 摄氏度时的电压值 Vref,之后只要将 ADC 采样的电压值与 Vref 对比,就能知道是否需要报警了。
使用热敏电阻制作温度计
这里为了快速实验,简单将热敏电阻与定电阻串联了,使用 51 单片机的 P1.0 口(即 ADC 通道 0)测量热敏电阻的电压:

参照上一节介绍的 ADC 采样C语言程序:
// 获取 10 位 adc
WORD get_adc_res(BYTE ch)
{
    WORD res = 0;
    res = get_adc_h8bit(ch);
    res <<= 2;
    res |= ADC_LOW2;

    return res;
}
void main()
{
    init_uart(9600);
    adc_init();

    while(1){
        delay_about_100ms(2);
        printf("adc: %0.2f\r\n", 5.0*((float)get_adc_res(0))/1024.0);
    }
}
连接好各个组件:

现在编译程序烧写到单片机,打开电脑端的串口调试软件,可以看出单片机已经能够成功测出热敏电阻的电压值了:
用手捏住热敏电阻,会发现电压值升高了,说明这种方法能够检测环境温度变化。
利用热敏电阻制作温度警报器
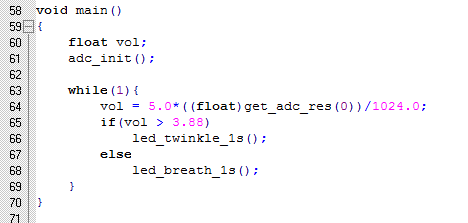
在温度为 15 摄氏度时,记录热敏电阻的电压值为 3.88V。因为我使用的这款热敏电阻温度越高阻值越低,相应的 P1.0 测量的电压值也越大。
所以当温度超过 15 摄氏度时,也即单片机测量的电压值大于 3.88V 时,单片机应驱动 LED 小灯执行“闪烁”报警动作。热敏电阻两端的电压低于 3.88V 时,温度正常,单片机应驱动 LED 小灯执行“呼吸灯”动作。
结合前面几节介绍的内容,上面的设计C语言代码应如下实现,请看:
sbit P20 = P2^0;

void delay(unsigned int n)
{
    unsigned int x;
    while(n--){
        x = 50;
        while(x--);
    }
}

void twinkle_once(unsigned char darkTime)
{
    P20 = 0;
    delay(100-darkTime);
    P20 = 1;
    delay(darkTime);
}

void led_breath_1s()
{
    static int cnt = 0;
    static char dark_time = 0, dir = 1  ;
    while(1){
        twinkle_once(dark_time);
        if( 0==((cnt++)%4) ){
            if(dir)
                dark_time += 1;
            else
                dark_time -= 1;
            if(dark_time >= 100)
                dir = 0;
            if(dark_time <= 60)
                dir = 1;
        }
        if(cnt > 200){
            cnt = 0;
            break;
        }
    }
}

void led_twinkle_1s()
{
    char cnt = 5;
    while(cnt--){
        P20 = 1;
        delay(2000);
        P20 = 0;
        delay(2000);
    }
}

void main()
{
    float vol;
    adc_init();

    while(1){
        vol = 5.0*((float)get_adc_res(0))/1024.0;
        if(vol > 3.88)
            led_twinkle_1s();
        else
            led_breath_1s();
    }
}
与驱动 DHT11 相比,上面的C语言程序简单了许多。编译并烧写到单片机,发现因为温度正常,LED 小灯执行的是“呼吸灯”动作。用手捏住热敏电阻,温度升高超出 15 摄氏度阈值后,LED 小灯执行了“闪烁”的报警动作:
至此,我们就使用价格只有几毛钱的热敏电阻完成了“温度警报器”的设计,而第 7 节完成这样的设计使用的 DHT11 至少需要几块钱。
阅读更多: 单片机
Recommend
About Joyk
Aggregate valuable and interesting links.
Joyk means Joy of geeK