

3. CocoaPods 命令解析 - CLAide
source link: https://looseyi.github.io/post/sourcecode-cocoapods/03-cocoapods-claide/
Go to the source link to view the article. You can view the picture content, updated content and better typesetting reading experience. If the link is broken, please click the button below to view the snapshot at that time.

在上文 整体把握 CocoaPods 核心组件 中,我们通过对 pod install 的流程的介绍,引出 CocoaPods 的各个核心组件的角色分工和其主要作用,希望通过对这些组件的使用和介绍来帮助大家更好的了解 CocoaPods 的完整工作流以及背后的原理。
今天我们主要聊一聊为 CocoaPods 提供的命令行解析的工具 CLAide,它是如何来解析 pod 命令以及 CocoaPods 的插件机制。
Open Class
开始之前,我们需要了解一个 Ruby 的语言特性:Open Classes
在 Ruby 中,类永远是开放的,你总是可以将新的方法加入到已有的类中,除了在你自己的代码中,还可以用在标准库和内置类中,这个特性被称为 Open Classes。说到这里作为 iOS 工程师,脑中基本能闪现出 Objective-C 的 Category 或者 Swift 的 Extensions 特性。不过,这种动态替换方法的功能也称作 Monkeypatch。(🐒 到底招谁惹谁了)
下面,我们通过在 Monkey.rb 文件中添加一个自定义类 Monkey 来简单看一下该特性,
 1
 2
 3
 4
 5
 6
 7
 8
 9
10
11
12
13
14
15
class Monkey
  def eat
    puts "i have banana"
  end
end

monkey = Monkey.new

class Monkey
  def eat
    puts "I have apple"
  end
end

monkey.eat
直接在 VSCode 中运行,效果如下:
1
2
[Running] ruby "/Users/edmond/Desktop/Monkey.rb"
I have apple
可以看到,Monkey 类的实例输出已经改为 I have apple。
需要注意,即使是已经创建好的实例,方法替换同样是生效的。 另外 ⚠️
Open Class可以跨文件、跨模块进行访问的,甚至对 Ruby 内置方法的也同样适用 (谨慎)。
这强大的功能让我们可以很容易的对三方模块进行扩展,这也是 CocoaPods 的插件体系所依赖的基础。
举个例子,在 CocoaPods 主仓库 cocoapods/downloader.rb 中定义了一些 download 方法:
1
2
3
4
5
module Pod
  module Downloader
    # ...
  end
end
但是在 cocoapods-downloader 模块中,module Downloader 的方法并不能满足全部需求,于是在 cocoapods-downloader/api.rbapi.rb 中就对其进行了扩展:
1
2
3
4
5
6
7
8
9
module Pod
  module Downloader
    module API
      def execute_command(executable, command, raise_on_failure = false)
        # ...
      end
      # ...
  end
end
CLAide
CLAide 虽然是一个简单的命令行解释器,但它提供了功能齐全的命令行界面和 API。它不仅负责解析我们使用到的 Pods 命令,例如:pod install, pod update 等,还可用于封装常用的一些脚本,将其打包成简单的命令行小工具。
备注:所谓命令行解释器就是从标准输入或者文件中读取命令并执行的程序。详见 Wiki。
CLAide 功能概览
我们先通过 pod --help 来查看 CLAide 的真实输出效果:
 1
 2
 3
 4
 5
 6
 7
 8
 9
10
11
12
13
14
15
16
17
$ pod
Usage:
  $ pod COMMAND
    CocoaPods, the Cocoa library package manager.

Commands:
  + cache               Manipulate the CocoaPods cache
  + deintegrate         Deintegrate CocoaPods from your project
  + env                 Display pod environment
  + init                Generate a Podfile for the current directory
  ...

Options:
  --allow-root          Allows CocoaPods to run as root
  --silent              Show nothing
  --version             Show the version of the tool
  ...
👆所展示的 Usage、Commands、Options section 及其内容均是由 CALide 的输出模版 Banner 来完成的。CALide 提供了 Command 基类帮助我们快速定义出标准且美观的命令。除了 pod 命令之外,例如:Xcodeproj 所提供的命令也是由 CALide 来实现的。
CALide 还提供了一套插件加载机制在命令执行前获取所有插件中的命令,例如:cocoapods-packeger 提供的 pod package NAME [SOURCE] 就是从其 source code 中的 lib/pod/commnad/package.rb 读取出来的,它令我们仅需一份 podspec 信息,即可完成 Cocoa 依赖库的 📦。
CALide 的目录结构
对于 Ruby 的项目结构,在 Rubygems.org 中有 文件结构手册 这个标准供大家参考学习。
首先来看 CALide 项目的文件入口 lib/calide.rb :
1
2
3
4
5
6
7
8
9
module CLAide
  VERSION = '1.0.3'.freeze
  require 'claide/ansi'
  require 'claide/argument'
  require 'claide/argv'
  require 'claide/command'
  require 'claide/help'
  require 'claide/informative_error'
end
我们接下来分析一下 lib/cladie/ 目录下的相关代码。
Command 抽象类
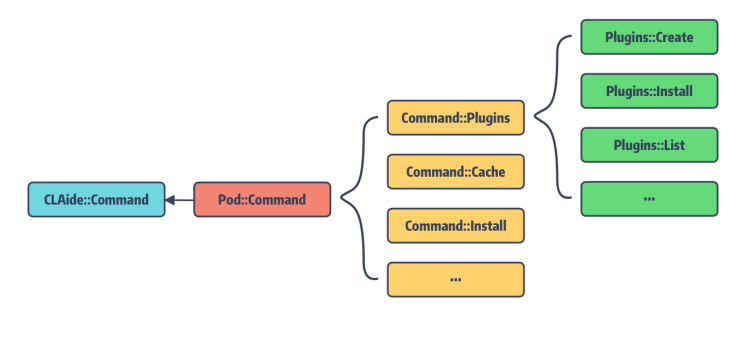
Command 是用于构建命令行界面的基础抽象类。所有我们添加的命令都需要继承自 Command,这些子类可以嵌套组合成更加精细的命令。
pod 命令正是由多个 Pod::Command < CLAide::Command 的子类组合而成的 abstract command。当然 pod 的 subcommand 同样也能声明为 abstact command,通过这样的方式我们就能达到多级嵌套命令的效果。有抽象命令当然也需要有具体执行任务的 normal command。
举个例子:
1
2
3
4
5
6
7
8
9
$ pod update --help
Usage:
  $ pod update [POD_NAMES ...]
    Updates the Pods identified by the specified `POD_NAMES`

Options:
  --verbose                              Show more debugging information
  --no-ansi                              Show output without ANSI codes
  --help                                 Show help banner of specified command
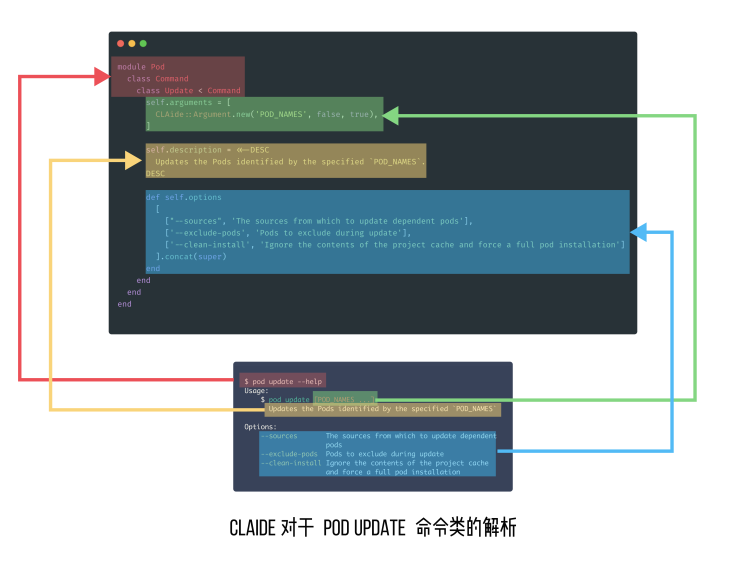
对应的, pod update 这个命令的逻辑在 CLAide 中就是如下描述:
 1
 2
 3
 4
 5
 6
 7
 8
 9
10
11
12
13
14
15
16
17
18
19
20
21
module Pod
  class Command
    class Update < Command
      self.arguments = [
        CLAide::Argument.new('POD_NAMES', false, true),
      ]

      self.description = <<-DESC
        Updates the Pods identified by the specified `POD_NAMES`.
      DESC

      def self.options
        [
          ["--sources", 'The sources from which to update dependent pods'],
          ['--exclude-pods', 'Pods to exclude during update'],
          ['--clean-install', 'Ignore the contents of the project cache and force a full pod installation']
        ].concat(super)
      end
    end
  end
end
当我们如此描述后,CLAide 会对这个类进行以下方式的解析:
此外,Command class 提供了大量基础功能,其中最核心的方法为 run,会在 normal command 小节会介绍。对于任何命令类型都可以设置以下几个属性和方法:
- summary: 用于简单描述该命令的作用
- options: 用于返回该命令的可选项及对应的描述,返回的 options 需要通过调用
super插入到父类的可选项前 - initialize: 如果需要获取命令行传递的实参,需要通过重载
initialize方法来获取 - validate!: 用于检查输入实参的有效性,如果校验失败,会通过调用
help!方法来输出帮助信息 - help!:用于错误信息的处理和展示
注意 ⚠️:这里我们说的 abstract command 和 normal command 均是通过 Command 来实现的,只是它们的配置不同。
Abstract Command
abstract command 为不提供具体命令实现的抽象容器命令类,不过它可以包含一个或多个的 subcommands。我们可以指定 subcommands 中的 normal command 为默认命令,就能将 abstract command 作为作为普通命令直接执行了。
抽象命令的现实比较简单:
1
self.abstract_command = true
仅需设置 abstract_command,然后就可以继承它来实现普通命令或者多级嵌套的抽象命令。
以 pod 命令的实现为例:
1
2
3
4
5
6
7
8
9
module Pod
  class Command < CLAide::Command
    require 'cocoapods/command/install' # 1
    require 'cocoapods/command/update'
    # ...
    self.abstract_command = true
    self.command = 'pod'
    # ...
end
上述通过 require 引入的 update、install 等子命令都是继承自 Pod::Command 的 normal command。
Normal Command
相对于抽象命令,普通命令就需要设置传递实参的名称和描述,以及重载 run 方法。
Arguments
arguments 用于配置该命令支持的参数列表的 banner 输出,类型为 Array<Argument>],它最终会格式化成对应的信息展示在 Usage banner 中。
我们来看 pod update 的 arguments 是如何配置的:
1
2
3
self.arguments = [
  CLAide::Argument.new('POD_NAMES', false, true),
]
其中 Argument 的构造方法如下:
1
2
3
4
5
6
7
8
9
module CLAide
  class Argument

    def initialize(names, required, repeatable = false)
      @names = Array(names)
      @required = required
      @repeatable = repeatable
    end
end
这里传入的 names 就是在 Usage banner 中输出的 [POD_NAMES ...] 。
require 表示该 Argument 是否为必传参数,可选参数会用 [ ] 将其包裹起来。也就是说 pod update 命令默认是不需要传 POD_NAMES
repeatable 表示该 Argument 是否可以重复多次出现。如果设置为可重复,那么会在 names 的输出信息后面会添加 ... 表示该参数为复数参数。
举个例子:
1
$ pod update Alamofire, SwiftyJSON
我们可以指定 pod update 仅更新特定的依赖库,如果不传 POD_NAMES 将进行全量更新。
Run 方法
在 Command 类中定义了两个 run 方法:
 1
 2
 3
 4
 5
 6
 7
 8
 9
10
11
12
13
14
15
16
17
18
19
20
21
22
def self.run(argv = [])
  # 根据文件前缀来匹配对应的插件
  plugin_prefixes.each do |plugin_prefix|
    PluginManager.load_plugins(plugin_prefix)
  end

  argv = ARGV.coerce(argv)
  # 解析 argument 生成对应的 command instance
  command = parse(argv)
  ANSI.disabled = !command.ansi_output?
  unless command.handle_root_options(argv)
    command.validate!
    command.run
  end
rescue Object => exception
  handle_exception(command, exception)
end

def run
  raise 'A subclass should override the `CLAide::Command#run` method to ' \
  'actually perform some work.'
end
这里的 self.run 方法是 class method,而 run 是 instanced method。对于 Ruby 不太熟悉的同学可以看看这个:What does def self.function name mean?
作为 Command 类的核心方法,类方法 self.run 将终端传入的参数解析成对应的 command 和 argv,并最终调用 command 的实例方法 run 来触发真正的命令逻辑。因此,子类需要通过重载 run 方法来完成对应命令的实现。
那么问题来了,方法 Command::parse 是如何将 run 的类方法转换为实例方法的呢?
 1
 2
 3
 4
 5
 6
 7
 8
 9
10
11
12
13
14
15
16
def self.parse(argv)
  # 通过解析 argv 获取到与 cmd 名称
  argv = ARGV.coerce(argv)
  cmd = argv.arguments.first
  # 如果 cmd 对应的 Command 类,则更新 argv,继续解析命令
  if cmd && subcommand = find_subcommand(cmd)
    argv.shift_argument
    subcommand.parse(argv)
  # 如果 cmd 为抽象命令且指定了默认命令,则返回默认命令继续解析参数
  elsif abstract_command? && default_subcommand
    load_default_subcommand(argv)
  else
    # 初始化真正的 cmd 实例
    new(argv)
  end
end
可以说,CLAide 的命令解析就是一个多叉树遍历,通过分割参数及遍历 CLAide::Command 的子类,最终找到用户输入的 normal command 并初始化返回。
这里还有一个知识点就是,CLAide::Command 是如何知道有哪些子类集成它的呢?
1
2
3
def self.inherited(subcommand)
  subcommands << subcommand
end
这里利用了 Ruby 提供的 Hook Method self.inherited 来获取它所继承的子类,并将其保存在 subcommands。
另外,这里在真正执行 self.run 方法之前会遍历当前项目所引入的 Gems 包中的指定目录下的命令插件文件,并进行插件加载,具体内容将在 PluginManager 中展开。
ARGV 传入参数
CLAide 提供了专门的类 ARGV 用于解析命令行传入的参数。主要功能是对 Parse 解析后的 tuple 列表进行各种过滤、CURD 等操作。
按照 CALide 的定义参数分三种类型:
arg: 普通的实参,所谓的实参就是直接跟在命令后面的,且不带任何--修饰的字符flag: 简单理解flag就是限定为 bool 变量的option类型参数,如果flag前面添加带--no-则值为 false,否则为 trueoption: 可选项参数,以--为前缀且以=作为分割符来区分 key 和 value
而在 ARGV 内部又提供了私有工具类 Parser 来解析终端的输入,其核心方法为 parse:
 1
 2
 3
 4
 5
 6
 7
 8
 9
10
11
12
13
14
15
module Parser
  def self.parse(argv)
    entries = []
    copy = argv.map(&:to_s)
    double_dash = false
    while argument = copy.shift
      next if !double_dash && double_dash = (argument == '--')
      type = double_dash ? :arg : argument_type(argument)
      parsed_argument = parse_argument(type, argument)
      entries << [type, parsed_argument]
    end
    entries
  end
  # ,,,
end
parse 的返回值为 [Array<Array<Symbol, String, Array>>] 类型的 tuple,其中 tuple 的第一个变量为实参的类型,第二个才是对应的实参。
依旧以 pod update 为例:
1
pod update Alamofire --no-repo-update --exclude-pods=SwiftyJSON

1
2
3
4
5
[
  [:arg, "Alamofire"],
  [:flag, ["repo-update", false]],
  [:option, ["exclude-pods", "SwiftyJSON"]]
]
Banner 与输出格式化
接下来,我们再来聊聊 CLAide 提供的格式化效果的 banner。
那什么是 banner 呢?回看第一个例子 pod --help 所输出的帮助信息,它分为三个 Section:
Usage:用于描该述命令的用法Commands:用于描述该命令所包含的子命令,没有则不显示。在子命令前面存在两种类型的标识+:用于强调该 command 是单独添加的子命令>:用于表示指引的意思,表示该 command 是当前命令的默认实现
Options:用于描述该命令的可选项
这三段帮助信息就是对应的不同的 banner。
CLAide 对于输出的 banner 信息提供了 ANSI 转义,用于在不同的终端里显示富文本的效果。banner 的主要格式化效果如下:
- 对于 setcion 标题:
Usage、Commands、Options添加了下划线且加粗处理 - Command 配置为绿色
- Options 配置为蓝色
- 提示警告信息配置为黄色
- 错误信息则是红色
对于这些配色方案,CLAide 提供了 String 的 convince method 来完成 ANSI 转义:
1
2
3
4
5
class String
  def ansi
    CLAide::ANSI::StringEscaper.new(self)
  end
end
1
2
3
"example".ansi.yellow #=> "\e[33mexample\e[39m"
"example".ansi.on_red #=> "\e[41mexample\e[49m"
"example".ansi.bold   #=> "\e[1mexample\e[21m"
对于 Banner 的一些高亮效果也提供了 convince method:
 1
 2
 3
 4
 5
 6
 7
 8
 9
10
11
def prettify_title(title)
  title.ansi.underline
end

def prettify_subcommand(name)
  name.chomp.ansi.green
end

def prettify_option_name(name)
  name.chomp.ansi.blue
end
PluginManager 载入插件
PluginManager 是 Command 的管理类,会在第一次运行命令 self.run 时进行加载,且仅加载命令类中指定前缀标识的文件下的命令。让我们先看 PluginManager.rb 的核心实现:
 1
 2
 3
 4
 5
 6
 7
 8
 9
10
11
12
13
14
15
16
17
18
19
20
21
22
def self.load_plugins(plugin_prefix)
   loaded_plugins[plugin_prefix] ||=
   plugin_gems_for_prefix(plugin_prefix).map do |spec, paths|
     spec if safe_activate_and_require(spec, paths)
   end.compact
end

def self.plugin_gems_for_prefix(prefix)
   glob = "#{prefix}_plugin#{Gem.suffix_pattern}"
   Gem::Specification.latest_specs(true).map do |spec|
      matches = spec.matches_for_glob(glob)
      [spec, matches] unless matches.empty?
   end.compact
end

def self.safe_activate_and_require(spec, paths)
  spec.activate
  paths.each { |path| require(path) }
  true
rescue Exception => exception
  # ...
end
整体的流程大致是:
- 调用
load_plugins并传入plugin_prefix plugin_gems_for_prefix对插件名进行处理,取出我们需要加载的文件- 调用
safe_activate_and_require进行对应的 gem spec 检验并对每个文件进行加载
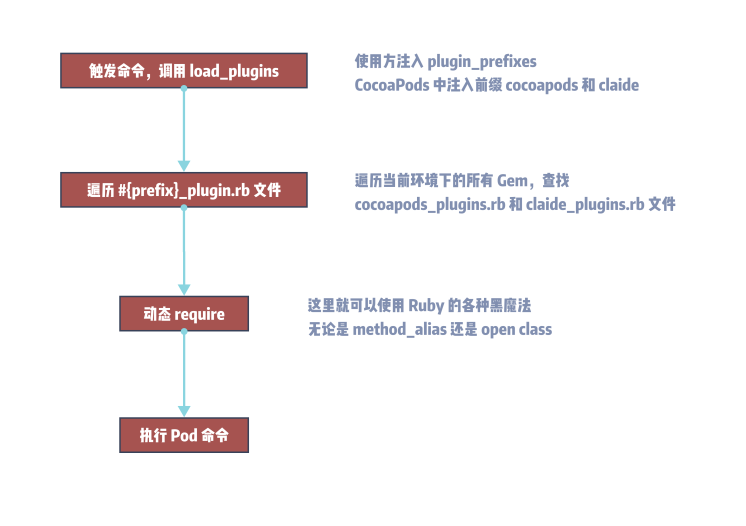
CocoaPods 的插件加载正是依托于 CLAide 的 load_plugins,它会遍历所有的 RubyGem,并搜索这些 Gem 中是否包含名为 #{plugin_prefix}_plugin.rb 的文件。例如,在 Pod 命令的实现中有如下配置:
1
self.plugin_prefixes = %w(claide cocoapods)
也就是说在 Pod 命令执行前,它会加载所有包含 claide_plugin.rb 或 cocoapods_plugin.rb 文件的 Gem。通过在运行时的文件检查来加载符合要求的相关命令。
用 CLAide 实现一款 🥤 贩卖机
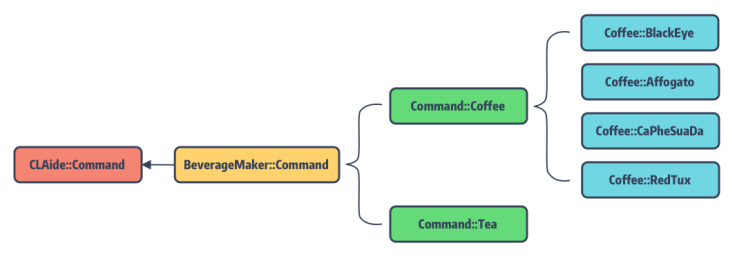
最后一节让我们一起来创建一个 CLAide 命令。需求是希望实现一个自动 🥤 贩卖机,它有如下功能:主要售卖 ☕️ 和 🍵,这两种 🥤 都可以按需选择是否添加 🥛 和 🍬,对于 🍬 还可以选择不同的甜度。
- ☕️:对于咖啡,我们提供了:BlackEye、Affogato、CaPheSuaDa、RedTux 的口味
- 🍵:对于茶,你可以选择不同的品种,有黑茶、绿茶、乌龙茶和白茶,同时茶还提供了加 🧊 的选项
配置模版项目
基于上述构想,我们最终的 BeverageMaker 目录将由以下文件组成:
 1
 2
 3
 4
 5
 6
 7
 8
 9
10
11
12
13
14
15
16
17
.
├── BeverageMaker.gemspec
│   # ...
├── exe
│   └── beverage-maker
├── lib
│   ├── beveragemaker
│   │   ├── command
│   │   │   ├── coffee.rb # 包含 abstract command 以及用于制作不同咖啡的 normal command
│   │   │   ├── maker.rb  # Command 抽象类
│   │   │   └── tea.rb    # normal command, 不同种类的 🍵 通过参数配置来完成
│   │   ├── command.rb
│   │   └── version.rb
│   └── beveragemaker.rb
└── spec
    ├── BeverageMaker_spec.rb
    └── spec_helper.rb
0x1 生成模版项目
首先,我们使用 bundler gem GEM_NAME 命令生成一个模版项目,项目取名为 BeverageMaker。
 1
 2
 3
 4
 5
 6
 7
 8
 9
10
11
12
$ bundle gem BeverageMaker
Creating gem 'BeverageMaker'...
MIT License enabled in config
Code of conduct enabled in config
  create  BeverageMaker/Gemfile
  create  BeverageMaker/lib/BeverageMaker.rb
  create  BeverageMaker/lib/BeverageMaker/version.rb
  create  BeverageMaker/BeverageMaker.gemspec
  create  BeverageMaker/Rakefile
  # ...
Initializing git repo in ~/$HOME/Desktop/BeverageMaker
Gem 'BeverageMaker' was successfully created. For more information on making a RubyGem visit https://bundler.io/guides/creating_gem.html
0x2 修改 gemspec 配置
生成的项目中需要将 BeverageMaker.gemspec 文件所包含 TODO 的字段进行替换,作为示例项目相关链接都替换为个人主页了 😂。
另外,需要添加我们的依赖 'claide', '>= 1.0.2', '< 2.0' 和 'colored2', '~> 3.1'。
colored2 用于 banner 信息的 ANSI 转义并使其能在终端以富文本格式输出。
最终 .gempsc 配置如下:
 1
 2
 3
 4
 5
 6
 7
 8
 9
10
11
12
13
14
15
16
17
18
19
20
21
22
23
24
25
26
27
28
29
30
31
require_relative 'lib/BeverageMaker/version'

Gem::Specification.new do |spec|
  spec.name          = "BeverageMaker"
  spec.version       = BeverageMaker::VERSION
  spec.authors       = ["Edmond"]
  spec.email         = ["[email protected]"]

  spec.summary       = "BeverageMaker"
  spec.description   = "BeverageMaker"
  spec.homepage      = "https://looseyi.github.io"
  spec.license       = "MIT"
  spec.required_ruby_version = Gem::Requirement.new(">= 2.3.0")

  spec.metadata["allowed_push_host"] = "https://looseyi.github.io"

  spec.metadata["homepage_uri"] = spec.homepage
  spec.metadata["source_code_uri"] = "https://looseyi.github.io"
  spec.metadata["changelog_uri"] = "https://looseyi.github.io"

  spec.files         = Dir.chdir(File.expand_path('..', __FILE__)) do
    `git ls-files -z`.split("\x0").reject { |f| f.match(%r{^(test|spec|features)/}) }
  end
  # 1
  spec.bindir        = "exe"
  spec.executables   = "beverage-maker"
  spec.require_paths = ["lib"]

  spec.add_runtime_dependency 'claide',         '>= 1.0.2', '< 2.0'
  spec.add_runtime_dependency 'colored2',       '~> 3.1'
end
0x3 添加命令行入口
通过修改 .gemspec 的 bindir 和 executables 字段,把最终的 binary 执行文件暴露给用户,使其成为一个真正的 CLI:
1
2
spec.bindir        = "exe"
spec.executables   = "beverage-maker"
在默认生成的模版中指定的 bindir 为 /bin 目录,这里我们替换为新建的 exe 目录,并在 exe 目录下创建一个名为 beverage-maker 的文件,它将作为 CLI 的入口,其内容如下:
1
2
3
4
5
#!/usr/bin/env ruby

require 'beveragemaker'

BeverageMaker::Command.run(ARGV)
添加命令实现
为了让 Demo 结构清晰,我们将不能类型的饮料制作分到了不同的文件和命令类中。
BeverageMaker
先来实现 beverage-maker 命令,它是一个 abstract command,其内容如下:
 1
 2
 3
 4
 5
 6
 7
 8
 9
10
11
12
13
14
15
16
17
18
19
20
21
22
23
24
25
26
27
28
29
30
31
32
33
34
35
36
37
38
39
40
41
42
43
44
45
46
47
48
require 'claide'
require 'colored2'

module BeverageMaker
  # 引入具体的 coffee & tea maker
  require 'beveragemaker/command/coffee'
  require 'beveragemaker/command/tea'

  class Command < CLAide::Command

    self.command = 'beverage-maker'
    self.abstract_command = true
    self.description = 'Make delicious beverages from the comfort of your terminal.'

    def self.options
      [
        ['--no-milk', 'Don’t add milk to the beverage'],
        ['--sweetener=[sugar|honey]', 'Use one of the available sweeteners'],
      ].concat(super)
    end

    def initialize(argv)
      @add_milk = argv.flag?('milk', true)
      @sweetener = argv.option('sweetener')
      super
    end

    def validate!
      super
      if @sweetener && !%w(sugar honey).include?(@sweetener)
        help! "`#{@sweetener}' is not a valid sweetener."
      end
    end

    def run
      puts '* Boiling water…'
      sleep 1
      if @add_milk
        puts '* Adding milk…'
        sleep 1
      end
      if @sweetener
        puts "* Adding #{@sweetener}…"
        sleep 1
      end
    end
  end
end
正常来说,对于不同口味的咖啡和茶是可以用相同的命令模式来实现的,不过为了更好的展示 CLAide 的效果,我们将咖啡的生产配置为 abstact command,对于不同口味的咖啡,需要实现不同的 normal command。而茶的生产直接通过 normal command 实现,不同品种的茶叶会以参数的形式来配置。
Coffee
接着添加 ☕️ 的代码
 1
 2
 3
 4
 5
 6
 7
 8
 9
10
11
12
13
14
15
16
17
18
19
class Coffee < Command
  # ...
  self.abstract_command = true

  def run
    super
    puts "* Grinding #{self.class.command} beans…"
    sleep 1
    puts '* Brewing coffee…'
    sleep 1
    puts '* Enjoy!'
  end

  class BlackEye < Coffee
    self.summary = 'A Black Eye is dripped coffee with a double shot of ' \
    'espresso'
  end
  # ...
end
 1
 2
 3
 4
 5
 6
 7
 8
 9
10
11
12
13
14
15
16
17
18
19
20
21
22
23
24
25
26
27
class Tea < Command
  # ...
  self.arguments = [
    CLAide::Argument.new('FLAVOR', true),
  ]

  def self.options
    [['--iced', 'the ice-tea version']].concat(super)
  end

  def initialize(argv)
    @flavor = argv.shift_argument
    @iced = argv.flag?('iced')
    super
  end

  def validate!
    super
    if @flavor.nil?
      help! 'A flavor argument is required.'
    end
    unless %w(black green oolong white).include?(@flavor)
      help! "`#{@flavor}' is not a valid flavor."
    end
  end
  # ...
end
安装 🥤 贩卖机
我们知道,对于正常发布的 gem 包,可以直接通过 gem install GEM_NAME 安装。
而我们的 Demo 程序并未发布,那要如何安装使用呢?幸好 Gem 提供了源码安装的方式:
1
2
gem build *.gemspec
gem install *.gem
gem build 可以根据一个 .gemspec 生成一个 .gem 文件供 gem 安装,所以在拥有源码的情况下,执行上面命令就可以安装了。
执行结果如下:
 1
 2
 3
 4
 5
 6
 7
 8
 9
10
11
12
13
14
$ gem build *.gemspec
WARNING:  description and summary are identical
WARNING:  See http://guides.rubygems.org/specification-reference/ for help
  Successfully built RubyGem
  Name: BeverageMaker
  Version: 0.1.0
  File: BeverageMaker-0.1.0.gem

$ gem install *.gem

Successfully installed BeverageMaker-0.1.0
Parsing documentation for BeverageMaker-0.1.0
Done installing documentation for BeverageMaker after 0 seconds
1 gem installed
编译通过! 现在可以开始我们的 🥤 制作啦!
 1
 2
 3
 4
 5
 6
 7
 8
 9
10
11
12
13
14
15
16
$ beverage-maker
Usage:
  $ beverage-maker COMMAND

    Make delicious beverages from the comfort of yourterminal.

Commands:
  + coffee                    Drink brewed from roasted coffee beans

Options:
  --no-milk                   Don’t add milk to the beverage
  --sweetener=[sugar|honey]   Use one of the available sweeteners
  --version                   Show the version of the tool
  --verbose                   Show more debugging information
  --no-ansi                   Show output without ANSI codes
  --help                      Show help banner of specified command
来一杯 black-eye ☕️,休息一下吧!
1
2
3
4
5
6
$ beverage-maker coffee black-eye
* Boiling water…
* Adding milk…
* Grinding black-eye beans…
* Brewing coffee…
* Enjoy!
如需本文的 Demo 代码,请访问:https://github.com/looseyi/BeverageMaker
本文简单聊了 CLAide 的实现,并手动制作了一款 🥤 贩卖机来展示 CALide 的命令配置。主要感受如下:
- 通过对源码对阅读,终于了解了对
pod命令的的正确使用姿势 - 仅需简单配置
Commandbanner,就能有比较精美的终端输出效果和帮助提示等 - 提供的抽象命令功能,方便的将相关逻辑收口到统一到命令中,方便查阅
- 从侧面简单了解了,如何在终端输出带富文本效果的提示信息
知识点问题梳理
这里罗列了四个问题用来考察你是否已经掌握了这篇文章,如果没有建议你加入收藏再次阅读:
CLAide预设的 banner 有哪些,其作用分别是什么 ?CALide中设定的 Argument 有几种类型,区别是什么 ?CALide中抽象命令的和普通命令的区别 ?- 要实现 CLI 需要修改
.gemspec中的哪些配置 ?
Recommend
About Joyk
Aggregate valuable and interesting links.
Joyk means Joy of geeK