

5. Podspec 文件分析
source link: https://looseyi.github.io/post/sourcecode-cocoapods/05-cocoapods-podspec/
Go to the source link to view the article. You can view the picture content, updated content and better typesetting reading experience. If the link is broken, please click the button below to view the snapshot at that time.

在上文 Podfile 解析逻辑 中,我们以 Xcode 工程结构作为切入点介绍了 Podfile 背后对应的数据结构,剖析了 Podfile 文件是如何解析与加载,并最终 “入侵” 项目影响其工程结构的。今天我们来聊一聊 CocoaPods-Core 中的另一个重要文件 — PodSpec 以及它所撑起的 CocoaPods 世界。
一个 Pod 的创建和发布离不开 PodSpec 文件,它可以很简单也能复杂,如 QMUIKit(后续介绍)。
今天我们就直奔主题,来分析 PodSpec 文件。
Tips:如果未看过前文,强烈推荐。
PodSpec
The Specification provides a DSL to describe a Pod. A pod is defined as a library originating from a source. A specification can support detailed attributes for modules of code through subspecs.
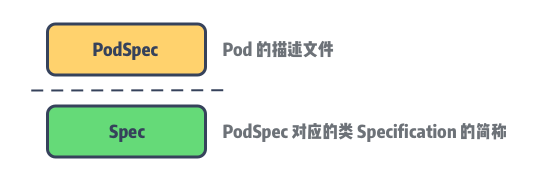
PodSpec 是用于描述一个 Pod 库的源代码和资源将如何被打包编译成链接库或 framework 的文件,而 PodSpec 中的这些描述内容最终将映会映射到 Specification 类中(以下简称 Spec)。
让我们来重新认识 PodSpec。
PodSpec 初探
PodSpec 支持的文件格式为 .podspec 和 .json 两种,而 .podspec 本质是 Ruby 文件。
问题来了,为什么是 JSON 格式而不像 Podfile 一样支持 YAML 呢?
笔者的理解:由于 PodSpec 文件会满世界跑,它可能存在于 CocoaPods 的 CDN Service、Speces Repo 或者你们的私有 Specs Repo 上,因此采用 JSON 的文件在网络传输中会更友好。而 Podfile 更多的场景是用于序列化,它需要在项目中生成一份经依赖仲裁后的 Podfile 快照,用于后续的对比。
PodSpec
 1
 2
 3
 4
 5
 6
 7
 8
 9
10
11
Pod::Spec.new do |spec|
  spec.name         = 'Reachability'
  spec.version      = '3.1.0'
  spec.license      = { :type => 'BSD' }
  spec.homepage     = 'https://github.com/tonymillion/Reachability'
  spec.authors      = { 'Tony Million' => '[email protected]' }
  spec.summary      = 'ARC and GCD Compatible Reachability Class for iOS and OS X.'
  spec.source       = { :git => 'https://github.com/tonymillion/Reachability.git', :tag => "v#{spec.version}" }
  spec.source_files = 'Reachability.{h,m}'
  spec.framework    = 'SystemConfiguration'
end
上面这份 Reachability.podspec 配置,基本通过命令行 pod lib create NAME 就能帮我们完成。除此之外我们能做的更多,比如,默认情况下 CococaPods 会为每个 pod framework 生成一个对应的 modulemap 文件,它将包含 PodSpec 中指定的公共 headers。如果需要自定义引入的 header 文件,仅需配置 moduel_map 即可完成。
下面是进阶版配置:
 1
 2
 3
 4
 5
 6
 7
 8
 9
10
11
12
13
14
15
16
17
18
19
20
Pod::Spec.new do |spec|
  spec.name         = 'Reachability'
  # 省略与前面相同部分的配置 ...

  spec.module_name   = 'Rich'
  spec.swift_version = '4.0'

  spec.ios.deployment_target  = '9.0'
  spec.osx.deployment_target  = '10.10'

  spec.source_files       = 'Reachability/common/*.swift'
  spec.ios.source_files   = 'Reachability/ios/*.swift', 'Reachability/extensions/*.swift'
  spec.osx.source_files   = 'Reachability/osx/*.swift'

  spec.framework      = 'SystemConfiguration'
  spec.ios.framework  = 'UIKit'
  spec.osx.framework  = 'AppKit'

  spec.dependency 'SomeOtherPod'
end
像 👆 我们为不同的系统指定了不同的源码和依赖等,当然可配置的不只这些。
PodSpec 支持的完整配置分类如下:
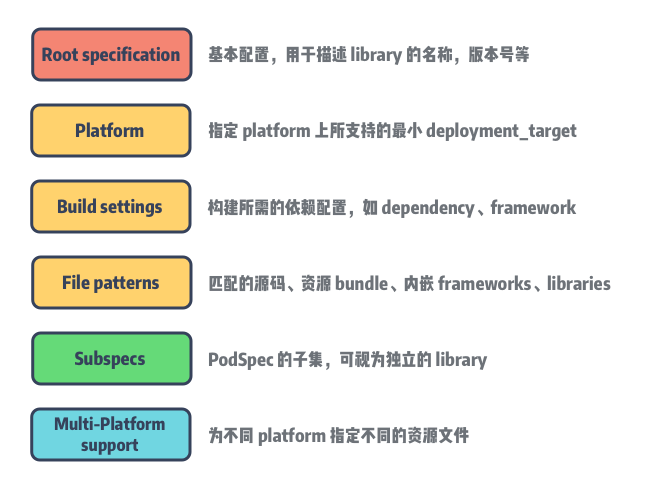
想了解更多的配置选项:传送门。
Convention Over Configuration
Convention over configuration (aka:coding by convention) is a software design paradigm used by software frameworks that attempts to decrease the number of decisions that a developer using the framework is required to make without necessarily losing flexibility.
说到配置,不得不提一下 CoC 约定大于配置。约定大于配置算是在软件工程较早出现的概念的了,大意是:为了简单起见,我们的代码需要按照一定的约定来编写(如代码放在什么目录,用什么文件名,用什么类名等)。 这样既简化了配置文件,同时也降低了学习成本。
约定大于配置可以说是通过 Ruby on Rails 发扬光大的。尽管它一直饱受争议,但是主流语言的依赖管理工具,如 Maven,npm 等都遵循 CoC 进行不断演进的,因为 CoC 能够有效帮助开发者减轻选择的痛感,减少无意义的选择。一些新的语言也吸收了这个思想,比如 Go 语言。如果用 C/C++ 可能需要定义复杂的 Makefile 来定义编译的规则,以及如何运行测试用例,而在 Go 中这些都是约定好的。
举个 🌰 :Podfile 中是可以指定 pod library 所链接的 Xcode project,不过大多情况下无需配置,CocoaPods 会自动查找 Podfile 所在的同级目录下所对应的工程文件 .project 。
Spec 的核心数据结构
Specification
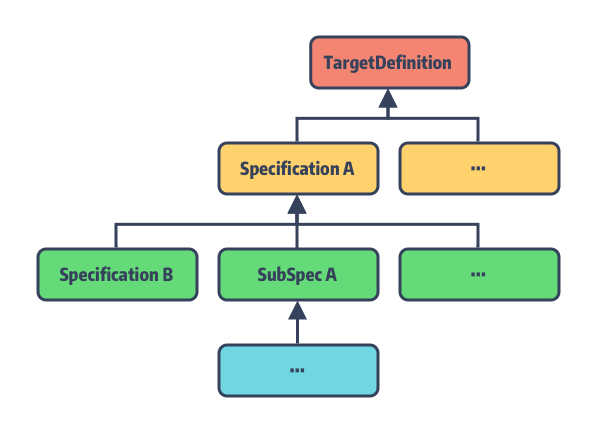
在数据结构上 Specification 与 TargetDefinition 是类似的,同为多叉树结构。简化后的 Spec 的类如下:
 1
 2
 3
 4
 5
 6
 7
 8
 9
10
11
12
13
14
15
16
17
18
19
20
21
22
23
24
25
26
27
28
29
30
31
32
33
34
35
36
37
38
39
40
41
42
43
require 'active_support/core_ext/string/strip.rb'
# 记录对应 platform 上 Spec 的其他 pod 依赖
require 'cocoapods-core/specification/consumer'
# 解析 DSL
require 'cocoapods-core/specification/dsl'
# 校验 Spec 的正确性,并抛出对应的错误和警告
require 'cocoapods-core/specification/linter'
# 用于解析 DSL 内容包含的配置信息
require 'cocoapods-core/specification/root_attribute_accessors'
# 记录一个 Pod 所有依赖的 Spec 来源信息
require 'cocoapods-core/specification/set'
# json 格式数据解析
require 'cocoapods-core/specification/json'

module Pod
  class Specification
    include Pod::Specification::DSL
    include Pod::Specification::DSL::Deprecations
    include Pod::Specification::RootAttributesAccessors
    include Pod::Specification::JSONSupport

    # `subspec` 的父节点
    attr_reader :parent
    # `Spec` 的唯一 id,由 name + version 的 hash 构成
    attr_reader :hash_value
    # 记录 `Spec` 的配置信息
    attr_accessor :attributes_hash
    # `Spec` 包含的 `subspec`
    attr_accessor :subspecs

    # 递归调用获取 Specification 的根节点
    def root
      parent ? parent.root : self
    end

	 def hash
   	if @hash_value.nil?
      	@hash_value = (name.hash * 53) ^ version.hash
		end
      @hash_value
    end
    # ...
end
Specification 同样用 map attributes_hash 来记录配置信息。
⚠️ 这里的 parent 是为 subspec 保留的,用于指向其父节点的 Spec。
Subspecs
A library can specify a dependency on either another library, a subspec of another library, or a subspec of itself.
乍一听 Subspec 这个概念似乎有一些抽象,不过当你理解了上面的描述,就能明白什么是 Subspec 了。我们知道在 Xcode 项目中,target 作为最小的可编译单元,它编译后的产物为链接库或 framework。而在 CocoaPods 的世界里这些 targets 则是由 Spec 文件来描述的,它还能拆分成一个或者多个 Subspec,我们暂且把它称为 Spec 的子模块,子模块也是用 Specification 类来描述的。
**子模块可以单独作为依赖被引入到项目中。**它有几个特点:
- 未指定
default_subspec的情况下,Spec的全部子模块都将作为依赖被引入; - 子模块会主动继承其父节点
Spec中定义的attributes_hash; - 子模块可以指定自己的源代码、资源文件、编译配置、依赖等;
- 同一
Spec内部的子模块是可以有依赖关系的; - 每个子模块在
pod push的时候是需要被 lint 通过的;
光听总结似乎还是云里雾里,祭出 QMUI 让大家感受一下:
 1
 2
 3
 4
 5
 6
 7
 8
 9
10
11
12
13
14
15
16
17
18
19
20
21
22
23
24
25
26
27
28
Pod::Spec.new do |s|
  s.name             = "QMUIKit"
  s.version          = "4.2.1"
  # ...
  s.subspec 'QMUICore' do |ss|
    ss.source_files = 'QMUIKit/QMUIKit.h', 'QMUIKit/QMUICore', 'QMUIKit/UIKitExtensions'
    ss.dependency 'QMUIKit/QMUIWeakObjectContainer'
    ss.dependency 'QMUIKit/QMUILog'
  end

  s.subspec 'QMUIWeakObjectContainer' do |ss|
    ss.source_files = 'QMUIKit/QMUIComponents/QMUIWeakObjectContainer.{h,m}'
  end

  s.subspec 'QMUILog' do |ss|
    ss.source_files = 'QMUIKit/QMUIComponents/QMUILog/*.{h,m}'
  end

  s.subspec 'QMUIComponents' do |ss|
    ss.dependency 'QMUIKit/QMUICore'

    ss.subspec 'QMUIButton' do |sss|
      sss.source_files = 'QMUIKit/QMUIComponents/QMUIButton/QMUIButton.{h,m}'
    end
    # 此处省略 59 个 Components
  end
  # ...
end
不吹不黑,QMUI 是笔者见过国内开源作品中代码注释非常详尽且提供完整 Demo 的项目之一。
QMUI 🐂 🍺
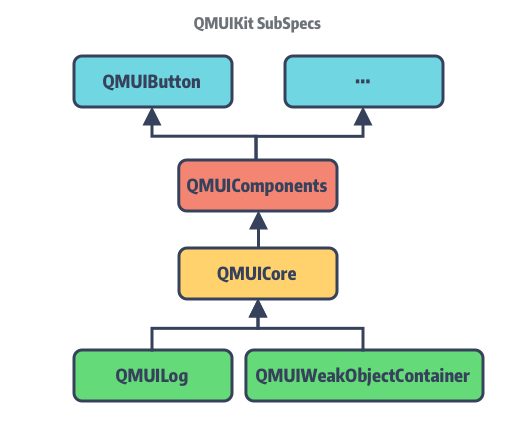
整个 QMUIKit 的 Spec 文件中,总共定义了 64 个 subspec 子模块,同时这些子模块之间还做了分层。比如 QMUICore:
另外补充一点,CocoaPods 支持了不同类型的 SubSpec:
1
2
3
# lib/cocoapods-core/specification/dsl/attribute_support.rb

SUPPORTED_SPEC_TYPES = [:library, :app, :test].freeze
:app 和 :test 用于在项目中集成单元测试代码的 Subspec。
PodSpec From JSON
有了上文 Podfile 的了解,这次我们对 PodSpec 的文件加载会更加轻车熟路。首先是由 #from_file 方法进行文件路径和内容编码格式的检查,将加载的内容转入 #from_string:
 1
 2
 3
 4
 5
 6
 7
 8
 9
10
11
12
13
14
15
16
17
18
19
20
21
22
23
24
25
26
27
28
29
30
31
32
33
34
35
def self.from_file(path, subspec_name = nil)
  path = Pathname.new(path)
  unless path.exist?
    raise Informative, "No podspec exists at path `#{path}`."
  end

  string = File.open(path, 'r:utf-8', &:read)
  # Work around for Rubinius incomplete encoding in 1.9 mode
  if string.respond_to?(:encoding) && string.encoding.name != 'UTF-8'
    string.encode!('UTF-8')
  end

  from_string(string, path, subspec_name)
end

def self.from_string(spec_contents, path, subspec_name = nil)
  path = Pathname.new(path).expand_path
  spec = nil
  case path.extname
  when '.podspec'
    Dir.chdir(path.parent.directory? ? path.parent : Dir.pwd) do
     spec = ::Pod._eval_podspec(spec_contents, path)
     unless spec.is_a?(Specification)
      raise Informative, "Invalid podspec file at path `#{path}`."
     end
    end
  when '.json'
    spec = Specification.from_json(spec_contents)
  else
 	 raise Informative, "Unsupported specification format `#{path.extname}` for spec at `#{path}`."
  end

  spec.defined_in_file = path
  spec.subspec_by_name(subspec_name, true)
end
接着根据文件类型为 .podspec 和 .json 分别采用不同的解析方式。在 JSONSupport 模块内将 #from_json 的逻辑拆成了两部分:
 1
 2
 3
 4
 5
 6
 7
 8
 9
10
11
12
13
14
15
16
17
18
19
20
21
22
23
24
25
26
27
28
29
30
31
32
33
34
35
36
37
38
39
# `lib/cocoapods-core/specification/json.rb`
module Pod
  class Specification
    module JSONSupport
      # ①
      def self.from_json(json)
        require 'json'
        hash = JSON.parse(json)
        from_hash(hash)
      end
  # ②
      def self.from_hash(hash, parent = nil, test_specification: false, app_specification: false)
        attributes_hash = hash.dup
        spec = Spec.new(parent, nil, test_specification, :app_specification => app_specification)
        subspecs = attributes_hash.delete('subspecs')
        testspecs = attributes_hash.delete('testspecs')
        appspecs = attributes_hash.delete('appspecs')

        ## backwards compatibility with 1.3.0
        spec.test_specification = !attributes_hash['test_type'].nil?

        spec.attributes_hash = attributes_hash
        spec.subspecs.concat(subspecs_from_hash(spec, subspecs, false, false))
        spec.subspecs.concat(subspecs_from_hash(spec, testspecs, true, false))
        spec.subspecs.concat(subspecs_from_hash(spec, appspecs, false, true))

        spec
      end
  	  # ③
      def self.subspecs_from_hash(spec, subspecs, test_specification, app_specification)
        return [] if subspecs.nil?
        subspecs.map do |s_hash|
          Specification.from_hash(s_hash, spec,
                                  :test_specification => test_specification,
                                  :app_specification => app_specification)
        end
      end
  end
end
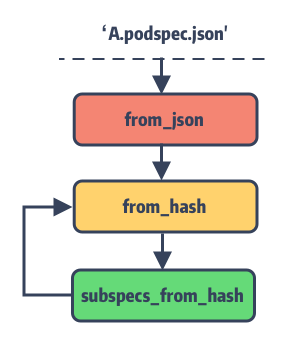
这里的逻辑也是比较简单:
① 将传入的字符串转换为 json;
② 将转换后的 json 转换为 Spec 对象并将 json 转换为 attributes_hash,同时触发 ③;
③ 通过 self.subspecs_from_hash 实现递归调用完成 subspecs 解析;
Tips: 方法 ② 里的 Spec 是对
Specification的别名。
PodSpec From Ruby
QMUIKit.podspec 的文件内容,大家是否注意到其开头的声明:
1
2
3
4
5
Pod::Spec.new do |s|
  s.name             = "QMUIKit"
  s.source_files     = 'QMUIKit/QMUIKit.h'
  # ...
end
发现没 .podspec 文件就是简单直接地声明了一个 Specifiction 对象,然后通过 block 块定制来完成配置。像 name、source_files 这些配置参数最终都会转换为方法调用并将值存入 attributes_hash 中。这些方法调用的实现方式分两种:
- 大部分配置是通过方法包装器
attribute和root_attribute来动态添加的 setter 方法; - 对于复杂逻辑的配置则直接方法声明,如
subspec、dependency方法等(后续介绍)。
attribute wrappter
 1
 2
 3
 4
 5
 6
 7
 8
 9
10
11
12
13
14
15
16
17
18
19
# `lib/cocoapods-core/specification/dsl.rb`
module Pod
   class Specification
      module DSL
         extend Pod::Specification::DSL::AttributeSupport
         # Deprecations must be required after include AttributeSupport
         require 'cocoapods-core/specification/dsl/deprecations'

         attribute :name,
                   :required => true,
                   :inherited => false,
                   :multi_platform => false

         root_attribute :version,
                        :required => true
         # ...
      end
   end
end
可以看出 name 和 version 的方法声明与普通的不太一样,其实 attribute 和 root_attribute 是通过 Ruby 的方法包装器来实现的,感兴趣的同学看这里 「Python装饰器 与 Ruby实现」。
Tips: Ruby 原生提供的属性访问器 —
attr_accessor大家应该不陌生,就是通过包装器实现的。
这些装饰器所声明的方法会在其模块被加载时动态生成,来看其实现:
 1
 2
 3
 4
 5
 6
 7
 8
 9
10
11
12
13
14
15
16
17
18
19
20
21
22
23
24
25
26
27
# `lib/cocoapods-core/specification/attribute_support.rb`
module Pod
 class Specification
   module DSL
     class << self
       attr_reader :attributes
     end

     module AttributeSupport
         def root_attribute(name, options = {})
             options[:root_only] = true
             options[:multi_platform] = false
             store_attribute(name, options)
         end

         def attribute(name, options = {})
             store_attribute(name, options)
         end

         def store_attribute(name, options)
             attr = Attribute.new(name, options)
             @attributes ||= {}
             @attributes[name] = attr
         end
     end
 end
end
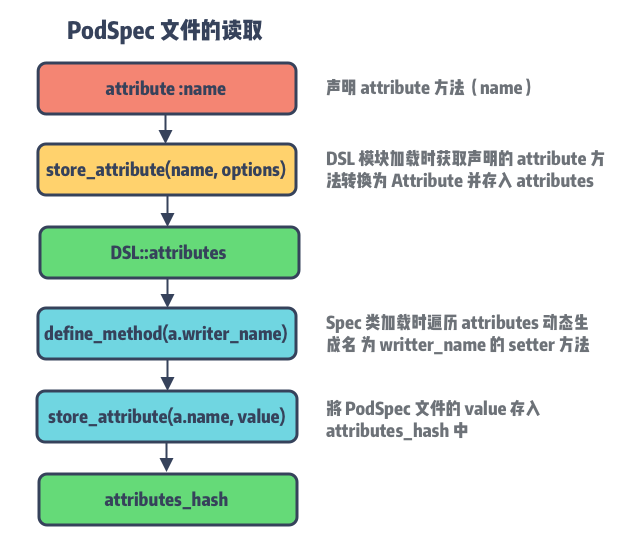
attribute 和 root_attribute 最终都走到了 store_attribute 保存在创建的 Attribute 对象内,并以配置的 Symbol 名称作为 KEY 存入 @attributes,用于生成最终的 attributes setter 方法。
最关键的一步,让我们回到 specification 文件:
 1
 2
 3
 4
 5
 6
 7
 8
 9
10
11
12
13
14
15
16
17
18
19
20
21
22
23
24
25
26
27
28
29
# `/lib/coocapods-core/specification`
module Pod
   class Specification
     # ...

      def store_attribute(name, value, platform_name = nil)
         name = name.to_s
         value = Specification.convert_keys_to_string(value) if value.is_a?(Hash)
         value = value.strip_heredoc.strip if value.respond_to?(:strip_heredoc)
         if platform_name
             platform_name = platform_name.to_s
             attributes_hash[platform_name] ||= {}
             attributes_hash[platform_name][name] = value
         else
             attributes_hash[name] = value
         end
      end

      DSL.attributes.values.each do |a|
         define_method(a.writer_name) do |value|
             store_attribute(a.name, value)
         end

         if a.writer_singular_form
             alias_method(a.writer_singular_form, a.writer_name)
         end
      end
   end
end
Specification 类被加载时,会先遍历 DSL module 加载后所保存的 attributes,再通过 define_method 动态生成对应的配置方法。最终数据还是保存在 attributes_hash 中。
Attribute
Attribute 是为了记录该配置的相关信息,例如,记录 Spec 是否为根节点、Spec 类型、所支持的 platforms、资源地址通配符等。
-
以
root_attribute包装的配置仅用于修饰Spec根节点,比如版本号version只能由Spec根节点来设置,另外还有source、static_framework、module_name等; -
以
attribute包装的配置则不限是否为Spec根结点。我们以 AFNetworking 的source_files为例:由于在 macOS 和 watchOS 上并没有 UIKit framwork,因此它单独将 UIKit 的相关功能拆分到了AFNetworking/UIKit中;
 1
 2
 3
 4
 5
 6
 7
 8
 9
10
11
12
13
14
Pod::Spec.new do |s|
  # ...
  s.subspec 'NSURLSession' do |ss|
	 # ...
  end

  s.subspec 'UIKit' do |ss|
    ss.ios.deployment_target = '9.0'
    ss.tvos.deployment_target = '9.0'
    ss.dependency 'AFNetworking/NSURLSession'

    ss.source_files = 'UIKit+AFNetworking'
  end
end
#subspec
除了 attribute 装饰器声明的 setter 方法,还有几个自定义的方法是直接通过 eval 调用的。
 1
 2
 3
 4
 5
 6
 7
 8
 9
10
11
12
13
14
15
16
17
def subspec(name, &block)
  subspec = Specification.new(self, name, &block)
  @subspecs << subspec
  subspec
end

def test_spec(name = 'Tests', &block)
  subspec = Specification.new(self, name, true, &block)
  @subspecs << subspec
  subspec
end

def app_spec(name = 'App', &block)
  appspec = Specification.new(self, name, :app_specification => true, &block)
  @subspecs << appspec
  appspec
end
这三种不同类型的 Subspec 经 eval 转换为对应的 Specification 对象,注意这里初始化后都将 parent 节点指向 self 同时存入 @subspecs 数组中,完成 SubSpec 依赖链的构造。
#dependency
对于其他 pod 依赖的添加我们通过 dependency 方法来实现:
 1
 2
 3
 4
 5
 6
 7
 8
 9
10
11
12
13
14
def dependency(*args)
   name, *version_requirements = args
   # dependency args 有效性校验 ...

   attributes_hash['dependencies'] ||= {}
   attributes_hash['dependencies'][name] = version_requirements

   unless whitelisted_configurations.nil?
   # configuration 白名单过滤和校验 ...

   attributes_hash['configuration_pod_whitelist'] ||= {}
   attributes_hash['configuration_pod_whitelist'][name] = whitelisted_configurations
   end
end
dependency 方法内部主要是对依赖有效性的校验,限于篇幅这里不列出实现,核心要点如下:
- 检查依赖循环,根据
Spec名称判断Spec与自身,Spec与SubSpec之间是否存在循环依赖; - 检查依赖来源,
PodSpec中不支持:git或:path形式的来源指定,如需设定可通过Podfile来修改; - 检查 configuation 白名单,目前仅支持 Xcode 默认的
Debug和Release的 configuration 配置;
创建并使用你的 Pod
最后一节来两个实践:创建 Pod 以及在项目中使用 SubSpecs。
Pod 创建
pod 相关使用官方都提供了很详尽的都文档,本小节仅做介绍。
0x1 创建 Pod
仅需一行命令完成 Pod 创建(文档):
1
$ pod lib create `NAME`
之后每一步都会输出友好提示,按照提示选择即可。在添加完 source code 和 dependency 之后,你还可以在 CocoaPods 为你提供的 Example 项目中运行和调试代码。
准备就绪后,可以通过以下命令进行校验,检查 Pod 正确性:
1
$ pod lib lint `[PODSPEC_PATHS ...]`
0x2 发布 Pod
校验通过后就可以将 Pod 发布了,你可以将 PodSepc 发布到 Master Repo 上,或者发布到内部的 Spec Repo 上。
CocoaPods Master Repo
如果发布的 CocoaPods 的主仓库,那么需要通过 CocoaPods 提供的 Trunk 命令:
1
$ pod trunk push `[NAME.podspec]`
不过使用前需要先通过邮箱注册,详情查看文档。
Private Spec Repo
对于发布到私有仓库的,可通过 CocoaPods 提供的 Repo 命令:
1
$ pod repo push `REPO_NAME` `SPEC_NAME.podspec`
文档详情 — 传送门。
SubSpecs In Podfile
在 SubSpec 一节提到过,在 CocoaPods 中 SubSpec 是被作为单独的依赖来看待的,这里就借这个实操来证明一下。
在上文的实践中,我们知道每一个 Pod 库对应为 Xcode 项目中的一个个 target,那么当明确指定部分 SubSpec 时,它们也将被作为独立的 target 进行编译。不过这里需要明确一下使用场景:
0x1 Single Target
当主项目中仅有一个 target 或多个 target 引用了同一个 pod 库的多个不同 SubSpec 时,生成的 target 只会有一个。我们以 QMUIKit 为例,项目 Demo.project 下的 Podfile 配置如下:
1
2
3
4
target 'Demo' do
  pod 'QMUIKit/QMUIComponents/QMUILabel', :path => '../QMUI_iOS'
  pod 'QMUIKit/QMUIComponents/QMUIButton', :path => '../QMUI_iOS'
end
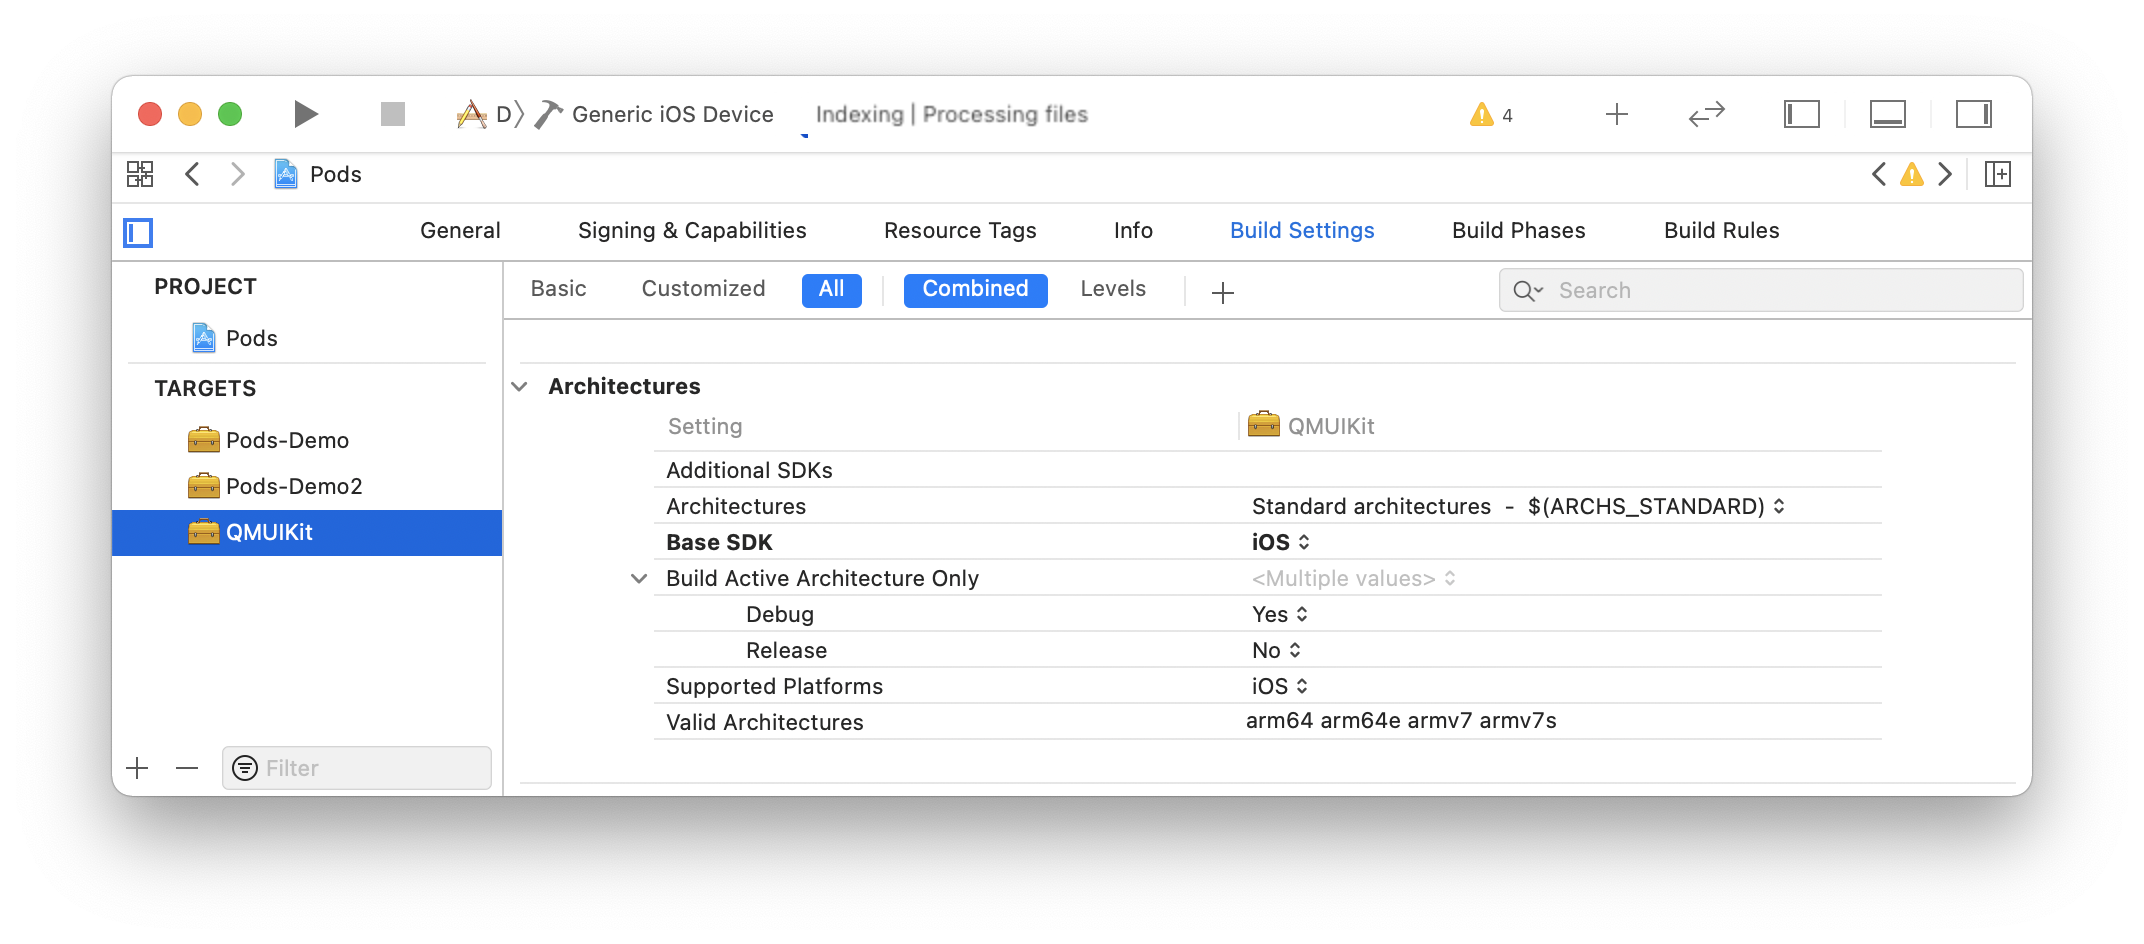
此时 Pods.project 下的 QMUIKit 的 target 名称为 QMUIKit。
0x2 Multiple Target
如果我们的主项目中存在多个 target 且使用同一个 pod 库的不同 SubSpec 时,结果则有所不同。
现在我们在 0x1 的基础上添加如下配置:
1
2
3
target 'Demo2' do
	pod 'QMUIKit/QMUIComponents/QMUILog', :path => '../QMUI_iOS'
end
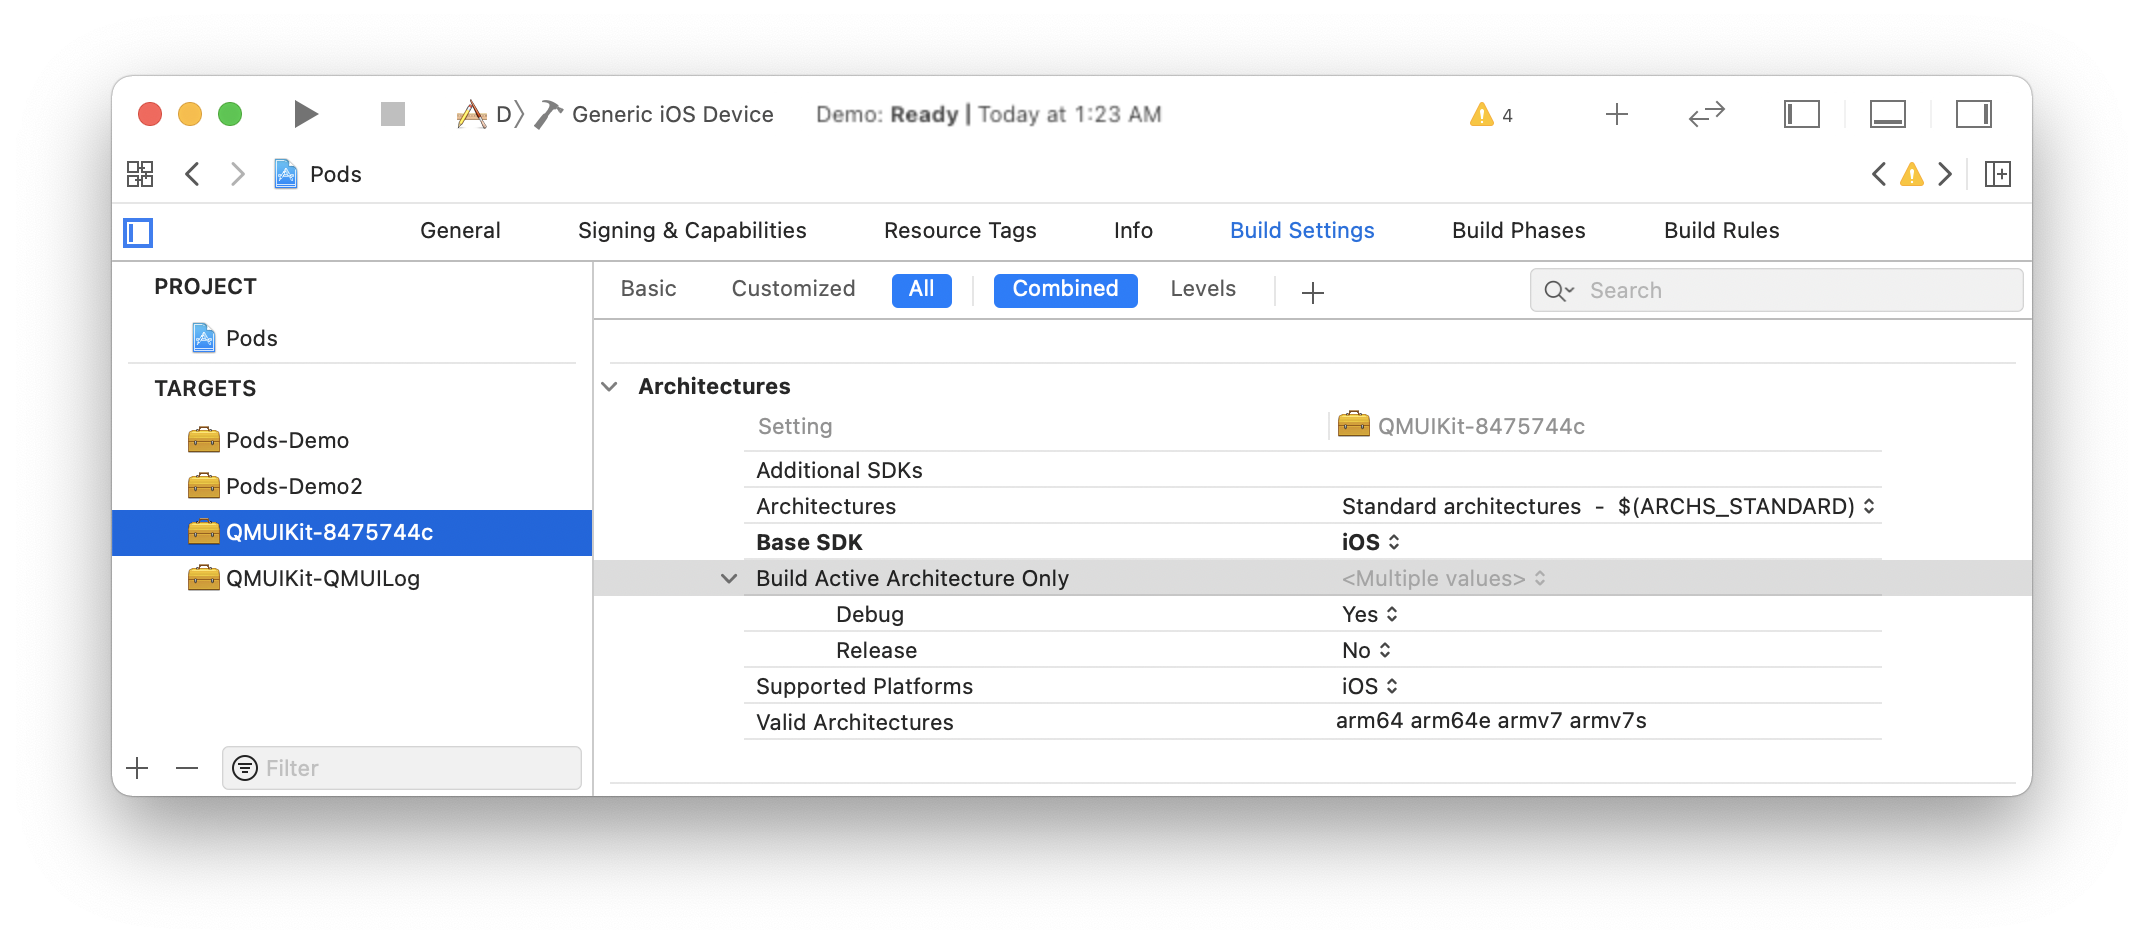
可以发现,CocoaPods 为每个 tareget 对应的 SubSpec 依赖生成了不同的 QMUIKit targets。
Tips: 当主工程 target 依赖的
Subspec数量过多导致的名称超过 50 个字符,将会对 subspec 后缀做摘要处理作为唯一标识符。
本文是 CocoaPods-Core 的第二篇,重点介绍了 PodSpec 的类构成和解析实现,总结如下:
- 初探
PodSpec让我们对其能力边界和配置分类有了更好的了解; - 深入
PodSpec我们发现其数据结构同Podfile类似,都是根据依赖关系建立对应的树结构; PodSpec针对单个库的源码和资源提供了更精细化的管理,SubSpec结构的推出让大型 library 的内部分层提供了很好的工具;- 装饰器模式结合 Ruby 的动态特性,让
PodSpec的 DSL 特性的实现起来更加优雅;
知识点问题梳理
这里罗列了四个问题用来考察你是否已经掌握了这篇文章,如果没有建议你加入收藏再次阅读:
- 说说
PodSpec所支持的配置有几类,分别具有哪些功能 ? PodSpec与SubSpec之间有哪些关系 ?- 说说
SubSpec的特点以及作用 ? - 谈谈
PodSpec中的 DSL 解析与Podfile的解析实现有哪些区别 ?
Recommend
About Joyk
Aggregate valuable and interesting links.
Joyk means Joy of geeK