

从FBTweak 源码剖析一些中阶知识
source link: http://satanwoo.github.io/2017/06/01/FBTweak/
Go to the source link to view the article. You can view the picture content, updated content and better typesetting reading experience. If the link is broken, please click the button below to view the snapshot at that time.

在开发的过程中,我们进场要做一些类似于参数调整之类的琐碎问题。如果每次都通过CMD + R来编译运行查看效果,浪费的时间真是得不偿失。因此,在看到了FBTweak这个项目以后,就感觉比较有意思,让我们来对这个项目一探究竟。
晕头转向的宏定义
打开项目,整个项目非常简单,抛去UI部分,主要使用的主API就是在FBTweakInline.h中的4个宏定义:
#define FBTweakInline(category_, collection_, name_, ...) _FBTweakInline(category_, collection_, name_, __VA_ARGS__)

#define FBTweakValue(category_, collection_, name_, ...) _FBTweakValue(category_, collection_, name_, __VA_ARGS__)

#define FBTweakBind(object_, property_, category_, collection_, name_, ...) _FBTweakBind(object_, property_, category_, collection_, name_, __VA_ARGS__)

#define FBTweakAction(category_, collection_, name_, ...) _FBTweakAction(category_, collection_, name_, __VA_ARGS__)
看起来很简单,但是随便点一个深入进去看,就会发现如下这些令人头昏脑胀的宏定义。熟悉Facebook开源项目的人可能都知道,它们就好这口。所以在进行整个项目的介绍前,我们先大致分析下各个宏的作用。
#define __FBTweakConcat_(X, Y) X ## Y
#define __FBTweakConcat(X, Y) __FBTweakConcat_(X, Y)

#define __FBTweakIndex(_1, _2, _3, value, ...) value
#define __FBTweakIndexCount(...) __FBTweakIndex(__VA_ARGS__, 3, 2, 1)

#define __FBTweakDispatch1(__withoutRange, __withRange, __withPossible, ...) __withoutRange
#define __FBTweakDispatch2(__withoutRange, __withRange, __withPossible, ...) __withPossible
#define __FBTweakDispatch3(__withoutRange, __withRange, __withPossible, ...) __withRange
#define _FBTweakDispatch(__withoutRange, __withRange, __withPossible, ...) __FBTweakConcat(__FBTweakDispatch, __FBTweakIndexCount(__VA_ARGS__))(__withoutRange, __withRange, __withPossible)
_FBTweakBind
我们以_FBTweakBind作为突破口,来进行深入分析。
#define FBTweakBind(object_, property_, category_, collection_, name_, ...) _FBTweakBind(object_, property_, category_, collection_, name_, __VA_ARGS__)
这个宏包了层皮,就是接受至少5个参数的可变参数,并将参数传递给_FBTweakBind这个宏。在这层定义中,我们看到了...和__VA_ARGS__。
...对于一个宏/函数来说,意味着接受可变参数。这个参数的形参(换句话说,你要使用或者传递给其他函数的载体)就是__VA_ARGS__。
好,接下来我们看下_FBTweakBind,其定义如下:
#define _FBTweakBind(object_, property_, category_, collection_, name_, ...) _FBTweakDispatch(_FBTweakBindWithoutRange, _FBTweakBindWithRange, _FBTweakBindWithPossible, __VA_ARGS__)(object_, property_, category_, collection_, name_, __VA_ARGS__)
卧槽,一开始看的时候,头大了,怎么两个括号呢?仔细一看,_FBTweakBindWithoutRange,_FBTweakBindWithRange, _FBTweakBindWithPossible 都是不同的宏定义。那么整个_FBTweakBind的作用就是根据可变参数,传递给_FBTweakDispatch,从上述三个宏定义中选择出一个对应的,然后继续调用宏展开。
好,再看__FBTweakDispatch,如下:
#define _FBTweakDispatch(__withoutRange, __withRange, __withPossible, ...) __FBTweakConcat(__FBTweakDispatch, __FBTweakIndexCount(__VA_ARGS__))(__withoutRange, __withRange, __withPossible)
这个也比较绕,我们继续抽丝剥茧,可以发现,核心的本质就变成:
__FBTweakIndexCount(args)返回一个具体数字(1、2、3)__FBTweakConcat(__FBTweakDispatch, 数字)生成具体的宏定义Token,比如__FBTweakDispatch1,__FBTweakDispatch2之类的。- 利用刚刚的token继续做函数展开。
到这里,整体思路都没啥特别困难的,但是让我有点诧异的如下两个宏定义:
#define __FBTweakIndex(_1, _2, _3, value, ...) value
#define __FBTweakIndexCount(...) __FBTweakIndex(__VA_ARGS__, 3, 2, 1)
我们刚刚提到,__FBTweakIndexCount会根据参数返回具体的数字,那它本质上是依靠__FBTweakIndex去返回第4个参数。(_1, _2, _3就是普通的宏展开占位符,别被骗了,和x, y, z没区别)。
好,这个__FBTweakIndex按定义来说,至少需要4个参数,但是我在试了__FBTweakIndexCount(),他竟然也能给返回1,这就让我懵逼了。
按照我的理解,当我传递参数为空的时候,__VA_ARGS__就是空,那么宏定义展开的时候,这个应该是不作数的,就导致缺少了一个参数啊???
后来,我发现我思考错了,我从语法分析的角度去分析了这个宏,但是实际上,宏就是简单的“token”展开!!!
我们再来看看__FBTweakIndex的定义,展开后其实就是要了第4个参数,前面的都没啥用。
也就是说,我直接写
__FBTweakIndex(..., 1, 2, 3);
__FBTweakIndex(,, 1, 2, 3);
__FBTweakIndex(, 1, 2, 3);
这种虽然没意义的、甚至是直觉上觉得都不能编译通过的代码,都是合理正确的。
是不是有点懵逼,休息一下,消化一下。
好,我们假设我们获取了数字1,因此,新的宏展开为_FBTweakBindWithoutRange,定义如下:
#define _FBTweakBindWithoutRange(object_, property_, category_, collection_, name_, default_) \
((^{ \
  FBTweak *__bind_tweak = _FBTweakInlineWithoutRange(category_, collection_, name_, default_); \
  _FBTweakBindInternal(object_, property_, category_, collection_, name_, default_, __bind_tweak); \
})())
这写法,也是醉了,我以前只是在JavaScript中看到过这样匿名函数自调用的写法,Facebook太强了。
整个过程继续抽丝剥茧,_FBTweakInlineWithoutRange会调用到如下函数:
#define _FBTweakInlineWithPossibleInternal(category_, collection_, name_, default_, possible_) \
((^{ \
  /* store the tweak data in the binary at compile time. */ \
  __attribute__((used)) static FBTweakLiteralString category__ = category_; \
  __attribute__((used)) static FBTweakLiteralString collection__ = collection_; \
  __attribute__((used)) static FBTweakLiteralString name__ = name_; \
  __attribute__((used)) static void *default__ = (__bridge void *) ^{ return default_; }; \
  __attribute__((used)) static void *possible__ = (__bridge void *)  ^{ return possible_; }; \
  __attribute__((used)) static char *encoding__ = (char *)@encode(__typeof__(default_)); \
  __attribute__((used)) __attribute__((section (FBTweakSegmentName "," FBTweakSectionName))) static fb_tweak_entry entry = \
    { &category__, &collection__, &name__, (void *)&default__, (void *)&possible__, &encoding__ }; \
\
  /* find the registered tweak with the given identifier. */ \
  FBTweakStore *store = [FBTweakStore sharedInstance]; \
  FBTweakCategory *category = [store tweakCategoryWithName:category__]; \
  FBTweakCollection *collection = [category tweakCollectionWithName:collection__]; \
\
  NSString *identifier = _FBTweakIdentifier(&entry); \
  FBTweak *__inline_tweak = [collection tweakWithIdentifier:identifier]; \
\
  return __inline_tweak; \
})())
这里相对来说比较复杂,我们逐个知识点进行查看。
__attribute__((used)) static FBTweakLiteralString category__ = category_;
这个前面出来了__attribute__((used)),它的作用是告诉编译器,我声明的这个符号是需要保留的。我们在开发iOS的过程中,常常会遇到有时候会报警告xxx unused,在某些优化的情况下,编译器甚至都不报警告,直接将我们进行了剔除,这样在编译后(预处理、编译、汇编)生成的目标文件里就不存在我们这个符号。
继续看这行,又出现了我们新的不熟悉的__attribute__((section (FBTweakSegmentName "," FBTweakSectionName)))
__attribute__((used)) __attribute__((section (FBTweakSegmentName "," FBTweakSectionName))) static fb_tweak_entry entry = \
       { &category__, &collection__, &name__, (void *)&default__, (void *)&possible__, &encoding__ };
我们知道,iOS里面函数代码一般存在于__TEXT段,数据部分一般存在于__DATA段。但是在每个段中,都存在着许多不同作用的节(section)。比如存储常量字符串的__cfstring等等。
因此,编译器提供了我们一种__attribute__((section("xxx段,xxx节")的方式让我们讲一个指定的数据储存到我们需要的节当中。
上述基础知识很容易理解,但是我在实际读代码理解整个运行机制的时候,还是有点懵逼。
令人困惑的指针和数据
我们将上章节中的代码简单具象一下:
static NSString *haha = @"Mingyi";
_attribute__((section ("__DATA, MinyiSpecific"))) static NSString ** entry = &haha;
我们看到,我们将&haha所代表这个数据存入了__DATA Segment的MinyiSpecificSection中。
但是,&haha的类型是一个NSString **,即指向指针的指针。换句话说,这个指针的指针的背后的含义是haha这个变量本身的地址。我们知道,苹果的程序在加载的过程中都会ASLR地址随机化,那我们对一个地址进行存储,有啥用呢?
上述的理解,有个最大的误区,就是从运行时来理解了地址,而不是从编译后的目标文件来理解程序,什么意思呢?
在我们这里,因为声明了常量字符串@”Mingyi”,在编译(而非程序运行)后,它就存在于可执行文件的cfstring这个节中,如下所示:

这个数据格式的起始地址偏移为00000001 00003068。
而由于我们使用的是静态变量haha,在编译后,也会生成一个指向刚刚那个常量字符串地址的数据。这个数据存在于__DATA,__data中,如下图:
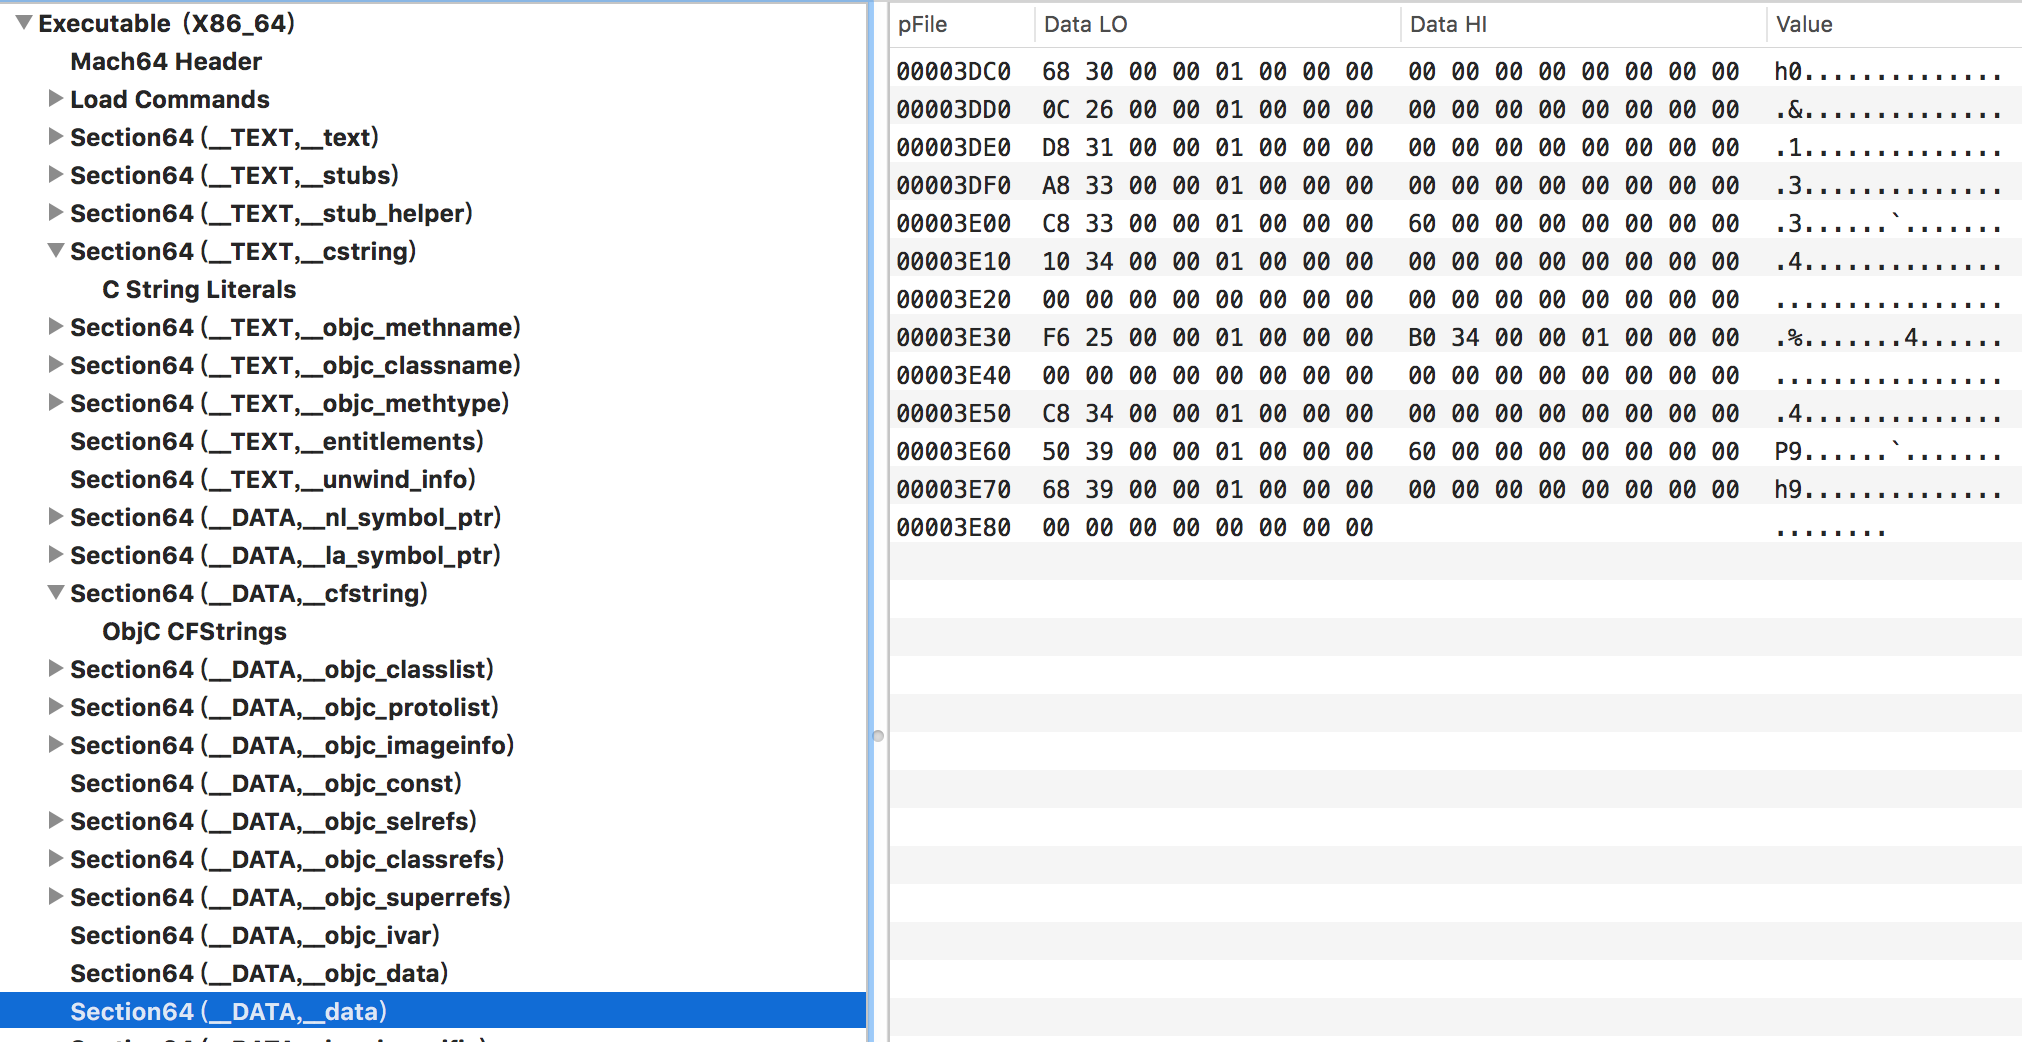
而00000001 00003DC0就是在代码中&haha的含义。
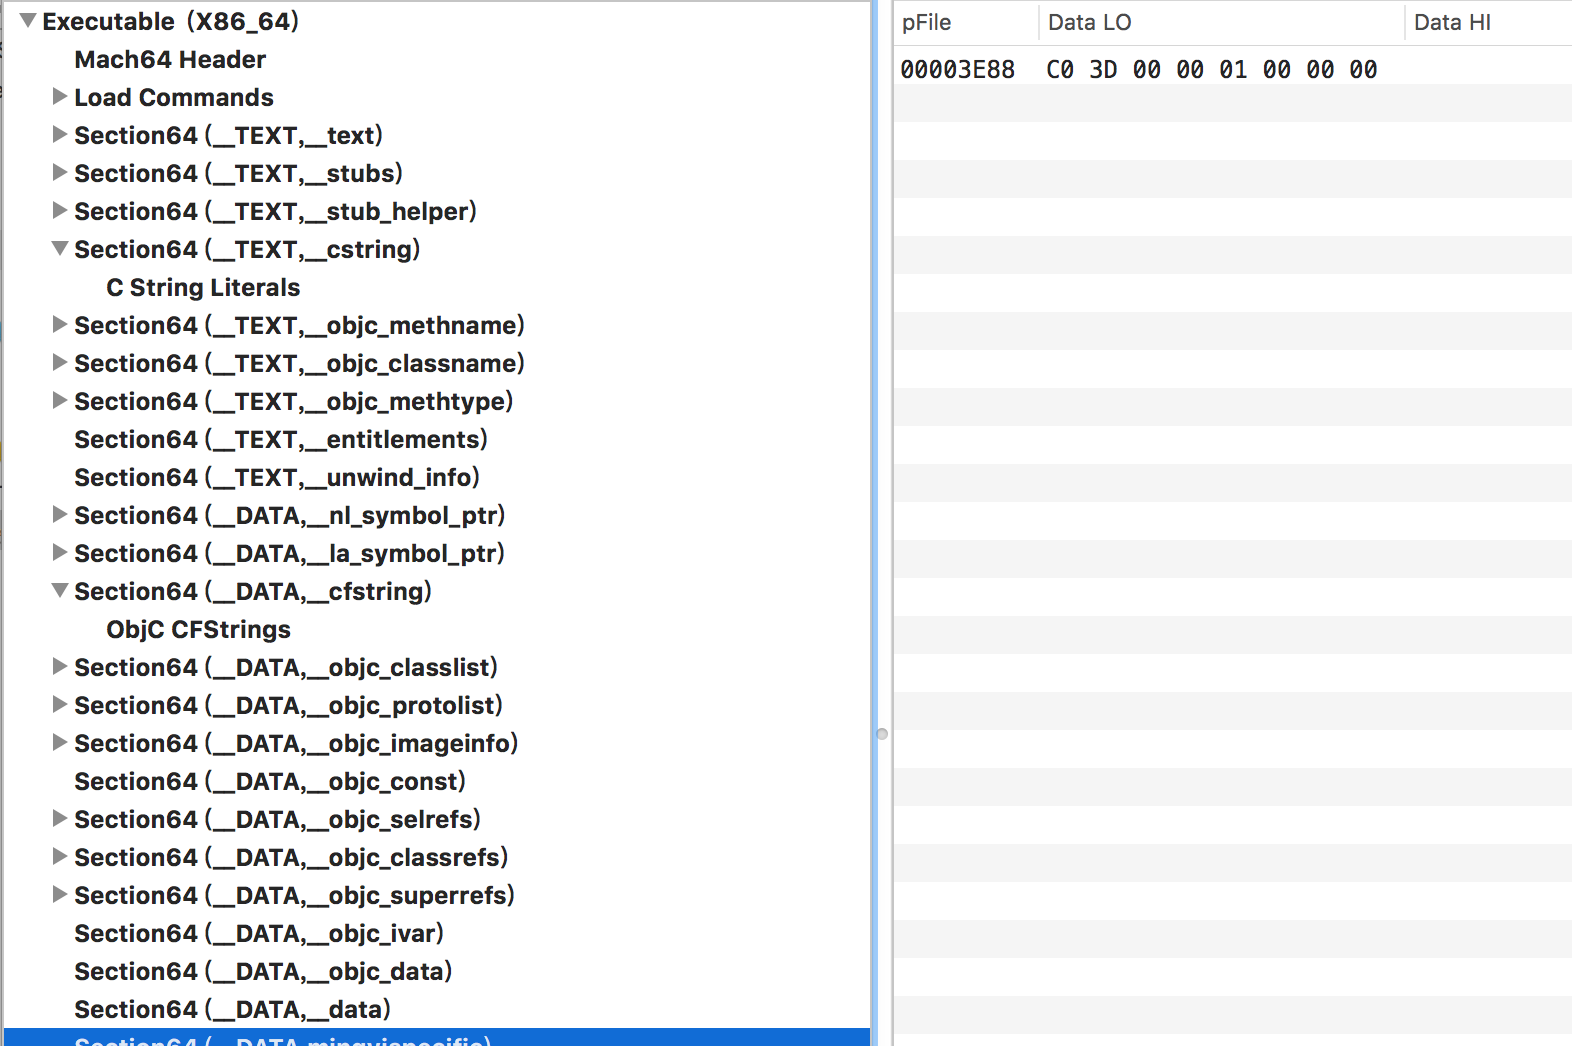
无论是3068抑或是3DC0,它们的含义都是一个地址偏移,在程序加载运行的过程中,都要进行地址REBASE,去获得真正正确地址空间中的数据。但是由于我们的
_attribute__((section ("__DATA, MinyiSpecific"))) static NSString ** entry = &haha;
是一个编译期的行为,因此这行语句的行为表征的还是存储没有rebase之前的相对地址偏移,如下图:
好,至此,我们才将整个数据存入的部分搞懂。
注意,iOS是小端序,即数据的高位在低地址。
镜像数据加载
说完了数据存储,我们再来看看怎么从编译后的执行文件的节中读取出文件,代码如下:
  static uint32_t _tweaksLoaded = 0;
  if (OSAtomicTestAndSetBarrier(1, &_tweaksLoaded)) {
    return;
  }

#ifdef __LP64__
  typedef uint64_t fb_tweak_value;
  typedef struct section_64 fb_tweak_section;
  typedef struct mach_header_64 fb_tweak_header;
#define fb_tweak_getsectbynamefromheader getsectbynamefromheader_64
#else
  typedef uint32_t fb_tweak_value;
  typedef struct section fb_tweak_section;
  typedef struct mach_header fb_tweak_header;
#define fb_tweak_getsectbynamefromheader getsectbynamefromheader
#endif


  FBTweakStore *store = [FBTweakStore sharedInstance];

  // 1. 注意点
  uint32_t image_count = _dyld_image_count();
  for (uint32_t image_index = 0; image_index < image_count; image_index++) {
    const fb_tweak_header *mach_header = (const fb_tweak_header *)_dyld_get_image_header(image_index);

    unsigned long size;

    // 2.注意点
    fb_tweak_entry *data = (fb_tweak_entry *)getsectiondata(mach_header, FBTweakSegmentName, FBTweakSectionName, &size);
    if (data == NULL) {
      continue;
    }
    size_t count = size / sizeof(fb_tweak_entry);
    for (size_t i = 0; i < count; i++) {
      fb_tweak_entry *entry = &data[i];
      FBTweakCategory *category = [store tweakCategoryWithName:*entry->category];
      if (category == nil) {
        category = [[FBTweakCategory alloc] initWithName:*entry->category];
        [store addTweakCategory:category];
      }

      FBTweakCollection *collection = [category tweakCollectionWithName:*entry->collection];
      if (collection == nil) {
        collection = [[FBTweakCollection alloc] initWithName:*entry->collection];
        [category addTweakCollection:collection];
      }

      NSString *identifier = _FBTweakIdentifier(entry);
      if ([collection tweakWithIdentifier:identifier] == nil) {
        FBTweak *tweak = _FBTweakCreateWithEntry(identifier, entry);

        if (tweak != nil) {
          [collection addTweak:tweak];
        }
      }
    }
  }
}
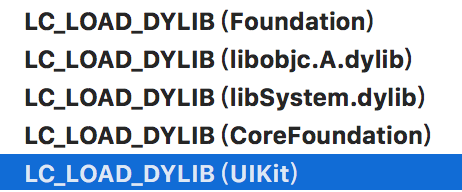
- 注意点1:通过dyld获取当前程序加载时候的image个数。什么是image个数呢?你的可执行文件就是一个image。那为什么又会存在多个image呢?如果你平时使用的都是静态库,那么在编译连接完成后,静态库这个scope就不存在了,所有的符号都互相匹配完成。但是呢,苹果自身比如
UIKIt之类的库又是动态库,因此,你的可执行文件中会存在多个image。
- 注意点2:读取macho文件中对应的段和节中我们自己储存的数据。
修改同步映射
我们之前看到,在利用FBTweakBind可以将某个对象的属性和操作进行映射,同步修改。这里的机制看起来很复杂,其实非常简单,就是简单的利用了KVO。
FBTweak就是想要修改的属性,其包含了多个Observer。在FBTweak的currentValue更改后,会利用观察者模式对每个Observer发送属性更新通知。而FBTweak的属性值改变则是和UI界面,利用KVO进行联动修改。
这里就没什么过于复杂的技术含量了,具体看下FBTweak和_FBTweakColorViewController代码就行。
其余知识点:
objc_precise_lifetime的作用__attribute__((objc_precise_lifetime)) id strongObject = _object;
这行代码的作用就是确保ARC不会进行特殊的优化,提前将一些本来认为在Scope最后才释放的对象提前释放了。
_Generic是一个编译时的泛型选择,他能根据变量的类型兼容来输出不同的结果,比如:#define cbrt(X) _Generic((X), \ long double: cbrtl, \ default: cbrt, \ /*for clang*/ const float: cbrtf, \ float: cbrtf \ )(X) int main(void) { long double x = 8.0; const float y = 3.375; printf("cbrt(8.0) = %Lg\n", cbrt(x)); // selects the default cbrt printf("cbrtf(3.375) = %f\n", cbrt(y)); // gcc: converts const float to float, // then selects cbrtf // clang: selects cbrtf for const float }
上述代码就根据编译器的类型声明,选择不同的函数进行执行。
Recommend
About Joyk
Aggregate valuable and interesting links.
Joyk means Joy of geeK