

【朝花夕拾】Android自定义View篇之(十一)View的滑动,弹性滑动与自定义PagerView -...
source link: https://www.cnblogs.com/andy-songwei/p/11213718.html
Go to the source link to view the article. You can view the picture content, updated content and better typesetting reading experience. If the link is broken, please click the button below to view the snapshot at that time.

【朝花夕拾】Android自定义View篇之(十一)View的滑动,弹性滑动与自定义PagerView
前言
转载请声明,转载自【https://www.cnblogs.com/andy-songwei/p/11213718.html】,谢谢!
由于手机屏幕尺寸有限,但是又经常需要在屏幕中显示大量的内容,这就使得必须有部分内容显示,部分内容隐藏。这就需要用一个Android中很重要的概念——滑动。滑动,顾名思义就是view从一个地方移动到另外一个地方,我们平时看到的各种很炫的移动效果,都是在基本的滑动基础上加入一些动画技术实现的。在Android中实现滑动的方式有多种,比如通过scrollTo/scrollBy,动画位移,修改位置参数等。本文主要介绍通过scrollTo/scrollBy方式来实现View的滑动,并通过该方法来实现一个自定义PagerView。
本文的主要内容如下:

一、 scrollTo/scrollBy实际滑动的是控件的内容
这里我们必须要先理解一个基本概念:使用scrollTo/scrollBy来实现滑动时,滑动的不是控件本身的位置,而是控件的内容。理解这一点,可以结合ScrollView控件,我们平时使用的使用会在xml布局文件中固定ScrollView的大小和位置,这也是我们肉眼看到的信息。但是如果我们左右/上下滑动滚动条,会发现里面原来还“藏”了许多“风景”。控件就像一个窗户,我们看到的只有窗户大小的内容,实际上窗户中“另有乾坤”。就像下面这张图显示的一样:
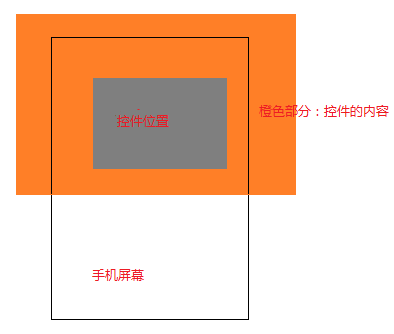
当我们手指在控件上滑动时,移动的其实是橙色部分表示的内容,而不是灰色部分表示的控件位置。
二、scrollBy实际上通过调用scrollTo来实现
scrollTo(int x, int y)方法的作用是:滑动到(x,y)这个坐标点,是一个绝对位置。
scrollBy(int x, int y)方法的作用是:在原来的位置上,水平方向向左滑动x距离,竖直方向向上滑动的y距离(滑动方向问题我们后面会详细讲),是一个相对位置。
这里我们先看看这两个函数的源码:
 1 //===========View.java=========
 2 /**
 3      * Set the scrolled position of your view. This will cause a call to
 4      * {@link #onScrollChanged(int, int, int, int)} and the view will be
 5      * invalidated.
 6      * @param x the x position to scroll to
 7      * @param y the y position to scroll to
 8      */
 9     public void scrollTo(int x, int y) {
10         if (mScrollX != x || mScrollY != y) {
11             int oldX = mScrollX;
12             int oldY = mScrollY;
13             mScrollX = x;
14             mScrollY = y;
15             invalidateParentCaches();
16             onScrollChanged(mScrollX, mScrollY, oldX, oldY);
17             if (!awakenScrollBars()) {
18                 postInvalidateOnAnimation();
19             }
20         }
21     }
22
23     /**
24      * Move the scrolled position of your view. This will cause a call to
25      * {@link #onScrollChanged(int, int, int, int)} and the view will be
26      * invalidated.
27      * @param x the amount of pixels to scroll by horizontally
28      * @param y the amount of pixels to scroll by vertically
29      */
30     public void scrollBy(int x, int y) {
31         scrollTo(mScrollX + x, mScrollY + y);
32     }
注释中也说明了这两个方法的功能,也可以看到scrollBy,就是调用的scrollTo来实现的,所以实际上这两个方法功能一样,实际开发中看那个方便就用那个。这部分源码逻辑比较简单,这里就不啰嗦了,需要注意的是mScrollX/mScrollY这两个变量,后面会用到,它们表示当前内容已经滑动的距离(向左/上滑动为正,向右/下滑动为负,方向问题下面详细讲)。
三、滑动坐标系和View坐标系正好相反
上面一节中介绍过,内容向左/上滑动时mScrollX/mScrollY为正,向右/下滑动时为负,这似乎和我们所理解的正好相反。我们平时理解的是基于View的坐标系,水平向右为X轴正方向,竖直向下为Y轴正方向。但是滑动坐标系和View坐标系正好相反,对于滑动而言,水平向左为X轴正方向,竖直向上为Y轴正方向,原点都还是View控件的左上角顶点。如下图所示:
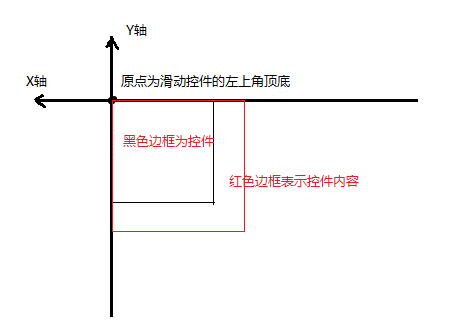
仅从数值上看,mScrollX表示控件内容左边缘到控件左边缘的偏移距离,mScrollY表示控件内容上边缘的距离与控件上边缘的偏移距离。在实际开发中,经常通过getScrollX()/getScrollY()来获取mScrollX/mScrollY的值。
1 //===========View.java=========
2 public final int getScrollX() {
3     return mScrollX;
4 }
5 ......
6 public final int getScrollY() {
7     return mScrollY;
8 }
对于其值的正负问题,读者可以自己通过打印log的方式来演示一下,比较简单,此处不赘述了。这里再提供几个图来体会一下滑动方向的问题。

水平方向的滑动
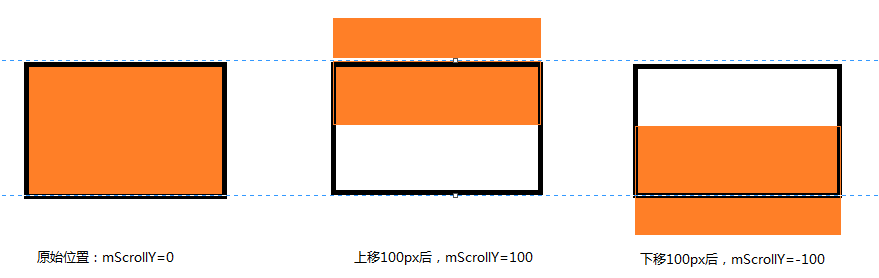
竖直方向的滑动
四、通过Scroller实现弹性滑动
通过scrollTo/scrollBy实现滑动时,是一瞬间来实现的。这样看起来会比较生硬和突兀,用户体验显然是不友好的,很多场景下,我们希望这个滑动是一个渐近式的,在给定的一段时间内缓慢移动到目标坐标。Android提供了一个Scroller类,来辅助实现弹性滑动,至于它的使用方法,下一点的代码中有详细演示,红色加粗的文字部分显示了使用步骤,这里结合该示例进行讲解。
通过Scroller实现弹性滑动的基本思想是,将一整段的滑动分为很多段微小的滑动,并在一定时间段内一一完成。
我们来看看CustomPagerView中第111行startScroll方法的源码:
 1 //===================Scroller.java==================
 2 /**
 3      * Start scrolling by providing a starting point, the distance to travel,
 4      * and the duration of the scroll.
 5      *
 6      * @param startX Starting horizontal scroll offset in pixels. Positive
 7      *        numbers will scroll the content to the left.
 8      * @param startY Starting vertical scroll offset in pixels. Positive numbers
 9      *        will scroll the content up.
10      * @param dx Horizontal distance to travel. Positive numbers will scroll the
11      *        content to the left.
12      * @param dy Vertical distance to travel. Positive numbers will scroll the
13      *        content up.
14      * @param duration Duration of the scroll in milliseconds.
15      */
16     public void startScroll(int startX, int startY, int dx, int dy, int duration) {
17         mMode = SCROLL_MODE;
18         mFinished = false;
19         mDuration = duration;
20         mStartTime = AnimationUtils.currentAnimationTimeMillis();
21         mStartX = startX;
22         mStartY = startY;
23         mFinalX = startX + dx;
24         mFinalY = startY + dy;
25         mDeltaX = dx;
26         mDeltaY = dy;
27         mDurationReciprocal = 1.0f / (float) mDuration;
28     }
startScroll方法实际上没有做移动的操作,只是提供了本次完整滑动的开始位置,需要滑动的距离,以及完成这次滑动所需要的时间。
第113行的invalidate()方法会让CustomPagerView重绘,这会调用View中的draw(...)方法,
 1 boolean draw(Canvas canvas, ViewGroup parent, long drawingTime) {
 2     ......
 3     computeScroll();
 4     ......
 5 }
 6 ......
 7 /**
 8  * Called by a parent to request that a child update its values for mScrollX
 9  * and mScrollY if necessary. This will typically be done if the child is
10  * animating a scroll using a {@link android.widget.Scroller Scroller}
11  * object.
12  */
13 public void computeScroll() {
14 }
draw()方法调用了computeScroll(),这是一个空方法,在CustomPagerView的126行重写了该方法,重绘时会进入到这个方法体中。第127行中有一个判断条件,看看它的源码:
 1 /**
 2      * Call this when you want to know the new location.  If it returns true,
 3      * the animation is not yet finished.
 4      */
 5     public boolean computeScrollOffset() {
 6         if (mFinished) {
 7             return false;
 8         }
 9
10         int timePassed = (int)(AnimationUtils.currentAnimationTimeMillis() - mStartTime);
11
12         if (timePassed < mDuration) {
13             switch (mMode) {
14             case SCROLL_MODE:
15                 final float x = mInterpolator.getInterpolation(timePassed * mDurationReciprocal);
16                 mCurrX = mStartX + Math.round(x * mDeltaX);
17                 mCurrY = mStartY + Math.round(x * mDeltaY);
18                 break;
19             case FLING_MODE:
20                 ......
21                 break;
22             }
23         }
24         else {
25             mCurrX = mFinalX;
26             mCurrY = mFinalY;
27             mFinished = true;
28         }
29         return true;
30     }
这个判断语句是在判断本次滑动是否在在继续,如果还没结束,会返回false,重写的computeScroll()中第130~135行会继续执行,直到滑动完成为止。同时这个方法还会根据已经滑动的时间来更新当前需要移动到位置mCurrX/mCurrY。所以我们可以看到,在滑动还没结束时,第134行就执行scrollTo方法来滑动一段距离。第134行又是一个刷新,让CustomPagerView重绘,又会调用draw(...)方法,computeScroll方法又被调用了,这样反复调用,直到整个滑动过程结束。(至于多长时间会执行一直刷新,笔者目前还没找到更深入的代码,有兴趣的读者可以自己再深入研究研究)
最后这里做个总结,Scroller辅助实现弹性滑动的原理为: Scroller本身不能实现滑动,而是通过startScroll方法传入起始位置、要滑动的距离和执行完滑动所需的时间,再通过invalidate刷新界面来调用重写的computeScroll方法,在没有结束滑动的情况下,computeScroll中执行scrollTo方法来滑动一小段距离,并再次刷新界面调用重写的computeScroll方法,如此反复,直到滑动过程结束。
五、实现一个自定义PagerView
本示例结合了该系列前面文章中提到的自定义View,View的绘制流程,触摸事件处理,速度等方面的知识,不明白的可以先去看看这些文章,打一下基础。本示例的项目结构非常简单,这里就不提供下载地址了。
这里先看看效果,一睹为快吧。

自定义一个view,继承自ViewGroup
  1 public class CustomPagerView extends ViewGroup {
  2
  3     private static final String TAG = "songzheweiwang";
  4     private Scroller mScroller;
  5     private VelocityTracker mVelocityTracker;
  6     private int mMaxVelocity;
  7     private int mCurrentPage = 0;
  8     private int mLastX = 0;
  9     private List<Integer> mImagesList;
 10
 11     public CustomPagerView(Context context, @Nullable AttributeSet attrs) {
 12         super(context, attrs);
 13         init(context);
 14     }
 15
 16     private void init(Context context) {
 17         //第一步:实例化一个Scroller实例
 18         mScroller = new Scroller(context);
 19         mVelocityTracker = VelocityTracker.obtain();
 20         mMaxVelocity = ViewConfiguration.get(context).getScaledMinimumFlingVelocity();
 21         Log.i(TAG, "mMaxVelocity=" + mMaxVelocity);
 22     }
 23
 24     //添加需要显示的图片,并显示
 25     public void addImages(Context context, List<Integer> imagesList) {
 26         if (imagesList == null) {
 27             mImagesList = new ArrayList<>();
 28         }
 29         mImagesList = imagesList;
 30         showViews(context);
 31     }
 32
 33     private void showViews(Context context) {
 34         if (mImagesList == null) {
 35             return;
 36         }
 37         for (int i = 0; i < mImagesList.size(); i++) {
 38             ImageView imageView = new ImageView(context);
 39             LayoutParams params = new LayoutParams(LayoutParams.MATCH_PARENT, LayoutParams.MATCH_PARENT);
 40             imageView.setLayoutParams(params);
 41             imageView.setBackgroundResource(mImagesList.get(i));
 42             addView(imageView);
 43         }
 44     }
 45
 46     @Override
 47     protected void onMeasure(int widthMeasureSpec, int heightMeasureSpec) {
 48         super.onMeasure(widthMeasureSpec, heightMeasureSpec);
 49         int count = getChildCount();
 50         for (int i = 0; i < count; i++) {
 51             View childView = getChildAt(i);
 52             childView.measure(widthMeasureSpec, heightMeasureSpec);
 53         }
 54     }
 55
 56     @Override
 57     protected void onLayout(boolean changed, int l, int t, int r, int b) {
 58         int count = getChildCount();
 59         for (int i = 0; i < count; i++) {
 60             View childView = getChildAt(i);
 61             childView.layout(i * getWidth(), t, (i + 1) * getWidth(), b);
 62         }
 63     }
 64
 65     @Override
 66     public boolean onTouchEvent(MotionEvent event) {
 67         mVelocityTracker.addMovement(event);
 68         int x = (int) event.getX();
 69         switch (event.getActionMasked()) {
 70             case MotionEvent.ACTION_DOWN:
 71                 //如果动画没有结束,先停止动画
 72                 if (!mScroller.isFinished()) {
 73                     mScroller.abortAnimation();
 74                 }
 75                 mLastX = x;
 76                 break;
 77             case MotionEvent.ACTION_MOVE:
 78                 int dx = x - mLastX;
 79                 //滑动坐标系正好和View坐标系是反的,dx为负数表示向右滑,为正表示向左滑
 80                 scrollBy(-dx, 0);
 81                 mLastX = x;
 82                 break;
 83             case MotionEvent.ACTION_UP:
 84                 mVelocityTracker.computeCurrentVelocity(1000);
 85                 int xVelocity = (int) mVelocityTracker.getXVelocity();
 86                 Log.i(TAG, "xVelocity=" + xVelocity);
 87                 if (xVelocity > mMaxVelocity && mCurrentPage > 0) {
 88                     //手指快速右滑后抬起,且当前页面不是第一页
 89                     scrollToPage(mCurrentPage - 1);
 90                 } else if (xVelocity < -mMaxVelocity && mCurrentPage < getChildCount() - 1) {
 91                     //手指快速左滑后抬起,且当前页面不是最后一页
 92                     scrollToPage(mCurrentPage + 1);
 93                 } else {
 94                     slowScrollToPage();
 95                 }
 96                 break;
 97         }
 98         return true;
 99     }
100
101     private void scrollToPage(int pageIndex) {
102         mCurrentPage = pageIndex;
103         if (mCurrentPage > getChildCount() - 1) {
104             mCurrentPage = getChildCount() - 1;
105         }
106         int scrollX = getScrollX();
107         int dx = mCurrentPage * getWidth() - scrollX;
108         int duration = Math.abs(dx) * 2;
109         Log.i(TAG, "[scrollToPage]scrollX=" + scrollX + ";dx=" + dx + ";duration=" + duration);
110         //第二步:调用startScroll方法,指定起始坐标,目的坐标和滑动时长
111         mScroller.startScroll(scrollX, 0, dx, 0, duration);
112         //第三步:让界面重绘
113         invalidate();
114     }
115
116     private void slowScrollToPage() {
117         int scrollX = getScrollX();
118         //缓慢滑动式,滑动一半以上后自动换到下一张,滑动不到一半则还原
119         int whichPage = (scrollX + getWidth() / 2) / getWidth();
120         Log.i(TAG, "[slowScrollToPage]scrollX=" + scrollX + ";whichPage=" + whichPage);
121         scrollToPage(whichPage);
122     }
123
124     //第四步:重写computeScroll方法,在该方法中通过scrollTo方法来完成滑动,并重绘
125     @Override
126     public void computeScroll() {
127         boolean isAnimateRun = mScroller.computeScrollOffset();
128         Log.i(TAG, "[computeScroll]isAnimateRun=" + isAnimateRun);
129         if (isAnimateRun) {
130             //当前页面的右上角,相对于第一页右上角的坐标
131             int curX = mScroller.getCurrX();
132             int curY = mScroller.getCurrY();
133             Log.i(TAG, "[computeScroll]curX=" + curX + ";curY=" + curY);
134             scrollTo(curX, curY);
135             postInvalidate();
136         }
137     }
138
139     @Override
140     protected void onDetachedFromWindow() {
141         super.onDetachedFromWindow();
142         if (mVelocityTracker != null) {
143             mVelocityTracker.recycle();
144             mVelocityTracker = null;
145         }
146     }
147 }
代码看起来有点长,其实逻辑很简单。基本思路是,使用者添加要显示的图片资源id列表,在CustomPagerView中为每一个要显示的图片实例一个ImageView进行显示。在滑动的过程中,如果速度比较快(大于某个阈值),手指抬起后,就会滑动下一页。如果速度很慢,手指抬起时,如果手指滑动的距离超过了屏幕的一半,则自动滑到下一页,如果没滑到一半,本次就不翻页,仍然停留在本页。
在布局文件中引入该控件
 1 //=========activity_scroller_demo.xml=========
 2 <?xml version="1.0" encoding="utf-8"?>
 3 <LinearLayout xmlns:android="http://schemas.android.com/apk/res/android"
 4     android:layout_width="match_parent"
 5     android:layout_height="match_parent"
 6     android:orientation="vertical">
 7
 8     <com.example.demos.customviewdemo.CustomPagerView
 9         android:id="@+id/viewpager"
10         android:layout_width="match_parent"
11         android:layout_height="300dp" />
12 </LinearLayout>
在Activity中使用该控件
 1 public class ScrollerDemoActivity extends AppCompatActivity {
 2
 3     private static final String TAG = "ScrollerDemoActivity";
 4
 5     @Override
 6     protected void onCreate(Bundle savedInstanceState) {
 7         super.onCreate(savedInstanceState);
 8         setContentView(R.layout.activity_scroller_demo);
 9         initViews();
10     }
11
12     private void initViews() {
13         List<Integer> mImageList = new ArrayList<>();
14         mImageList.add(R.drawable.dog);
15         mImageList.add(R.drawable.test2);
16         mImageList.add(R.drawable.test3);
17         mImageList.add(R.drawable.test4);
18         CustomPagerView customPagerView = findViewById(R.id.viewpager);
19         customPagerView.addImages(this, mImageList);
20     }
21 }
这里再啰嗦一句,本示例很好地演示了一个自定义View的开发,包含了不少自定义View需要掌握的基础知识点。通过该代码,希望能够强化理解前面文章中介绍的相关知识。
六、其他实现滑动及弹性滑动的方法
前面只介绍了通过scrollTo/scrollBy,并结合Scroller来实现滑动和弹性滑动的方式,实际上还有很多方式来实现这些效果。比如,要实现滑动,还有使用动画以及修改控件位置参数等方式。要实现弹性滑动,已经知道了基本思路是把一整段滑动分为很多小段滑动来一一实现,那么还可以使用定时器,Handler,Thread/sleep等方式来实现。这些方法就不一一介绍了,在使用时可以根据实际的场景和需求选择实现方式。
结语
本文主要介绍通过scrollTo/scrollBy来实现控件内容的滑动,以及结合Scroller实现弹性滑动的方式。由于笔者水平和经验有限,有描述不准确或不正确的地方,欢迎来拍砖,谢谢!
《Android开发艺术探索》
Recommend
About Joyk
Aggregate valuable and interesting links.
Joyk means Joy of geeK