

教你如何结合WebRTC与TensorFlow实现图像检测(上篇)
source link: https://zhuanlan.zhihu.com/p/32659252?
Go to the source link to view the article. You can view the picture content, updated content and better typesetting reading experience. If the link is broken, please click the button below to view the snapshot at that time.

教你如何结合WebRTC与TensorFlow实现图像检测(上篇)
原文作者:Chad Hart
原文地址:Computer Vision on the Web with WebRTC and TensorFlow - webrtcHacks
摘要:本文作者介绍了结合WebRTC与TensorFlow实现图像检测的具体过程,不论对于TensorFlow的使用者,还是WebRTC的开发者来讲都有参考意义。由于文章较长,我们将分为上下篇进行连载。
TensorFlow是目前最流行的机器学习框架之一。TensorFlow的一大优势是,它的很多库都有人积极进行维护和更新。而我最喜欢的其中一个库就是TensorFlow对象检测API。Tensorflow对象检测API可以对一张图形上的多个对象进行分类,并提供它们的具体位置。该API在将近1000个对象类上进行了预先训练,可提供各种经过预先训练的模型,让你可以在速度与准确性之间权衡取舍。
有这些模型的指引固然很好,但所有这些模型都要使用图像才能发挥作用,而这些图像则需要你自行添加到一个文件夹中。我其实很想将其与实时的WebRTC流配合到一起,通过网络实现实时的计算机视觉。由于未能找到这方面的任何例子或指南,我决定写这篇博文来介绍具体的实现方法。对于使用RTC的人,可以将本文作为一篇快速指南加以参考,了解如何使用TensorFlow来处理WebRTC流。对于使用TensorFlow的人士,则可以将本文作为一份快速简介,了解如何向自己的项目中添加WebRTC。使用WebRTC的人需要对Python比较熟悉。而使用TensorFlow的人则需要熟悉网络交互和一些JavaScript。
本文不适合作为WebRTC或TensorFlow的入门指南使用。如需这样的指南,应参考TensorFlow入门指南、WebRTC入门指南等,网上的相关介绍与指南数不胜数。
利用Tensor Flow和WebRTC检测猫咪
直接告诉我如何实现吧
如果你来这里只是为了快速找到一些参考信息,或者懒得读详细的文字介绍,按照下面的方法即可快速着手。首先安装Docker。加载一个命令提示窗口,接着键入下面的命令:
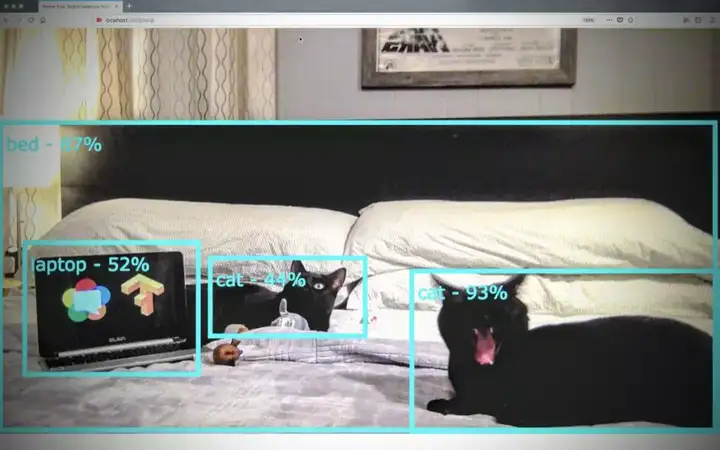
docker run -it -p 5000:5000 chadhart/tensorflow-object-detection:runserver然后在浏览器地址栏中键入并转到http://localhost:5000/local,接受摄像头权限请求,你应该会看到类似下面的界面:
请移步原文观看油管视频
基本架构
我们首先建立一个基本架构,用以在本地将一个本地网络摄像头流从WebRTC的getUserMedia发送到一个Python服务器,这要用到Flask网络服务器和TensorFlow 对象检测API(Object Detection API)。具体的设置大致如下图所示。
为搭配使用WebRTC与TensorFlow对象检测API而建立的基本架构
Flask将提供html和JavaScript文件供浏览器呈现。getUserMedia.js负责抓取本地视频流。接下来,objDetect.js会使用HTTP POST方法向TensorFlow对象检测API发送图像,该API则返回它所看到的对象(它称之为“类”)及对象在图像中的位置。我们会将这些详细信息封装到一个JSON对象中,然后将该对象发回给objDetect.js,这样我们就能将我们所看到的对象的方框和标签显示出来。
配置
设置和前提条件
在开始之前,我们需要先对Tensorflow和对象检测API进行一些设置。
使用Docker轻松完成设置
我在OSX、Windows 10和Raspbian已经设置过好几次(过程可不简单)。各种版本依赖关系错综复杂,把这些关系理顺并非易事,特别是当你只是想看看一些前期工作是否行得通时,你可能会感到气馁。我推荐使用Docker来避免这些棘手问题。你将需要学习Docker,这也是非学不可的东西,与其试着构建合适的Protobuf版本,倒不如花些时间学习它来得更为高效。TensorFlow项目维护了一些官方的Docker映像,比如tensorflow/tensorflow。
如果你使用Docker,我们就可以使用我为这篇博文创建的映像。在命令行中,请运行以下命令:
git clone https://github.com/webrtcHacks/tfObjWebrtc.git
cd tfObjWebrtc
docker run -it -p 5000:5000 --name tf-webrtchacks -v $(pwd):/code chadhart/tensorflow-object-detection:webrtchacks
请注意,docker run中的$(pwd)仅适用于Linux和Windows Powershell。在Windows 10命令行中,请使用%cd%。
看到这里,你应该已经进入了Docker容器。现在,请运行:
python setup.py install这样,就会使用最新的TensorFlow Docker映像,并将Docker主机上的端口5000连接到端口5000,将容器命名为tf-webrtchacks,将一个本地目录映射到容器中的一个新/code目录,将该目录设为默认目录(我们接下来将在该目录中操作),然后运行bash以便进行命令行交互。完成这些准备工作后,我们才能开始。
如果你才刚开始接触TensorFlow,可能需要先按照tensorflow/tensorflow中的说明运行初始Jupyter notebook,然后再回来执行上述命令。
另一种麻烦的实现方法
如果你打算从头开始,则需要安装TensorFlow,它自身有很多依赖项,比如Python。TensorFlow项目针对各种平台都提供了指南,具体请访问https://www.tensorflow.org/install。对象检测API也有自己的安装说明,以及一些额外的依赖项。完成这些准备工作后,请运行下面的命令:
git clone https://github.com/webrtcHacks/tfObjWebrtc.git
cd tfObjWebrtc
python setup.py install
这样,就应该安装好了所有的Python依赖项,将相应的Tensorflow对象检测API文件都复制了过来,并安装了Protobufs。如果这一步行不通,我建议检查setup.py,然后手动在其中运行命令,以解决存在的任何问题。
第1部分——确保Tensorflow正常工作
为确保TensorFlow对象检测API正常工作,我们首先从用于演示对象检测的官方版JupyterNotebook经调整后的版本着手。我将此文件保存为object_detection_tutorial.py。
如果你剪切并粘贴该notebook的每个部分,得到的结果应如下所示:(由于此段代码较长,截图会影响阅读,我们更换为文字排版,左右拖动可查看长代码)
# IMPORTS

import numpy as np
import os
import six.moves.urllib as urllib
import sys
import tarfile
import tensorflow as tf
import zipfile

from collections import defaultdict
from io import StringIO
# from matplotlib import pyplot as plt ### CWH
from PIL import Image

if tf.__version__ != '1.4.0':
  raise ImportError('Please upgrade your tensorflow installation to v1.4.0!')

# ENV SETUP  ### CWH: remove matplot display and manually add paths to references
'''
# This is needed to display the images.
%matplotlib inline

# This is needed since the notebook is stored in the object_detection folder.
sys.path.append("..")
'''

# Object detection imports

from object_detection.utils import label_map_util    ### CWH: Add object_detection path

#from object_detection.utils import visualization_utils as vis_util ### CWH: used for visualization

# Model Preparation

# What model to download.
MODEL_NAME = 'ssd_mobilenet_v1_coco_2017_11_17'
MODEL_FILE = MODEL_NAME + '.tar.gz'
DOWNLOAD_BASE = 'http://download.tensorflow.org/models/object_detection/'

# Path to frozen detection graph. This is the actual model that is used for the object detection.
PATH_TO_CKPT = MODEL_NAME + '/frozen_inference_graph.pb'

# List of the strings that is used to add correct label for each box.
PATH_TO_LABELS = os.path.join('object_detection/data', 'mscoco_label_map.pbtxt') ### CWH: Add object_detection path

NUM_CLASSES = 90


# Download Model
opener = urllib.request.URLopener()
opener.retrieve(DOWNLOAD_BASE + MODEL_FILE, MODEL_FILE)
tar_file = tarfile.open(MODEL_FILE)
for file in tar_file.getmembers():
  file_name = os.path.basename(file.name)
  if 'frozen_inference_graph.pb' in file_name:
    tar_file.extract(file, os.getcwd())


# Load a (frozen) Tensorflow model into memory.
detection_graph = tf.Graph()
with detection_graph.as_default():
  od_graph_def = tf.GraphDef()
  with tf.gfile.GFile(PATH_TO_CKPT, 'rb') as fid:
    serialized_graph = fid.read()
    od_graph_def.ParseFromString(serialized_graph)
    tf.import_graph_def(od_graph_def, name='')

# Loading label map
label_map = label_map_util.load_labelmap(PATH_TO_LABELS)
categories = label_map_util.convert_label_map_to_categories(label_map, max_num_classes=NUM_CLASSES, use_display_name=True)
category_index = label_map_util.create_category_index(categories)


# Helper code
def load_image_into_numpy_array(image):
  (im_width, im_height) = image.size
  return np.array(image.getdata()).reshape(
      (im_height, im_width, 3)).astype(np.uint8)

# Detection
# For the sake of simplicity we will use only 2 images:
# image1.jpg
# image2.jpg
# If you want to test the code with your images, just add path to the images to the TEST_IMAGE_PATHS.
PATH_TO_TEST_IMAGES_DIR = 'object_detection/test_images' #cwh
TEST_IMAGE_PATHS = [ os.path.join(PATH_TO_TEST_IMAGES_DIR, 'image{}.jpg'.format(i)) for i in range(1, 3) ]

# Size, in inches, of the output images.
IMAGE_SIZE = (12, 8)

with detection_graph.as_default():
  with tf.Session(graph=detection_graph) as sess:
    # Definite input and output Tensors for detection_graph
    image_tensor = detection_graph.get_tensor_by_name('image_tensor:0')
    # Each box represents a part of the image where a particular object was detected.
    detection_boxes = detection_graph.get_tensor_by_name('detection_boxes:0')
    # Each score represent how level of confidence for each of the objects.
    # Score is shown on the result image, together with the class label.
    detection_scores = detection_graph.get_tensor_by_name('detection_scores:0')
    detection_classes = detection_graph.get_tensor_by_name('detection_classes:0')
    num_detections = detection_graph.get_tensor_by_name('num_detections:0')
    for image_path in TEST_IMAGE_PATHS:
      image = Image.open(image_path)
      # the array based representation of the image will be used later in order to prepare the
      # result image with boxes and labels on it.
      image_np = load_image_into_numpy_array(image)
      # Expand dimensions since the model expects images to have shape: [1, None, None, 3]
      image_np_expanded = np.expand_dims(image_np, axis=0)
      # Actual detection.
      (boxes, scores, classes, num) = sess.run(
          [detection_boxes, detection_scores, detection_classes, num_detections],
          feed_dict={image_tensor: image_np_expanded})

      ### CWH: below is used for visualizing with Matplot
      '''
      # Visualization of the results of a detection.
      vis_util.visualize_boxes_and_labels_on_image_array(
          image_np,
          np.squeeze(boxes),
          np.squeeze(classes).astype(np.int32),
          np.squeeze(scores),
          category_index,
          use_normalized_coordinates=True,
          line_thickness=8)
      plt.figure(figsize=IMAGE_SIZE)
      plt.imshow(image_np)
      '''
在这里我就不再赘述实际TensorFlow代码的作用了,这方面的信息可在Jupyter演示及其他教程中找到。我将重点介绍我们对代码所做的修改。
我注释了几个小节:
- 更改了一些位置引用
- 删除了对Python matplot的所有引用。Python matplot用于在GUI环境中以可视化方式呈现输出结果。在我的Docker环境中没有设置它——根据你采用的具体运行方式,可以酌情决定是否保留这些引用。
对象检测API的输出结果
正如第111行所示,对象检测API输出4种对象:
- 类——一个由对象名组成的数组
- 分值——一个由置信度分值组成的数组
- 方框——检测到的每个对象所在的位置
- 数量——检测到的对象总数
类、分值和方框都是相互并列、大小相等的数组,因此classes[n]与scores[n]和boxes[n]都是一一对应的。
由于我删去了可视化功能,我们需要通过某种方式来查看结果,所以我们要把下面的命令添加到文件末尾:
### CWH: Print the object details to the console instead of visualizing them with the code above

classes = np.squeeze(classes).astype(np.int32)
scores = np.squeeze(scores)
boxes = np.squeeze(boxes)

threshold = 0.50  #CWH: set a minimum score threshold of 50%
obj_above_thresh = sum(n > threshold for n in scores)
print("detected %s objects in %s above a %s score" % ( obj_above_thresh, image_path, threshold))

for c in range(0, len(classes)):
  if scores[c] > threshold:
      class_name = category_index[classes[c]]['name']
      print(" object %s is a %s - score: %s, location: %s" % (c, class_name, scores[c], boxes[c]))
第一个np.squeeze部分只是将多维数组输出缩减成一维,这与原来的可视化代码一样。我认为这是TensorFlow的一个副产品,因为它通常会输出多维数组。
接着我们要为它输出的分值设置一个阈值。好像TensorFlow默认会返回100个对象。其中很多对象嵌套在置信度更高的对象内或与这些对象重叠。在选择阈值方面我还没有发现任何最佳做法,不过对于这些示例图像来说,50%似乎是合适的。
最后,我们需要循环遍历这些数组,直接输出那些超过阈值的分值。
如果运行下面的命令:
python object_detection_tutorial.py应该会获得下面的输出:
detected 2 objects in object_detection/test_images/image1.jpg above a 0.5 score
 object 0 is a dog - score: 0.940691, location: [ 0.03908405  0.01921503  0.87210345  0.31577349]
 object 1 is a dog - score: 0.934503, location: [ 0.10951501  0.40283561  0.92464608  0.97304785]
detected 10 objects in object_detection/test_images/image2.jpg above a 0.5 score
 object 0 is a person - score: 0.916878, location: [ 0.55387682  0.39422381  0.59312469  0.40913767]
 object 1 is a kite - score: 0.829445, location: [ 0.38294643  0.34582412  0.40220094  0.35902989]
 object 2 is a person - score: 0.778505, location: [ 0.57416666  0.057667    0.62335181  0.07475379]
 object 3 is a kite - score: 0.769985, location: [ 0.07991442  0.4374091   0.16590245  0.50060284]
 object 4 is a kite - score: 0.755539, location: [ 0.26564282  0.20112294  0.30753511  0.22309387]
 object 5 is a person - score: 0.634234, location: [ 0.68338078  0.07842994  0.84058815  0.11782578]
 object 6 is a kite - score: 0.607407, location: [ 0.38510025  0.43172216  0.40073246  0.44773054]
 object 7 is a person - score: 0.589102, location: [ 0.76061964  0.15739655  0.93692541  0.20186904]
 object 8 is a person - score: 0.512377, location: [ 0.54281253  0.25604743  0.56234604  0.26740867]
 object 9 is a person - score: 0.501464, location: [ 0.58708113  0.02699314  0.62043804  0.04133803]
第2部分——打造一项对象API网络服务
在这一部分,我们将对教程代码作一些改动,以将其作为一项网络服务加以运行。我在Python方面的经验颇为有限(主要在Raspberry Pi项目中使用过),所以如有不对的地方,请添加备注或提交拉取请求,以便我可以修正。
2.1将演示代码转变成一项服务
至此我们已经让TensorFlow Object API能够正常工作了,接下来我们就将它封装成一个可以调用的函数。我将演示代码复制到了一个名为object_detection_api.py的新python文件中。你可以看到,我删除了很多没有用到或注释掉的行,以及用于将详细信息输出到控制台的部分(暂时删除)。
由于我们要将这些信息输出到网络上,因此最好将我们的输出结果封装成一个JSON对象。为此,请务必向你导入的内容中添加一个importjso语句,然后再添加下面的命令:
# added to put object in JSON
class Object(object):
    def __init__(self):
        self.name="Tensor Flow Object API Service 0.0.1"

    def toJSON(self):
        return json.dumps(self.__dict__)
接下来,我们要重复利用之前的代码创建一个get_objects函数:
def get_objects(image, threshold=0.5):
    image_np = load_image_into_numpy_array(image)
    # Expand dimensions since the model expects images to have shape: [1, None, None, 3]
    image_np_expanded = np.expand_dims(image_np, axis=0)
    # Actual detection.
    (boxes, scores, classes, num) = sess.run(
        [detection_boxes, detection_scores, detection_classes, num_detections],
        feed_dict={image_tensor: image_np_expanded})

    classes = np.squeeze(classes).astype(np.int32)
    scores = np.squeeze(scores)
    boxes = np.squeeze(boxes)obj_above_thresh = sum(n > threshold for n in scores)

    obj_above_thresh = sum(n > threshold for n in scores)
    print("detected %s objects in image above a %s score" % (obj_above_thresh, threshold))
在此函数中我们添加了一个图像输入参数和一个默认为0.5的threshold值。其余内容都是在演示代码的基础上重构的。
现在我们再向此函数添加一些代码,以查询具体的值并将它们输出到一个JSON对象中:
output = []

    #Add some metadata to the output
    item = Object()
    item.numObjects = obj_above_thresh
    item.threshold = threshold
    output.append(item)

    for c in range(0, len(classes)):
        class_name = category_index[classes[c]]['name']
        if scores[c] >= threshold:      # only return confidences equal or greater than the threshold
            print(" object %s - score: %s, coordinates: %s" % (class_name, scores[c], boxes[c]))

            item = Object()
            item.name = 'Object'
            item.class_name = class_name
            item.score = float(scores[c])
            item.y = float(boxes[c][0])
            item.x = float(boxes[c][1])
            item.height = float(boxes[c][2])
            item.width = float(boxes[c][3])

            output.append(item)

    outputJson = json.dumps([ob.__dict__ for ob in output])
    return outputJson
这一次我们是使用Object类来创建一些初始元数据并将这些元数据添加到output列表中。然后我们使用循环向此列表中添加Object数据。最后,将此列表转换成JSON并予以返回。
之后,我们来创建一个测试文件(这里要提醒自己:先做测试),以检查它是否调用了object_detection_test.py:
import scan_image
import os
from PIL import Image

# If you want to test the code with your images, just add path to the images to the TEST_IMAGE_PATHS.
PATH_TO_TEST_IMAGES_DIR = 'object_detection/test_images' #cwh
TEST_IMAGE_PATHS = [ os.path.join(PATH_TO_TEST_IMAGES_DIR, 'image{}.jpg'.format(i)) for i in range(1, 3) ]

for image_path in TEST_IMAGE_PATHS:
    image = Image.open(image_path)
    response = object_detection_api.get_objects(image)
    print("returned JSON: \n%s" % response)
至此万事俱备,接下来就是运行了。
python object_detection_test.py除了前面的控制台输出之外,你应该还会看到一个JSON字符串:
returned JSON:
[{"threshold": 0.5, "name": "webrtcHacks Sample Tensor Flow Object API Service 0.0.1", "numObjects": 10}, {"name": "Object", "class_name": "person", "height": 0.5931246876716614, "width": 0.40913766622543335, "score": 0.916878342628479, "y": 0.5538768172264099, "x": 0.39422380924224854}, {"name": "Object", "class_name": "kite", "height": 0.40220093727111816, "width": 0.3590298891067505, "score": 0.8294452428817749, "y": 0.3829464316368103, "x": 0.34582412242889404}, {"name": "Object", "class_name": "person", "height": 0.6233518123626709, "width": 0.0747537910938263, "score": 0.7785054445266724, "y": 0.5741666555404663, "x": 0.057666998356580734}, {"name": "Object", "class_name": "kite", "height": 0.16590245068073273, "width": 0.5006028413772583, "score": 0.7699846625328064, "y": 0.07991442084312439, "x": 0.43740910291671753}, {"name": "Object", "class_name": "kite", "height": 0.3075351119041443, "width": 0.22309386730194092, "score": 0.7555386424064636, "y": 0.26564282178878784, "x": 0.2011229395866394}, {"name": "Object", "class_name": "person", "height": 0.8405881524085999, "width": 0.11782577633857727, "score": 0.6342343688011169, "y": 0.6833807826042175, "x": 0.0784299373626709}, {"name": "Object", "class_name": "kite", "height": 0.40073245763778687, "width": 0.44773054122924805, "score": 0.6074065566062927, "y": 0.38510024547576904, "x": 0.43172216415405273}, {"name": "Object", "class_name": "person", "height": 0.9369254112243652, "width": 0.20186904072761536, "score": 0.5891017317771912, "y": 0.7606196403503418, "x": 0.15739655494689941}, {"name": "Object", "class_name": "person", "height": 0.5623460412025452, "width": 0.26740866899490356, "score": 0.5123767852783203, "y": 0.5428125262260437, "x": 0.25604742765426636}, {"name": "Object", "class_name": "person", "height": 0.6204380393028259, "width": 0.04133802652359009, "score": 0.5014638304710388, "y": 0.5870811343193054, "x": 0.026993142440915108}]
2.2添加一个网络服务器
我们已经有了函数——接下来我们就用它来打造一项网络服务。
先使用测试用的路由(Route)运行
我们有了一个可以轻松添加到网络服务的良好API。我发现使用Flask是最简单的测试方法。我们来创建一个server.py,然后执行一次快速测试:
import object_detection_api
import os
from PIL import Image
from flask import Flask, request, Response

app = Flask(__name__)

@app.route('/')
def index():
    return Response('Tensor Flow object detection')

@app.route('/test')
def test():

    PATH_TO_TEST_IMAGES_DIR = 'object_detection/test_images'  # cwh
    TEST_IMAGE_PATHS = [os.path.join(PATH_TO_TEST_IMAGES_DIR, 'image{}.jpg'.format(i)) for i in range(1, 3)]

    image = Image.open(TEST_IMAGE_PATHS[0])
    objects = object_detection_api.get_objects(image)

    return objects

if __name__ == '__main__':
    app.run(debug=True, host='0.0.0.0')
现在,运行该服务器:
python server.py确保该服务正常工作
然后调用该网络服务。就我自己的情况而言,我只是从主机运行了下面的命令(因为我的Docker实例现在正在前台运行该服务器):
curl http://localhost:5000/test | python -m json.tooljson.tool将帮助你为输出结果设置格式。你应该会看到下面的结果:
  % Total    % Received % Xferd  Average Speed   Time    Time     Time  Current
                                 Dload  Upload   Total   Spent    Left  Speed
100   467  100   467    0     0    300      0  0:00:01  0:00:01 --:--:--   300
[
    {
        "name": "webrtcHacks Sample Tensor Flow Object API Service 0.0.1",
        "numObjects": 2,
        "threshold": 0.5
    },
    {
        "class_name": "dog",
        "height": 0.8721034526824951,
        "name": "Object",
        "score": 0.9406907558441162,
        "width": 0.31577348709106445,
        "x": 0.01921503245830536,
        "y": 0.039084047079086304
    },
    {
        "class_name": "dog",
        "height": 0.9246460795402527,
        "name": "Object",
        "score": 0.9345026612281799,
        "width": 0.9730478525161743,
        "x": 0.4028356075286865,
        "y": 0.10951501131057739
    }
]
好了,接下来我们就要接受一个包含一个图片文件及其他一些参数的POST,使用真实路由运行了。为此,需要在/test路由函数下添加一个新的/image路由:
@app.route('/image', methods=['POST'])
def image():

    try:
        image_file = request.files['image']  # get the image

        # Set an image confidence threshold value to limit returned data
        threshold = request.form.get('threshold')
        if threshold is None:
            threshold = 0.5
        else:
            threshold = float(threshold)

        # finally run the image through tensor flow object detection`
        image_object = Image.open(image_file)
        objects = object_detection_api.get_objects(image_object, threshold)
        return objects

    except Exception as e:
        print('POST /image error: %e' % e)
        return e
这样就会从一个采用表单编码方式的POST中获取图片,并且可以选择指定一个阈值,然后将该图片传递给我们的object_detection_api。
我们来测试一下:
curl -F "image=@./object_detection/test_images/image1.jpg" http://localhost:5000/image | python -m json.tool这时看到的结果应该与上面使用/test路径时相同。继续测试,可以指定你任选的其他本地图像的路径。
让该服务在localhost以外的位置也能正常工作
如果你打算在localhost上运行浏览器,可能就不需要再做些什么。但如果是真实的服务,甚至是在需要运行很多测试的情况下,这就不太现实了。如果要跨网络运行网络服务,或者使用其他资源运行网络服务,都需要用到CORS。幸好,在路由前添加以下代码就可以轻松解决这一问题:
# for CORS
@app.after_request
def after_request(response):
    response.headers.add('Access-Control-Allow-Origin', '*')
    response.headers.add('Access-Control-Allow-Headers', 'Content-Type,Authorization')
    response.headers.add('Access-Control-Allow-Methods', 'GET,POST') # Put any other methods you need here
    return response
让该服务支持安全源
最佳做法是搭配HTTPS使用WebRTC,因为Chrome和Safari等浏览器若不作专门配置,则仅支持安全源(不过Chrome可以很好地支持localhost,你也可以将Safari设为允许在非安全网站上捕获信息——跳转到此处的调试工具部分了解详情)。为此,你需要获取一些SSL证书或生成一些自托管证书。我将我自己的证书放在了ssl/目录中,然后将最后一行app.run更改为:
app.run(debug=True, host='0.0.0.0', ssl_context=('ssl/server.crt', 'ssl/server.key')) 如果你使用的是自签名证书,你在使用CURL进行测试时可能需要添加--insecure选项:
curl -F "image=@./object_detection/test_images/image2.jpg" --insecure https://localhost:5000/image | python -m json.tool严格来讲并非一定要生成你自己的证书,而且这会增加一定的工作量,所以在server.py最底部,我依然让SSL版本保持被注释掉的状态。
如果是要投入生产环境中使用的应用程序,你可能需要使用nginx之类的代理向外发送HTTPS,同时在内部依然使用HTTP(此外还要做很多其他方面的改进)。
添加一些路由以便提供我们的网页
在开始介绍浏览器端的工作之前,我们先为后面需要用到的一些路由生成存根。为此,请将下面的代码放在index()路由后面:
@app.route('/local')
def local():
    return Response(open('./static/local.html').read(), mimetype="text/html")


@app.route('/video')
def remote():
    return Response(open('./static/video.html').read(), mimetype="
Python方面的工作到此就结束了。接下来我们将用到JavaScript,并且需要编写一些HTML。
我们将在下篇分享浏览器端的开发,以及优化方面经验。
Recommend
About Joyk
Aggregate valuable and interesting links.
Joyk means Joy of geeK