

【SpringBootStarter】自定义全局加解密组件 - Xbhog
source link: https://www.cnblogs.com/xbhog/p/18012435
Go to the source link to view the article. You can view the picture content, updated content and better typesetting reading experience. If the link is broken, please click the button below to view the snapshot at that time.

【SpringBootStarter】#
目的#
- 了解
SpringBoot Starter相关概念以及开发流程 - 实现自定义
SpringBoot Starter(全局加解密) - 了解测试流程
最终引用的效果:
<dependency>
    <groupId>com.xbhog</groupId>
    <artifactId>globalValidation-spring-boot-starter</artifactId>
    <version>1.0.0</version>
</dependency>
【开源地址】https://gitee.com/xbhog/encry-adecry-spring-boot-starter; 欢迎star
了解SpringBoot Starter相关概念以及开发流程#
SpringBoot Starter#
SpringBoot Starter作用将一组相关的依赖打包,简化项目的配置和初始化过程,通过特定的Starter开发者可以快速的实现特定功能模块的开发和扩展。
自定义Starter能够促进团队内部资源的复用,保持项目间的一致性,提升协作效率并且有助于构建稳定、高效的大型系统。
开发流程#
注入SpringBoot的方式#
在刚开始开发Starter的时候,首先考虑的是怎么能注入到SpringBoot中?
这部分涉及到部分SpringBoot的自动装配原理,不太清楚的朋友可以补习下;
注入SpringBoot需要配置文件,在项目中的resources资源目录中创建该目录和文件。
demo-spring-boot-starter
└── src
    └── main
        └── java
            └── com.xbhog
                ├── DemoBean.java
                └── DemoBeanConfig.java
        └── resources
                └── META-INF
                    └── spring.factories
在spring.factories中我们指定一下自动装配的配置类,格式如下:
org.springframework.boot.autoconfigure.EnableAutoConfiguration=com.xbhog.DemoBeanConfig
/**
 * @author xbhog
 * @describe:
 */
@Slf4j
@Configuration
public class DemoBeanConfig {

    @Bean
    public DemoBean getDemo() {
        log.info("已经触发了配置类,正在初始化DemoBean...");
        return new DemoBean();
    }
}
@Slf4j
public class DemoBean {
    public void getDemo(){
      log.info("方法调用成功");
    }
}
这样就可以将设置的包扫描路径下的相关操作打包到SpringBoot 中。
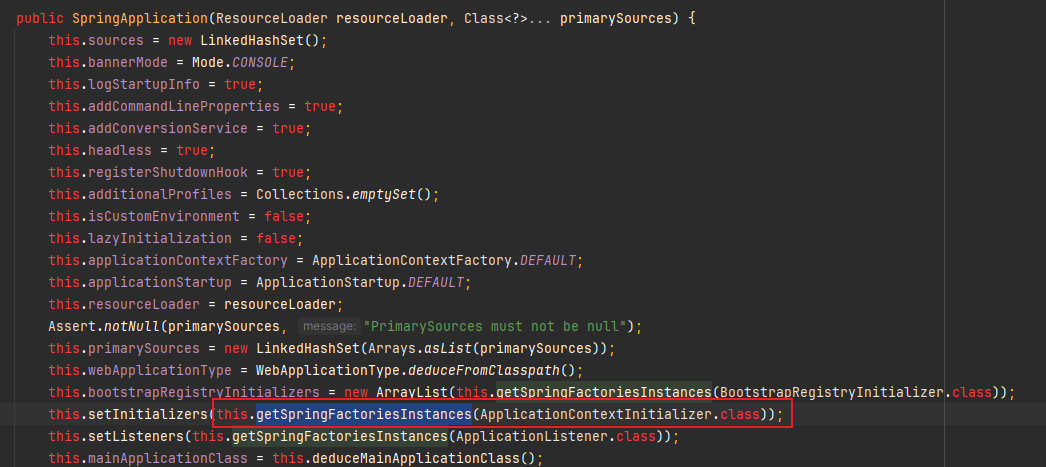
SpringBoot主类启动器:初始化的操作,感兴趣的朋友可以研究下

完成后,我们可以打包该项目,然后在测试工程红进行Maven的引入、测试。
测试#
新建Spring 测试工程,引入依赖:
<dependency>
    <groupId>com.xbhog</groupId>
    <artifactId>demo-spring-boot-starter</artifactId>
    <version>1.0</version>
</dependency>
@RestController
public class BasicController implements ApplicationContextAware {
    private ApplicationContext applicationContext;

    /**两种引入方式都可以
    @Autowired
    private DemoBean demoBean;*/

    @GetMapping("/configTest")
    public void configTest() {
        DemoBean demoBean = applicationContext.getBean(DemoBean.class);
        demoBean.getDemo();
    }

    @Override
    public void setApplicationContext(ApplicationContext applicationContext) throws BeansException {
        this.applicationContext = applicationContext;
    }
}
请求地址后,可以观察控制台,如下日志表示SpringBoot Starter可以使用了。
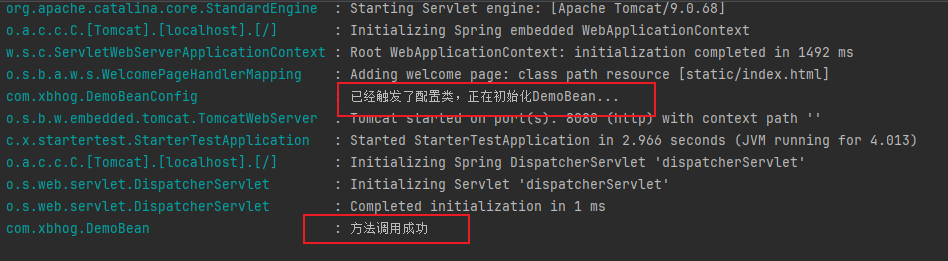
到此,一个简单的Starter开发完成了,后续可以围绕工程,根据需求和业务,对通用功能(接口操作日志、异常、加解密、白名单等)进行封装,最后打到Maven仓库中进行使用。
自定义SpringBoot Starter(全局加解密)#
来源#
在之前金融系统开发中,需要对接多个第三方的服务且数据安全性要求比较高;在接口评审阶段需要双方在数据传输的时候进行接口加解密;起初在第一个服务对接的时候,将相关的加解密操作写到工具类中;随着后续服务的增多,代码的侵入越来越严重。
封装#
选择通过Starter进行功能的封装;好处:引用方便,开发迭代方便,团队复用度高且对业务没有侵入。
开发#
思路:通过配置文件初始化,让配置类注解@ComponentScan扫描到的Bean等注入到SpringBoot中,通过自定义注解和``RequestBodyAdvice/ResponseBodyAdvice组合拦截请求,在BeforBodyRead/beforeBodyWrite`中进行数据的前置处理,解密后映射到接口接收的字段或对象。
接口上的操作有两种方式:
- 注解+
AOP实现 - 注解+
RequestBodyAdvice/ResponseBodyAdvice
这里我选择的第二种的RequestBodyAdvice/ResponseBodyAdvice,抛砖引玉一下。
【注】第二种存在的局限性是:只能针对POST请求中的Body数据处理,无法针对GET请求进行处理。
项目结构:
encryAdecry-spring-boot-starter
└── src
    └── main
        └── java
            └── com.xbhog
                ├── advice
                │   ├──ResponseBodyEncryptAdvice.java
                │   └──RequestBodyDecryptAdvice.java
                ├── annotation
                │   └──SecuritySupport
                ├── handler
                │    ├──impl
                │    │   └──SecurityHandlerImpl.java
                │    └──SecurityHandler
                └── holder
                │    ├──ContextHolder.java
                │    ├──EncryAdecryHolder.java
                │    └──SpringContextHolder.java
                └──GlobalConfig.java
        └── resources
                └── META-INF
                    └── spring.factories
项目处理流程图:
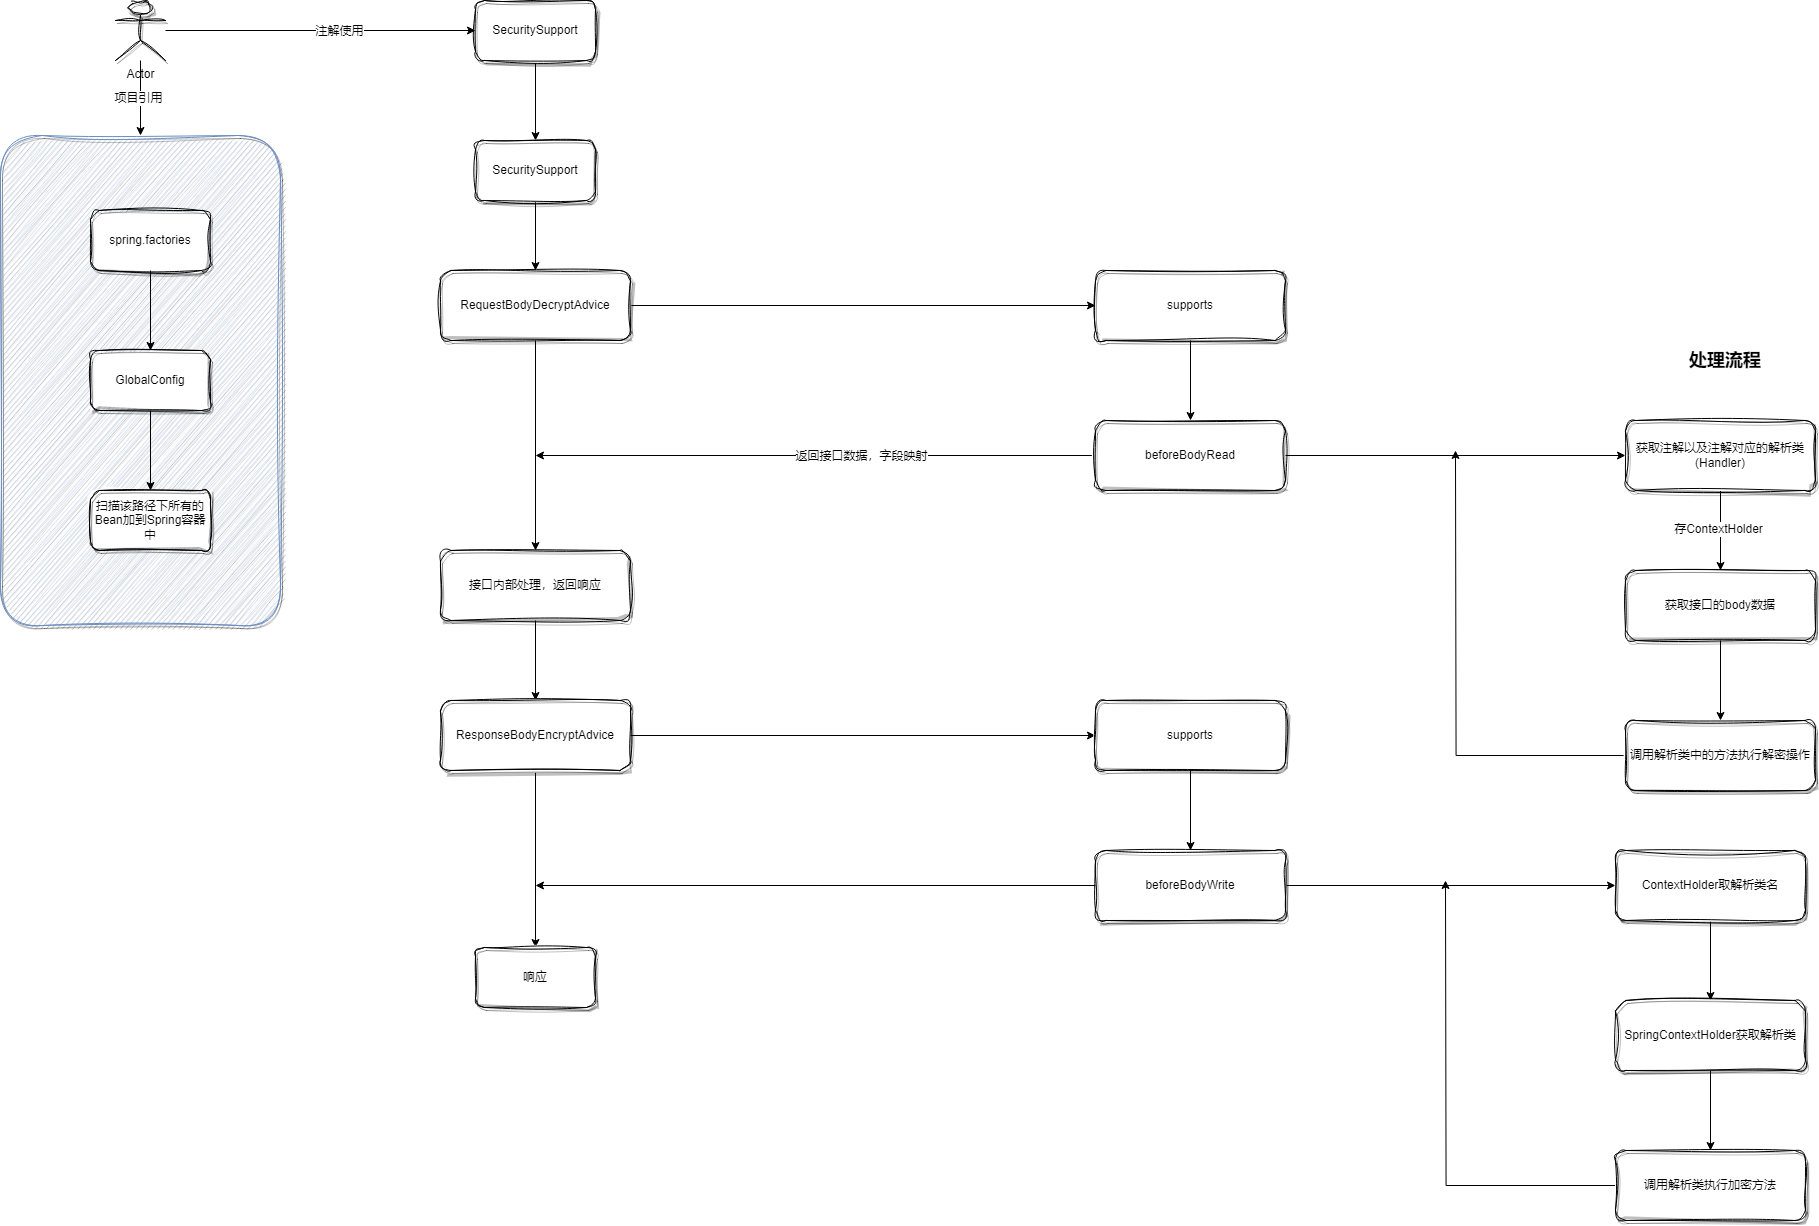
核心代码:
@Override
public HttpInputMessage beforeBodyRead(HttpInputMessage inputMessage, MethodParameter parameter, Type targetType, Class<? extends HttpMessageConverter<?>> converterType) throws IOException {
    log.info("进入【RequestBodyDecryptAdvice】beforeBodyRead的操作,方法:{}",parameter.getMethod());
    SecuritySupport securitySupport = parameter.getMethodAnnotation(SecuritySupport.class);
    assert securitySupport != null;
    ContextHolder.setCryptHolder(securitySupport.securityHandler());
    String original = IOUtils.toString(inputMessage.getBody(), Charset.defaultCharset());
    //todo
    log.info("该流水已插入当前请求流水表");
    String handler = securitySupport.securityHandler();
    String plainText = original;
    if(StringUtils.isNotBlank(handler)){
        SecurityHandler securityHandler = SpringContextHolder.getBean(handler, SecurityHandler.class);
        plainText = securityHandler.decrypt(original);
    }
    return new MappingJacksonInputMessage(IOUtils.toInputStream(plainText, Charset.defaultCharset()), inputMessage.getHeaders());
}
@Override
public Object beforeBodyWrite(Object body, MethodParameter returnType, MediaType selectedContentType, Class selectedConverterType, ServerHttpRequest request, ServerHttpResponse response) {
    log.info("进入【ResponseBodyEncryptAdvice】beforeBodyWrite的操作,方法:{}",returnType.getMethod());
    String cryptHandler = ContextHolder.getCryptHandler();
    SecurityHandler securityHandler = SpringContextHolder.getBean(cryptHandler, SecurityHandler.class);
    assert body != null;
    return securityHandler.encrypt(body.toString());
}
该Starter中的全局加解密默认采用的国密非对称加密SM2,在开发过程中遇到了该问题InvalidCipherTextException: invalid cipher text
【原因】 私钥和公钥值不是成对存在的,每次调用SmUtil.sm2()会生成不同的随机密钥对。
【解决】在该Starter中采用@PostConstruct修饰方法,在项目运行中只会初始化运行一次该方法,保证了SmUtil.sm2()只会调用一次,不会生成不同的随机秘钥对。
【ISSUES#1890】详细请看该地址:https://hub.fgit.cf/dromara/hutool/issues/1890
/**
 * @author xbhog
 * @date 2024/02/01 13:23
 **/
@Slf4j
@Component
public class EncryAdecryHolder {
    public static SM2 sm2 = null;
    @PostConstruct
    public void encryHolder(){
        KeyPair pair = SecureUtil.generateKeyPair("SM2");
        byte[] privateKey = pair.getPrivate().getEncoded();
        byte[] publicKey = pair.getPublic().getEncoded();
        log.info("生成的公钥:{}",publicKey);
        log.info("生成的私钥:{}",privateKey);
        sm2= SmUtil.sm2(privateKey, publicKey);
    }
}
除了默认的加密方式,还可以通过SecurityHandler接口进行扩展,扩展出来的impl可以在@SecuritySupport(securityHandler="xxxxxx")中指定。
/**
 * @author xbhog
 * @describe: 全局加解密注解
 * @date 2023/6/8
 */
@Target(ElementType.METHOD)
@Retention(RetentionPolicy.RUNTIME)
public @interface SecuritySupport {
    /*securityHandlerImpl*/
    String securityHandler() default "securityHandlerImpl";

    String exceptionResponse() default "";

}
测试#
复用之前的测试项目,引用打包的mavne依赖:
<dependency>
    <groupId>com.xbhog</groupId>
    <artifactId>encryAdecry-spring-boot-starter</artifactId>
    <version>1.0.0</version>
</dependency>
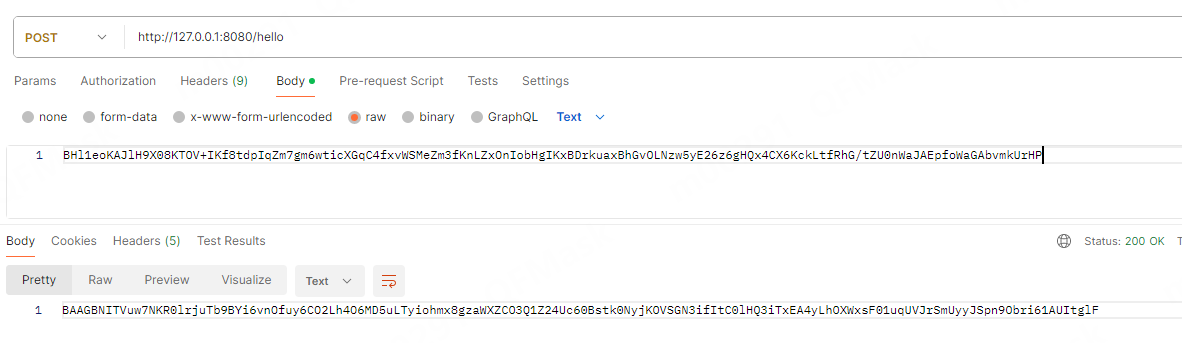
启动项目,初始化公私钥。


测试接口代码如下:
@Slf4j
@RestController
public class BasicController implements ApplicationContextAware {
    @Resource(name = "demoSecurityHandlerImpl")
    private SecurityHandler encryAdecry;
    private ApplicationContext applicationContext;

    // http://127.0.0.1:8080/hello?name=lisi
    //@SecuritySupport(securityHandler = "demoSecurityHandlerImpl")
    @SecuritySupport
    @PostMapping("/hello")
    public String hello(@RequestBody String name) {
        return "Hello " + name;
    }

    @GetMapping("/configTest")
    public String configTest(@RequestParam("name") String name) {
        /*DemoBean demoBean = applicationContext.getBean(DemoBean.class);
        demoBean.getDemo();*/
        return encryAdecry.encrypt(name);
        //return MD5.create().digestHex16(name);
    }
}
优化#
优化后的项目结构:
encryAdecry-spring-boot-starter
└── src
    └── main
        └── java
            └── com.xbhog
                ├── advice
                │   ├──ResponseBodyEncryptAdvice.java
                │   └──RequestBodyDecryptAdvice.java
                ├── annotation
                │   └──SecuritySupport
                ├── handler
                │    ├──impl
                │    │   └──EncryAdecryImpl.java
                │    └──SecurityHandler
                └── holder
                │    ├──ContextHolder.java
                │    └──SpringContextHolder.java
                ├──GlobalProperties.java
                └──GlobalConfig.java
        └── resources
                └── META-INF
                    └── spring.factories
增加配置类,用于绑定外部配置(properties和YAML)到Java对象的的一种机制;
@Data
@ConfigurationProperties(GlobalProperties.PREFIX)
public class GlobalProperties {
    /**
     * 默认前缀
     */
    public static final String PREFIX = "encryption.type";
    /**
     * 加解密算法
     */
    private String algorithmType;

    /**
     * 加解密key值
     */
    private String key;
}
注解修改:
@Target(ElementType.METHOD)
@Retention(RetentionPolicy.RUNTIME)
public @interface SecuritySupport {
    /**
     * 项目默认加解密实现类encryAdecryImpl
     * */
    String securityHandler() default "encryAdecryImpl";

}
重写Starter默认的加解密方式:
@Slf4j
@Component
public class EncryAdecryImpl implements SecurityHandler {

    @Resource
    private GlobalProperties globalProperties;
    private static volatile SM2 sm2;

    @Override
    public String encrypt(String original) {
        log.info("【starter】具体加密的数据{}",original);
        return sm2.encryptBase64(original, KeyType.PublicKey);
    }

    @Override
    public String decrypt(String original) {
        String decryptData = StrUtil.utf8Str(sm2.decryptStr(original, KeyType.PrivateKey));
        log.info("【starter】具体解密的数据:{}",decryptData);
        return decryptData;
    }

    @PostConstruct
    @Override
    public void init() {
        log.info("======>获取映射的加密算法类型:{}",globalProperties.getAlgorithmType());
        //传的是加密算法
        KeyPair pair = SecureUtil.generateKeyPair(globalProperties.getAlgorithmType());
        byte[] privateKey = pair.getPrivate().getEncoded();
        byte[] publicKey = pair.getPublic().getEncoded();
        sm2= SmUtil.sm2(privateKey, publicKey);
    }
}
Recommend
About Joyk
Aggregate valuable and interesting links.
Joyk means Joy of geeK