

可缩放矢量图形SVG
source link: https://www.biaodianfu.com/svg.html
Go to the source link to view the article. You can view the picture content, updated content and better typesetting reading experience. If the link is broken, please click the button below to view the snapshot at that time.

SVG简介
可缩放矢量图形(SVG) 是一种基于 XML 的图像格式,专门用于在网络上描述二维矢量图形。这种格式的独特之处在于其可缩放性和矢量性质,意味着不论放大多少倍,图像都能保持清晰。
矢量图形与栅格图形的区别
- 矢量图形(如SVG):使用数学方程(线条和曲线)来描述图形,可以无限缩放而不失真。
- 栅格图形(如JPG、PNG):由像素点组成,放大过度会出现像素化,影响清晰度。
SVG的特点
- 分辨率独立:不受屏幕分辨率限制,图像总是清晰。
- 小文件尺寸:通常比同等清晰度的栅格图形小,尤其适用于网页。
- 可编辑性:可以通过文本编辑器直接编辑,也可以通过专业软件进行可视化编辑。
- DOM兼容性:可以被浏览器的DOM(文档对象模型)识别,意味着可以用CSS和JavaScript进行操控和交互。
- 跨平台兼容:大部分现代浏览器都支持SVG。
使用场景
- 网页设计:图标、logo、图表等,尤其是响应式设计中。
- 打印媒体:由于高清晰度和可缩放性,适合用于高质量打印。
- 动画和交互:与CSS和JavaScript结合,可创造动态和交互效果。
如何创建和编辑SVG
- 文本编辑器:手动编写或编辑SVG的XML代码。
- 图形编辑软件:如Adobe Illustrator、Inkscape等,可以生成SVG文件。
- 网页开发工具:如各种前端开发框架和库,支持SVG的创建和操控。
SVG的局限性
- 复杂度:对于非常复杂或高度详细的图形,SVG文件可能变得很大,影响性能。
- 学习曲线:需要一定的学习和实践才能熟练掌握。
SVG因其可缩放性、清晰度和灵活性,在网络图形和某些打印场景中被广泛应用。不过,对于特别复杂的图像,或者那些需要像素级细节的应用场景,栅格图形格式可能更为合适。
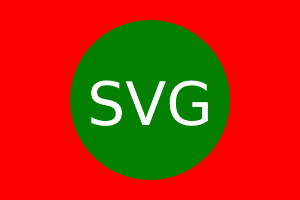
一个简单的示例
让我们直接从一个简单的例子开始,看一下下面代码:
<svg version="1.1"
     baseProfile="full"
     width="300" height="200"
     xmlns="http://www.w3.org/2000/svg">
  <rect width="100%" height="100%" fill="red" />
  <circle cx="150" cy="100" r="80" fill="green" />
  <text x="150" y="125" font-size="60" text-anchor="middle" fill="white">SVG</text>
</svg>
复制并粘贴代码到文件 demo.svg。然后在浏览器中打开该文件。它将会呈现为下面的截图。
SVG的使用
SVG 文件可以直接插入网页,成为 DOM 的一部分,然后用 JavaScript 和 CSS 进行操作。
<!DOCTYPE html>
<html>
<head></head>
<body>
<svg
  id="mysvg"
  xmlns="http://www.w3.org/2000/svg"
  viewBox="0 0 800 600"
  preserveAspectRatio="xMidYMid meet">
  <circle id="mycircle" cx="400" cy="300" r="50" />
<svg>
</body>
</html>
上面是 SVG 代码直接插入网页的例子。
SVG 代码也可以写在一个独立文件中,然后用<img>、<object>、<embed>、<iframe>等标签插入网页。
<img src="circle.svg">
<object id="object" data="circle.svg" type="image/svg+xml"></object>
<embed id="embed" src="icon.svg" type="image/svg+xml">
<iframe id="iframe" src="icon.svg"></iframe>
CSS 也可以使用 SVG 文件。
.logo {
  background: url(icon.svg);
}
SVG 文件还可以转为 BASE64 编码,然后作为 Data URI 写入网页。
<img src="data:image/svg+xml;base64,[data]">
SVG的语法
<svg>标签
SVG 代码都放在顶层标签<svg>之中。下面是一个例子。
<svg width="100%" height="100%">
  <circle id="mycircle" cx="50" cy="50" r="50" />
</svg>
<svg>的width属性和height属性,指定了 SVG 图像在 HTML 元素中所占据的宽度和高度。除了相对单位,也可以采用绝对单位(单位:像素)。如果不指定这两个属性,SVG 图像默认大小是300像素(宽) x 150像素(高)。
width/height如果是纯数字,使用的就是“像素”作为单位的。以下为支持的单位:
| 单位 | 含义 |
| em | 相对于父元素的字体大小 |
| ex | 相对于小写字母”x”的高度 |
| px | 相对于屏幕分辨率而不是视窗大小:通常为1个点或1/72英寸 |
| in | inch, 表英寸 |
| cm | centimeter, 表厘米 |
| mm | millimeter, 表毫米 |
| pt | 1/72英寸 |
| pc | 12点活字,或1/12点 |
| % | 相对于父元素。正常情况下是通过属性定义自身或其他元素 |
如果只想展示 SVG 图像的一部分,就要指定viewBox属性。
<svg width="100" height="100" viewBox="50 50 50 50">
  <circle id="mycircle" cx="50" cy="50" r="50" />
</svg>
<viewBox>属性的值有四个数字,分别是左上角的横坐标和纵坐标、视口的宽度和高度。上面代码中,SVG 图像是100像素宽 x 100像素高,viewBox属性指定视口从(50, 50)这个点开始。所以,实际看到的是右下角的四分之一圆。
注意,视口必须适配所在的空间。上面代码中,视口的大小是 50 x 50,由于 SVG 图像的大小是 100 x 100,所以视口会放大去适配 SVG 图像的大小,即放大了四倍。
如果不指定width属性和height属性,只指定viewBox属性,则相当于只给定 SVG 图像的长宽比。这时,SVG 图像的默认大小将等于所在的 HTML 元素的大小。
<circle>标签
<circle>标签代表圆形。
<svg width="300" height="180">
  <circle cx="30"  cy="50" r="25" />
  <circle cx="90"  cy="50" r="25" class="red" />
  <circle cx="150" cy="50" r="25" class="fancy" />
</svg>
上面的代码定义了三个圆。<circle>标签的cx、cy、r属性分别为横坐标、纵坐标和半径,单位为像素。坐标都是相对于<svg>画布的左上角原点。
class属性用来指定对应的 CSS 类。
.red {
  fill: red;
}

.fancy {
  fill: none;
  stroke: black;
  stroke-width: 3pt;
}
SVG 的 CSS 属性与网页元素有所不同。
- fill:填充色
- stroke:描边色
- stroke-width:边框宽度
<line>标签
<line>标签用来绘制直线。
<svg width="300" height="180">
  <line x1="0" y1="0" x2="200" y2="0" style="stroke:rgb(0,0,0);stroke-width:5" />
</svg>
上面代码中,<line>标签的x1属性和y1属性,表示线段起点的横坐标和纵坐标;x2属性和y2属性,表示线段终点的横坐标和纵坐标;style属性表示线段的样式。
<polyline>标签
<polyline>标签用于绘制一根折线。
<svg width="300" height="180">
  <polyline points="3,3 30,28 3,53" fill="none" stroke="black" />
</svg>
<polyline>的points属性指定了每个端点的坐标,横坐标与纵坐标之间与逗号分隔,点与点之间用空格分隔。
<rect>标签
<rect>标签用于绘制矩形。
<svg width="300" height="180">
  <rect x="0" y="0" height="100" width="200" style="stroke: #70d5dd; fill: #dd524b" />
</svg>
<rect>的x属性和y属性,指定了矩形左上角端点的横坐标和纵坐标;width属性和height属性指定了矩形的宽度和高度(单位像素)。
<ellipse>标签
<ellipse>标签用于绘制椭圆。
<svg width="300" height="180">
  <ellipse cx="60" cy="60" ry="40" rx="20" stroke="black" stroke-width="5" fill="silver"/>
</svg>
<ellipse>的cx属性和cy属性,指定了椭圆中心的横坐标和纵坐标(单位像素);rx属性和ry属性,指定了椭圆横向轴和纵向轴的半径(单位像素)。
<polygon>标签
<polygon>标签用于绘制多边形。
<svg width="300" height="180">
  <polygon fill="green" stroke="orange" stroke-width="1" points="0,0 100,0 100,100 0,100 0,0"/>
</svg>
<polygon>的points属性指定了每个端点的坐标,横坐标与纵坐标之间与逗号分隔,点与点之间用空格分隔。
<path>标签
<path>标签用于制路径。
<svg width="300" height="180">
<path d="
  M 18,3
  L 46,3
  L 46,40
  L 61,40
  L 32,68
  L 3,40
  L 18,40
  Z
"></path>
</svg>
<path>的d属性表示绘制顺序,它的值是一个长字符串,每个字母表示一个绘制动作,后面跟着坐标。
- M:移动到(moveto)
- L:画直线到(lineto)
- Z:闭合路径
<text>标签
<text>标签用于绘制文本。
<svg width="300" height="180">
  <text x="50" y="25">Hello World</text>
</svg>
<text>的x属性和y属性,表示文本区块基线(baseline)起点的横坐标和纵坐标。文字的样式可以用class或style属性指定。
<use>标签
<use>标签用于复制一个形状。
<svg viewBox="0 0 30 10" xmlns="http://www.w3.org/2000/svg">
  <circle id="myCircle" cx="5" cy="5" r="4"/>

  <use href="#myCircle" x="10" y="0" fill="blue" />
  <use href="#myCircle" x="20" y="0" fill="white" stroke="blue" />
</svg>
<use>的href属性指定所要复制的节点,x属性和y属性是<use>左上角的坐标。另外,还可以指定width和height坐标。
<g>标签
<g>标签用于将多个形状组成一个组(group),方便复用。
<svg width="300" height="100">
  <g id="myCircle">
    <text x="25" y="20">圆形</text>
    <circle cx="50" cy="50" r="20"/>
  </g>

  <use href="#myCircle" x="100" y="0" fill="blue" />
  <use href="#myCircle" x="200" y="0" fill="white" stroke="blue" />
</svg>
<defs>标签
<defs>标签用于自定义形状,它内部的代码不会显示,仅供引用。
<svg width="300" height="100">
  <defs>
    <g id="myCircle">
      <text x="25" y="20">圆形</text>
      <circle cx="50" cy="50" r="20"/>
    </g>
  </defs>

  <use href="#myCircle" x="0" y="0" />
  <use href="#myCircle" x="100" y="0" fill="blue" />
  <use href="#myCircle" x="200" y="0" fill="white" stroke="blue" />
</svg>
<pattern>标签
<pattern>标签用于自定义一个形状,该形状可以被引用来平铺一个区域。
<svg width="500" height="500">
  <defs>
    <pattern id="dots" x="0" y="0" width="100" height="100" patternUnits="userSpaceOnUse">
      <circle fill="#bee9e8" cx="50" cy="50" r="35" />
    </pattern>
  </defs>
  <rect x="0" y="0" width="100%" height="100%" fill="url(#dots)" />
</svg>
上面代码中,<pattern>标签将一个圆形定义为dots模式。patternUnits=”userSpaceOnUse”表示<pattern>的宽度和长度是实际的像素值。然后,指定这个模式去填充下面的矩形。
<image>标签
<image>标签用于插入图片文件。
<svg viewBox="0 0 100 100" width="100" height="100">
  <image xlink:href="path/to/image.jpg"
    width="50%" height="50%"/>
</svg>
上面代码中,<image>的xlink:href属性表示图像的来源。
<animate>标签
<animate>标签用于产生动画效果。
<svg width="500px" height="500px">
  <rect x="0" y="0" width="100" height="100" fill="#feac5e">
    <animate attributeName="x" from="0" to="500" dur="2s" repeatCount="indefinite" />
  </rect>
</svg>
上面代码中,矩形会不断移动,产生动画效果。
<animate>的属性含义如下。
- attributeName:发生动画效果的属性名。
- from:单次动画的初始值。
- to:单次动画的结束值。
- dur:单次动画的持续时间。
- repeatCount:动画的循环模式。
可以在多个属性上面定义动画。
<animate attributeName="x" from="0" to="500" dur="2s" repeatCount="indefinite" />
<animate attributeName="width" to="500" dur="2s" repeatCount="indefinite" />
<animateTransform>标签
<animate>标签对 CSS 的transform属性不起作用,如果需要变形,就要使用<animateTransform>标签。
<svg width="500px" height="500px">
  <rect x="250" y="250" width="50" height="50" fill="#4bc0c8">
    <animateTransform attributeName="transform" type="rotate" begin="0s" dur="10s" from="0 200 200" to="360 400 400" repeatCount="indefinite" />
  </rect>
</svg>
上面代码中,<animateTransform>的效果为旋转(rotate),这时from和to属性值有三个数字,第一个数字是角度值,第二个值和第三个值是旋转中心的坐标。from=”0 200 200″表示开始时,角度为0,围绕(200, 200)开始旋转;to=”360 400 400″表示结束时,角度为360,围绕(400, 400)旋转。
参考链接:
Recommend
About Joyk
Aggregate valuable and interesting links.
Joyk means Joy of geeK