

从零搭建Vue3 + Typescript + Pinia + Vite + Tailwind CSS + Element Plus开发脚手架...
source link: https://www.cnblogs.com/breezefaith/p/18001427
Go to the source link to view the article. You can view the picture content, updated content and better typesetting reading experience. If the link is broken, please click the button below to view the snapshot at that time.

项目代码以上传至码云,项目地址:https://gitee.com/breezefaith/vue-ts-scaffold
近日心血来潮想做一个开源项目,目标是做一款可以适配多端、功能完备的模板工程,包含后台管理系统和前台系统,开发者基于此项目进行裁剪和扩展来完成自己的功能开发。但前台系统花样繁多,可能是PC端浏览器,可能是微信网页,微信小程序,安卓,鸿蒙……因此笔者只能从个人的需求出发,搭建了原生vue3版、原生微信小程序版、原生React版和uniapp版的前台系统模板。
本文内容主要就是来介绍从零搭建Typescript版Vue3工程的完整过程。
脚手架技术栈简介
Vue 3 是一个流行的开源JavaScript框架,用于构建用户界面和单页面应用。Vue 3与Vue 2的主要区别包括:
- 构建:Vue 3使用monorepo架构,更容易管理和维护。
- API:Vue 3引入了新的组合式API,它提供了更灵活的代码组织方式。
- 性能:Vue 3提供了更好的性能,包括更快的渲染速度和更小的打包大小。
- TypeScript:Vue 3提供了更好的TypeScript支持。
Vue3官方文档:https://cn.vuejs.org/
TypeScript
TypeScript是由 Microsoft 开发并维护的开源编程语言,它是在 JavaScript的基础上增加了静态类型、类和接口等特性,从而将其提升为一个功能更为丰富的开发平台。TypeScript 通过编译器将 TypeScript 代码转换为 JavaScript 代码,确保这些代码能够在支持 JavaScript 的各种设备和平台上运行。这种设计允许开发者利用 TypeScript 的静态类型检查以及类、接口和其他 OOP 功能来构建大型、复杂的 Web 应用,同时享受 JavaScript 本身的高灵活性和易于使用的特点。
Typescript官网文档:https://www.typescriptlang.org/
Pinia
Pinia 是 Vue 的存储库,它允许您跨组件/页面共享状态。 如果您熟悉 Composition API,您可能会认为您已经可以通过一个简单的 export const state = reactive({}). 这对于单页应用程序来说是正确的,但如果它是服务器端呈现的,会使您的应用程序暴露于安全漏洞。 但即使在小型单页应用程序中,您也可以从使用 Pinia 中获得很多好处:
- dev-tools 支持
- 跟踪动作、突变的时间线
- Store 出现在使用它们的组件中
- time travel 和 更容易的调试
- 热模块更换
- 在不重新加载页面的情况下修改您的 Store
- 在开发时保持任何现有状态
- 插件:使用插件扩展 Pinia 功能
- 为 JS 用户提供适当的 TypeScript 支持或 autocompletion
- 服务器端渲染支持
Pinia 目前也已经是 vue 官方正式的状态库。适用于 vue2 和 vue3。可以简单的理解成 Pinia 就是 Vuex5。也就是说, Vue3 项目,建议使用Pinia。
Pinia官方文档:https://pinia.web3doc.top/
Tailwind CSS
Tailwind是一个原子类方式命名的CSS工具集。Tailwind CSS 是一个功能类优先的 CSS 框架,它集成了诸如 flex, pt-4, text-center 和 rotate-90 这样的的类,它们能直接在脚本标记语言中组合起来,构建出任何设计。它将所有的css属性全部封装成语义化的类,比如你想要一个float:left,它已经帮你封装好了,你直接使用一个float-left就可以。需要一个宽度为12像素,只需要写w-3就可以。
使用tailwindcss极大的减少代码量,能轻松完成响应式设计,不需要再写单独的css,也不需要再为class取个什么名字而苦恼。
tailwindcss官方文档:https://tailwindcss.com/
Element Plus
Element Plus是一个基于Vue.js 3.0的UI库,是Element UI的升级版。它提供了一套漂亮、易于使用和自定义的组件,如按钮、输入框、表格、弹窗、日期选择器等。Element Plus的设计理念注重用户体验和响应式设计,所有组件都可以自适应不同屏幕大小以提供良好的用户体验。
Element Plus具有更好的性能和更好的API设计,遵循更好的Reactivity和Function API,并且使用了更符合Vue.js用户习惯的Composition API。相对于Element UI,Element Plus使用Vue.js 3.0,废弃了依赖和拦截器,优化了性能和API设计,更新了主题和组件样式,并且去掉了一些过时的组件,增加了一些更实用和流行的组件(如Slider),支持多语言和自定义主题。
Element Plus是一个功能强大、易于使用和定制的Vue.js UI库,提供了许多实用的组件和功能,并且可以按照自己的需求进行配置和扩展。它适用于各种类型的Web应用程序、移动应用程序和桌面应用程序。
Element Plus官方文档:https://element-plus.gitee.io/zh-CN/
Vite是Vue的作者尤雨溪开发的Web开发构建工具,它是一个基于浏览器原生ES模块导入的开发服务器,在开发环境下,利用浏览器去解析import,在服务器端按需编译返回,完全跳过了打包这个概念,服务器随启随用。同时不仅对Vue文件提供了支持,还支持热更新,而且热更新的速度不会随着模块增多而变慢。Vue3默认使用Vite作为项目脚手架工具。
Vite官方文档:https://vitejs.cn/
Node.js安装
Vite需要 Node.js 版本 14.18+,16或更高版本。
Tailwind CSS 需要 Node.js 12.13.0 或更高版本。
可使用 node -v命令查看当前node版本,如果不符合要求请先升级Nodejs。
创建以 typescript 开发的vue3工程
npm create vue@latest
或
yarn create vue@latest
或
pnpm create vue@latest
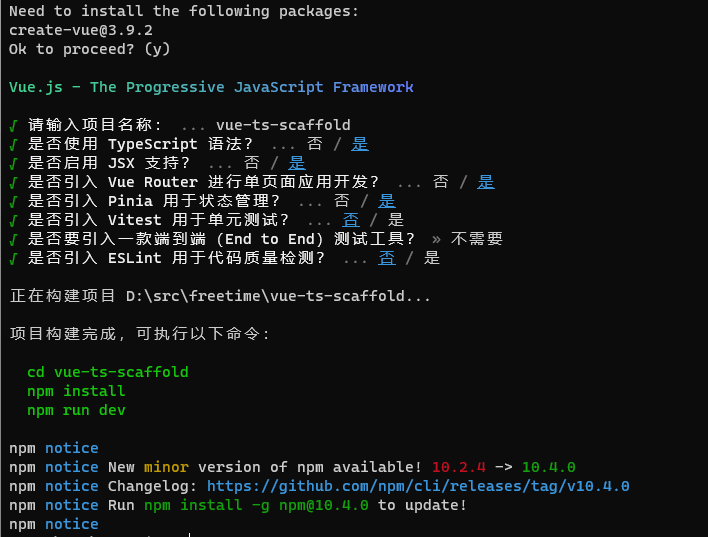
创建过程中需要选择项目要支持的特性,笔者选择使用TypeScript、启用JSX、引入Vue-Router和Pinia。
项目创建成功后执行以下命令安装npm依赖。
npm install --registry=https://registry.npmmirror.com
或
yarn install
或
pnpm install
依赖安装完成后,执行以下命令可运行代码。
npm run dev
或
yarn dev
或
pnpm run dev
集成Pinia
安装pinia
如果项目创建过程中已选择了pinia特性则可跳过该步骤,如果没有,则需要手动安装pinia并创建自定义Store。
npm install --registry=https://registry.npmmirror.com [email protected]
或
yarn add [email protected]
或
pnpm install [email protected]
修改main.ts
将src/main.ts修改为以下内容:
import './assets/main.css'

import { createApp } from 'vue'
import { createPinia } from 'pinia'

import App from './App.vue'
import router from './router'

const app = createApp(App)

app.use(createPinia())
app.use(router)

app.mount('#app')
创建一个store
// stores/counter.ts
import { ref, computed } from 'vue'
import { defineStore } from 'pinia'

export const useCounterStore = defineStore('counter', () => {
  const count = ref(0)
  const doubleCount = computed(() => count.value * 2)
  function increment() {
    count.value++
  }

  return { count, doubleCount, increment }
})
在组件中使用store
<script setup lang="ts">
import TheWelcome from '../components/TheWelcome.vue'
import { useCounterStore } from '@/stores/counter'

const counter = useCounterStore();
counter.count++
// 自动补全!
counter.$patch({ count: counter.count + 1 })
// 或使用 action 代替
counter.increment()
</script>

<template>
  <main>
    <!-- 直接从 store 中访问 state -->
    <div>Current Count: {{ counter.count }}</div>
    <TheWelcome />
  </main>
</template>
集成Tailwind CSS
Tailwind CSS 需要 Node.js 12.13.0 或更高版本。对于大多数实际项目,建议将 Tailwind 作为 PostCSS 插件安装,本文使用的也是该方式。
安装postcss、sass、autoprefixer和tailwindcss以及相关依赖
- Sass 是一款强化 CSS 的辅助工具,它在 CSS 语法的基础上增加了变量 (variables)、嵌套 (nested rules)、混合 (mixins)、导入 (inline imports) 等高级功能,这些拓展令 CSS 更加强大与优雅。使用 Sass 以及 Sass 的样式库(如 Compass)有助于更好地组织管理样式文件,以及更高效地开发项目。
- autoprefixer是一款自动管理浏览器前缀的插件,它可以解析CSS文件并且添加浏览器前缀到CSS内容里,使用Can I Use(caniuse网站)的数据来决定哪些前缀是需要的。把autoprefixe添加到资源构建工具(例如Grunt)后,可以完全忘记有关CSS前缀的东西,只需按照最新的W3C规范来正常书写CSS即可。如果项目需要支持旧版浏览器,可修改browsers参数设置 。
执行以下命令安装依赖:
npm install --registry=https://registry.npmmirror.com --save-dev autoprefixer postcss postcss-comment postcss-html postcss-import postcss-scss sass sass-loader tailwindcss
或
yarn add --save-dev autoprefixer postcss postcss-comment postcss-html postcss-import postcss-scss sass sass-loader tailwindcss
或
pnpm install --save-dev autoprefixer postcss postcss-comment postcss-html postcss-import postcss-scss sass sass-loader tailwindcss
创建配置文件postcss.config.js和tailwind.config.js
创建配置文件
使用命令行可以自动创建postcss.config.js和tailwind.config.js配置文件,也可以手动创建。
npx tailwindcss init -p
tailwind.config.js
/** @type {import('tailwindcss').Config} */
module.exports = {
  darkMode: "class",
  corePlugins: {
    preflight: false
  },
  content: ["./index.html", "./src/**/*.{vue,js,ts,jsx,tsx}"],
  theme: {
    extend: {
      colors: {
      }
    }
  }
};
postcss.config.js
export default {
  plugins: {
    tailwindcss: {},
    autoprefixer: {},
  },
}
创建并引入tailwind.css
创建tailwind.css
在src目录下创建styles目录,在styles目录下创建tailwind.css。
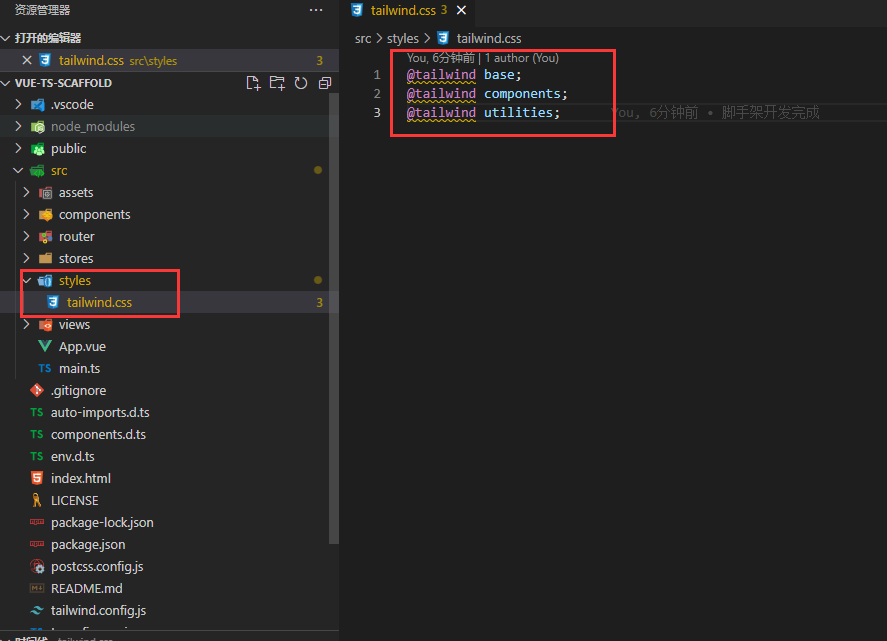
tailwind.css文件内容如下:
@tailwind base;
@tailwind components;
@tailwind utilities;
main.ts中引入tailwind.css
配置完成后需要引入tailwindcss,修改src/main.ts内容如下:
import '@/styles/tailwindcss.css';
import './assets/main.css'

import { createApp } from 'vue'
import { createPinia } from 'pinia'

import App from './App.vue'
import router from './router'

const app = createApp(App)

app.use(createPinia())
app.use(router)

app.mount('#app')
在组件中使用tailwindcss
<template>
  <main>
    <!-- 直接从 store 中访问 state -->
    <div class="w-full h-[100px] bg-[red] flex justify-center items-center">
      Hello Tailwind CSS
    </div>
    <TheWelcome />
  </main>
</template>
以上代码定义了一个宽度100%,高度100px,背景是红色,使用flex布局,垂直方向和水平方向内容都居中的区域,区域中有一个文本元素,显示Hello Tailwind CSS。
Element Plus
本文使用的是Element Plus按需自动引入的方式,此方式可以使编译产物体积更小,运行速度更快。如果需要实现完整导入,请参阅Element Plus官方文档。
安装Element Plus
npm install --registry=https://registry.npmmirror.com element-plus --save
或
yarn add element-plus --save
或
pnpm install element-plus --save
修改tsconfig.json
在 tsconfig.json 中通过 compilerOptions.type 指定全局组件类型,这样可以配合Volar插件实现代码提示功能。
{
  "files": [],
  "references": [
    {
      "path": "./tsconfig.node.json"
    },
    {
      "path": "./tsconfig.app.json"
    }
  ],
  "compilerOptions": {
    "types": [
      "element-plus/global"
    ]
  }
}
安装Element Plus自动导入工具
npm install --registry=https://registry.npmmirror.com -D unplugin-vue-components unplugin-auto-import
或
yarn add -D unplugin-vue-components unplugin-auto-import
或
pnpm install -D unplugin-vue-components unplugin-auto-import
修改vite.config.js
import { fileURLToPath, URL } from 'node:url'

import { defineConfig } from 'vite'
import vue from '@vitejs/plugin-vue'
import vueJsx from '@vitejs/plugin-vue-jsx'
import AutoImport from 'unplugin-auto-import/vite'
import Components from 'unplugin-vue-components/vite'
import { ElementPlusResolver } from 'unplugin-vue-components/resolvers'

// https://vitejs.dev/config/
export default defineConfig({
  plugins: [
    vue(),
    vueJsx(),
    AutoImport({
      resolvers: [ElementPlusResolver()],
    }),
    Components({
      resolvers: [ElementPlusResolver()],
    }),
  ],
  resolve: {
    alias: {
      '@': fileURLToPath(new URL('./src', import.meta.url))
    }
  }
})
使用Element Plus组件
<template>
  <main>
    <!-- 直接从 store 中访问 state -->
    <div class="w-full h-[100px] bg-[red] flex justify-center items-center">
      Hello Tailwind CSS
    </div>
    <div>
      <el-button type="primary">Element Plus按钮</el-button>
    </div>
    <div>Current Count: {{ counter.count }}</div>
    <TheWelcome />
  </main>
</template>
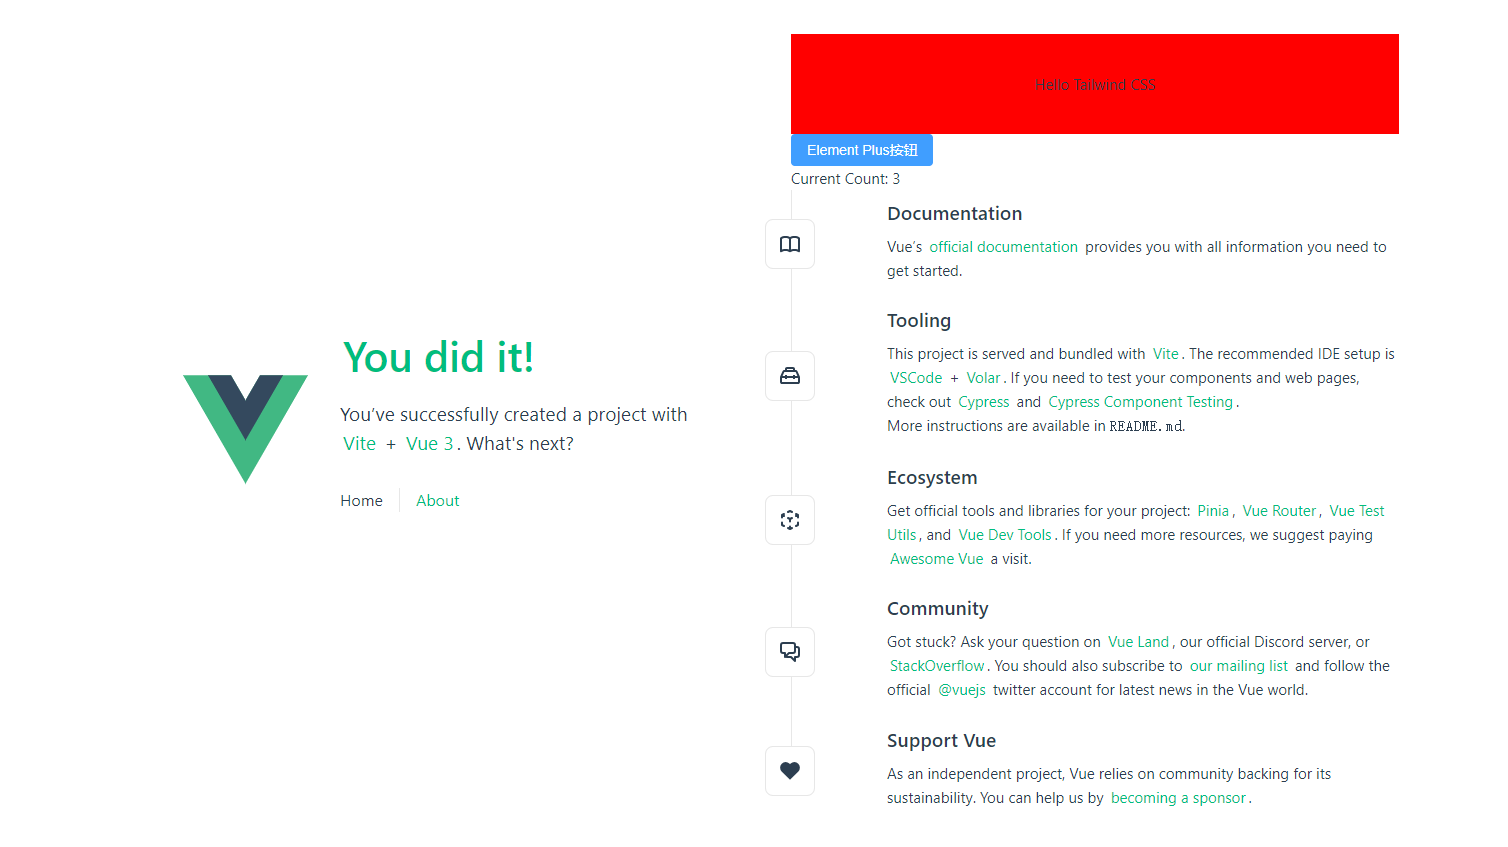
以上代码就是添加了一个Element Plus组件库的按钮。
至此,环境搭建完成,运行效果如下:
在本文中介绍了从零搭建Typescript版Vue3工程的完整过程,如有错误,还望批评指正。
在后续实践中我也是及时更新自己的学习心得和经验总结,希望与诸位看官一起进步。
项目代码以上传至码云,项目地址:https://gitee.com/breezefaith/vue-ts-scaffold
Recommend
About Joyk
Aggregate valuable and interesting links.
Joyk means Joy of geeK