

Building a Generative AI Processor in Python
source link: https://dzone.com/articles/building-a-generative-ai-processor-in-python
Go to the source link to view the article. You can view the picture content, updated content and better typesetting reading experience. If the link is broken, please click the button below to view the snapshot at that time.

Building a Generative AI Processor in Python
Why not create a Python Processor for Apache NiFi 2.0.0? In this tutorial, discover whether the challenge to do so is easy or difficult.
It was a really snowy day when I started this. I saw the IBM WatsonX Python SDK and realized I needed to wire up my Gen AI Model (LLM) to send my context-augmented prompt from Slack. Why not create a Python Processor for Apache NiFi 2.0.0? I guess that won’t be hard. It was easy!
IBM WatsonXAI has a huge list of powerful foundation models that you can choose from, just don't pick those v1 models as they are going to be removed in a few months.
- GitHub, IBM/watsonxdata-python-sdk: This is used for wastonx.data Python SDK.
After we picked a model I tested it in WatsonX’s Prompt Lab. Then I ported it to a simple Python program. Once that worked I started adding the features like properties and the transform method. That’s it.
Source Code
Here is the link to the source code.
Now we can drop our new LLM calling processor into a flow and use it as any other built-in processor. For example, the Python API requires that Python 3.9+ is available on the machine hosting NiFi.
Package-Level Dependencies
Add to requirements.txt.
Basic Format for the Python Processor
You need to import various things from the nifiapi library. You then set up your class, CallWatsonXAI. You need to include class Java definition and ProcessDetails that include NiFi version, dependencies, a description, and some tags.
class ProcessorDetails:
        version = '0.0.1-SNAPSHOT',
        dependencies = ['pandas']
Define All The Properties For the Processor
You need to set up PropertyDescriptors for each property that include things like a name, description, required, validators, expression_language_scope, and more.
Transform Main Method
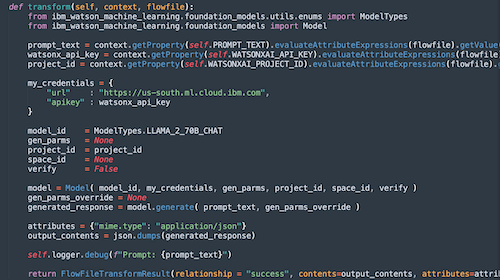
Here we include the imports needed. You can access properties via context.getProperty. You can then set attributes for outputs as shown via attributes. We then set contentsfor Flow File output. And finally, relationship, which for all guide is success. You should add something to handle errors. I need to add that.
If you need to, redeploy, debug, or fix something.
While you may delete the entire work directory while NiFi is stopped, doing so may result in NiFi taking significantly longer to startup the next time, as it must source all extensions' dependencies from PyPI, as well as expand all Java extensions' NAR files.
So to deploy it, we just need to copy the Python file to the nifi-2.0.0/python/extensions directory and possibly restart your NiFi server(s). I would start developing locally on your laptop with either a local GitHub build or Docker.
Now that we have written a processor, let's use it in a real-time streaming data pipeline application.
Example Application
Building off our previous application that receives Slack messages, we will take those Slack queries send them against PineCone or Chroma vector databases and take that context and send it along with our call to IBM’s WatsonX AI REST API for Generative AI (LLM).
You can find those previous details here:
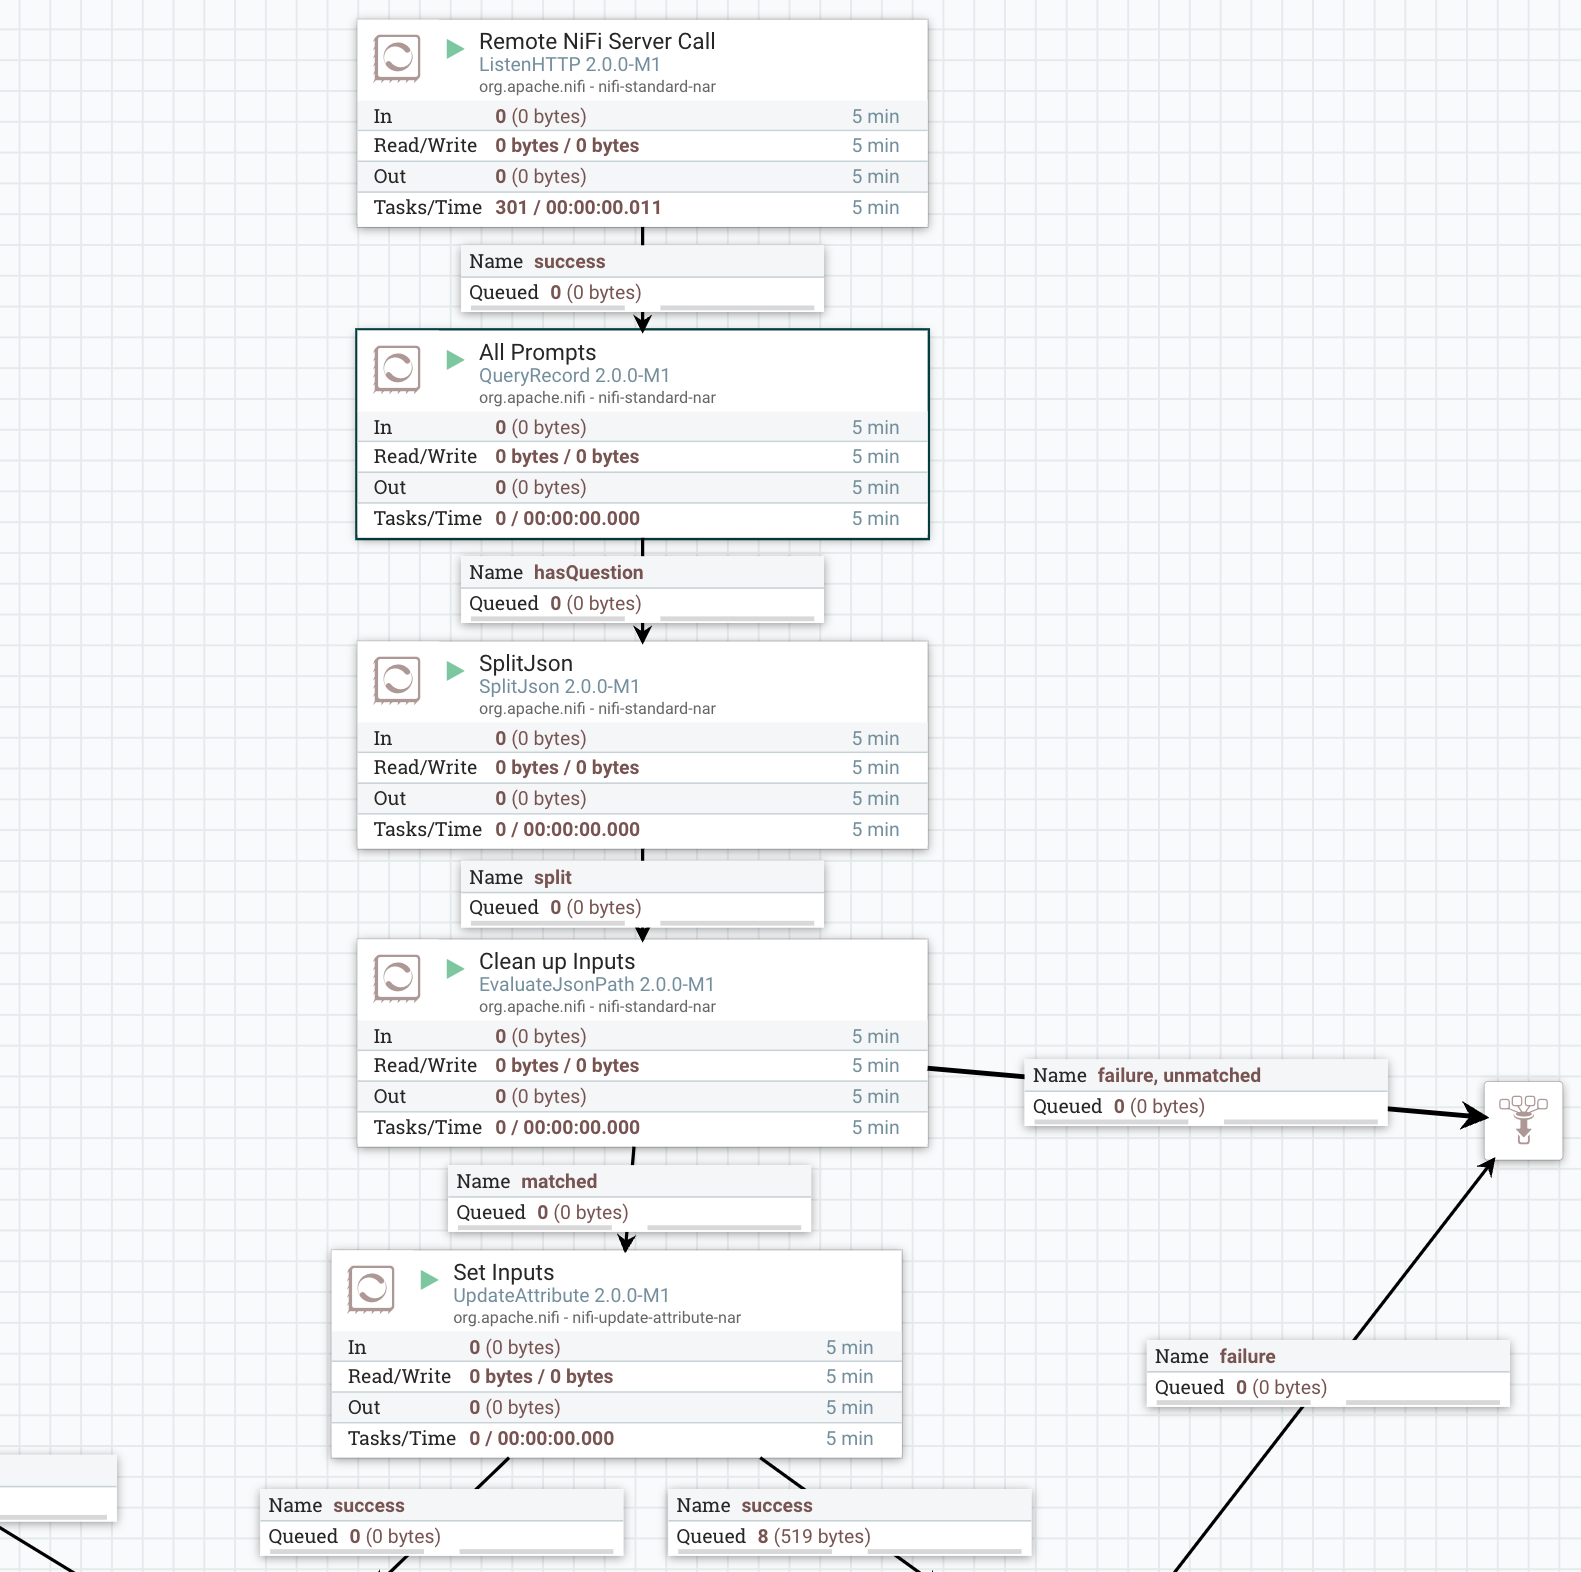
NiFi Flow
Listen HTTP: On port 9518/slack; NiFi is a universal REST endpointQueryRecord: JSON cleanupSplitJSON: $.*EvalJSONPath: Output attribute for $.inputsQueryChroma: Call server on port 9776 using ONNX model, export 25 RowsQueryRecord: JSON->JSON; Limit 1SplitRecord: JSON->JSON; Into 1 rowEvalJSONPath: Export the context from$.documentReplaceText: Make context the new Flow FileUpdateAttribute: Update inputsCallWatsonX: Our Python processor to call IBMSplitRecord: 1 Record, JSON -> JSONEvalJSONPath: Add attributesAttributesToJSON: Make a new Flow file from attributesQueryRecord: Validate JSONUpdateRecord: Add generated text, inputs, ts, UUID- Kafka Path,
PublishKafkaRecord_2_6: Send results to Kafka. - Kafka Path,
RetryFlowFile: If Apache Kafka send fails, try again. - Slack Path,
SplitRecord: Split into 1 record for display. - Slack Path,
EvaluateJSONPath: Pull out fields to display. - Slack Path,
PutSlack: Send formatted message to #chat group.
This is a full-fledged Retrieval Augmented Generation (RAG) application utilizing ChromaDB. (The NiFi flow can also use Pinecone. I am working on Milvus, SOLR, and OpenSearch next.)
Enjoy how easy it is to add Python code to your distributed NiFi applications.
Recommend
About Joyk
Aggregate valuable and interesting links.
Joyk means Joy of geeK