
Vue2转Vue3快速上手第二篇(共两篇)
source link: https://blog.51cto.com/u_15947040/9192788
Go to the source link to view the article. You can view the picture content, updated content and better typesetting reading experience. If the link is broken, please click the button below to view the snapshot at that time.

Vue2转Vue3快速上手第二篇(共两篇)
精选 原创teleport 传送门
这里说一下传送,这个传送就是我可以把teleport标签通过to="名称"放在我想要放在的标签里面 看个例子: Home.vue
<template>
  <div id="one">
      <h3>第一个div</h3>
  </div>
  <div class="two">
      <h3>第二个div</h3>
  </div>
  <ModalButton></ModalButton>
</template>
<script>
import { defineComponent } from "vue";
import ModalButton from '../components/ModalButton.vue';

export default defineComponent({
  components: {
    ModalButton,
  },
  setup() {
    return {};
  },
});
</script>
子组件ModalButton.vue
<template>
  <div>
    <button @click="modalOpen = true">弹出框</button>
    <teleport to="body">
      <div v-if="modalOpen" class="modal">
        <div>
          传送
          <button @click="modalOpen = false">关闭</button>
        </div>
      </div>
    </teleport>
  </div>
</template>
<script>
import { defineComponent, ref } from "vue";
export default defineComponent({
  setup() {
    const modalOpen = ref(false);
    return { modalOpen };
  },
});
</script>

<style scoped>
.modal {
  position: absolute;
  top: 0;
  right: 0;
  bottom: 0;
  left: 0;
  background-color: rgba(0, 0, 0, 0.5);
  display: flex;
  flex-direction: column;
  align-items: center;
  justify-content: center;
}
.modal div {
  display: flex;
  flex-direction: column;
  align-items: center;
  justify-content: space-around;
  background-color: white;
  width: 350px;
  height: 300px;
  padding: 5px;
}
</style>
我们来具体看一下效果:

把to中的body替换成#one

再看效果:

最后再尝试把to中的#one替换成.two,可想而知效果是一致的


注意:这个传送是需要通过找到上方层级的盒子才能进行传送

如果写成这样:(是进行不了传送的)
<template>
  <ModalButton></ModalButton>
  <div id="one">
    <h3>第一个div</h3>
  </div>
  <div class="two">
    <h3>第二个div</h3>
  </div>
</template>

为什么我们需要 Teleport Teleport 是一种能够将我们的模板移动到 DOM 中 Vue app 之外的其他位置的技术,就有点像哆啦A梦的“任意门”。
场景:像 modals,toast 等这样的元素,很多情况下,我们将它完全的和我们的 Vue 应用的 DOM 完全剥离,管理起来反而会方便容易很多
原因在于如果我们嵌套在 Vue 的某个组件内部,那么处理嵌套组件的定位、z-index 和样式就会变得很困难
另外,像 modals,toast 等这样的元素需要使用到 Vue 组件的状态(data 或者 props)的值
这就是 Teleport 派上用场的地方。我们可以在组件的逻辑位置写模板代码,这意味着我们可以使用组件的 data 或 props。然后在 Vue 应用的范围之外渲染它
Suspense组件
官网中有提到他是属于实验性功能:
<Suspense> 是一项实验性功能。它不一定会最终成为稳定功能,并且在稳定之前相关 API 也可能会发生变化。
<Suspense> 是一个内置组件,用来在组件树中协调对异步依赖的处理。它让我们可以在组件树上层等待下层的多个嵌套异步依赖项解析完成,并可以在等待时渲染一个加载状态。
意思就是此组件用来等待异步组件时渲染一些额外内容,让应用有更好的用户体验
要了解 <Suspense> 所解决的问题和它是如何与异步依赖进行交互的,我们需要想象这样一种组件层级结构:
<Suspense>
└─ <Dashboard>
   ├─ <Profile>
   │  └─ <FriendStatus>(组件有异步的 setup())
   └─ <Content>
      ├─ <ActivityFeed> (异步组件)
      └─ <Stats>(异步组件)
在这个组件树中有多个嵌套组件,要渲染出它们,首先得解析一些异步资源。如果没有 <Suspense>,则它们每个都需要处理自己的加载、报错和完成状态。在最坏的情况下,我们可能会在页面上看到三个旋转的加载态,在不同的时间显示出内容。
有了 <Suspense> 组件后,我们就可以在等待整个多层级组件树中的各个异步依赖获取结果时,在顶层展示出加载中或加载失败的状态。
接下来看个简单的例子:
首先需要引入异步组件
import {defineAsyncComponent} from 'vue'
const Child = defineAsyncComponent(()=>import('./components/Child.vue'))
简洁一些就是用组件实现异步的加载的这么一个效果 Home父组件代码如下:
<template>
  <div class="home">
    <h3>我是Home组件</h3>
    <Suspense>
       <template #default>
        <Child />
      </template>
      <template v-slot:fallback>
        <h3>Loading...</h3>
      </template>
    </Suspense>
  </div>
</template>

<script >
// import Child from './components/Child'//静态引入
import { defineAsyncComponent  } from "vue";
const Child = defineAsyncComponent(() => import("../components/Child"));
export default {
  name: "",
  components: { Child },
};
</script>

<style>
.home {
  width: 300px;
  background-color: gray;
  padding: 10px;
}
</style>
自组件Child
<template>
  <div class="child">
    <h3>我是Child组件</h3>
    name: {{user.name}}
    age: {{user.age}}
  </div>
</template>

<script>
import { ref } from "vue";
export default {
  name: "Child",
  async setup() {
    const NanUser = () => {
      return new Promise((resolve, reject) => {
        setTimeout(() => {
          resolve({
            name: "NanChen",
            age: 20,
          });
        },2000);
      });
    };
    const user = await NanUser();
    return {
      user,
    };
  },
};
</script>

<style>
.child {
  background-color: skyblue;
  padding: 10px;
}
</style>
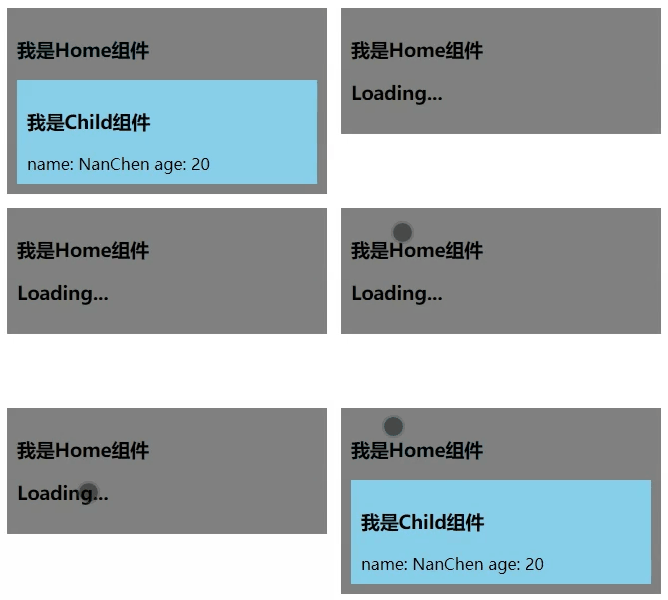
根据插槽机制,来区分组件, #default 插槽里面的内容就是你需要渲染的异步组件; #fallback 就是你指定的加载中的静态组件。
效果如下:

使用Ref来获取DOM
Vue3中没有this,所以不能使用$refs来获取dom元素 在V3中的写法可以使用**ref(null)**来获取dom元素
<template>
  <div class="home">
    <h3 ref="name">NanChen</h3>
  </div>
</template>

<script >
// import Child from './components/Child'//静态引入
import {onMounted, ref} from 'vue'
export default {
  name: "",
  setup(){
    const name = ref(null)
    onMounted(()=>{
      console.log(name.value);
    })
    return{
      name
    }
  }
};
</script>

<style>
</style>
这里注意一下要放在onMounted中,因为它需要在组件挂载时调用!!!
获取动态循环生成的ref
<template>
  <div v-for="(item,index) in list" :key="index" :ref="setItemRef">
    {{item}}
  </div>
  <el-button @click="getRefData">点我获取</el-button>
</template>

<script setup>
import { ref, reactive, onMounted } from "vue";
const refList = ref([]); //定义ref数组
const list = reactive(["我是第一行", "我是第二行", "我是NanChen"]);
// 给动态ref一个灵活的函数
const setItemRef = (el) => {
  console.log(el);
  if (el) {
    refList.value.push(el);
  }
};

//通过获得的函数并执行接下来操作
const getRefData = () => {
  for (let i = 0; i < refList.value.length; i++) {
    console.log(refList.value[i]);
  }
};
</script>
实现效果:

打印结果:

Fragments(片段)
我们都知道在vue2中,不支持多个根组件,意外创建根组件时会提示警告,所以我们在写组件时,必须要用div来包裹多个组件才行,
<template>
  <div>
    <header>header</header>
    <main>
      main
      <aside>aside</aside>
    </main>
    <footer>footer</footer>
  </div>
</template>
在Vue3中就不需要用div来包裹,意思就是组件可以有多个节点,想怎么用就怎么使用
<template>
  <header>header</header>
  <main>
    main
    <aside>aside</aside>
  </main>
  <footer>footer</footer>
</template>
单文件组件状态驱动的 CSS 变量
<template>
  <div class="parent">
  I am Parent
  <div class="child">
    I am Child
    <div>NanChen</div>
  </div>
</div>
</template>

<script setup>
</script>
<style scoped>
.parent {
  /*  变量的作用域就是它所在的选择器的有效范围,所以.parent 读取不到 child 中的变量  */
  color: var(--child-color);
  /*  定义变量  */
  --parent-color: #f00;
}
.child {
  /*  通过 var 读取变量  */
  color: var(--parent-color);
  --child-color: green;
}
.child div{
  color: var(--child-color);
}
</style>
注意以下几点:
- CSS变量的命名是敏感的,也就是说--child-color 和--child-Color是有区别的
- var() 参数可以使用第二个参数设置默认值,当该变量无效的时候,就会使用这个默认值
- CSS变量提供了JavaScript与CSS通信的一种途径,可以通过js去操作我们所用的css,这里了解一下即可。
// 获取DOM元素节点上的css名
element.style.getPropertyValue('--child-color');

// 获取任意DOM节点上的CSS名
getComputedStyle(element).getPropertyValue('--child-color');
这里提一下为什么出现这种写法,这样写的意义在什么地方?
现在许多复杂的网站都有大量的css代码,重复的值也比较多,是用这种方式可读性比较强,而且在性能上也是要好许多,通过css变量,可以通过在组件的根元素设置变量,在组件内部<style>中直接使用即可。
还有一点就是我们无法在动态的style中设置伪元素样式,而css变量就可以。
div::first-list {
  color: var(--parent-color);
}- 赞
- 收藏
- 评论
- 分享
- 举报
Recommend
About Joyk
Aggregate valuable and interesting links.
Joyk means Joy of geeK