

在Kubernetes中部署Zookeeper和Kafka
source link: https://jasonkayzk.github.io/2023/12/15/%E5%9C%A8Kubernetes%E4%B8%AD%E9%83%A8%E7%BD%B2Zookeeper%E5%92%8CKafka/
Go to the source link to view the article. You can view the picture content, updated content and better typesetting reading experience. If the link is broken, please click the button below to view the snapshot at that time.

在前一篇文章《在Kubernetes中创建NFS类型的StorageClass》中,我们创建了一个StorageClass用于动态为PVC创建PV;
这篇文章我们会用这个StorageClass,来部署Zookeeper和Kafka;
在Kubernetes中部署Zookeeper和Kafka
前言
本次部署会使用到 bitnami 提供的 Helm Chart 直接进行安装;
可以参考的文章:
首先,会部署一个3节点Zookeeper集群,并通过NodePort对外暴露服务;
然后,会再部署 3节点 Kafka 集群,使用上面我们部署的 Zookeeper 来存储元数据,而不再单独创建;
注:还没有创建 StorageClass 的需要先看这篇文章《在Kubernetes中创建NFS类型的StorageClass》创建!
关于 Helm 的安装,配置,这里就不再赘述了,可以参考官方文档:
Helm 安装之后还需要添加 bitnami 的 repo:
helm repo add bitnami https://charts.bitnami.com/bitnami

helm repo update
root@ubuntu-1:~# helm repo list
NAME URL
stable http://mirror.azure.cn/kubernetes/charts/
bitnami https://charts.bitnami.com/bitnami部署Zookeeper集群
部署集群
bitnami 官方文档:
使用 helm 部署 zookeeper 集群非常简单,通过下面一条命令即可:
helm install zookeeper bitnami/zookeeper \
  --namespace workspace --create-namespace \
  --set replicaCount=3 \
  --set service.type=NodePort \
  --set service.nodePorts.client="32181" \
  --set global.storageClass=my-storage
参数说明:
--namespace workspace:部署的 namespace 为 workspace,可自行修改;--create-namespace:如果 namespace 不存在则创建;--set replicaCount=3:创建的 Zookeeper 有三个副本,即三节点;--set service.type=NodePort:服务暴露方式为 NodePort--set service.nodePorts.client="32181":对外 NodePort 的端口为 32181--set global.storageClass=my-storage:ZK 使用的存储为上一篇文章中创建的 StorageClass;
更多参数说明:
执行后输出如下:
NAME: zookeeper
LAST DEPLOYED: Fri Dec 15 11:42:36 2023
NAMESPACE: workspace
STATUS: deployed
REVISION: 1
TEST SUITE: None
NOTES:
CHART NAME: zookeeper
CHART VERSION: 12.3.4
APP VERSION: 3.9.1

** Please be patient while the chart is being deployed **

ZooKeeper can be accessed via port 2181 on the following DNS name from within your cluster:

    zookeeper.workspace.svc.cluster.local

To connect to your ZooKeeper server run the following commands:

    export POD_NAME=$(kubectl get pods --namespace workspace -l "app.kubernetes.io/name=zookeeper,app.kubernetes.io/instance=zookeeper,app.kubernetes.io/component=zookeeper" -o jsonpath="{.items[0].metadata.name}")
    kubectl exec -it $POD_NAME -- zkCli.sh

To connect to your ZooKeeper server from outside the cluster execute the following commands:

    export NODE_IP=$(kubectl get nodes --namespace workspace -o jsonpath="{.items[0].status.addresses[0].address}")
    export NODE_PORT=$(kubectl get --namespace workspace -o jsonpath="{.spec.ports[0].nodePort}" services zookeeper)
    zkCli.sh $NODE_IP:$NODE_PORT
提示了 ZK 版本,以及连接到 ZK Pod 的几种方式;
注意:
zookeeper.workspace.svc.cluster.local,这是 Zookeeper 服务在集群中的服务名,后面 Kafka 在连接时会用到!
部署验证
查看部署成功:
root@ubuntu-1:~# kubectl get po -n workspace
NAME          READY   STATUS    RESTARTS   AGE
zookeeper-0   1/1     Running   0          75s
zookeeper-1   1/1     Running   0          75s
zookeeper-2   1/1     Running   0          75s

root@ubuntu-1:~# k get svc -n workspace
NAME                 TYPE        CLUSTER-IP       EXTERNAL-IP   PORT(S)                                        AGE
zookeeper            NodePort    10.233.157.223   <none>        2181:32181/TCP,2888:32688/TCP,3888:32220/TCP   17s
zookeeper-headless   ClusterIP   None             <none>        2181/TCP,2888/TCP,3888/TCP                     17s

root@ubuntu-1:~# k get pvc -n workspace
NAME               STATUS   VOLUME                                     CAPACITY   ACCESS MODES   STORAGECLASS   AGE
data-zookeeper-0   Bound    pvc-fcc70d18-fc0b-4b56-bb1e-66181fbe598f   8Gi        RWO            my-storage     5m1s
data-zookeeper-1   Bound    pvc-80ca6167-2f9d-48c6-ad6c-82549e713250   8Gi        RWO            my-storage     5m1s
data-zookeeper-2   Bound    pvc-c9c32d8d-9c21-4473-9d18-48b8b7b9edd7   8Gi        RWO            my-storage     5m1s
可以看到,我们已经通过 NodePort 暴露了 Client 连接端口;
直接在本地连接即可,这里使用 Zookeeper 官方提供的 ZooInspector:
连接集群中哪个 Node 均可!
也可以使用代码连接~
至此,Zookeeper 集群就部署完成了!
部署Kafka集群
部署集群
在上面成功部署了 Zookeeper 的基础之上,我们继续部署 Kafka 集群:
export ZOOKEEPER_SERVICE_NAME='zookeeper.workspace.svc.cluster.local'

# kafka
helm install kafka bitnami/kafka \
  --namespace workspace --create-namespace \
  --set global.storageClass=my-storage \
  --set broker.replicaCount=3 \
  --set controller.replicaCount=0 \
  --set zookeeper.enabled=false \
  --set kraft.enabled=false \
  --set externalZookeeper.servers=${ZOOKEEPER_SERVICE_NAME} \
  --set externalAccess.enabled=true \
  --set externalAccess.broker.service.type=NodePort \
  --set externalAccess.broker.service.nodePorts[0]=30092 \
  --set externalAccess.broker.service.nodePorts[1]=30093 \
  --set externalAccess.broker.service.nodePorts[2]=30094 \
  --set externalAccess.autoDiscovery.enabled=true \
  --set serviceAccount.create=true \
  --set rbac.create=true
参数说明:
--namespace workspace:部署的 namespace 为 workspace,可自行修改;--create-namespace:如果 namespace 不存在则创建;--set global.storageClass=my-storage:Kafka 使用的存储为上一篇文章中创建的 StorageClass;--set broker.replicaCount=3:kafka Broker 的副本数为 3;--set controller.replicaCount=0:不再创建 controller 而是使用我们之前已经创建的 Zookeeper 作为 Controller;--set zookeeper.enabled=false:不再创建 Zookeeper 而是使用我们之前已经创建的 Zookeeper;--set kraft.enabled=false:不使用 kraft 模式部署 Kafka(高版本的 Kafka 已不再使用 Zookeeper存储元数据,而是使用 Raft 协议将元数据存储在各个 Kafka 节点上);--set externalZookeeper.servers=${ZOOKEEPER_SERVICE_NAME}:声明使用我们已经部署的 Zookeeper,这里提供的是集群服务名;--set externalAccess.enabled=true:允许外部访问;--set externalAccess.broker.service.type=NodePort:使用 NodePort 暴露 Broker 的服务;--set externalAccess.broker.service.nodePorts[i]=x:设置第 i 个节点的端口号为x(对应external服务的端口号);--set externalAccess.autoDiscovery.enabled=true:允许服务自动发现;--set serviceAccount.create=true: k8s 集群外访问的kafka-<0|1|2>-external服务对应帐号;--set rbac.create=true: k8s 集群外访问的kafka-<0|1|2>-external服务对应 RBAC;
更多参数见官方文档:
执行后输出:
NAME: kafka
LAST DEPLOYED: Fri Dec 15 12:25:26 2023
NAMESPACE: workspace
STATUS: deployed
REVISION: 1
TEST SUITE: None
NOTES:
CHART NAME: kafka
CHART VERSION: 26.5.0
APP VERSION: 3.6.1
** Please be patient while the chart is being deployed **
Kafka can be accessed by consumers via port 9092 on the following DNS name from within your cluster:
kafka.workspace.svc.cluster.local
Each Kafka broker can be accessed by producers via port 9092 on the following DNS name(s) from within your cluster:
kafka-broker-0.kafka-broker-headless.workspace.svc.cluster.local:9092
kafka-broker-1.kafka-broker-headless.workspace.svc.cluster.local:9092
kafka-broker-2.kafka-broker-headless.workspace.svc.cluster.local:9092
The CLIENT listener for Kafka client connections from within your cluster have been configured with the following security settings:
- SASL authentication
To connect a client to your Kafka, you need to create the 'client.properties' configuration files with the content below:
security.protocol=SASL_PLAINTEXT
sasl.mechanism=SCRAM-SHA-256
sasl.jaas.config=org.apache.kafka.common.security.scram.ScramLoginModule required \
username="user1" \
password="$(kubectl get secret kafka-user-passwords --namespace workspace -o jsonpath='{.data.client-passwords}' | base64 -d | cut -d , -f 1)";
To create a pod that you can use as a Kafka client run the following commands:
kubectl run kafka-client --restart='Never' --image docker.io/bitnami/kafka:3.6.1-debian-11-r0 --namespace workspace --command -- sleep infinity
kubectl cp --namespace workspace /path/to/client.properties kafka-client:/tmp/client.properties
kubectl exec --tty -i kafka-client --namespace workspace -- bash
PRODUCER:
kafka-console-producer.sh \
--producer.config /tmp/client.properties \
--broker-list kafka-broker-0.kafka-broker-headless.workspace.svc.cluster.local:9092,kafka-broker-1.kafka-broker-headless.workspace.svc.cluster.local:9092,kafka-broker-2.kafka-broker-headless.workspace.svc.cluster.local:9092 \
--topic test
CONSUMER:
kafka-console-consumer.sh \
--consumer.config /tmp/client.properties \
--bootstrap-server kafka.workspace.svc.cluster.local:9092 \
--topic test \
--from-beginning
To connect to your Kafka nodes from outside the cluster, follow these instructions:
NOTE: It may take a few minutes for the LoadBalancer IPs to be available.
Watch the status with: 'kubectl get svc --namespace workspace -l "app.kubernetes.io/name=kafka,app.kubernetes.io/instance=kafka,app.kubernetes.io/component=kafka,pod" -w'
Kafka Brokers domain: You will have a different external IP for each Kafka broker. You can get the list of external IPs using the command below:
echo "$(kubectl get svc --namespace workspace -l "app.kubernetes.io/name=kafka,app.kubernetes.io/instance=kafka,app.kubernetes.io/component=kafka,pod" -o jsonpath='{.items[*].status.loadBalancer.ingress[0].ip}' | tr ' ' '\n')"
Kafka Brokers port: 9094
To connect to your Kafka broker nodes from outside the cluster, follow these instructions:
Kafka brokers domain: You can get the external node IP from the Kafka configuration file with the following commands (Check the EXTERNAL listener)
1. Obtain the pod name:
kubectl get pods --namespace workspace -l "app.kubernetes.io/name=kafka,app.kubernetes.io/instance=kafka,app.kubernetes.io/component=kafka"
2. Obtain pod configuration:
kubectl exec -it KAFKA_POD -- cat /opt/bitnami/kafka/config/server.properties | grep advertised.listeners
Kafka brokers port: You will have a different node port for each Kafka broker. You can get the list of configured node ports using the command below:
echo "$(kubectl get svc --namespace workspace -l "app.kubernetes.io/name=kafka,app.kubernetes.io/instance=kafka,app.kubernetes.io/component=kafka,pod" -o jsonpath='{.items[*].spec.ports[0].nodePort}' | tr ' ' '\n')"
The EXTERNAL listener for Kafka client connections from within your cluster have been configured with the following settings:
- SASL authentication
To connect a client to your Kafka, you need to create the 'client.properties' configuration files with the content below:
security.protocol=SASL_PLAINTEXT
sasl.mechanism=SCRAM-SHA-256
sasl.jaas.config=org.apache.kafka.common.security.scram.ScramLoginModule required \
username="user1" \
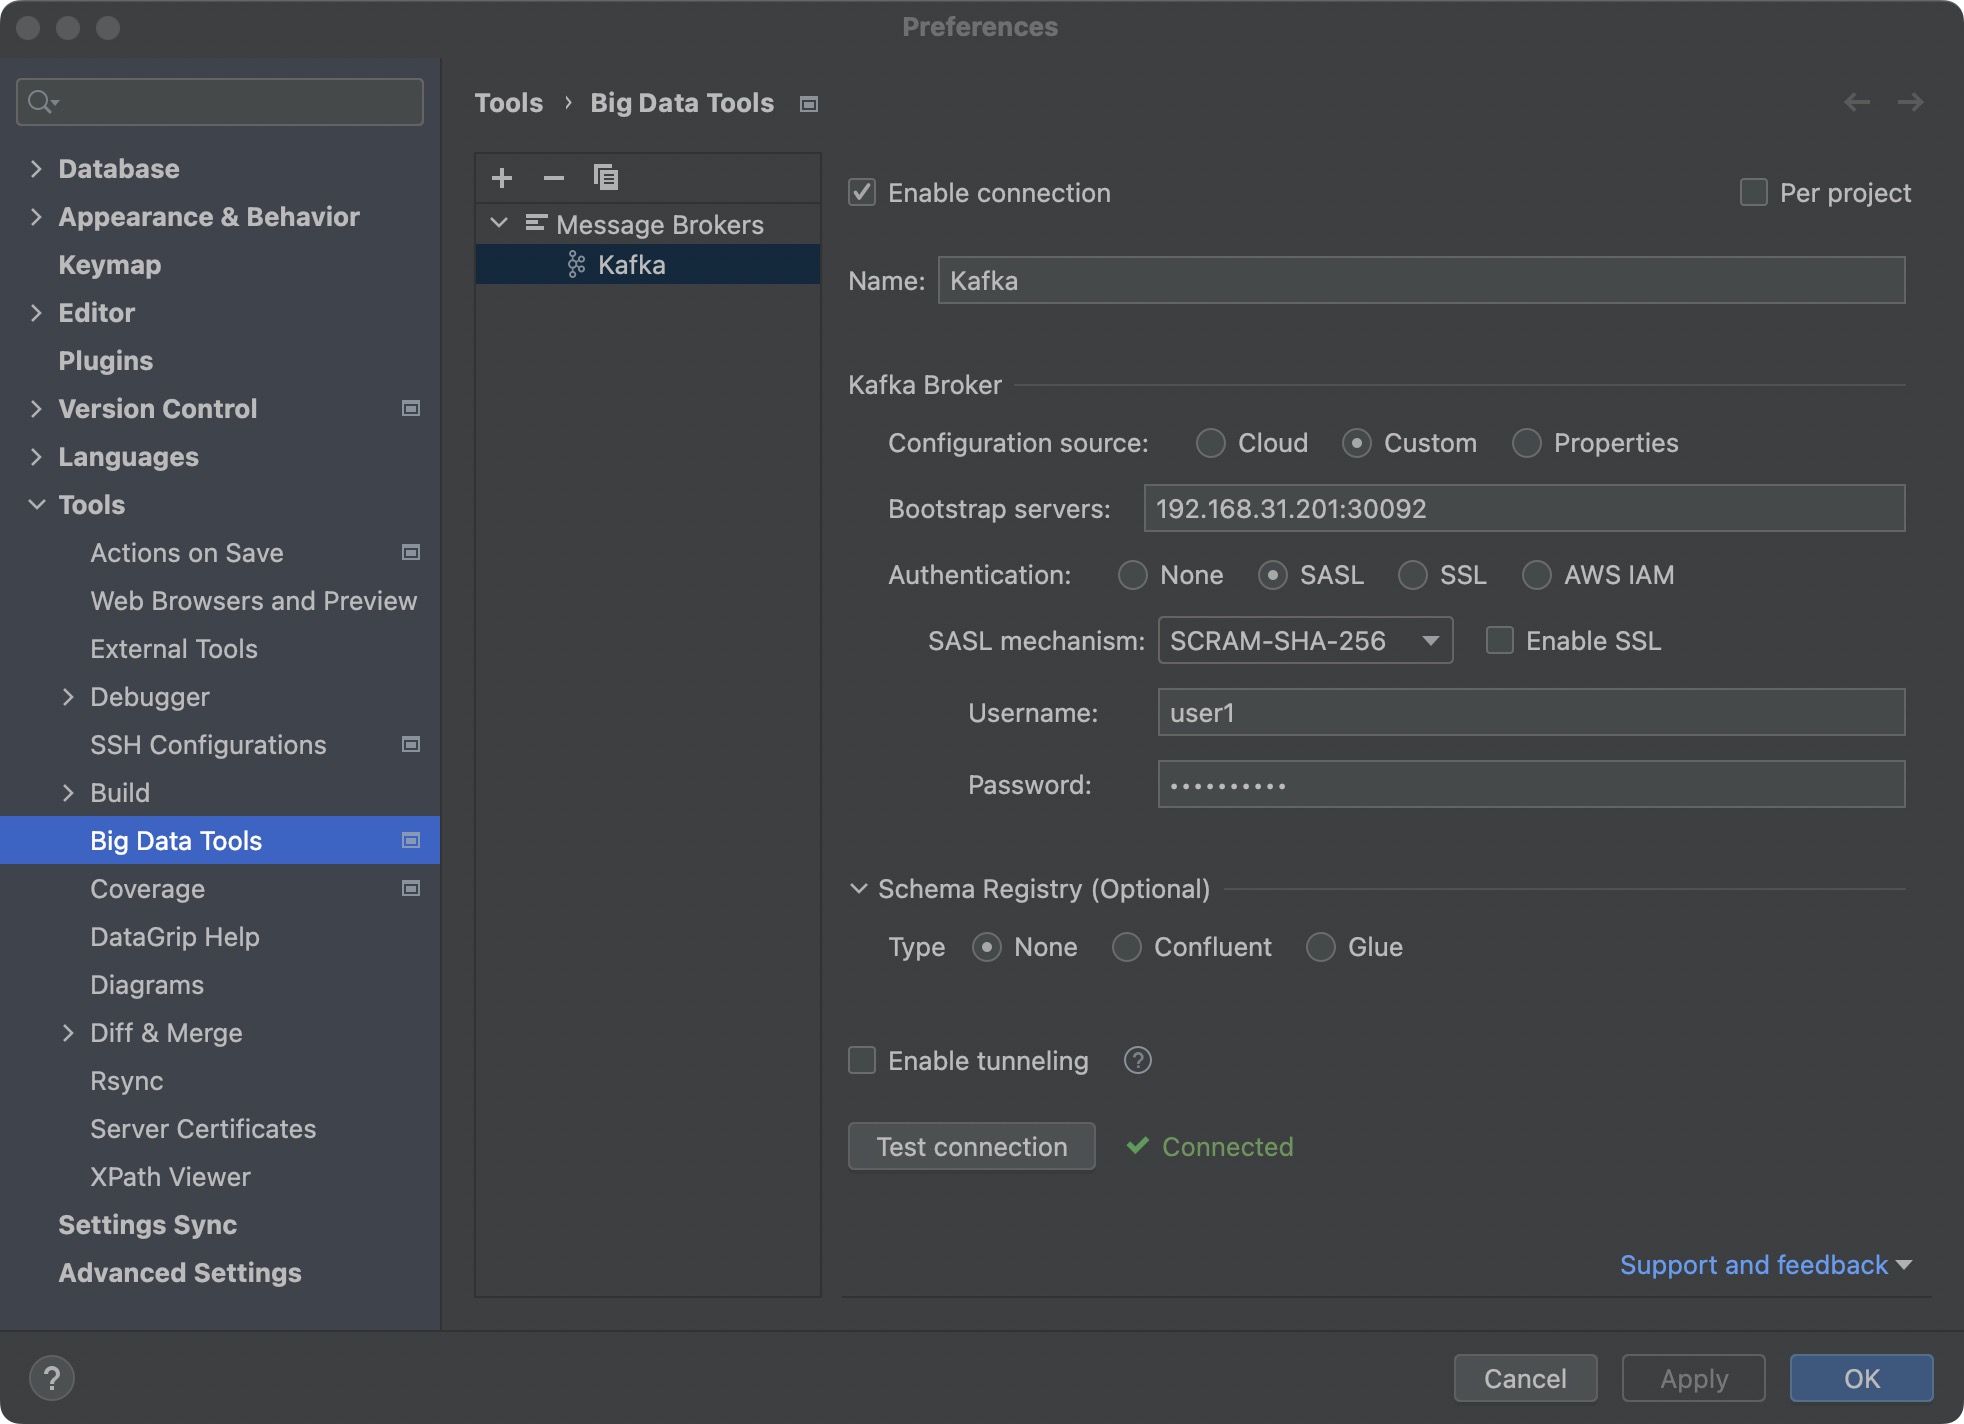
password="$(kubectl get secret kafka-user-passwords --namespace workspace -o jsonpath='{.data.client-passwords}' | base64 -d | cut -d , -f 1)";提供了多种连接 Kafka 集群中服务的方式,尤其要注意的是,我们部署的 Kafka 会使用 SASL 进行身份验证;
默认的username:user1
默认的password:存储在 K8S 的 secret 中,根据提示,可以通过下面的命令获取:
kubectl get secret kafka-user-passwords --namespace workspace -o jsonpath='{.data.client-passwords}' | base64 -d | cut -d , -f 1

# g2Xltk19G0
部署验证
查看部署成功:
root@ubuntu-1:~# k get po -n workspace
NAME             READY   STATUS    RESTARTS   AGE
kafka-broker-0   1/1     Running   0          8m54s
kafka-broker-1   1/1     Running   0          8m54s
kafka-broker-2   1/1     Running   0          8m54s
zookeeper-0      1/1     Running   0          42m
zookeeper-1      1/1     Running   0          42m
zookeeper-2      1/1     Running   0          42m

root@ubuntu-1:~# k get svc -n workspace
NAME                      TYPE        CLUSTER-IP       EXTERNAL-IP   PORT(S)                                        AGE
kafka                     ClusterIP   10.233.56.148    <none>        9092/TCP,9095/TCP                              9m6s
kafka-broker-0-external   NodePort    10.233.117.223   <none>        9094:30092/TCP                                 9m7s
kafka-broker-1-external   NodePort    10.233.12.255    <none>        9094:30093/TCP                                 9m7s
kafka-broker-2-external   NodePort    10.233.187.124   <none>        9094:30094/TCP                                 9m7s
kafka-broker-headless     ClusterIP   None             <none>        9094/TCP,9092/TCP                              9m6s
zookeeper                 NodePort    10.233.157.223   <none>        2181:32181/TCP,2888:32688/TCP,3888:32220/TCP   42m
zookeeper-headless        ClusterIP   None             <none>        2181/TCP,2888/TCP,3888/TCP                     42m

root@ubuntu-1:~# k get pvc -n workspace
NAME                  STATUS   VOLUME                                     CAPACITY   ACCESS MODES   STORAGECLASS   AGE
data-kafka-broker-0   Bound    pvc-38d3502c-638c-433d-949f-8d2a9780322b   8Gi        RWO            my-storage     9m22s
data-kafka-broker-1   Bound    pvc-16ab6844-be99-448b-8147-2dac1f74eeab   8Gi        RWO            my-storage     9m22s
data-kafka-broker-2   Bound    pvc-301855a2-a0ca-4b0b-816a-adbb1422446b   8Gi        RWO            my-storage     9m22s
data-zookeeper-0      Bound    pvc-fcc70d18-fc0b-4b56-bb1e-66181fbe598f   8Gi        RWO            my-storage     42m
data-zookeeper-1      Bound    pvc-80ca6167-2f9d-48c6-ad6c-82549e713250   8Gi        RWO            my-storage     42m
data-zookeeper-2      Bound    pvc-c9c32d8d-9c21-4473-9d18-48b8b7b9edd7   8Gi        RWO            my-storage     42m
可以看到,服务已经成功部署,并且 kafka-broker-0-external、kafka-broker-1-external、kafka-broker-2-external 分别暴露在 30092、30093、30094 端口;
真正使用时,暴露一个端口,然后连接 K8S 集群任意一个 Node 的对应即可!
可以使用 DataGrip 中的 Kafka 插件来测试:
总结
查找错误
在使用 bitnami 创建资源的时候,基本上都需要查看官方提供的文档:
同时,如果因为参数错误,报错无法部署,可以仔细查看报错的内容,也可以通过在这里找对应的检测逻辑来判断具体哪个参数有问题:
数组参数
bitnami 的某些参数为一个数组,例如:controller.extraContainerPorts;
如果是命令行输入,可以通过加空格的方式输入多个,例如:
--set controller.extraContainerPorts='30001 30002 30003'附录
参考文章:
Recommend
About Joyk
Aggregate valuable and interesting links.
Joyk means Joy of geeK