

Creating a Composable React App with Data Fetching using Bit
source link: https://blog.bitsrc.io/creating-a-composable-react-app-with-data-fetching-using-bit-7558e69d6ff7
Go to the source link to view the article. You can view the picture content, updated content and better typesetting reading experience. If the link is broken, please click the button below to view the snapshot at that time.

Creating a Composable React App with Data Fetching using Bit
How To Build React and GraphQL Apps Better in 2024?

If you’re a full-stack developer working with React and GraphQL, you may have used different techniques to connect these two. On the surface, it looks simple. It’s as simple as invoking the GraphQL endpoint and rendering the data in React. But, if you dig deeper into this, you’ll understand there’s more complexity to this. For example, imagine:
How would you establish a contract between React and GraphQL? Would you share your entities or DTOs across frontend and backend? Is it even possible?
If you were working in TypeScript or any typed language, you’d notice that you traditionally maintain two copies of your DTOs/ entities.
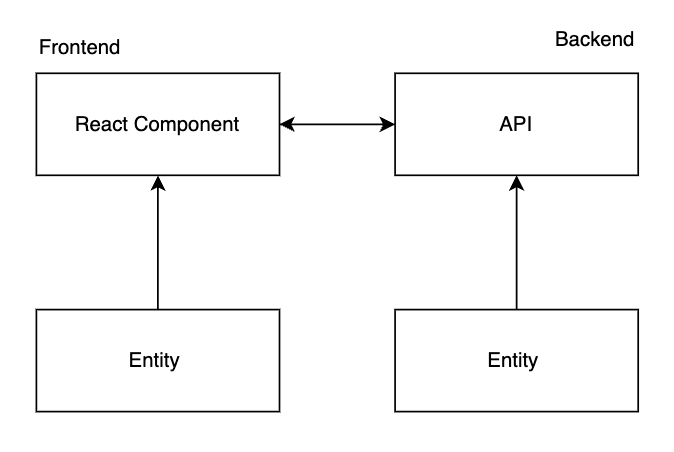
Figure: Maintaining copies of the entity across projects
Now, at a glance, this doesn’t feel like an issue. However, this creates a lot of friction and is prone to inconsistencies as the number of entities grows in the application.
But if GraphQL is using Node.js, can’t we package the entities into NPM and install them in frontend and backend?
Yes, it’s possible. Yet, it has its own challenges.
NPM packages and its code have its own lifecycle.
After modifying an entity, you must test it with the frontend and backend.
Breaking entities into multiple NPM packages is difficult as it complicates testing and managing different versions.
To overcome these issues, you’d need a next generation build system that allows you to;
Develop and test the entities in isolation.
After modifications, propagates the updates to React, GraphQL.
Build and test them automatically, as shown below.

Figure: An automated build system that identifies changes in your packages
Okay, it seems interesting, but I also run into code versioning and repository management issues.
Yeah, I run into this issue quite a lot. I maintain my projects in a monorepo setup where my entire app is split into different directories in a single repo. Most of the time, I run into issues when giving access to the code base. Everyone has access to the entire repository. However, I don’t want my frontend team messing with my backend codebase. I only want them to access the components they will be working with.
But this is quite hard, and I have come to terms with this.
Building Better Software With Composable Build Systems like Bit
I recently came across a build system for composable software that fundamentally addresses this issue.
In a nutshell, Bit allows you to build software as a collection of small composable units that are designed, developed, and built-in isolation.
This addresses the problems we discussed on code sharing, sharing, collaboration, and automating builds. With Bit, you can build independent components maintained in complete isolation from the rest. But, the beauty in this is that it’s capable of keeping track of all of the usages of a component by creating a component graph so that you can quickly check out possible breaking points when you change part of one component.

Figure: A Component Dependency Graph with Bit
And, when you combine this with the build system — Ripple CI, it makes the perfect toolchain for building composable apps as it can traverse through its dependencies and update the usages automatically.
So, why don’t we develop our composable application using React and GraphQL?
Step 01 — Pre-requisites
In our short guide, let’s build a simple React component — ArticleList communicates with a GraphQL API, fetches a list of to-do items, and renders it on the component as a bullet list. To do so, we'd need to install Bit and create an account on Bit Cloud.
To install Bit, run the command:
npx @teambit/bvm install
To confirm the installation, run the command bit --version and you should see the output I've shown below.

Figure: Installing Bit Successfully
Next, you’ll want to create a Bit scope. This is a remote server in which our components will reside in that will let other developers consume the components or contribute to it (based on RBAC).

Figure: Creating a Bit scope
Step 02 — Creating a development environment
Alright, next, you’ll need to create a disposable space to work on your local computer. Luckily, you can create a Bit Workspace using the command:
bit init
This creates a workspace that lets you work offline. Once you run this command, you’ll see a file — workspace.jsonc. This enables you to configure your local environment by including parameters like a workspace name or the default scope. In our scope, let's update the default scope to use the scope we created earlier.
In my case, it’s dummyorg.data-fetching, but you can use the scope you created. Update the workspace file as below:
"defaultScope": "dummyorg.data-fetching",
By doing so, this ensures that all components you create in this workspace will be associated to the scope that you’ve defined in defaultScope.
Step 03 — Building the runtimes
Now, this is where things get interesting. A Bit workspace isn’t coupled to any runtime. You get to define the runtimes that you components require using environments.
What this means is that you can literally build anything with Bit 🤯
For our use case, let’s go ahead and create two environments — a React environment and a Node environment to make our React and GraphQL app.
To do so, run the following command:
bit fork learnbit-react.graphql/envs/graphql
The command above will let us reuse a GraphQL env created by the Bit Team by creating our own copy. Once you run the command, you’ll see the output:

Figure: Importing the GraphQL env
Once you’ve done this, you’ll see a new directory — scope-name/envs/graphql . Open up the env.json file. This file essentially contains a list of all dependencies used by the env. So, in this case, you'll see the configuration:
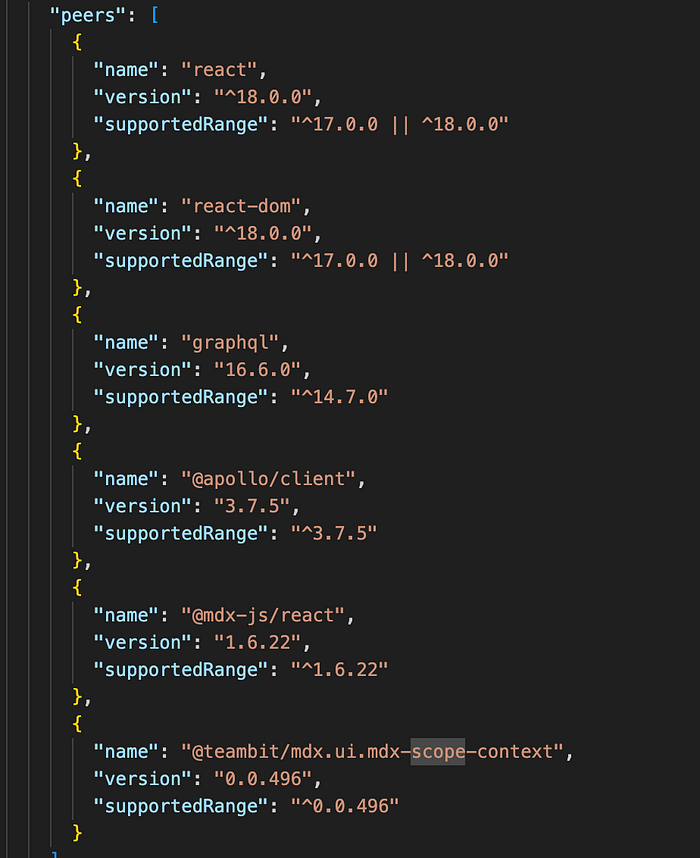
Figure: Dependencies used by GraphQL env
If you observe closely, this environment includes the React and GraphQL libraries needed to build with these technologies. So, we only need to create components that use this env.
Step 04 — Building the GraphQL API
To get started, let’s first create a GraphQL API. You’ll need to create a GraphQL provider that lets you configure your APIs. To do so, let’s fork the environment used to create the provider from Team Bit by running the command:
bit fork learnbit-react.graphql/envs/graphql-providers
Afterward, fork the provider component using the command:
bit fork learnbit-react.graphql/context/apollo-provider
Afterward, let’s update the context environment to use the environment we forked to ensure that all environments originate from our scope, not from Team Bit. To do so, run the command:
bit envs set context/apollo-provider envs/graphql-providers
Once you do so, run bit list and you should be able to see the output:

Figure: Showcasing the created components
Next, let’s launch the Bit workspace by running bit start so that we can see the components we've built so far:

Figure: The Bit workspace that we’re working on at the moment
Alright, now that things are looking positive, it’s important to understand that the apollo-provider is capable of presenting any GraphQL API as its main service. For example, open the apollo-provider compositions file. You'll see basic GraphQL connection being made to the Rick and Morty API:

Figure: Connection made to Rick and Morty API
Likewise, you can ensure that your app connects to a GraphQL endpoint using this component. In our case let’s consume a GraphQL API for a Todo API. The query that we’ll be executing is as below:
URL - https://api.mocki.io/v2/c4d7a195/graphql
Query: {
    todos  {
        id
        description
    }
}
Our API will have an output as below:

Figure: The GraphQL API
Step 05 — Building an Entity Component
Now, this is where things get interesting with Bit. You no longer have to maintain two versions of your entity components — one for frontend and backend. Instead, you can create one entity component with Bit and share it in both your React and GraphQL API as both run using a simple Node component (as they both use Node runtimes behind the scenes).
So, to create an entity component, run the command:
bit create node entities/todo
This will create a Node component with an isolated environment for Node.js, as shown below.

Figure: The Node entity
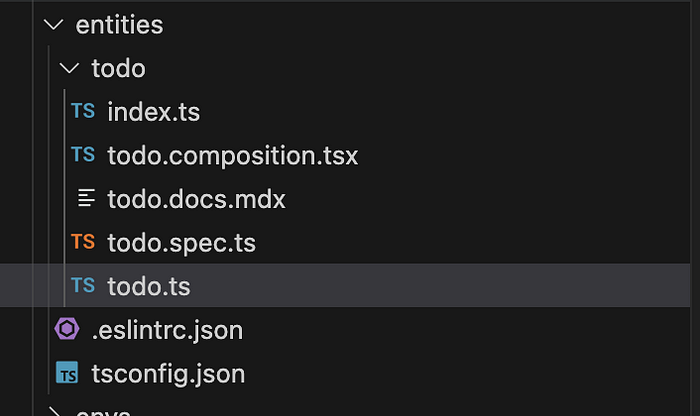
Figure: The project structure
This component has it’s own linter and TypeScript configuration showcasing the isolated development.
Let’s open the todo.ts and implement the entity. Include the snippet shown below:
export class Todo {
  private id: string;
  private name: string;
  private description: string;
  constructor(id: string, name: string, description: string) {
    this.id = id;
    this.name = name;
    this.description = description;
  }  getId() {
    return this.id;
  }  getName() {
    return this.name;
  }  getDescription() {
    return this.description;
  }  setId(id: string) {
    this.id = id;
  }  setName(name: string) {
    this.name = name;
  }  setDescription(description: string) {
    this.description = description;
  }
}
We’ve implemented a simple Todo class will behave as an entity and maintain a contract between the front and backend through a shared entity.
Next, we have to make sure that the component works as expected. Let’s open the todo.composition.tsx and include a few variations for the component:
import React from 'react';
import { Todo } from './todo';
export function BasicTodo() {
  const todo: Todo = new Todo('1', 'Sample Name', 'Sample Description');
  return (
    <ul>
      <li>ID: {todo.getId()}</li>
      <li>Name: {todo.getName()}</li>
      <li>Description: {todo.getDescription()}</li>
    </ul>
  )
}
The composition we defined above will help showcase the functionality of the component. But what’s important is to test the component. Next, define a test case to ensure the component works as expected in the todo.spec.js
import { Todo } from './todo';
it('should construct a todo entity correctly', () => {
  const todo: Todo = new Todo('1', 'Sample Name', 'Sample Description');
  expect(todo.getId()).toBe('1');
  expect(todo.getName()).toBe('Sample Name');
  expect(todo.getDescription()).toBe('Sample Description');
});
As you can see, we’ve written a simple unit test to assess the entity component to see if everything works as expected. To confirm this, let’s test the component using the command:
bit test entities/todo
You should see your test cases pass if you’ve done everything correctly:
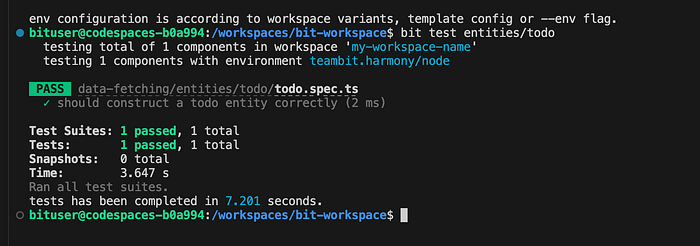
Figure: Testing the component successfully
Step 06: Building the frontend component
When building frontend components that communicate with an API, it’s always best to decouple the API logic from the component. One such approach that React offers for better modeling is to use a React Hook to invoke the APIs and use the component only for data visualization.
This lets you independently manage the invocation logic and the component while allowing you to reuse your invocation behavior.
So, let’s create two components:
- A React Hook —
useTodos - A React Component —
TodoList
To create a React hook, run the command:
bit create react-hook hooks/use-todos

Figure: Exploring the created hook
Afterward, let’s update the implementation of useTodos to fetch from the API and use the entity component:
/**
 * an ES module is exposed using the (package.json) "module"
 * property which is supported by bundlers but not by node.js.
 * import using '/index' to enforce the consumption of ESM (instead * of cjs) in a node.js environment to enable testing with jest,
 * etc.
 */
import { gql, useQuery } from '@apollo/client/index';
import { Todo } from '@dummyorg/data-fetching.entities.todo';export const GET_CHARACTERS = gql`
  query {
    todos {
      id
      description
    }
  }
`;type Data = {
  todos: {
    id: string;
    description: string;
  }[];
};export function useTodos(): Todo[] | undefined {
  const { data } = useQuery<Data>(GET_CHARACTERS, {});
  const characters = data?.todos.map((plainTodo) => Todo.fromObject(plainTodo));
  return characters;
}
After we’ve done this, let’s update our composition to consume the hook:
import React from 'react';
import { useTodos } from './use-todos';
const RenderTodos = () => {
  const todos = useTodos();  return (
    <ul>
      {todos?.map((result) => (
        <li key={result.getId()}>
          {result.getDescription()}
        </li>
      ))}
    </ul>
  );
};export const BasicTodos = () => {
  return <>
    <RenderTodos />
  </>;
};
Next, navigate back to your development server to view the Todo API in action through the hook:

Figure: The Todo Hook
Okay, we’re almost done. All we need is a simple UI component that consumes the hook and we’ve successfully consumed a GraphQL API using shared entity components.
Create a React component using the command:
bit create react ui/todo-list
Afterward, include the snippet shown below in todo-list.tsx:
import React from 'react';
import { useTodos } from '@dummyorg/data-fetching.hooks.use-todos';
import { Todo } from '@dummyorg/data-fetching.entities.todo';
export function TodoList() {
  const todos: Todo[] | undefined = useTodos();  if (!todos) {
    return null;
  }  return (
    <ul>
      {todos.map((todo) => <li>
        Description: {todo.getDescription()} | Name: {todo.getId()}
      </li>)}
    </ul>
  );
}
As shown above, we’re using the entity in our hook and this component in a reusable manner to build this UI component. Our output should be as shown below:

Additionally, if we inspect its dependency graph, we can notice this:
Finally, we can share this composable app with the whole world to use! Simply run:
bit tag && bit export
This will automatically export your components to the scope we created before:

Figure: Exporting the components onto Bit Cloud
Next, if you visit the URL, you can observe the modern CI pipeline in action: https://bit.cloud/ripple-ci/job/dummyorg-main-bump-dependencies-versions
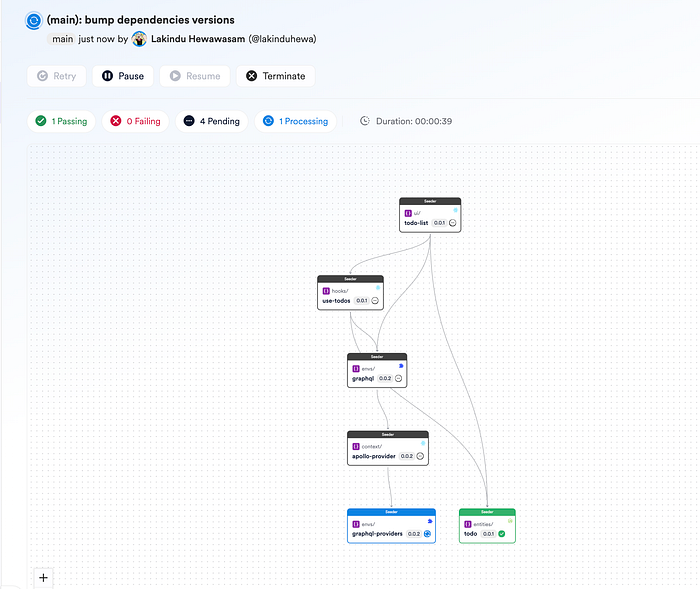
Figure: The Ripple Build
We can see that the entity is being used across two components in hooks and UI. By doing so, we’re ensuring that we can make one change and have it propagate across the component tree without effort, thanks to Ripple CI!
Wrapping up
Well, this has been one hell of a ride. We’ve successfully built a modern composable app with React and GraphQL with little to no effort.
If you enjoyed what we built, feel free to explore my scope on Bit Cloud.
Thank you for reading!
Recommend
About Joyk
Aggregate valuable and interesting links.
Joyk means Joy of geeK