

Should You Test React Components Using Cypress?
source link: https://blog.bitsrc.io/react-testing-with-cypess-73bcce5cdcdb
Go to the source link to view the article. You can view the picture content, updated content and better typesetting reading experience. If the link is broken, please click the button below to view the snapshot at that time.

What are the benefits of using Cypress for testing React Components?
1. Ensuring UI functionality and end-to-end testing
Popular frontend testing frameworks like Jest and React Testing Library don’t support UI functionality; however, since Cypress runs in a browser, it provides a UI where users can see the execution of the test happening in real-time.

Furthermore, end-to-end testing can be conducted using Cypress, whereas other testing frameworks like Jest only focus on unit testing, integration testing, and snapshot testing. To perform end-to-end testing using Jest, you must combine it with other tools.
2. Simplicity and ease of use
Setting up Cypress is very easy compared to other testing frameworks. It provides a step-by-step installation guide. Therefore, developers can easily install Cypress.
By default, Cypress will generate a default test component upon selecting the “Create New Spec” option.

Furthermore, developers can modify the created tests easily. Once you click the test you have made, the test file will be opened in your editor.
Execution of the tests is also easy with Cypress.
Using other frameworks, developers have to execute commands like npm run test to execute the tests. If we want to execute a specific test file, we must declare it in the test execution command and run it.
By using Cypress, we can see all the tests we have created, and upon clicking that test file, we can execute it.
3. Seamless integration with React components
Integrating cypress with react components is quite easy. In the test file you have created, include the below code line to integrate the specific react component we are testing.
cy.mount(<App/>);
Let’s look at a simple example to understand the benefits we explained.
Setting up the React Project
This example will create a simple react application with two react components.
- App Component
- ContactData Component
Step 01 — Application Creation
Use the below command to create the react application.
npx create-react-app cypress-react-demo
Step 02 — Component Creation & UI Creation
- App Component

function App() {

const [displayData, setDisplayData] = useState(false);
 const [comment, setComment] = useState('');
 const [email, setEmail] = useState('');

const handleSubmit = (event) => {
  event.preventDefault();
  setComment(document.getElementById('comment').value);
  setEmail(document.getElementById('email').value);
  setDisplayData(true);
 };

return (
   <div className="form-container">
    {!displayData ? (
    <form onSubmit={handleSubmit}>
     <h3>Want to learn more on React and Cypress? </h3>
     <h2>Contact Us</h2>
     <label htmlFor="comment">Your question or comment</label>
     <textarea name="comment" id="comment"></textarea>

<label htmlFor="email">Email (optional)</label>
     <input type="email" name="email" id="email"/>

<button type="submit" id="submitBtn">Submit</button>
    </form>
    ) : (
     <ContactData comment={comment} email={email}/>
    )}
   </div>
 );
}

export default App;
Based on the above code snippet, this component consists of two text fields and a submit button. Once the user enters the details, data will be sent to the ContactData component as props.
We will be creating tests in Cypress for the above component. To create tests, we need to configure Cypress first.
Installation and setup of Cypress
Step 01 — Install Cypress
Use the below command to install Cypress.
npm install cypress --save-dev
Step 02 — Configure Cypress
To configure Cypress, you have to open Cypress. To do so, run the command:
npx cypress open
You will get a step-by-step installation/configuration setup upon executing this command.

Based on the given example, we will be proceeding with Component Testing. Upon clicking Component Testing, you will get the next step, framework selection.
2. Framework Selection

Since we created a basic React app without any frontend framework, we will proceed with the “Create React App” option.
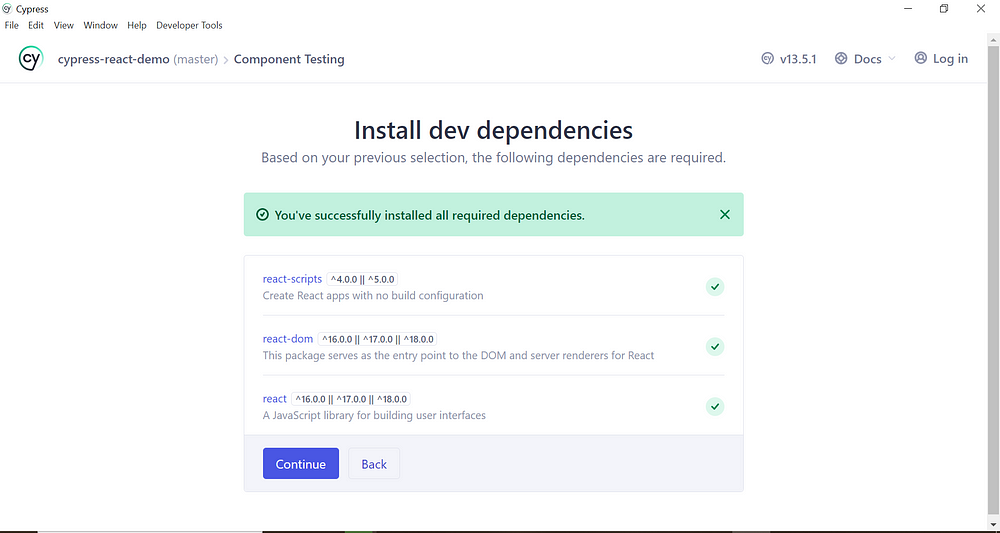
3. Verify Dependencies
Next, you will be asked to verify the dev dependencies required for Cypress.
4. Verify Configuration Files
Based on the below image, you have to verify the configuration files next.

5. Browser Selection
As the final step, you must select the browser to execute tests. I’ll use “Chrome” as the browser that will be used for component testing.

Congratulations! You have successfully installed and configured Cypress. Now, let’s create some tests for the created react component.
Writing Cypress tests for React components
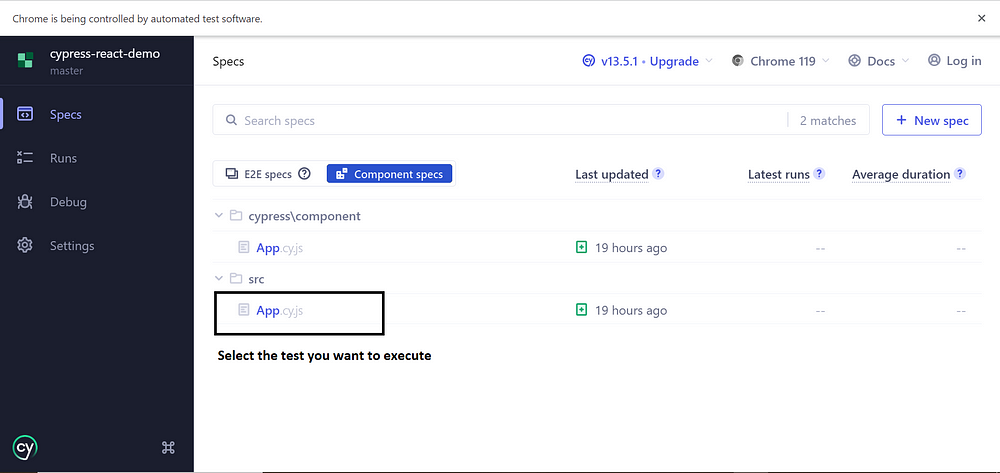
After successfully configuring Cypress, you can see the dashboard below. Select “New spec” to create a new test.

Once created, you can modify the test file. In this example, the test file we have created is App.cy.js.
import React from 'react'
import App from './App'

describe('<App />', () => {

it('renders', () => {
  cy.mount(<App/>);
  cy.wait(2000); // Wait for 2 seconds
  cy.get('#comment').should('be.visible');
  cy.get('#comment').type("Should you test react components using cypress");
  cy.get('#email').should('be.visible');
  cy.get('#email').type("[email protected]");
  cy.get('#submitBtn').click();
 })
})
Based on the above code snippet, we are mounting the App Component cy.mount();
We have used cy.get() to get the element in the DOM tree. In the react component, we have declared the id of the textarea as “comment”.
<textarea name="comment" id="comment"></textarea>
We must ensure the element is visible before we type something in the text area. For that below code can be used.
cy.get('#id of the element').should('be.visible');Then, we can write the code below to type something on the text area.
cy.get('#id of the element').type()Finally, we can click the submit button, and the ContactData component will be visible with the entered details.

Good Job! Now you know how to write tests using Cypress.
As explained earlier, we can verify that Cypress is easy to use and configure.
Let’s also look at some advanced test scenarios and the drawbacks of using Cypress.
Advanced Test Scenarios
API Testing
Let’s modify the created React component (App Component) to call an API in the submit button click event.
try {
   const response = await fetch('http://localhost:3001/saveContactDetails', {
    method: 'POST',
    headers: {
     'Content-Type': 'application/json',
    },
    body: JSON.stringify({ comment: comment, email: email }),
   });

if (response.ok) {
    setDisplayData(true);
   } else {
    console.error('Failed to submit data');
   }
  } catch (error) {
   console.error('Error:', error.message);
  }
Now, let’s try to mock the API call with Cypress. To do so, modify the App.cy.js file with below code.
cy.mount(<App/>);
cy.intercept('POST', 'http://localhost:3001/saveContactDetails', (req) => {
   req.reply({
    statusCode: 200,
    body: {
     success: true,
     message: 'Mock API response for testing',
    },
    delay: 1000,
   });
  });
cy.wait(2000);
cy.get('#comment').should('be.visible');
cy.get('#comment').type("Should you test react components using cypress");
In the snippet above, we have mocked the API to get a successful response. To simulate the API response, we use cy.intercept().
Similarly, we can mock the error response and test the error scenario.
Testing Redux with Cypress
Redux is the easiest way to store and display data among multiple components. We will modify the created react component (AppComponent) to store data in redux and display data in ContactDataComponent by retrieving from the redux store.
App.js
const handleSubmit = async (event) => {
  event.preventDefault();
  const comment = document.getElementById('comment').value;
  const email = document.getElementById('email').value;
  dispatch(submitContactDetails({ comment, email }));
 };
ContactData.js
const ContactData = () => {

const contactDetails = useSelector(state => state.submitContactDetailsReducer.contactDetails);

return (
  <div>
   <h1>Questions & Concerns</h1>
   <div>
    <h2>Comment:</h2>
    <p>{contactDetails.comment}</p>
   </div>
   <div>
    <h2>Email:</h2>
    <p>{contactDetails.email}</p>
   </div>
  </div>
 );
};
Upon integrating redux, conducting component testing using Cypress is very complex. It can considered as one of the significant drawbacks. So, let’s explore more on the drawbacks of using Cypress.
What are the Drawbacks of Using Cypress?
1. Complex Setup for Unit Testing
Even though Cypress is easy to use and configure, when it comes to conducting unit tests, it is very complex. Jest or other testing frameworks might be more suitable than Cypress for conducting unit tests.
2. Speed and Performance
While conducting end-to-end tests, Cypress can be more time-consuming than usual testing frameworks.
Recommend
About Joyk
Aggregate valuable and interesting links.
Joyk means Joy of geeK