

OpenHarmony 扫码自动配网-开源基础软件社区-51CTO.COM
source link: https://ost.51cto.com/posts/27040
Go to the source link to view the article. You can view the picture content, updated content and better typesetting reading experience. If the link is broken, please click the button below to view the snapshot at that time.

OpenHarmony 扫码自动配网 原创 精华
作者:徐金生
随着移动互联网的发展,WiFi已成为人们生活中不可或缺的网络接入方式。但在连接WiFi时,用户常需要手动输入一个复杂的密钥,这带来了一定的不便。针对这一痛点,利用QR码连接WiFi的方案应运而生。QR码连接WiFi的工作流程是:商家或公共场所提供含有WiFi密钥的QR码,用户只需使用手机扫一扫即可读取密钥信息并连接WiFi,无需手动输入,这种连接方式大大简化了用户的操作。随着智能手机摄像头识别能力的提升,以及用户需求的引领,利用QR码连接WiFi的方式未来还将得到更广泛的应用,为用户提供更稳定便捷的上网体验。它利用了移动互联网时代的技术优势,解决了传统WiFi连接中的痛点,是一种值得推广的网络连接方式。
| 扫码页面 |
|---|
 |
| 配网连接中 | 配网连接成功 | 配网连接失败 |
|---|---|---|
 |
 |
 |
使用QR码连接WiFi具有以下优势:
- 提高了连接成功率,避免因手动输入密钥错误导致的连接失败问题。
- 加快了连接速度,扫码相对于手动输入更高效方便。
- 提升了用户体验,无需记忆和输入复杂密钥,操作更人性化。
- 方便密钥分享和更改,通过更新QR码即可实现。
- 在一些需要频繁连接不同WiFi的场景下尤其便利,如酒店、餐厅、机场等。
- 一些App可以自动识别WiFi二维码,实现零点击连接。
开发与实现
开发平台:windows10、DevEco Studio 3.1 Release
系统:OpenHarmony 3.2 Release,API9(Full SDK 3.2.11.9)
设备:SD100(工业平板设备、平台:RK3568、屏幕像素:1920 * 1200)
1、支持相机扫码,并可以解析二维码信息;
2、获取二维码中的wifi连接信息,自动完成网络连接;
3、网络连接成功,则提示用户成功;
4、网络连接失败,则提示用户失败,可以重新连接;
5、UI界面符合OpenHarmony设计原则,应用界面简洁高效、自然流畅。
项目流程图
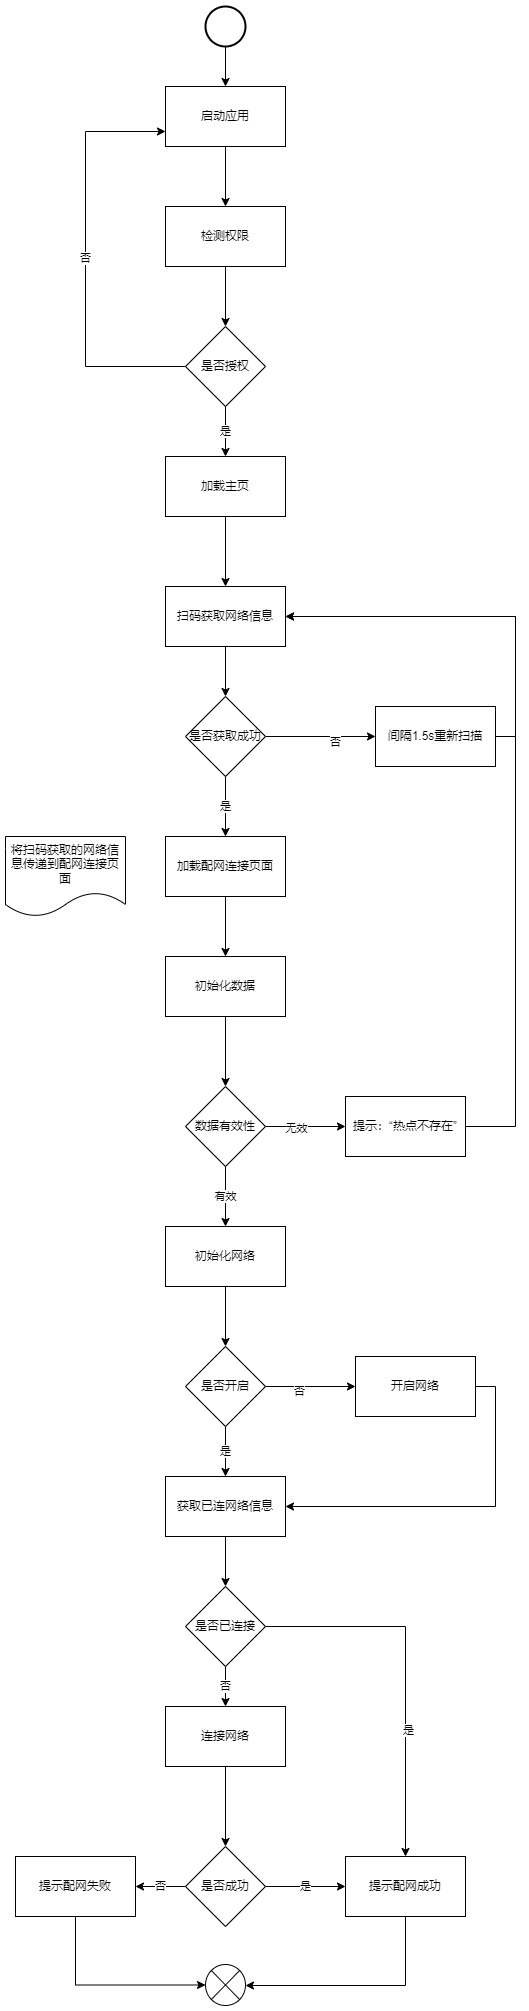
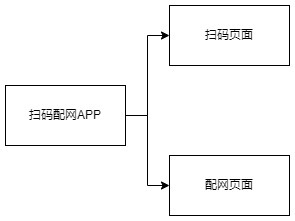
说明:从需求上分析,可以有两个界面,一是扫码界面、二是wifi连接等待和显示结果界面。
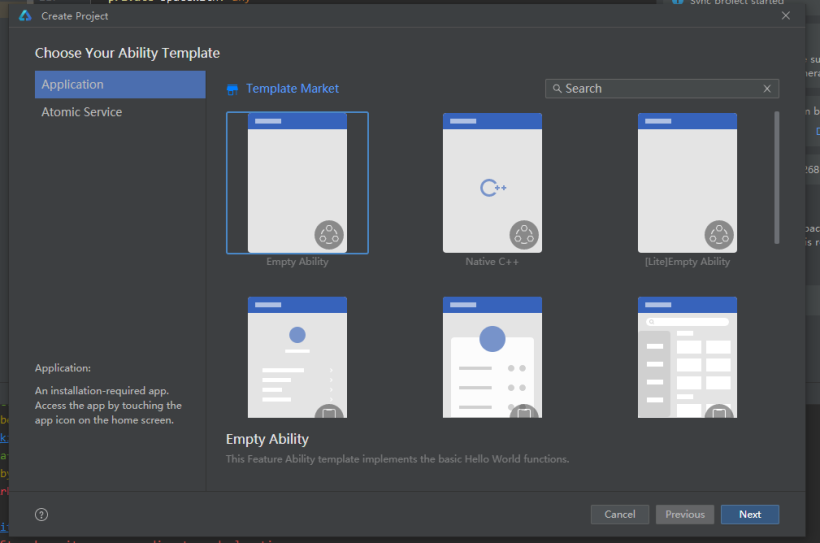
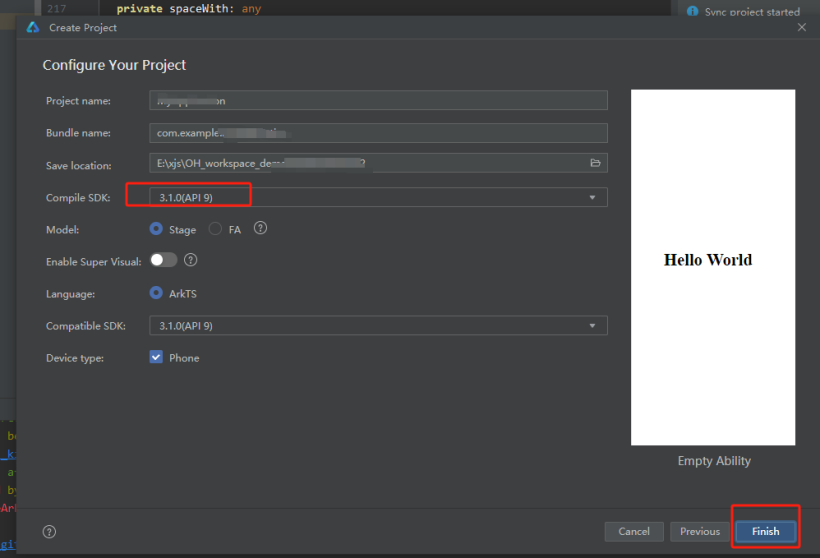
一、创建项目
说明:通过DevEco Studio创建一个OpenHarmony的项目。
二、申请权限
说明:在应用中涉及到使用相机和wifi的操作,需要动态申请一些必要的权限,我们可以在 EntryAbility.ts中实现,EntryAbility.ts继承UIAbility,用于管理应用的生面周期,在OnCreate是实例冷启动时触发,在此函数中实现权限申请。具体代码如下:
let permissionList: Array<Permissions> = [
  "ohos.permission.GET_WIFI_INFO",
  "ohos.permission.INTERNET",
  'ohos.permission.CAMERA',
  'ohos.permission.READ_MEDIA',
  'ohos.permission.WRITE_MEDIA',
  'ohos.permission.MEDIA_LOCATION',
  'ohos.permission.LOCATION',
  'ohos.permission.APPROXIMATELY_LOCATION'
]

onCreate(want, launchParam) {
  hilog.info(0x0000, 'testTag', '%{public}s', 'Ability onCreate');
  this.requestPermissions()
}

private requestPermissions() {
  let AtManager = abilityAccessCtrl.createAtManager()
  AtManager.requestPermissionsFromUser(this.context, permissionList).then(async (data) => {
    Logger.info(`${TAG} data permissions: ${JSON.stringify(data.permissions)}`)
    Logger.info(`${TAG} data authResult: ${JSON.stringify(data.authResults)}`)
    // 判断授权是否完成
    let resultCount: number = 0
    for (let result of data.authResults) {
      if (result === 0) {
        resultCount += 1
      }
    }
    let permissionResult : boolean = false
    if (resultCount === permissionList.length) {
      permissionResult = true
    }
    AppStorage.SetOrCreate(KEY_IS_PERMISSION, true)
    this.sendPermissionResult(permissionResult)
  })
}

sendPermissionResult(result : boolean) {
  let eventData: emitter.EventData = {
    data: {
      "result": result
    }
  };

  let innerEvent: emitter.InnerEvent = {
    eventId: EVENT_PERMISSION_ID,
    priority: emitter.EventPriority.HIGH
  };

  emitter.emit(innerEvent, eventData);
  Logger.info(`${TAG} sendPermissionResult`)
}

onDestroy() {
  Logger.info(`${TAG} onDestroy`)
  emitter.off(EVENT_PERMISSION_ID)
}
代码解析
1、在应用中使用到相机和操作wifi需要根据需要动态申请相关权限,具体的权限用途可以查看:应用权限列表
2、应用动态授权需要使用到@ohos.abilityAccessCtrl (程序访问控制管理),通过abilityAccessCtrl.createAtManager()获取到访问控制对象 AtManager。
3、通过AtManager.requestPermissionsFromUser() 拉起请求用户授权弹窗,由用户动态授权。
4、授权成功后通过Emitter(@ohos.events.emitter)向主界面发送授权结果。
5、在onDestroy()应用退出函数中取消Emitter事件订阅。
说明:首页即为扫码页面,用于识别二维码获取二维码信息,为网络连接准备。所以此页面有有个功能,加载相机和识别二维码。
相机的启动借鉴社区提供的代码案例:二维码扫码
- 相机功能在CameraServices中,源码参考CameraServices.ets
- 获取相机实例使用到媒体相机接口@ohos.multimedia.camera (相机管理)。
- 首先使用camera.getCameraManager方法获取相机管理器,然后使用cameraManager.getSupportedCameras方法得到设备列表, 这里默认点亮列表中的首个相机;
- 打开相机:使用 cameraManager.createCameraInput方法创建CameraInput实例,调用open方法打开相机;
- 获取相机输出流:使用getSupportedOutputCapability查询相机设备在模式下支持的输出能力,然后使用createPreviewOutput创建相机输出流。
- 获取拍照输出流,使用@ohos.multimedia.image接口的 createImageReceiver 方法创建ImageReceiver实例,并通过其getReceivingS_urfaceId()获取S_urfaceId,通过CameraManager.createPhotoOutput()函数构建拍照输出流,并将imageReceive 的 S_urfaceId与其建立绑定关系。
- 获取相片输出:首先使用createCaptureSession方法创建捕获会话的实例,然后使用beginConfig方法配置会话,接下来使用addInput方法添加一个摄像头输入流,使用addOutput添加一个摄像头和相机照片的输出流,使用commitConfig方法提交会话配置后,调用会话的start方法开始捕获相片输出。
- 这里也可以使用相机预览流获取图像数据,但在界面上需要预览,所以这里需要构建两条预览流,一条预览流用于显示,在XComponent组件中渲染,另外一条预览流用于获取头像数据用于解析,根据实践发现,开启两条预览流后,相机帧率为:7fsp,表现为预览卡顿,所以为提升预览效果,使用定时拍照的方式获取图像数据。
- 获取图像的在SaveCameraAsset.ets中实现,扫码页面启动后每间隔1.5s调用PhotoOutput.capture()实现拍照,通过imageReceiver.on(‘imageArrival’)接收图片,使用imageReceiver.readNextImage()获取图像对象,通过Image.getComponent()获取图像缓存数据。
具体实现代码:
CameraService
import camera from '@ohos.multimedia.camera';
import image from '@ohos.multimedia.image';
import SaveCameraAsset from './SaveCameraAsset'
import { QRCodeScanConst, SCAN_TYPE } from './QRCodeScanConst'
import { Logger } from '@ohos/common'
import common from '@ohos.app.ability.common'
let TAG: string = 'CameraService'
/**
 * 拍照保存图片回调
 */
export interface FunctionCallBack {
  onCaptureSuccess(thumbnail: image.PixelMap, resourceUri: string): void
  onCaptureFailure(): void
  onRecordSuccess(thumbnail: image.PixelMap): void
  onRecordFailure(): void
  /**
   * 缩略图
   */
  thumbnail(thumbnail: image.PixelMap): void
  /**
   * AI 识别结果
   * @param result 识别结果
   */
  aiResult(result: string): void
}
export interface PreviewCallBack {
  onFrameStart()
  onFrameEnd()
}
export interface MetaDataCallBack {
  onRect(rect: camera.Rect)
}
export default class CameraService {
  private static instance: CameraService = null
  private mCameraManager: camera.CameraManager = null
  private mCameraCount: number = 0 // 相机总数
  private mCameraMap: Map<string, Array<camera.CameraDevice>> = new Map()
  private mCurCameraDevice: camera.CameraDevice = null
  private mCameraInput: camera.CameraInput = null
  private mPreviewOutput: camera.PreviewOutput = null
  private mPreviewOutputByImage: camera.PreviewOutput = null
  private mPhotoOutput: camera.PhotoOutput = null
  private mSaveCameraAsset: SaveCameraAsset = new SaveCameraAsset()
  private mCaptureSession: camera.CaptureSession
  private mMetadataOutput: camera.MetadataOutput
  private constructor() {
  }
  /**
   * 单例
   */
  public static getInstance(): CameraService {
    if (this.instance === null) {
      this.instance = new CameraService()
    }
    return this.instance
  }
  /**
   * 初始化
   */
  public async initCamera(): Promise<number> {
    Logger.info(`${TAG} initCamera`)
    if (this.mCameraManager === null) {
      this.mCameraManager = camera.getCameraManager(AppStorage.Get('context'))
      // 注册监听相机状态变化
      this.mCameraManager.on('cameraStatus', (cameraStatusInfo) => {
        Logger.info(`${TAG} camera Status: ${JSON.stringify(cameraStatusInfo)}`)
      })
      // 获取相机列表
      let cameras: Array<camera.CameraDevice> = this.mCameraManager.getSupportedCameras()
      if (cameras) {
        this.mCameraCount = cameras.length
        Logger.info(`${TAG} mCameraCount: ${this.mCameraCount}`)
        if (this.mCameraCount === 0) {
          return this.mCameraCount
        }
        for (let i = 0; i < cameras.length; i++) {
          Logger.info(`${TAG} --------------Camera Info-------------`)
          const tempCameraId: string = cameras[i].cameraId
          Logger.info(`${TAG} camera_id: ${tempCameraId}`)
          Logger.info(`${TAG} cameraPosition: ${cameras[i].cameraPosition}`)
          Logger.info(`${TAG} cameraType: ${cameras[i].cameraType}`)
          const connectionType = cameras[i].connectionType
          Logger.info(`${TAG} connectionType: ${connectionType}`)
          // 判断本地相机还是远程相机
          if (connectionType === camera.ConnectionType.CAMERA_CONNECTION_BUILT_IN) {
            // 本地相机
            this.displayCameraDevice(QRCodeScanConst.LOCAL_DEVICE_ID, cameras[i])
          } else if (connectionType === camera.ConnectionType.CAMERA_CONNECTION_REMOTE) {
            // 远程相机 相机ID格式 : deviceID__Camera_cameraID 例如:3c8e510a1d0807ea51c2e893029a30816ed940bf848754749f427724e846fab7__Camera_lcam001
            const cameraKey: string = tempCameraId.split('__Camera_')[0]
            Logger.info(`${TAG} cameraKey: ${cameraKey}`)
            this.displayCameraDevice(cameraKey, cameras[i])
          }
        }
        // todo test 选择首个相机
        this.mCurCameraDevice = cameras[0]
        Logger.info(`${TAG} mCurCameraDevice: ${this.mCurCameraDevice.cameraId}`)
      }
    }
    return this.mCameraCount
  }
  /**
   * 处理相机设备
   * @param key
   * @param cameraDevice
   */
  private displayCameraDevice(key: string, cameraDevice: camera.CameraDevice) {
    Logger.info(`${TAG} displayCameraDevice ${key}`)
    if (this.mCameraMap.has(key) && this.mCameraMap.get(key)?.length > 0) {
      Logger.info(`${TAG} displayCameraDevice has mCameraMap`)
      // 判断相机列表中是否已经存在此相机
      let isExist: boolean = false
      for (let item of this.mCameraMap.get(key)) {
        if (item.cameraId === cameraDevice.cameraId) {
          isExist = true
          break
        }
      }
      // 添加列表中没有的相机
      if (!isExist) {
        Logger.info(`${TAG} displayCameraDevice not exist , push ${cameraDevice.cameraId}`)
        this.mCameraMap.get(key).push(cameraDevice)
      } else {
        Logger.info(`${TAG} displayCameraDevice has existed`)
      }
    } else {
      let cameras: Array<camera.CameraDevice> = []
      Logger.info(`${TAG} displayCameraDevice push ${cameraDevice.cameraId}`)
      cameras.push(cameraDevice)
      this.mCameraMap.set(key, cameras)
    }
  }
  /**
   * 创建相机输入流
   * @param cameraIndex 相机下标
   * @param deviceId 设备ID
   */
  public async createCameraInput(cameraIndex?: number, deviceId?: string) {
    Logger.info(`${TAG} createCameraInput`)
    if (this.mCameraManager === null) {
      Logger.error(`${TAG} mCameraManager is null`)
      return
    }
    if (this.mCameraCount <= 0) {
      Logger.error(`${TAG} not camera device`)
      return
    }
    if (this.mCameraInput) {
      this.mCameraInput.close()
    }
    if (deviceId && this.mCameraMap.has(deviceId)) {
      if (cameraIndex < this.mCameraMap.get(deviceId)?.length) {
        this.mCurCameraDevice = this.mCameraMap.get(deviceId)[cameraIndex]
      } else {
        this.mCurCameraDevice = this.mCameraMap.get(deviceId)[0]
      }
    }
    Logger.info(`${TAG} mCurCameraDevice: ${this.mCurCameraDevice?.cameraId}`)
    try {
      this.mCameraInput = this.mCameraManager.createCameraInput(this.mCurCameraDevice)
      Logger.info(`${TAG} mCameraInput: ${JSON.stringify(this.mCameraInput)}`)
      this.mCameraInput.on('error', this.mCurCameraDevice, (error) => {
        Logger.error(`${TAG} CameraInput error: ${JSON.stringify(error)}`)
      })
      await this.mCameraInput.open()
    } catch (err) {
      if (err) {
        Logger.error(`${TAG} failed to createCameraInput`)
      }
    }
  }
  /**
   * 释放相机输入流
   */
  public async releaseCameraInput() {
    Logger.info(`${TAG} releaseCameraInput`)
    if (this.mCameraInput) {
      try {
        await this.mCameraInput.close()
        Logger.info(`${TAG} releaseCameraInput closed`)
      } catch (err) {
        Logger.error(`${TAG} releaseCameraInput ${err}}`)
      }
      this.mCameraInput = null
    }
  }

  /**
   * 创建相机预览输出流
   */
  public async createPreviewOutput(s_urfaceId: string, callback?: PreviewCallBack) {
    Logger.info(`${TAG} createPreviewOutput s_urfaceId ${s_urfaceId}`)
    if (this.mCameraManager === null) {
      Logger.error(`${TAG} createPreviewOutput mCameraManager is null`)
      return
    }
    // 获取当前相机设备支持的输出能力
    let cameraOutputCap = this.mCameraManager.getSupportedOutputCapability(this.mCurCameraDevice)
    if (!cameraOutputCap) {
      Logger.error(`${TAG} createPreviewOutput getSupportedOutputCapability error}`)
      return
    }
    Logger.info(`${TAG} createPreviewOutput cameraOutputCap ${JSON.stringify(cameraOutputCap)}`)
    let previewProfilesArray = cameraOutputCap.previewProfiles
    let previewProfiles: camera.Profile
    if (!previewProfilesArray || previewProfilesArray.length <= 0) {
      Logger.error(`${TAG} createPreviewOutput previewProfilesArray error}`)
      previewProfiles = {
        format: 1,
        size: {
          width: QRCodeScanConst.DEFAULT_WIDTH,
          height: QRCodeScanConst.DEFAULT_HEIGHT
        }
      }
    } else {
      Logger.info(`${TAG} createPreviewOutput previewProfile length ${previewProfilesArray.length}`)
      previewProfiles = previewProfilesArray[0]
    }
    Logger.info(`${TAG} createPreviewOutput previewProfile[0] ${JSON.stringify(previewProfiles)}`)
    try {
      this.mPreviewOutput = this.mCameraManager.createPreviewOutput(previewProfiles, s_urfaceId)
      Logger.info(`${TAG} createPreviewOutput success`)
      // 监听预览帧开始
      this.mPreviewOutput.on('frameStart', () => {
        Logger.info(`${TAG} createPreviewOutput camera frame Start`)
        if (callback) {
          callback.onFrameStart()
        }
      })
      this.mPreviewOutput.on('frameEnd', () => {
        Logger.info(`${TAG} createPreviewOutput camera frame End`)
        if (callback) {
          callback.onFrameEnd()
        }
      })
      this.mPreviewOutput.on('error', (error) => {
        Logger.error(`${TAG} createPreviewOutput error: ${error}`)
      })
    } catch (err) {
      Logger.error(`${TAG} failed to createPreviewOutput ${err}`)
    }
  }
  /**
   *  释放预览输出流
   */
  public async releasePreviewOutput() {
    Logger.info(`${TAG} releaseCamera PreviewOutput`)
    if (this.mPreviewOutput) {
      await this.mPreviewOutput.release()
      Logger.info(`${TAG} releaseCamera PreviewOutput release`)
      this.mPreviewOutput = null
    }
  }
  /**
   * 创建拍照输出流
   */
  public async createPhotoOutput(functionCallback: FunctionCallBack) {
    Logger.info(`${TAG} createPhotoOutput`)
    if (!this.mCameraManager) {
      Logger.error(`${TAG} createPhotoOutput mCameraManager is null`)
      return
    }
    // 通过宽、高、图片格式、容量创建ImageReceiver实例
    const receiver: image.ImageReceiver = image.createImageReceiver(QRCodeScanConst.DEFAULT_WIDTH, QRCodeScanConst.DEFAULT_HEIGHT, image.ImageFormat.JPEG, 8)
    const imageS_urfaceId: string = await receiver.getReceivingS_urfaceId()
    Logger.info(`${TAG} createPhotoOutput imageS_urfaceId: ${imageS_urfaceId}`)
    let cameraOutputCap = this.mCameraManager.getSupportedOutputCapability(this.mCurCameraDevice)
    Logger.info(`${TAG} createPhotoOutput cameraOutputCap ${cameraOutputCap}`)
    if (!cameraOutputCap) {
      Logger.error(`${TAG} createPhotoOutput getSupportedOutputCapability error}`)
      return
    }
    let photoProfilesArray = cameraOutputCap.photoProfiles
    let photoProfiles: camera.Profile
    if (!photoProfilesArray || photoProfilesArray.length <= 0) {
      // 使用自定义的配置
      photoProfiles = {
        format: camera.CameraFormat.CAMERA_FORMAT_JPEG,
        size: {
          width: QRCodeScanConst.DEFAULT_WIDTH,
          height: QRCodeScanConst.DEFAULT_HEIGHT
        }
      }
    } else {
      Logger.info(`${TAG} createPhotoOutput photoProfile length ${photoProfilesArray.length}`)
      photoProfiles = photoProfilesArray[0]
    }
    Logger.info(`${TAG} createPhotoOutput photoProfile ${JSON.stringify(photoProfiles)}`)
    try {
      this.mPhotoOutput = this.mCameraManager.createPhotoOutput(photoProfiles, imageS_urfaceId)
      Logger.info(`${TAG} createPhotoOutput mPhotoOutput success`)
      // 保存图片
      this.mSaveCameraAsset.saveImage(receiver, functionCallback)
    } catch (err) {
      Logger.error(`${TAG} createPhotoOutput failed to createPhotoOutput ${err}`)
    }
  }
  /**
   * 释放拍照输出流
   */
  public async releasePhotoOutput() {
    Logger.info(`${TAG} releaseCamera PhotoOutput`)
    if (this.mPhotoOutput) {
      await this.mPhotoOutput.release()
      Logger.info(`${TAG} releaseCamera PhotoOutput release`)
      this.mPhotoOutput = null
    }
  }
  public async createSession() {
    Logger.info(`${TAG} createSession`)
    this.mCaptureSession = await this.mCameraManager.createCaptureSession()
    Logger.info(`${TAG} createSession mCaptureSession ${this.mCaptureSession}`)
    this.mCaptureSession.on('error', (error) => {
      Logger.error(`${TAG} CaptureSession error ${JSON.stringify(error)}`)
    })
    try {
      this.mCaptureSession?.beginConfig()
      this.mCaptureSession?.addInput(this.mCameraInput)

      if (this.mPreviewOutputByImage != null) {
        Logger.info(`${TAG} createSession addOutput PreviewOutputByImage`)
        this.mCaptureSession?.addOutput(this.mPreviewOutputByImage)
      }

      if (this.mPreviewOutput != null) {
        Logger.info(`${TAG} createSession addOutput PreviewOutput`)
        this.mCaptureSession?.addOutput(this.mPreviewOutput)
      }
      if (this.mPhotoOutput != null) {
        Logger.info(`${TAG} createSession addOutput PhotoOutput`)
        this.mCaptureSession?.addOutput(this.mPhotoOutput)
      }
      if (this.mMetadataOutput != null) {
        Logger.info(`${TAG} createSession addOutput mMetadataOutput`)
        this.mCaptureSession?.addOutput(this.mMetadataOutput)
      }
    } catch (err) {
      if (err) {
        Logger.error(`${TAG} createSession beginConfig fail err:${JSON.stringify(err)}`)
      }
    }
    try {
      await this.mCaptureSession?.commitConfig()
    } catch (err) {
      if (err) {
        Logger.error(`${TAG} createSession commitConfig fail err:${JSON.stringify(err)}`)
      }
    }
    try {
      await this.mCaptureSession?.start()
    } catch (err) {
      if (err) {
        Logger.error(`${TAG} createSession start fail err:${JSON.stringify(err)}`)
      }
    }
    if (this.mMetadataOutput) {
      this.mMetadataOutput.start().then(() => {
        Logger.info(`${TAG} Callback returned with metadataOutput started`)
      }).catch((err) => {
        Logger.error(`${TAG} Failed to metadataOutput start ${err.code}`)
      })
    }
    Logger.info(`${TAG} createSession mCaptureSession start`)
  }
  public async releaseSession() {
    Logger.info(`${TAG} releaseCamera Session`)
    if (this.mCaptureSession) {
      await this.mCaptureSession.release()
      Logger.info(`${TAG} releaseCamera Session release`)
      this.mCaptureSession = null
    }
  }
  /**
   * 拍照
   */
  public async takePicture() {
    Logger.info(`${TAG} takePicture`)
    if (!this.mCaptureSession) {
      Logger.info(`${TAG} takePicture session is release`)
      return
    }
    if (!this.mPhotoOutput) {
      Logger.info(`${TAG} takePicture mPhotoOutput is null`)
      return
    }
    try {
      const photoCaptureSetting: camera.PhotoCaptureSetting = {
        quality: camera.QualityLevel.QUALITY_LEVEL_HIGH,
        rotation: camera.ImageRotation.ROTATION_0,
        location: {
          latitude: 0,
          longitude: 0,
          altitude: 0
        },
        mirror: false
      }
      await this.mPhotoOutput.capture(photoCaptureSetting)
    } catch (err) {
      Logger.error(`${TAG} takePicture err:${JSON.stringify(err)}`)
    }
  }
  /**
   * 获取设备的相机列表
   * @param deviceId 设备ID
   */
  public getDeviceCameras(deviceId: string): Array<camera.CameraDevice> {
    Logger.info(`${TAG} getDeviceCameras ${deviceId} size ${this.mCameraMap.size}`)
    return this.mCameraMap.get(deviceId)
  }
  public getCameraCount(): number {
    return this.mCameraCount
  }
  /**
   * 释放相机
   */
  public async releaseCamera(): Promise<boolean> {
    Logger.info(`${TAG} releaseCamera`)
    let result: boolean = false
    let tempStartTime: number = new Date().getTime()
    try {
      await this.releaseCameraInput()
      await this.releasePhotoOutput()
      await this.releasePreviewOutput()
      await this.releaseSession()
      result = true
    } catch (err) {
      Logger.error(`${TAG} releaseCamera fail ${JSON.stringify(err)}`)
    }
    let tempTime: number = new Date().getTime() - tempStartTime
    Logger.info(`${TAG} releaseCamera finish time: ${tempTime}`)
    return result
  }
  public async selectPic() {
    Logger.info("getSingleImageFromAlbum start")
    let context = AppStorage.Get('context') as common.UIAbilityContext
    let abilityResult = await context.startAbilityForResult({
      bundleName: 'com.ohos.photos',
      abilityName: 'com.ohos.photos.MainAbility',
      parameters: {
        uri: 'singleselect' // 只选取单个文件
      }
    })
    if (abilityResult.want === null || abilityResult.want === undefined) {
      Logger.info("getSingleImageFromAlbum end. abilityResult.want is null.")
      return null
    }
    if (abilityResult.want.parameters === null || abilityResult.want.parameters === undefined) {
      Logger.info("getSingleImageFromAlbum end. abilityResult.want.parameters is null.")
      return null
    }
    let images = abilityResult.want.parameters['select-item-list']
    let imageUri = images[0]
    Logger.info("getSingleImageFromAlbum end. uri:" + imageUri)
    return imageUri
  }
}
SaveCameraAsset
import image from '@ohos.multimedia.image'
import { FunctionCallBack } from './CameraService'
import { Logger } from '@ohos/common'
import CodeRuleUtil from '../utils/CodeRuleUtil'


const TAG: string = 'SaveCameraAsset'

/**
 * 保存相机拍照的资源
 */
export default class SaveCameraAsset {
  constructor() {

  }

  /**
   *  保存拍照图片
   * @param imageReceiver 图像接收对象
   * @param thumbWidth 宽度
   * @param thumbHeight 高度
   * @param callback 回调
   */
  public saveImage(imageReceiver: image.ImageReceiver, callback: FunctionCallBack) {
    console.info(`${TAG} saveImage`)
    let buffer = new ArrayBuffer(4096)
    const imgWidth: number = imageReceiver.size.width
    const imgHeight: number = imageReceiver.size.height
    Logger.info(`${TAG} saveImage size ${JSON.stringify(imageReceiver.size)}`)
    // 接收图片回调
    imageReceiver.on('imageArrival', async () => {
      console.info(`${TAG} saveImage ImageArrival`)
      // 使用当前时间命名
      imageReceiver.readNextImage((err, imageObj: image.Image) => {
        if (imageObj === undefined) {
          Logger.error(`${TAG} saveImage failed to get valid image error = ${err}`)
          return
        }
        // 根据图像的组件类型从图像中获取组件缓存 4-JPEG类型
        imageObj.getComponent(image.ComponentType.JPEG, async (errMsg, imgComponent) => {
          if (imgComponent === undefined) {
            Logger.error(`${TAG} getComponent failed to get valid buffer error = ${errMsg}`)
            return
          }
          if (imgComponent.byteBuffer) {
            Logger.info(`${TAG} getComponent imgComponent.byteBuffer ${imgComponent.byteBuffer.byteLength}`)
            buffer = imgComponent.byteBuffer
            // todo 内置解码库不开源
            let resultRGB: string = qr.decode(buffer)
            Logger.info(`${TAG} AI uimg result RGB ${resultRGB}`)
            if (callback) {
              callback.aiResult(CodeRuleUtil.getRuleResult(resultRGB))
            }
          } else {
            Logger.info(`${TAG} getComponent imgComponent.byteBuffer is undefined`)
          }
说明:解码使用内部的解码库因为不开源,非常抱歉,当然可以使用开源解码可以,如jsqr、zxing
"dependencies": {
    "jsqr": "^1.4.0",
    "@ohos/zxing": "^2.0.0"
  }
四、配网协议
说明:处于通用性考虑,需要对配网的二维码解析约定一个协议,也就是约定联网二维码数据的格式:##ssid##pwd##securityType
- ssid : 热点的SSID,编码格式为UTF-8。
- pwd :热点的密钥
- securityType : 加密类型,这可以参看wifiManager.WifiSecurityType
在项目中也提供了协议解析类AnalyticResult.ts,具体代码如下:
/**
 * 结果解析类
 */
export type ResultType = {
  ssid: string,
  pwd: string,
  securityType : number
}

const SEPARATOR: string = '##'

export class Analytic {
  constructor() {

  }

  getResult(msg: string): ResultType {
    let result: ResultType = null
    if (msg && msg.length > 0 && msg.indexOf(SEPARATOR) >= 0) {
      let resultArr: string[] = msg.split(SEPARATOR)
      if (resultArr.length >= 4) {
        result = {
          ssid: resultArr[1],
          pwd: resultArr[2],
          securityType: parseInt(resultArr[3])
        }
      }
    }
    return result
  }
}
五、配网页面
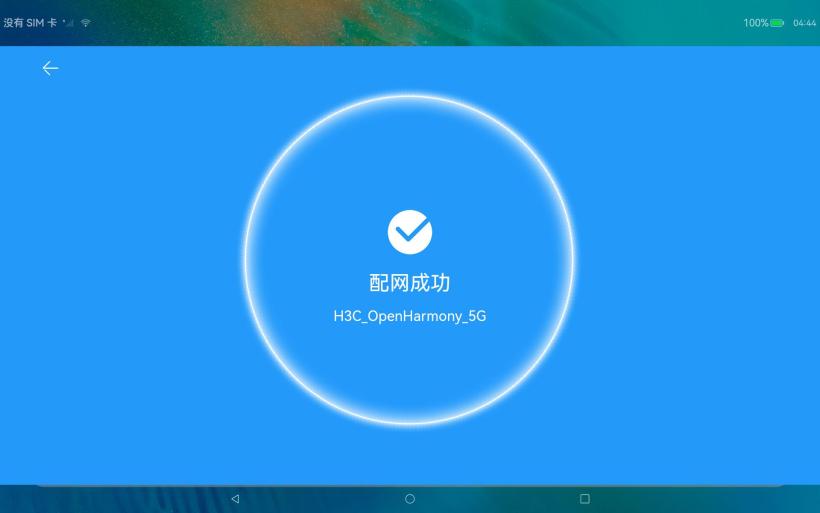
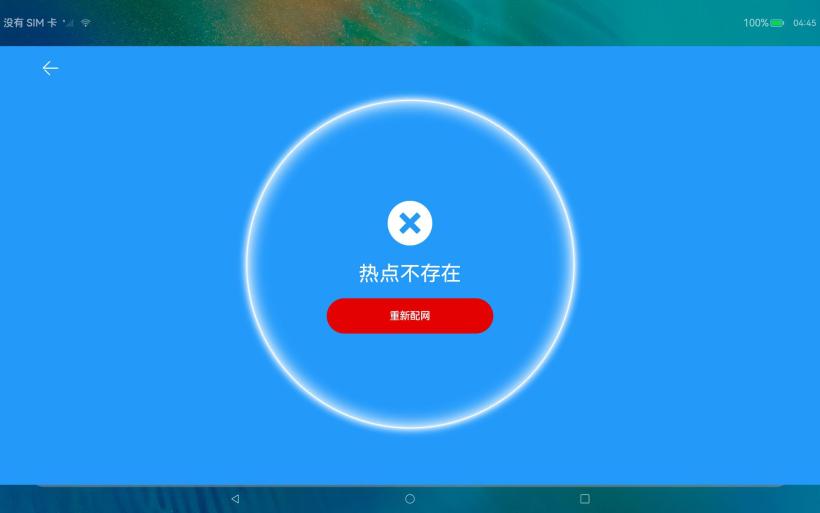
说明:通过对配网二维码的解析获取到热点的ssid、密钥、加密类型,就可以通过@ohos.wifiManager(WLAN)提供的网络连接接口实现配网。因为网络连接需要调用系统的一些验证流程,需要消耗一些时间,为了优化交互,需要一个网络连接等待界面ConnectPage.ets,界面截图如下:
具体代码如下:
import { WifiConnectStatus } from '../model/Constant'
import router from '@ohos.router';
import { Logger } from '@ohos/common'
import wifi from '@ohos.wifiManager';
import { ResultType } from '../model/AnalyticResult'
import { WifiModel } from '../model/WifiModel'
/**
 * 网络连接页面
 */
const TAG: string = '[ConnectPage]'
const MAX_TIME_OUT: number = 60000 // 最大超时时间
@Entry
@Component
struct ConnectPage {
  @State mConnectSsid: string = ''
  @State mConnectStatus: WifiConnectStatus = WifiConnectStatus.CONNECTING
  @State mConnectingAngle : number = 0
  @State mConnectFailResource : Resource = $r('app.string.connect_wifi_fail')
  private linkedInfo: wifi.WifiLinkedInfo = null
  private mWifiModel: WifiModel = new WifiModel()
  private mTimeOutId: number = -1
  private mAnimationTimeOutId : number = -1
  async aboutToAppear() {
    Logger.info(`${TAG} aboutToAppear`)
    this.showConnecting()
    let wifiResult: ResultType = router.getParams()['wifiResult']
    Logger.info(`${TAG} wifiResult : ${JSON.stringify(wifiResult)}`)
    // 如果wifi是开的,就记录下状态,然后扫描wifi,并获取连接信息
    if (!wifi.isWifiActive()) {
      Logger.info(TAG, 'enableWifi')
      try {
        wifi.enableWifi()
      } catch (error) {
        Logger.error(`${TAG} wifi enable fail, ${JSON.stringify(error)}`)
      }
    }
    await this.getLinkedInfo()
    // 启动监听
    this.addListener()
    if (wifiResult == null) {
      Logger.info(TAG, 'wifiResult is null')
      this.mConnectFailResource = $r('app.string.scan_code_data_error')
      this.mConnectStatus = WifiConnectStatus.FAIL
    } else {
      this.mConnectSsid = wifiResult.ssid
      Logger.info(`${TAG} connect wifi ${this.mConnectSsid}`)
      this.disposeWifiConnect(wifiResult)
    }
  }
  /**
   * 启动超时任务
   */
  startTimeOut(): void {
    Logger.info(TAG, `startTimeOut`)
    this.mTimeOutId = setTimeout(() => {
      // 如果超过1分钟没有连接上网络,则认为网络连接超时
      try {
        this.mConnectFailResource = $r('app.string.connect_wifi_fail')
        this.mConnectStatus = WifiConnectStatus.FAIL
        wifi.disconnect();
      } catch (error) {
        Logger.error(TAG, `failed,code:${JSON.stringify(error.code)},message:${JSON.stringify(error.message)}`)
      }
    }, MAX_TIME_OUT)
  }
  /**
   * 取消超时任务
   */
  cancelTimeOut() {
    Logger.info(TAG, `cancelTimeOut id:${this.mTimeOutId}`)
    if (this.mTimeOutId >= 0) {
      clearTimeout(this.mTimeOutId)
      this.mTimeOutId = -1
    }
  }
  // 监听wifi的变化
  addListener() {
    // 连接状态改变时,修改连接信息
    wifi.on('wifiConnectionChange', async state => {
      Logger.info(TAG, `wifiConnectionChange: ${state}`)
      // 判断网络是否连接 0=断开  1=连接
      if (state === 1) {
        this.mConnectStatus = WifiConnectStatus.SUCCESS
        this.cancelTimeOut()
      }
      await this.getLinkedInfo()
    })
    // wifi状态改变时,先清空wifi列表,然后判断是否是开启状态,如果是就扫描
    wifi.on('wifiStateChange', state => {
      Logger.info(TAG, `wifiStateLisener state: ${state}`)
    })
  }
  // 获取有关Wi-Fi连接的信息,存入linkedInfo
  async getLinkedInfo() {
    try {
      let wifiLinkedInfo = await wifi.getLinkedInfo()
      if (wifiLinkedInfo === null || wifiLinkedInfo.bssid === '') {
        this.linkedInfo = null
        return
      }
      this.linkedInfo = wifiLinkedInfo
    } catch (err) {
      Logger.info(`getLinkedInfo failed err is ${JSON.stringify(err)}`)
    }
  }
  /**
   * 处理wifi连接
   * @param wifiResult
   */
  disposeWifiConnect(wifiResult: ResultType): void {
    this.mConnectStatus = WifiConnectStatus.CONNECTING
    if (this.linkedInfo) {
      // 说明wifi已经连接,需要确认需要连接的wifi和已连接的wifi是否为相同
      let linkedSsid: string = this.linkedInfo.ssid;
      if (linkedSsid === wifiResult.ssid) {
        Logger.info(`${TAG} The same ssid`);
        this.mConnectStatus = WifiConnectStatus.SUCCESS
        return;
      }
      // 如果wifi不同,则先断开网络连接,再重新连接
      try {
        wifi.disconnect();
        this.connectWifi(wifiResult.ssid, wifiResult.pwd, wifiResult.securityType)
      } catch (error) {
        Logger.error(TAG, `failed,code:${JSON.stringify(error.code)},message:${JSON.stringify(error.message)}`)
      }
    } else {
      this.connectWifi(wifiResult.ssid, wifiResult.pwd, wifiResult.securityType)
    }
  }
  private connectWifi(ssid: string, pwd: string, securityType : number) {
    this.startTimeOut()
    this.mWifiModel.connectNetwork(ssid, pwd, securityType)
  }
  async gotoIndex() {
    try {
      let options: router.RouterOptions = {
        url: "pages/Index"
      }
      await router.replaceUrl(options)
    } catch (error) {
      Logger.error(`${TAG} go to index fail, err: ${JSON.stringify(error)}`)
    }
  }
  showConnecting() {
    this.mConnectingAngle = 0
    this.mAnimationTimeOutId = setTimeout(() => {
      this.mConnectingAngle = 360
    }, 500)
  }
  closeConnecting() {
    if (this.mAnimationTimeOutId > -1) {
      clearTimeout(this.mAnimationTimeOutId)
    }
  }
  aboutToDisappear() {
    wifi.off('wifiConnectionChange')
    wifi.off('wifiStateChange')
    this.cancelTimeOut()
    this.closeConnecting()
  }
  build() {
    Column() {
      // back
      Row() {
        Image($r('app.media.icon_back'))
          .width(30)
          .height(30)
          .objectFit(ImageFit.Contain)
          .onClick(() => {
            router.back()
          })
      }
      .width('90%')
      .height('10%')
      .justifyContent(FlexAlign.Start)
      .alignItems(VerticalAlign.Center)
      Stack() {
        // 背景
        Column() {
          Image($r('app.media.bg_connect_wifi'))
            .width('100%')
            .height('100%')
            .objectFit(ImageFit.Contain)
            .rotate({
              x: 0,
              y: 0,
              z: 1,
              centerX: '50%',
              centerY: '49%',
              angle: this.mConnectingAngle
            })
            .animation({
              duration: 2000, // 动画时长
              curve: Curve.Linear, // 动画曲线
              delay: 0, // 动画延迟
              iterations: -1, // 播放次数
              playMode: PlayMode.Normal // 动画模式
            })
        }
        Column({ space: 20 }) {
          if (this.mConnectStatus === WifiConnectStatus.SUCCESS) {
            // 连接成功
            Image($r('app.media.icon_connect_wifi_success'))
              .width(80)
              .height(80)
              .objectFit(ImageFit.Contain)
            Text($r('app.string.connect_wifi_success'))
              .fontSize(32)
              .fontColor($r('app.color.connect_wifi_text'))
            Text(this.mConnectSsid)
              .fontSize(22)
              .fontColor($r('app.color.connect_wifi_text'))
          } else if (this.mConnectStatus === WifiConnectStatus.FAIL) {
            // 连接失败
            Image($r('app.media.icon_connect_wifi_fail'))
              .width(80)
              .height(80)
              .objectFit(ImageFit.Contain)
            Text(this.mConnectFailResource)
              .fontSize(32)
              .fontColor($r('app.color.connect_wifi_text'))
            Button($r('app.string.reconnect_wifi'))
              .width(260)
              .height(55)
              .backgroundColor($r('app.color.connect_fail_but_bg'))
              .onClick(() => {
                this.gotoIndex()
              })
          } else {
            // 连接中
            Image($r('app.media.icon_connect_wifi'))
              .width(100)
              .height(100)
              .objectFit(ImageFit.Contain)
            Text($r('app.string.connect_wifi_hint'))
              .fontSize(16)
              .fontColor($r('app.color.connect_wifi_text'))
            Text($r('app.string.connecting_wifi'))
              .fontSize(32)
              .fontColor($r('app.color.connect_wifi_text'))
            Text(this.mConnectSsid)
              .fontSize(22)
              .fontColor($r('app.color.connect_wifi_text'))
          }
        }
        .width('100%')
        .height('100%')
        .justifyContent(FlexAlign.Center)
        .alignItems(HorizontalAlign.Center)
      }
      .width('100%')
      .height('80%')
    }
    .width('100%')
    .height('100%')
    .backgroundColor($r('app.color.connect_bg'))
  }
}
整个界面比较简单,主要显示当前的连接状态:连接中、连接成功、连接超时,特别强调连接超时,计划热点最长连接60s,如果在预定时间未连接成功,则显示超时,超时后可以通过重新配网按钮进行重新扫码连接,根据实际测试,在热点未打开状态下扫码连接耗时平均值12s。
界面中最大的亮点,增加了一个发光圆形的属性动画animation,圆形在2s内绕着z轴旋从0度转到360度。
Image($r('app.media.bg_connect_wifi'))
            .width('100%')
            .height('100%')
            .objectFit(ImageFit.Contain)
            .rotate({
              x: 0,
              y: 0,
              z: 1,
              centerX: '50%',
              centerY: '49%',
              angle: this.mConnectingAngle
            })
            .animation({
              duration: 2000, // 动画时长
              curve: Curve.Linear, // 动画曲线
              delay: 0, // 动画延迟
              iterations: -1, // 播放次数
              playMode: PlayMode.Normal // 动画模式
            })
六、网络自动连接
说明:网络自动连接主要是通过@ohos.wifiManager(WLAN)提供的连接接口实现,具体代码如下:
import wifi from '@ohos.wifiManager'
import { Logger } from '@ohos/common'
const TAG: string = '[WiFiModel]'
export type WifiType = {
  ssid: string,
  bssid: string,
  securityType: wifi.WifiSecurityType,
  rssi: number,
  band: number,
  frequency: number,
  timestamp: number
}
export class WifiModel {
  async getScanInfos(): Promise<Array<WifiType>> {
    Logger.info(TAG, 'scanWifi begin')
    let wifiList: Array<WifiType> = []
    let result: Array<wifi.WifiScanInfo> = []
    try {
      result = await wifi.getScanResults()
    } catch (err) {
      Logger.info(TAG, `scan info err: ${JSON.stringify(err)}`)
      return wifiList
    }
    Logger.info(TAG, `scan info call back: ${result.length}`)
    for (var i = 0; i < result.length; ++i) {
      wifiList.push({
        ssid: result[i].ssid,
        bssid: result[i].bssid,
        securityType: result[i].securityType,
        rssi: result[i].rssi,
        band: result[i].band,
        frequency: result[i].frequency,
        timestamp: result[i].timestamp
      })
    }
    return wifiList
  }
  connectNetwork(wifiSsid: string, psw: string, securityType : number): void {
    Logger.debug(TAG, `connectNetwork bssid=${wifiSsid} securityType:${securityType}`)
    // securityType 加密类型默认:Pre-shared key (PSK)加密类型
    let deviceConfig: wifi.WifiDeviceConfig  = {
      ssid: wifiSsid,
      preSharedKey: psw,
      isHiddenSsid: false,
      securityType: securityType
    }
    try {
      wifi.connectToDevice(deviceConfig)
      Logger.info(TAG, `connectToDevice success`)
    } catch (err) {
      Logger.error(TAG, `connectToDevice fail err is ${JSON.stringify(err)}`)
    }
    try {
      wifi.addDeviceConfig(deviceConfig)
    } catch (err) {
      Logger.error(TAG, `addDeviceConfig fail err is ${JSON.stringify(err)}`)
    }
  }
}
网络连接主要是通过wifi.connectToDevice(deviceConfig)实现,其中:deviceConfig: wifi.WifiDeviceConfig为WLAN配置信息,在连接网络时必填三个参数ssid、preSharedKey、securityType。
- ssid:热点的SSID
- preSharedKey:热点密钥
- securityType:加密类型
注意:在调用connectToDevice()函数连接网络时,如果网络已经连接,则需要先调用disconnect()接口断开网络后再执行。
至此,你已经完成了扫码即可连接网络的应用。
如果您能看到最后,还希望您能动动手指点个赞,一个人能走多远关键在于与谁同行,我用跨越山海的一路相伴,希望得到您的点赞。
Recommend
About Joyk
Aggregate valuable and interesting links.
Joyk means Joy of geeK