

Vue学习笔记(九):组件化编程 - 奥辰
source link: https://www.cnblogs.com/chenhuabin/p/17758678.html
Go to the source link to view the article. You can view the picture content, updated content and better typesetting reading experience. If the link is broken, please click the button below to view the snapshot at that time.

1 什么是组件
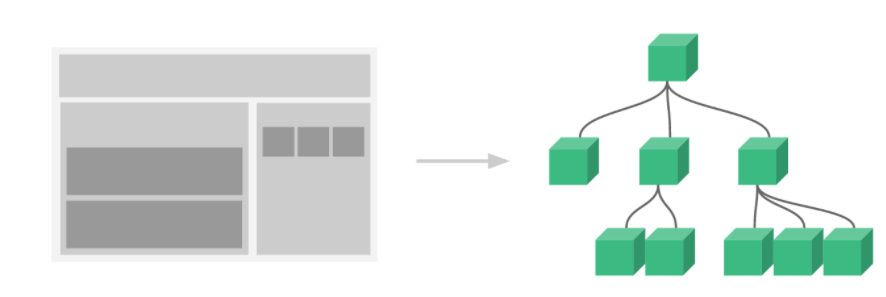
当页面功能十分复杂时,将页面各功能化整为零,拆分成多个不同的小部分,这样便于分析,也有利于代码的复用,在vue中,我们将划分后的每个小部分称为组件。组件化是vue里面最强的功能,可以扩展html,封装重用的代码。在使用vue时,我们可以将一个完整的页面拆分为多个组件,每个组件都用于实现页面的一个功能块,每一个组件又可以进行细分,从而将页面整个应用抽象成一颗组件树,如下图所示。
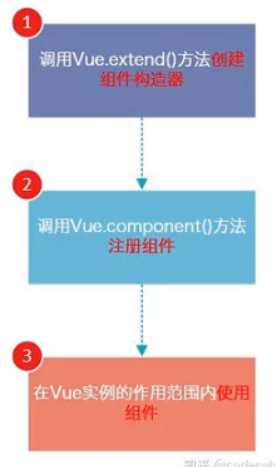
(1)Vue.extend():
- 调用Vue.extend()创建的是一个组件构造器。
- 通常在创建组件构造器时,传入template代表我们自定义组件的模板。
- 该模板就是使用到组件的地方要使用的HTML代码。
- 事实上,这种写法在Vue2.0以上的版本的文档中几乎已经看不到了,很少会直接使用,但是在很多资料中会提到这种方式,而且这种方式是其他创建组件方式的基础。
(2)Vue.component():
- 调用Vue.component()是将刚才的组件构造器租车位一个组件,并且给它起一个组件的标签名称。
- 需要传递两个参数:一是注册组件的标签名,二是组件构造器
(3)组件必须挂载在某个Vue实例下,在实例对应的容器之外是不会生效的。
一个基本的组件使用示例如下:
<div id="root">
    		<hello></hello>
    		<hello></hello>
    	</div>
    	<hello></hello> <!-- 此处因为在容器外,使用无效-->
    	<script type="text/javascript">
    		Vue.config.productionTip = false

    		//第一步:创建hello组件
    		const hello = Vue.extend({
    			template:`
    				<div class="demo">
    					<h2>Hello, {{lang}}</h2>
    				</div>
    			`,
    			data(){
    				return {
    					lang:'python'				}
    			},
    		})
    		//第二步:全局注册组件
    		Vue.component('hello',hello)

    		//第三步:创建vm
    		new Vue({
    			el:'#root',

    		})
    	</script>
3 全局组件与局部组件
根据注册方式的不同,可以将组件分为全局组件和局部组件。在上文中,我们注册组件的方式就是全局组件,这种注册方式的好处组件键可以再多个vue实例中使用。
<!-- 准备好一个容器-->
    	<div id="root">
    		<hello></hello>
    		<hello></hello>
    	</div>
    	<!-- 准备好第二个容器-->
    	<div id="root2">
    		<hello></hello>
    		<hello></hello>
    	</div>
    	<hello></hello> <!-- 此处因为在容器外,使用无效-->
    	<script type="text/javascript">
    		Vue.config.productionTip = false

    		//第一步:创建hello组件
    		const hello = Vue.extend({
    			template:`
    				<div class="demo">
    					<h2>Hello, {{lang}}</h2>
    				</div>
    			`,
    			data(){
    				return {
    					lang:'python'				}
    			},
    		})
    		//第二步:全局注册组件,可以再多个容器中使用
    		Vue.component('hello',hello)

    		//第三步:创建vm
    		new Vue({
    			el:'#root',
    		})
    		new Vue({
    		el:'#root2',
    	})
    	</script>
局部组件是指在实例化Vue时,使用components关键字进行配置,从而完成组成,这种方式注册的组件只能在Vue实例对应的容器内部使用:
<!-- 准备好一个容器-->
    	<div id="root">
    		<hello></hello>
    		<hello></hello>
    	</div>
    	<!-- 准备好第二个容器-->
    	<div id="root2">
    		<hello></hello>   <!-- 因为是局部组件,此处不生效-->
    	</div>
    	<script type="text/javascript">
    		Vue.config.productionTip = false

    		//第一步:创建hello组件
    		const hello = Vue.extend({
    			template:`
    				<div class="demo">
    					<h2>Hello, {{lang}}</h2>
    				</div>
    			`,
    			data(){
    				return {
    					lang:'python'
    				}
    			},
    		})


    		new Vue({
    			el:'#root',
    			components: {   //第二步:局部注册组件,仅可以在
    				hello
    			}
    		})
    		new Vue({
    		el:'#root2',
    	})
    	</script>
在实际开发中,还是局部组件使用得更多。
4 组件嵌套(父组件与子组件)
Vue中的组件是允许嵌套的,且这是一种十分常用的编码方式。如下所示,创建两个组件:hello1和hello2,hello1在hello2创建时,在hello2中进行注册,从而实现了两者的嵌套关系,hello2是父组件,hello1是子组件:
<!-- 准备好一个容器-->
    	<div id="root">
    		<hello2></hello2>
    		<hello2></hello2>
    		<hello2></hello2>
    	</div>

    	<script type="text/javascript">
    		Vue.config.productionTip = false

    		// 创建hello1组件
    		const hello1 = Vue.extend({
    			template:`
    				<div class="demo1">
    					<h2>{{msg}}</h2>
    				</div>
    			`,
    			data(){
    				return {
    					msg:'我是组件:hello1'
    				}
    			},
    		})

    		// 创建hello2组件
    		const hello2 = Vue.extend({
    			template:`
    			<hello1></hello1>
    			`,
    			components:{
    				hello1
    			}

    		})

    		new Vue({
    			el:'#root',
    			components: {
    				hello2
    			}
    		})
    	</script>
5 注册组件语法糖
上文中说到组件的使用分为三步:创建组件构造器、注册组件、使用组件,其中前两步可以使用语法糖的形式进行合并,从而简化代码。如下所示,使用全局语法糖创建并注册组件hello1,使用局部语法糖创建并注册组件hello2:
<!-- 准备好一个容器-->
    	<div id="root">
    		<hello1></hello1>
    		<hello2></hello2>
    	</div>

    	<script type="text/javascript">
    		Vue.config.productionTip = false

    		// 全局组件语法糖
    		Vue.component('hello1',{
    			template:`
    				<div class="demo1">
    					<h2>{{msg}}</h2>
    				</div>
    			`,
    			data(){
    				return {
    					msg:'我是组件:hello1'
    				}
    			},
    		})

    		new Vue({
    			el:'#root',
    			components: {
    				hello2:{  // 局部注册方式语法糖
    					template:`
    					<div class="demo2">
    						<h2>{{msg}}</h2>
    					</div>
    					`,
    					data(){
    						return {
    							msg:'我是组件:hello2'
    						}
    					},
    				}
    			}
    		})
    	</script>
6 单文件组件
单文件组件是指将创建组件的各种配置存放于单独的文件,需要使用时,单独引入组件,方便管理。当文件组件的编写分为三个部分,如下所示,分别为template、script、style,分别用于编写模板、配置脚本和样式:
<template>

</template>

<script>

</script>

<style>

</style>
继续上文例子,定义两个组件:hello1和hello2,hello1是hello2的子组件,hello2又是根组件App的子组件。我们将hello1的内容写入名为“hello1.vue”的文件中,内容如下:
<template>
    <div class="demo1">
        <h2>{{msg}}</h2>
    </div>
</template>

<script>
    export default {
        name: 'hello1',
        data(){
            return {
                msg:'我是组件:hello1'
            }
        },
    }
</script>

<style>
.demo1{
background:#f0d4c2;
}
</style>
hello2中因为要使用hello1所以,需要引入hello1.vue。hello2.vue文件内容如下:
<template>
    <div class="demo2">
        <h2>{{msg}}</h2>
        <hello1></hello1>
    </div>
</template>

<script>
import hello1 from './hello1.vue'

    export default {
        name: 'hello2',
        data(){
            return {
                msg:'我是组件:hello2'
            }
        },
        components:{
            hello1
        }
    }
</script>

<style>
.demo2{
background:#f19e66;
}
</style>
根组件App文件app.vue内容如下:
<template>
  <div id="app">
    <hello2></hello2>
  </div>
</template>

<script>
import hello2 from './components/hello2'

export default {
  name: 'App',
  components: {
    hello2
  }
}
</script>

<style>
#app{
width:600px;
height:300px;
background:#a4a5a7;
margin-top:60px;
}
</style>
7 通过 Prop 向子组件传递数据
在子组件中定义props属性,可以用来接收父组件传递过来的变量,注意,props以数组的形式存在。例如,我们根据父组件传递的不同变量值,显示不同内容, 子组件内容如下
<template>
    <div class="demo1">
        <h4>{{person}} 的年龄是:{{age}}</h4>
    </div>
</template>

<script>
    export default {
        name: 'hello1',
        props: ['person', 'age']  // 接受两个值,注意,就算是一个值,也是数组
    }
</script>
父组件内容如下:
<template>
    <div class="demo2">
        <hello1 person="张三" age=23></hello1>
        <hello1 person="李四" age=34></hello1>
        <hello1 person="王五" age=45></hello1>
    </div>
</template>

<script>
import hello1 from './hello1.vue'
    export default {
        name: 'hello2',
        components:{
            hello1
        }
    }
</script>
当然,还可以结合v-for对父组件的中的变量进行遍历,在遍历过程中,创建多个子组件,并向子组件传递值。此时,子组件hello1.vue文件内容如下:
<template>
    <div class="demo1">
        <h4>{{perObj.name}} 的年龄是:{{perObj.age}}</h4>
    </div>
</template>

<script>
    export default {
        name: 'hello1',
        props: ['perObj']
    }
</script>
父组件内容如下:
<template>
    <div class="demo2">
        <hello1
        v-for="per in persons"
        :key="per.id"
        :perObj=per
        >
        </hello1>
    </div>
</template>

<script>
import hello1 from './hello1.vue'
    export default {
        name: 'hello2',
        data(){
            return {
                persons: [
                    { id: 1, name: '张三', age: 23 },
                    { id: 2, name: '李四', age: 34 },
                    { id: 3, name: '王五', age: 45 }
                ]
            }
        },
        components:{
            hello1
        }
    }
</script>
8 监听子组件事件(向父组件传递数据)
监听子组件事件是指子组件事件被触发,出发后的动作需要与父组件数据产生交互。Vue中有一个原则,数据属于哪个组件,最好由该组件进行处理,也就是说,子组件需要对父组件数据进行修改时,需要调用父组件函数。那么这时候,就需要将父组件的函数,传递到子组件,传递的方法还是通过prop。同时因为是子组件中调用父组件函数,可以在调用时,通过参数形式将子组件数据传递到父组件中。
继续上述例子,在每一行后面添加一个按钮,每次点击按钮后,对应的年龄字段加1。因为子组件显示的persons数据来源于父组件,所以,点击按钮后,需要调用父组件的函数对persons中各对象的age字段进行修改。
父组件hello2.vue代码如下:
<template>

    <div class="demo2">
        <!--注意:这里通过:changeAge="changeAge" 将父组件函数传递到了组件-->
        <hello1
        v-for="per in persons"
        :key="per.id"
        :perObj=per
        :changeAge="changeAge"
        >
        </hello1>
    </div>
</template>

<script>
import hello1 from './hello1.vue'
    export default {
        name: 'hello2',
        data(){
            return {
                persons: [
                    { id: 1, name: '张三', age: 23 },
                    { id: 2, name: '李四', age: 34 },
                    { id: 3, name: '王五', age: 45 }
                ]
            }
        },
        components:{
            hello1
        },
        methods: {
            changeAge(id){  // 在父组件中定义函数修改父组件中的数据
                this.persons.forEach((per)=>{
                    if(per.id === id) per.age += 1
                });
                console.log('id值为:', id, 'age值加1')
            }
        },
    }
</script>
子组件hello1.vue内容如下:
<template>
    <div class="demo1">
        <h4>{{perObj.name}} 的年龄是:{{perObj.age}}</h4>
        <!-- 此处调用从父组件中传过来的函数 -->
        <button @click="changeAge(perObj.id)">修改年龄</button>
    </div>
</template>

<script>
    export default {
        name: 'hello1',
        props: ['perObj', 'changeAge'],  // 在子组件中接收父组件传递过来的函数
    }
</script>
9 在组件上使用v-model
v-model也可以在组件标签上使用。如下所示,在父组件上使用子组件标签时,使用v-model双向绑定lang属性。
<template>
    <div class="demo2">
        <h3>{{ lang }}</h3>
        <hello1 v-model="lang"></hello1>
    </div>
</template>

<script>
import hello1 from './hello1.vue'
    export default {
        name: 'hello2',
        data(){
            return {
                lang: 'python'
            }
        },
        components:{
            hello1
        }
    }
</script>
在子组件上,有两点需要注意,一是子组件标签上,不能再使用v-model进行双向绑定,而是使用v-bind进行绑定,第二是“@input”调用emit函数继续出发v-model机制内置的input事件修改父组件的lang属性值。只要子组件上绑的是v-model,那么,emit就一定要出发input事件。
<template>
    <div class="demo1">
        <label>开发语言</label>
        <input type="text"
        v-bind="lang"
        @input="$emit('input', $event.target.value)"
        >
    </div>
</template>

<script>
    export default {
        name: 'hello1',
        props: ['lang'],  // 在子组件中接收父组件传递过来的函数
    }
</script>
Recommend
About Joyk
Aggregate valuable and interesting links.
Joyk means Joy of geeK