

带宽优化新思路:RoCE网卡聚合实现X2增长 - 华为云开发者联盟
source link: https://www.cnblogs.com/huaweiyun/p/17746495.html
Go to the source link to view the article. You can view the picture content, updated content and better typesetting reading experience. If the link is broken, please click the button below to view the snapshot at that time.

本文分享自华为云社区《2个RoCE网卡Bond聚合,实现带宽X2》,作者: tsjsdbd 。
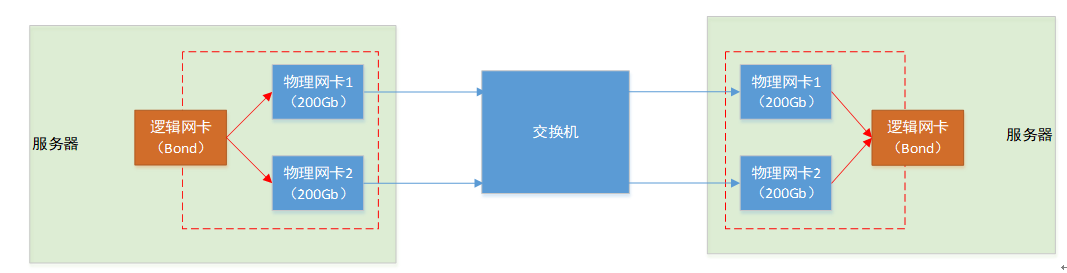
我们知道操作系统里面,可以将2个实际的物理网卡,合体形成一个“逻辑网卡”,从而达到如主备/提升带宽等目的。但是RoCE网卡,是否也跟普通网卡一样,支持Bond能力呢?答案是的,RoCE也可以组Bond,只是比普通网卡多了一些约束。
今天我们就来实际操作一下这个过程,并了解其中需要注意的地方。也欢迎一起交流学习。
一、RoCE网卡链路聚合(LAG)
根据找到的资料:https://mellanox.my.site.com/mellanoxcommunity/s/article/How-to-Configure-RoCE-over-LAG-ConnectX-4-ConnectX-5-ConnectX-6 里面说的,RoCE网卡的Bond,只支持3种模式:
- 模式1(主备)
- 模式2(负载均衡)
- 模式4(链路聚合)
相比普通网卡总共0-6共七种模式而言,算是打了大折。好在我们想要的“提升带宽”的模式还是有的。
二、服务器执行双网卡聚合(Bond)操作
不同的操作系统,执行Bond的命令不一样。这里我实际操作的是Ubuntu22.04,使用自带的 netplan工具,执行bond过程如下:
vi /etc/netplan/00-installer-config.yaml
network:
  ethernets:
    ens3f0np0
      dhcp4: no
    ens3f1np1
      dhcp4: no
  version: 2
  renderer: networkd
  bonds:
    bond0:
      interfaces: [ens3f0np0, ens3f1np1]
      parameters:
        mode: 802.3ad
        mii-monitor-interval: 1
        lacp-rate: faset
        transmit-hash-policy: layer3+4
      addresses: [10.10.2.20/24]
netplan apply
后,就可以看到一个叫“bond0”的网卡了。
这里,咱们配置的bond里面有2个重要的参数:
(1)选择bond模式4,即802.3ad(链路聚合)
(2)transmit-hash-policy,负载均衡策略,有以下3种值:
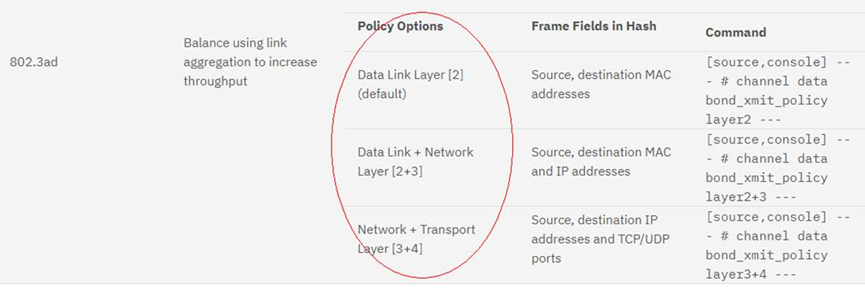
这里由于RDMA点对点通信的时候,IP+MAC地址都不会变。所以咱选 layer3+4,毕竟发送报文的时候,源端口还是随机的。
附CentOS的操作供参考:
新建bond口
nmcli con add type bond ifname tsjbond0 bond.options "mode=2,miimon=100,updelay=100,downdelay=100"
添加子网卡
nmcli con add type ethernet ifname enp80s0f0 master tsjbond0
nmcli con add type ethernet ifname enp80s0f1 master tsjbond0
激活子网卡
nmcli con up bond-slave-enp80s0f0
nmcli con up bond-slave-enp80s0f1
修改了bond卡的配置
vi /etc/sysconfig/network-scripts/ifcfg-bond-tsjbond0
IPADDR=29.28.195.228
NETMASK=255.255.240.0
修改2子网卡配置
vi /etc/sysconfig/network-scripts/ifcfg-enp80s0f0
DEVICE=enp80s0f0
TYPE=Ethernet
ONBOOT=yes
MASTER= tsjbond0
SLAVE=yes
BOOTPROTO=none
激活bond卡
ifup bond-slave-enp80s0f0
ifup bond-slave-enp80s0f1
ifdown bond-tsjbond0
ifup bond-tsjbond0
三、服务器为新网卡开启PFC流控
执行如下命令,首先设置MTU:
ifconfig bond0 mtu 4200
然后开启队列4的pfc流控策略:
mlnx_qos -i ens3f0np0 --pfc=0,0,0,0,1,0,0,0 --turst=dscp
mlnx_qos -i ens3f1np1 --pfc=0,0,0,0,1,0,0,0 --turst=dscp
cma_roce_mode -d mlx5_bond_0 -p 1 -m 2
echo 128 > /sys/class/infiniband/mlx5_bond_0/tc/1/traffic_class
其中,前2条命令需要分别为bond下的各个子网卡开启pfc。
然后,mlx5_bond_0 可以通过 ibdev2netdev 命令查询得到。
最后一条echo 128命令,是指强制网卡发送的报文的Traffic Class为128,即匹配网卡发送队列4。不设置的话也行,可以通过 NCCL_IB_TC=128 达成相同的目的。详细可以参考《为什么华为云上AI训练必须设置NCCL_IB_TC=128》一文。
四、交换机执行双网口聚合(LACP)
不同的交换机开启LACP模式的命令不一样,这里型号是 CE9860。执行如下:
开启eth-trunk口。
interface Eth-Trunk1
port link-type trunk
mode lacp-static
然后切换到对应的网口,使其加入到这个trunk口。
interface GigabitEthernet0/0/1
eth-trunk 1

interface GigabitEthernet0/0/2
eth-trunk 1
命令操作基本这个思路,另外,LACP的LB策略,是通过修改 load-balance profile default配置完成的:
eth-trunk hash-mode ?
  INTEGER<1-9> Different hash mode provide different load distribution result for egress traffic flows from a trunk, the default is 1
  For Eth-Trunk, mode 1 is suggested
  For SMAC change, mode 1/2/6/7 is suggested
  For SIP change, mode 1/5/7/9 is suggested
  For DIP change, mode 5/6 is suggested
  For DMAC&SMAC change, mode 9 is suggested
  For SMAC+SIP change, mode 5/6 is suggested
默认值是1。
五、交换机为对应端口开启PFC流控
交换机上执行:
qos buffer headroom-pool size 20164 cells slot 1
interface 400 x/x/x
trust dscp
dcb pfc enable mode manual
dcb pfc buffer 4 xoff dynamic 4 hdrm 3000 cells
commit
上面的命令,其实除了开启pfc之外,还设置了网口对应的buffer大小。具体参数值大小自己看着办。
六、RDMA流量带宽测试
这个就是咱们平时经常用的带宽测试命令了:
首先服务器端,启动Server,
ib_write_bw -s 8388608 -F --run_infinitely -x 3 -q 8 --report_gbits
然后Client开始给服务端打流:
ib_write_bw -s 8388608 -F --run_infinitely -x 3 10.10.2.20 -q 8 --report_gbits
其中 -x参数设置为3,是表示使用 RoCE V2协议。
参数 --run_infinitely 可以让测试一直进行而不停止。
-q 表示使用多个QPS(Queue-Pairs)流。对应 NCCL_IB_QPS_PER_CONNECTION,可以尝试设大一点试试效果。
示意的一个结果如下:

七、服务器端统计信息
查询队列4的报文数量:
watch -n 2 “ethtool -S ens3f0np0 | grep prio4”
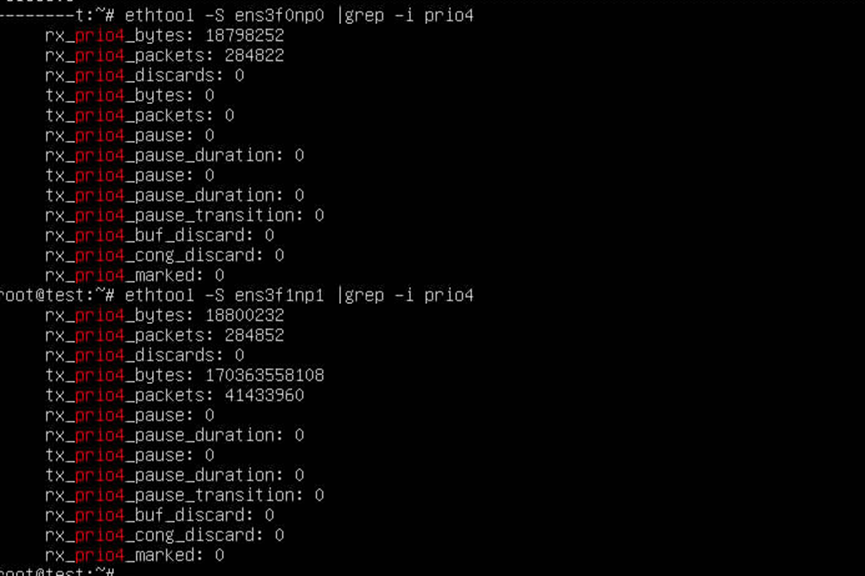
这个报文数不会减少,清零不方便,好像重启服务器数量也不会清0。
只找到了通过卸载IB模块来达到清空统计数的目的(假如需要的话):
rmmod mlx5_ib
rmmod mlx5_core
modprob mlx5_core
查询网卡温度:
mget_temp -d mlx5_bond_0
可以看到温度,一般都是62/63度左右。

本文只是操作记录,用于互相交流,不一定是最佳实践,自己有选择的看。
因为官网https://mellanox.my.site.com/mellanoxcommunity/s/article/How-to-Configure-RoCE-over-LAG-ConnectX-4-ConnectX-5-ConnectX-6
这么写的:

Recommend
About Joyk
Aggregate valuable and interesting links.
Joyk means Joy of geeK