

Overclocking and *Underclocking* the Raspberry Pi 5
source link: https://www.jeffgeerling.com/blog/2023/overclocking-and-underclocking-raspberry-pi-5
Go to the source link to view the article. You can view the picture content, updated content and better typesetting reading experience. If the link is broken, please click the button below to view the snapshot at that time.

Overclocking and *Underclocking* the Raspberry Pi 5
October 4, 2023
Less than a week from the Raspberry Pi 5's announcement, enthusiasts with early access to the board have already been pushing it to its limits, overclocking the CPU to 3.1 GHz, and the GPU to 1 GHz.
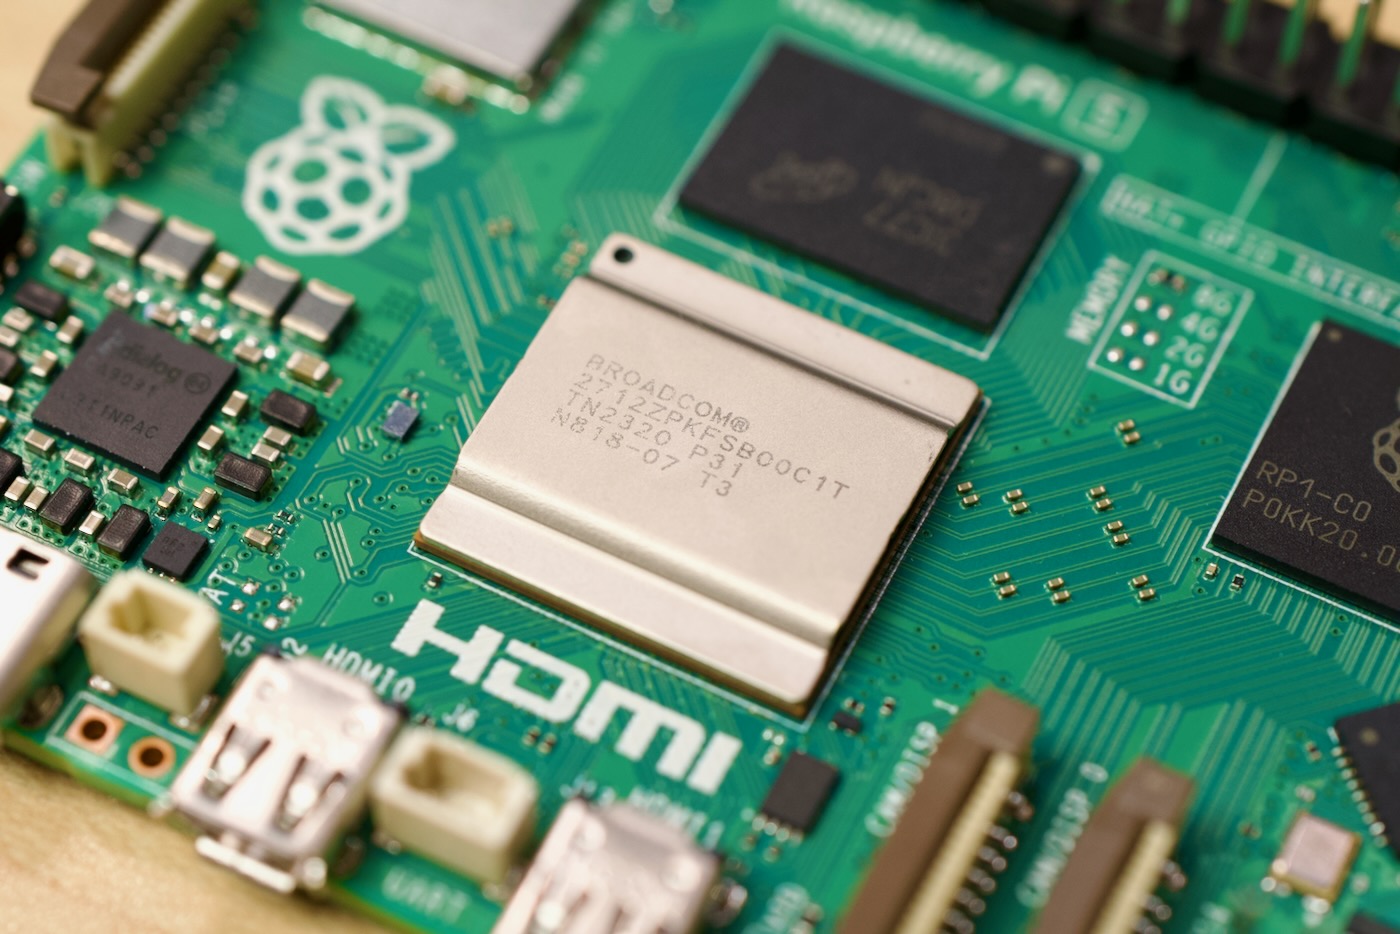
The BCM2712 SoC's defaults are 2.4 GHz, and 800 MHz, respectively; so by the numbers, one should expect 25% better CPU performance, and 22% better GPU performance.
In reality, the results are a slight bit less, and heavy use can result in instability, especially if you don't have very adequate cooling (even beyond the already-great Active Cooler).
I overclocked the alpha board I was sent (which did not go through the same final production quality controls as the ones many other reviewers have), and could get a stable overclock at 2.6 GHz, with some stability at 2.8 GHz. At 3.0 GHz, my board exhibited strange behaviors and couldn't complete any benchmarks.
How to overclock a Pi 5
To overclock, it's similar to the previous few generations of Pi. You edit /boot/config.txt, adding in the following lines:
# Tell the DVFS algorithm to increase voltage by this amount (in µV; default 0).
# IMPORTANT: See note below
over_voltage_delta=50000

# Set the Arm A76 core frequency (in MHz; default 2400).
arm_freq=3000

# Set the VideoCore VII core frequency (in MHz; default 800).
gpu_freq=1000
Note that I am using over_voltage_delta, and not over_voltage. In the past, one could use over_voltage to hardcode a certain voltage limit (or other over_voltage_* values if you wanted to get really advanced)... but the Pi engineers are now recommending you use the _delta option—if you need to tweak the voltage at all... you might not!
DVFS (Dynamic Voltage and Frequency Scaling) is a feature of the Pi 4 (and by extension Pi 400 and CM4) and Pi 5 to increase and decrease voltage to parts of the SoC automatically, to conserve energy and reduce thermal load when parts of the system are idling. Using the _delta option allows DVFS to still work. If you just set over_voltage, you bypass DVFS entirely.
Note this can still be helpful in certain situations, like if you're having problems with certain PCI Express devices, or if you are going for some extreme overclocking or tuning (maybe someone could break the 4 GHz barrier on a Pi 5? Who knows!).
According to the engineers, "over_voltage_delta adds the offset after DVFS has run whereas over_voltage essentially defeats the voltage scaling."
What's more interesting is this value is a signed integer... meaning it could be decreased:
It's signed, and you can specify any value up to whatever the built-in hardcoded limit on max-core voltage is. Although, much over whatever DVFS fixed (
vcgencmd measure_volts uncached) will cause the Pi to get hot.
I ran one test of the system with an underclock (2.2 GHz) with a -10000 μV delta, base clock (2.4 GHz) with no delta, and overclock (2.6 GHz) with a +10000 μV delta, and here are the thermals for those three scenarios:
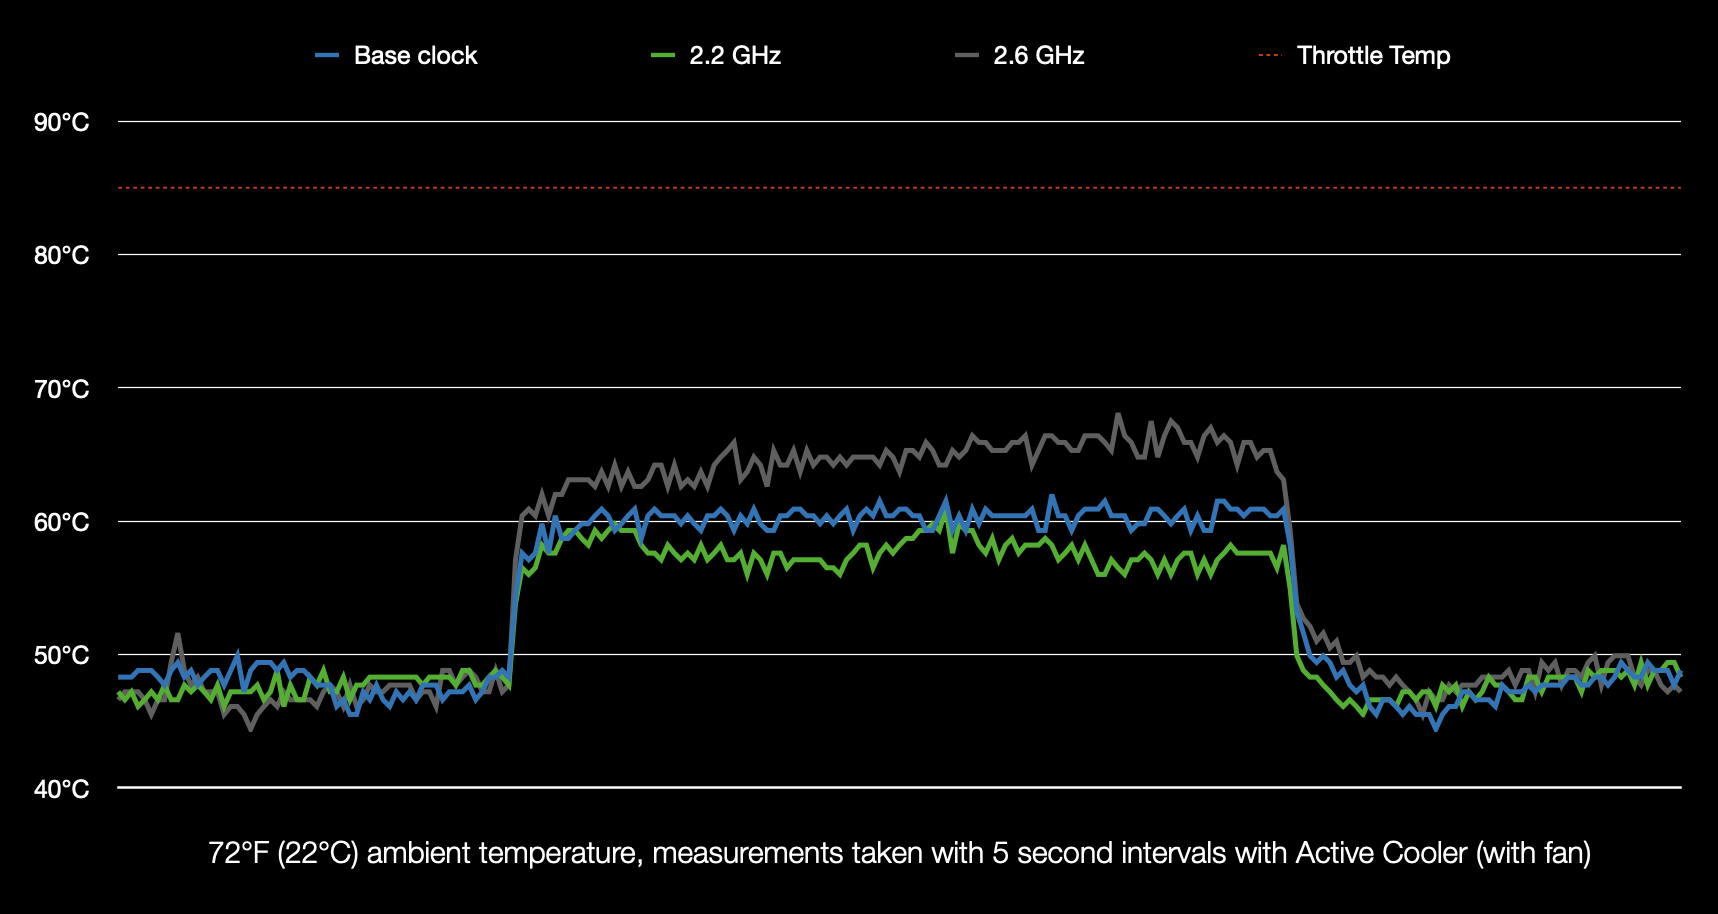
I also ran the under/overclock tests without the deltas, and everything was stable, and temps were within a margin of error, so maybe DVFS is reliable enough to drop the custom overvolting except in extreme cases.
I also measured power consumption in all three states (underclock, base clock, and overclock), and the results there mirrored the thermals above:
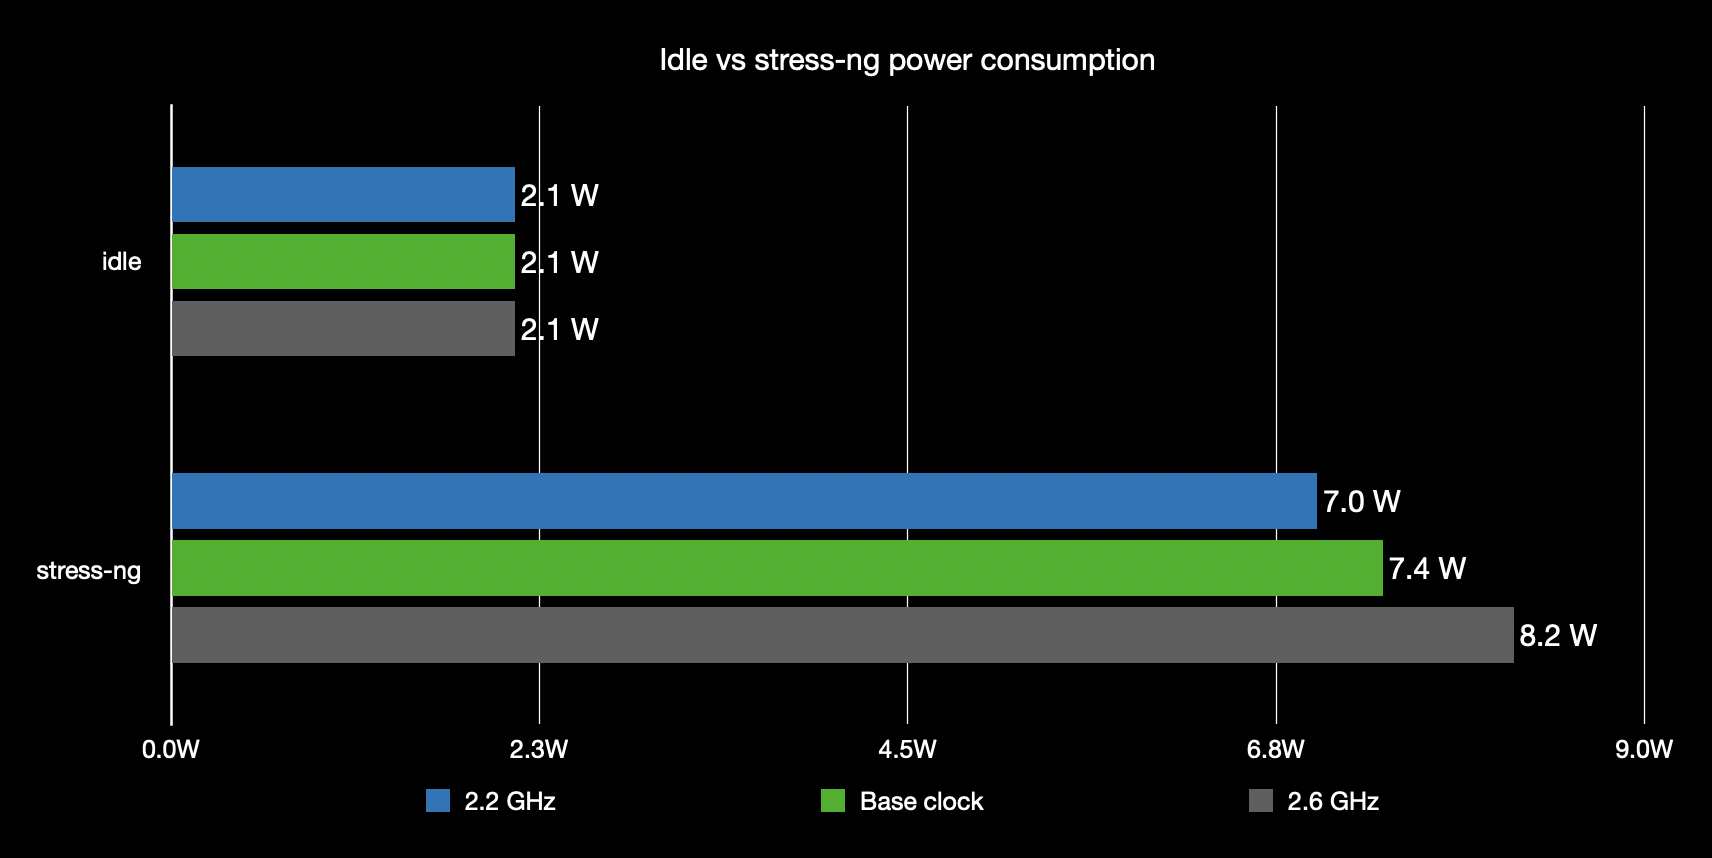
The idle power is identical in all three cases, as DVFS scales down the core voltage, dropping the board's idle power consumption to around 2W. And going full-blast, the board only needs a little power for 2.2 GHz, a little more for the default 2.4 GHz, and a little more still for 2.6 GHz.
So power and performance scale decently on the Pi 5, and I'm guessing the reason Raspberry Pi chose a default clock of 2.4 GHz is because that's the most reliable clock for all the BCM2712 chips, and hits a sweet spot on the performance/efficiency curve.
I presume, judging by how many of us have overclocked to 2.6, 3.0, or even 3.1 GHz, the Pi 5 will have enough headroom for a generous clock boost—if you choose to burn through a few extra W of power (using the 5V 5A power supply!) and have the Active Cooler and decent ventilation.
Validating the overclock
After a reboot, the overclock settings should apply; to validate your new settings took effect, run the command:
$ sudo cat /sys/devices/system/cpu/cpu0/cpufreq/cpuinfo_max_freq
This should return the arm_freq value you set in config.txt, times 1,000.
And then, to make sure thermals aren't causing any throttling, you can run the following commands:
$ vcgencmd get_throttled
throttled=0x0  # will return a different value if any throttling has occurred

$ vcgencmd measure_temp
temp=39.5'C

$ vcgencmd measure_volts uncached
volt=0.7200V
Ideally, you should run something to stress the cores for a while (I usually run my pi-cpu-stress.sh script, then check if they are throttled. Monitor the temperature (or other options) in real time by prepending watch to one of the above commands.
You can also get all the voltages measured by the new PMIC aboard the Pi 5 using pmic_read_adc, for example:
pi@pi5:~ $ vcgencmd pmic_read_adc
 3V7_WL_SW_A current(0)=0.00780744A
   3V3_SYS_A current(1)=0.12199130A
   1V8_SYS_A current(2)=0.24300660A
  DDR_VDD2_A current(3)=0.02147046A
  DDR_VDDQ_A current(4)=0.00000000A
   1V1_SYS_A current(5)=0.18640260A
   0V8_SYS_A current(6)=0.26935670A
  VDD_CORE_A current(7)=0.75012000A
   3V3_DAC_A current(17)=0.61050000A
...
Overclocking limits
I believe the clock could be pushed further with adequate cooling (like with liquid nitrogen, on a delidded chip)—probably up to 3.3 GHz, maybe slightly higher...).
Here are a few other articles and links with others' experience so far:
Raspberry Pi and Broadcom chose an older 16nm process node for the BCM2711, and regardless of the clock, this process node size limits the efficiency (and increases the cooling requirements for a given clock speed over more efficient chips). For more, see: Why are more/smaller transistors more power efficient?
Other chips implementing the Arm A76 core elected to go with a smaller process node, for example:
Arm themselves explained that smaller process nodes don't improve clock speeds on the A76, only its efficiency:
According to ARM, process node shrinks below 16nm have not yielded significant clock speed increases. Rather, smaller process nodes primarily benefit from reduced power consumption and thermal output. This is still important for performance considerations, however, because a cooler chip can have improved sustained performance.
So even if there is a die-shrink in a potential Pi 5 B+ or some similar future revision, don't expect it to get much faster—besides maybe increasing the default clock to a conservative 2.6 or 2.8 GHz. Instead, expect it to get much more efficient.
I noted in my Pi 5 video the RK3588S in particular is the most power-efficient Arm SoC I've tested:
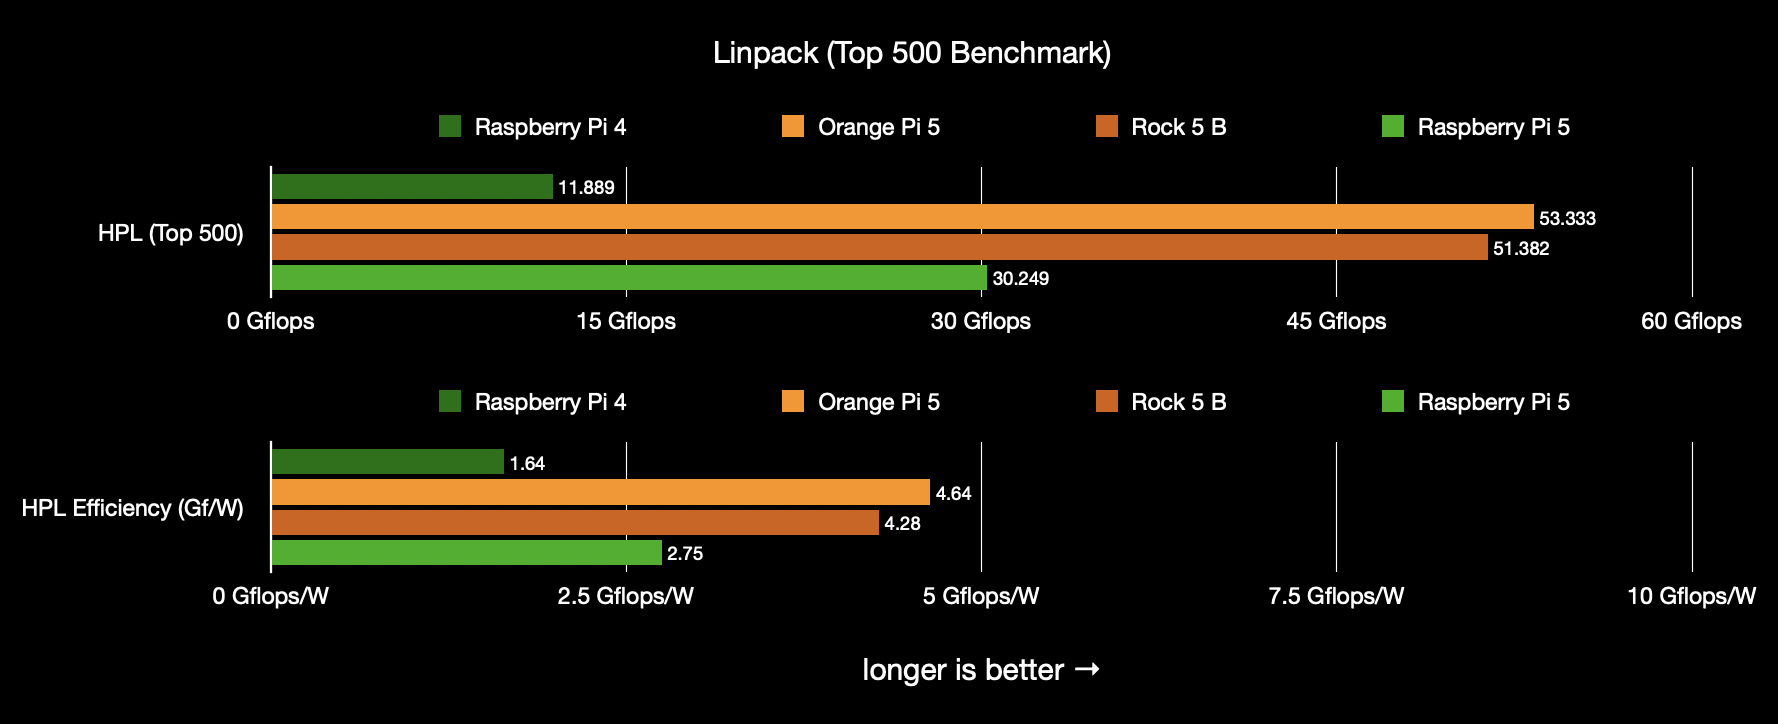
So the Raspberry Pi 5 is not quite as efficient, and when overclocked, efficiency gets a little worse. For now, I'm sticking with the default 2.4 GHz clock in my testing, especially since I only have my single alpha board on hand ;)
For more discussion on overclocking the Pi 5 and other interesting aspects of the board, check out my Raspberry Pi 5 discussion on my sbc-reviews project on GitHub.
Recommend
About Joyk
Aggregate valuable and interesting links.
Joyk means Joy of geeK