

Glide 4.0原理讲解(二)之缓存策略
source link: https://www.longdw.com/glide4-cache-memory-disk/
Go to the source link to view the article. You can view the picture content, updated content and better typesetting reading experience. If the link is broken, please click the button below to view the snapshot at that time.

Glide缓存主要分两种,一种是内存缓存,一种是磁盘缓存。其实也有说法是分三种,内存缓存又细分为活动缓存和内存缓存。两种缓存的作用不同,内存缓存的作用是防止应用重复将图片读取到内存中,磁盘缓存的作用是防止应用重复从网络或其他地方读取数据。
接下来分两个部分讲解。
(1)内存缓存的读取和写入。
(2)磁盘缓存的读取和写入。
1 内存缓存的读取和写入
1.1 读取
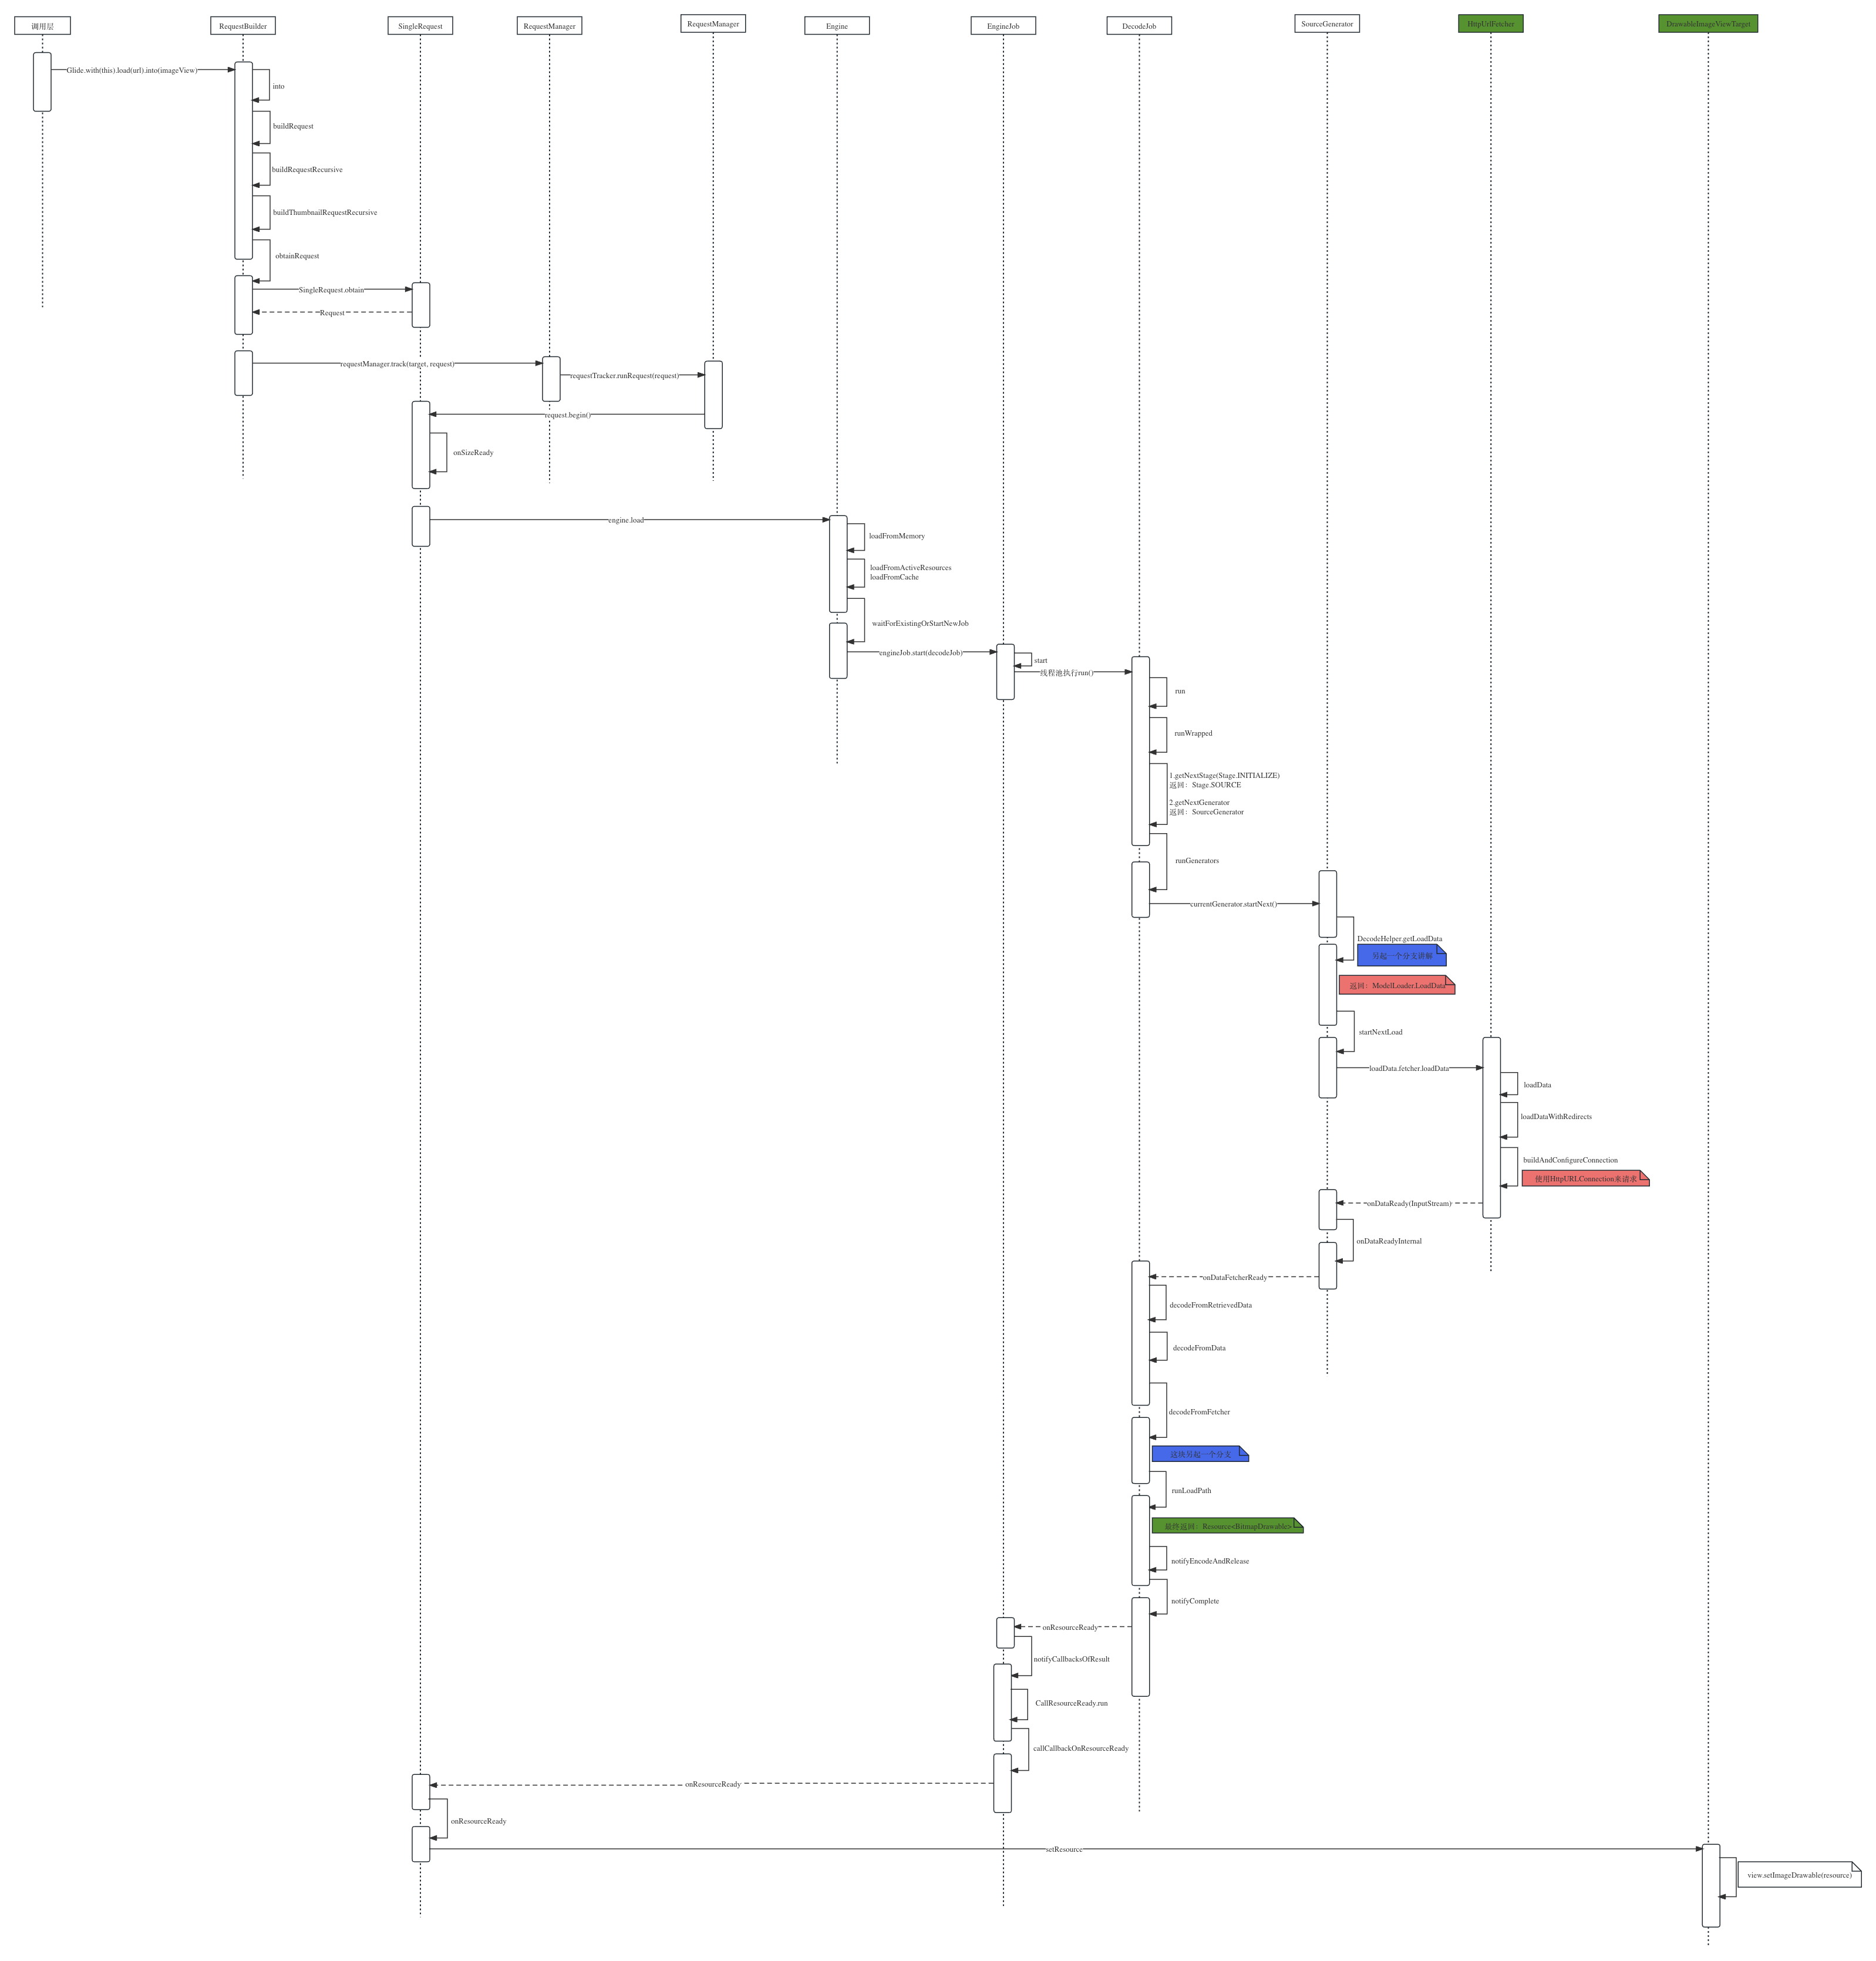
首先回顾下我们在Glide第一篇开头部分讲解的Glide全流程,大家可以打开那篇文章再简单回顾下,或者直接打开into时序图。其中engine.load(xxx)是发起请求的一个关键地方,因为这个方法里面主要干了两件事,有缓存就从缓存读取数据,没缓存就启动新的请求。
//Engine.java
public <R> LoadStatus load(xxx) {
    ...
    EngineKey key =
    keyFactory.buildKey(
        model,
        signature,
        width,
        height,
        transformations,
        resourceClass,
        transcodeClass,
        options);
    EngineResource<?> memoryResource;
    synchronized (this) {
        memoryResource = loadFromMemory(key, isMemoryCacheable, startTime);

        if (memoryResource == null) {
            return waitForExistingOrStartNewJob(xxx)
        }
    }

    cb.onResourceReady(memoryResource, DataSource.MEMORY_CACHE, /* isLoadedFromAlternateCacheKey= */ false);

    ...
}
key的生成过程传入的参数较多,model就是load("url")传入的图片url,还有width和height不同也会造成key的不同。接着看loadFromMemory,该方法看名字就知道是从内存中加载数据。
private EngineResource<?> loadFromMemory(
    EngineKey key, boolean isMemoryCacheable, long startTime) {
  if (!isMemoryCacheable) {
    return null;
  }

  EngineResource<?> active = loadFromActiveResources(key);
  if (active != null) {
    if (VERBOSE_IS_LOGGABLE) {
      logWithTimeAndKey("Loaded resource from active resources", startTime, key);
    }
    return active;
  }

  EngineResource<?> cached = loadFromCache(key);
  if (cached != null) {
    if (VERBOSE_IS_LOGGABLE) {
      logWithTimeAndKey("Loaded resource from cache", startTime, key);
    }
    return cached;
  }

  return null;
}
loadFromActiveResources(key)就是所谓的活动缓存,loadFromCache(key)就是内存缓存。其实它们都是内存缓存,只是实现的方式不一样,其中活动缓存使用的是HashMap+弱引用的方式实现的,内存缓存使用的是LruResourceCache,实际就是对原生LruCache(Least Recently Used)的包装。LruCache也叫近期最少使用算法,它的主要算法原理就是把最近使用的对象用强引用存储在LinkedHashMap中,并且在缓存值达到预设定值之前把最近最少使用的对象从内存中移除。
@Nullable
private EngineResource<?> loadFromActiveResources(Key key) {
  EngineResource<?> active = activeResources.get(key);
  if (active != null) {
    active.acquire();
  }

  return active;
}

private EngineResource<?> loadFromCache(Key key) {
  EngineResource<?> cached = getEngineResourceFromCache(key);
  if (cached != null) {
    cached.acquire();
    activeResources.activate(key, cached);
  }
  return cached;
}

private EngineResource<?> getEngineResourceFromCache(Key key) {
    Resource<?> cached = cache.remove(key);

    final EngineResource<?> result;
    if (cached == null) {
        result = null;
    } else if (cached instanceof EngineResource) {
        // Save an object allocation if we've cached an EngineResource (the typical case).
        result = (EngineResource<?>) cached;
    } else {
        result =
            new EngineResource<>(
                cached,
                /* isMemoryCacheable= */ true,
                /* isRecyclable= */ true,
                key,
                /* listener= */ this);
    }
    return result;
}
其中loadFromCache方法,从内存中读取到缓存后将其移除并存入活动缓存中,因为活动缓存的是应用正在使用的图片,这一步的目的是防止LruCache将正在使用的图片回收掉。
以上就是内存缓存的读取过程,也比较简单,接下来看下内存缓存的写入。
1.2 写入
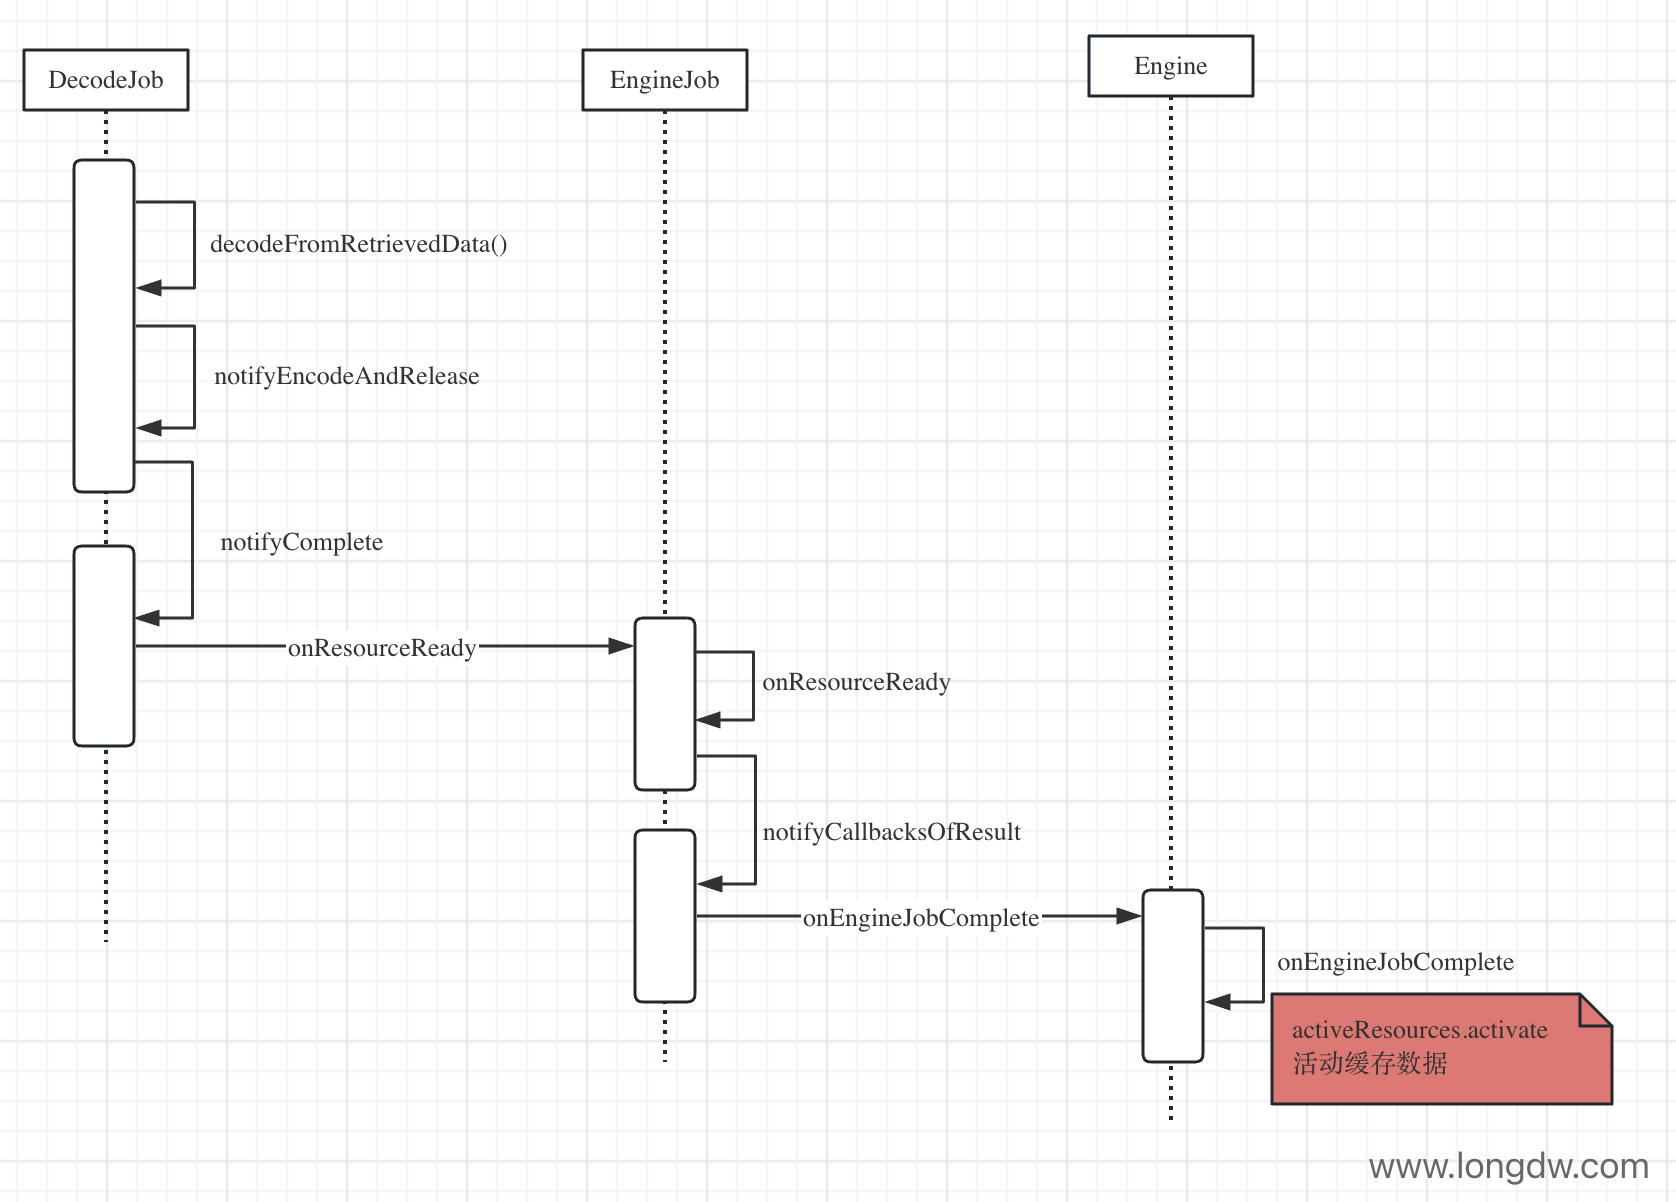
还是看下这张时序图,获取到图片后通过DecodeJob的decodeFromRetrievedData()方法来解析数据和通知缓存,整个调用链路如下图:
//EngineJob.java
void notifyCallbacksOfResult() {
    ResourceCallbacksAndExecutors copy;
    Key localKey;
    EngineResource<?> localResource;
    synchronized (this) {
      ...
      //假如copy.size()=2     acquire=1
      incrementPendingCallbacks(copy.size() + 1);

      localKey = key;
      localResource = engineResource;
    }

    //setResource()--->setImageDrawable,setImageView等
    engineJobListener.onEngineJobComplete(this, localKey, localResource);

    //遍历2次
    for (final ResourceCallbackAndExecutor entry : copy) {
      entry.executor.execute(new CallResourceReady(entry.cb));
    }
    //最后再减1
    decrementPendingCallbacks();
}

synchronized void incrementPendingCallbacks(int count) {
    Preconditions.checkArgument(isDone(), "Not yet complete!");
    //pendingCallbacks=3
    if (pendingCallbacks.getAndAdd(count) == 0 && engineResource != null) {
      engineResource.acquire();
    }
  }

  @SuppressWarnings("WeakerAccess")
  @Synthetic
  void decrementPendingCallbacks() {
    EngineResource<?> toRelease = null;
    synchronized (this) {
      stateVerifier.throwIfRecycled();
      Preconditions.checkArgument(isDone(), "Not yet complete!");
      int decremented = pendingCallbacks.decrementAndGet();
      Preconditions.checkArgument(decremented >= 0, "Can't decrement below 0");
      if (decremented == 0) {
        toRelease = engineResource;

        release();
      }
    }

    if (toRelease != null) {
      toRelease.release();
    }
  }


  private class CallResourceReady implements Runnable {

    private final ResourceCallback cb;

    CallResourceReady(ResourceCallback cb) {
      this.cb = cb;
    }

    @Override
    public void run() {
      // Make sure we always acquire the request lock, then the EngineJob lock to avoid deadlock
      // (b/136032534).
      synchronized (cb.getLock()) {
        synchronized (EngineJob.this) {
          if (cbs.contains(cb)) {
            //一共acquire加2次
            engineResource.acquire();
            //一共acquire减2次
            callCallbackOnResourceReady(cb);
            removeCallback(cb);
          }
          //pendingCallbacks一共减2次
          decrementPendingCallbacks();
        }
      }
    }
  }
上面是内存缓存的关键代码,其中pendingCallbacks和engineResource比较有意思,pendingCallbacks是AtomicInteger类型,EngineResource的关键代码如下:
class EngineResource<Z> implements Resource<Z> {
  ...
  synchronized void acquire() {
    if (isRecycled) {
      throw new IllegalStateException("Cannot acquire a recycled resource");
    }
    ++acquired;
  }

  void release() {
    boolean release = false;
    synchronized (this) {
      if (acquired <= 0) {
        throw new IllegalStateException("Cannot release a recycled or not yet acquired resource");
      }
      if (--acquired == 0) {
        release = true;
      }
    }
    if (release) {
      listener.onResourceReleased(key, this);
    }
  }
  ...
}
结合上面两大段代码来说下,整体思路是使用acquired变量来计数,有一个使用的就计数加1,当计数为0是表示图片资源没有被使用了,此时会调用toRelease.release()这句话,接着走到EngineResource的release()中,调用listener.onResourceReleased(key, this),listener就是Engine:
//Engine.Java
public void onResourceReleased(Key cacheKey, EngineResource<?> resource) {
    activeResources.deactivate(cacheKey);
    if (resource.isMemoryCacheable()) {
      //内存缓存
      cache.put(cacheKey, resource);
    } else {
      resourceRecycler.recycle(resource, /* forceNextFrame= */ false);
    }
  }
也就是当图片没有被使用的时候会被放入到内存缓存即LruResourceCache中。
以上就是内存缓存的读和写的过程。
2 磁盘缓存的读取和写入
我们可以通过如下代码设置磁盘缓存策略:
val requestOptions = RequestOptions().diskCacheStrategy(DiskCacheStrategy.AUTOMATIC)
Glide.with(this).load(url).apply(requestOptions).into(imageView)
DiskCacheStrategy有5种类型:
| 策略 | 解释 |
| DiskCacheStrategy.NONE | 表示不开启磁盘缓存 |
| DiskCacheStrategy.RESOURCE | 表示只缓存转换之后的图片 |
| DiskCacheStrategy.ALL | 表示既缓存原始图片,也缓存转换过后的图片 |
| DiskCacheStrategy.DATA | 表示只缓存原始图片 |
| DiskCacheStrategy.AUTOMATIC | 根据数据源自动选择磁盘缓存策略(默认) |
磁盘缓存策略
再次看下into时序图,DecodeJob的runWrapped()方法是接下来分析的重点,我们看下源码:
//DecodeJob.java
private void runWrapped() {
   switch (runReason) {
     case INITIALIZE:
       stage = getNextStage(Stage.INITIALIZE);
       currentGenerator = getNextGenerator();
       runGenerators();
       break;
     case SWITCH_TO_SOURCE_SERVICE:
       runGenerators();
       break;
     case DECODE_DATA:
       decodeFromRetrievedData();
       break;
     default:
       throw new IllegalStateException("Unrecognized run reason: " + runReason);
   }
 }

 private DataFetcherGenerator getNextGenerator() {
   switch (stage) {
     case RESOURCE_CACHE:
       return new ResourceCacheGenerator(decodeHelper, this);
     case DATA_CACHE:
       return new DataCacheGenerator(decodeHelper, this);
     case SOURCE:
       return new SourceGenerator(decodeHelper, this);
     case FINISHED:
       return null;
     default:
       throw new IllegalStateException("Unrecognized stage: " + stage);
   }
 }

 private void runGenerators() {
   currentThread = Thread.currentThread();
   startFetchTime = LogTime.getLogTime();
   boolean isStarted = false;
   while (!isCancelled
       && currentGenerator != null
       && !(isStarted = currentGenerator.startNext())) {
     stage = getNextStage(stage);
     currentGenerator = getNextGenerator();

     if (stage == Stage.SOURCE) {
       reschedule(RunReason.SWITCH_TO_SOURCE_SERVICE);
       return;
     }
   }
   // We've run out of stages and generators, give up.
   if ((stage == Stage.FINISHED || isCancelled) && !isStarted) {
     notifyFailed();
   }

   // Otherwise a generator started a new load and we expect to be called back in
   // onDataFetcherReady.
 }
这段调用过程在上一篇介绍Glide全流程的时候介绍过,当时只是一笔带过,接下来详细分析下调用过程。还是老规矩,我们先看DecodeJob时序图。
图稍微有点复杂,但是不难,主要就是上面三个方法的循环调用,也算是对上一篇文章的补充,我们重点关注下几个Generator。
2.1 读取
首先我们看下磁盘缓存的读取,因为我们上面分析过DecodeJob执行的过程,首先会走到ResourceCacheGenerator,因为我们没有对图片处理过(指的是大小、圆角之类的处理),所以接下来逻辑处理是在DataCacheGenerator中:
//DataCacheGenerator.java
@Override
public boolean startNext() {
    ...
    Key originalKey = new DataCacheKey(sourceId, helper.getSignature());
    cacheFile = helper.getDiskCache().get(originalKey);
    ...
}
通过helper.getDiskCache()获取到了DiskLruCacheWrapper,然后调用get方法,在get方法内部通过DiskLruCache来获取到磁盘缓存数据。
2.2 写入
接着我们再看下磁盘缓存的写入,因为我们第一次加载图片的时候没有缓存数据,所以我们对照时序图和源码,最终会发现走到SourceGenerator。
磁盘缓存写入,我们自然会想到肯定是在数据返回的时候写入的,所以找到数据返回的地方,也就是startNextLoad方法里面的onDataReady回调方法。
//SourceGenerator.java
private void startNextLoad(final LoadData<?> toStart) {
    loadData.fetcher.loadData(
        helper.getPriority(),
        new DataCallback<Object>() {
          @Override
          public void onDataReady(@Nullable Object data) {
            if (isCurrentRequest(toStart)) {
              onDataReadyInternal(toStart, data);
            }
          }

          @Override
          public void onLoadFailed(@NonNull Exception e) {
            if (isCurrentRequest(toStart)) {
              onLoadFailedInternal(toStart, e);
            }
          }
        });
}

void onDataReadyInternal(LoadData<?> loadData, Object data) {
    DiskCacheStrategy diskCacheStrategy = helper.getDiskCacheStrategy();
    if (data != null && diskCacheStrategy.isDataCacheable(loadData.fetcher.getDataSource())) {
      dataToCache = data;
      // We might be being called back on someone else's thread. Before doing anything, we should
      // reschedule to get back onto Glide's thread. Then once we're back on Glide's thread, we'll
      // get called again and we can write the retrieved data to cache.
      cb.reschedule();
    } else {
      cb.onDataFetcherReady(
          loadData.sourceKey,
          data,
          loadData.fetcher,
          loadData.fetcher.getDataSource(),
          originalKey);
    }
}

//DecodeJob.java
@Override
public void reschedule() {
    reschedule(RunReason.SWITCH_TO_SOURCE_SERVICE);
}
reschedule(RunReason.SWITCH_TO_SOURCE_SERVICE)调用后最终又会走到SourceGenerator的startNext()。
//SourceGenerator.java
@Override
  public boolean startNext() {
    if (dataToCache != null) {
      Object data = dataToCache;
      dataToCache = null;
      ...
      boolean isDataInCache = cacheData(data);
      ...
    }

    if (sourceCacheGenerator != null && sourceCacheGenerator.startNext()) {
        return true;
    }
    ...
}

private boolean cacheData(Object dataToCache) throws IOException {
    long startTime = LogTime.getLogTime();
    boolean isLoadingFromSourceData = false;
    try {
      DataRewinder<Object> rewinder = helper.getRewinder(dataToCache);
      Object data = rewinder.rewindAndGet();
      Encoder<Object> encoder = helper.getSourceEncoder(data);
      DataCacheWriter<Object> writer = new DataCacheWriter<>(encoder, data, helper.getOptions());
      DataCacheKey newOriginalKey = new DataCacheKey(loadData.sourceKey, helper.getSignature());
      DiskCache diskCache = helper.getDiskCache();
      diskCache.put(newOriginalKey, writer);

      if (diskCache.get(newOriginalKey) != null) {
        originalKey = newOriginalKey;
        sourceCacheGenerator =
            new DataCacheGenerator(Collections.singletonList(loadData.sourceKey), helper, this);
        // We were able to write the data to cache.
        return true;
      } else {

        isLoadingFromSourceData = true;
        cb.onDataFetcherReady(
            loadData.sourceKey,
            rewinder.rewindAndGet(),
            loadData.fetcher,
            loadData.fetcher.getDataSource(),
            loadData.sourceKey);
      }
      // We failed to write the data to cache.
      return false;
    } finally {
      if (!isLoadingFromSourceData) {
        loadData.fetcher.cleanup();
      }
    }
  }
所以第二次进入SourceGenerator的startNext()时,走的是if (dataToCache != null)逻辑,调用cacheData方法,然后调用diskCache.put(xxx)来缓存数据。然后还会继续调用sourceCacheGenerator.startNext(),sourceCacheGenerator也就是DataCacheGenerator,DataCacheGenerator会继续从磁盘缓存中取出数据后再回调给DecodeJob的onDataFetcherReady()来解析处理。
不得不说Glide的缓存逻辑设计的是非常巧妙的,尤其是在内存缓存的时候,因为考虑到LruCache算法会回收资源,还加入了活动缓存,大大提高的程序的健壮性。
至此,Glide的内存缓存以及磁盘缓存的讲解就到这里了。当然还有Glide图片变化、自定义模块等用法,这里就不介绍了,大家可以移步郭霖的Glide系列分析,虽然用的时过境迁,但是核心思想都没怎么变。
Recommend
About Joyk
Aggregate valuable and interesting links.
Joyk means Joy of geeK