

深度学习(十一)——神经网络:线形层及其他层介绍 - 码头牛牛
source link: https://www.cnblogs.com/zoubilin/p/17649353.html
Go to the source link to view the article. You can view the picture content, updated content and better typesetting reading experience. If the link is broken, please click the button below to view the snapshot at that time.

一、正则化层中nn.BatchNorm2d简介#
主要作用:对输入函数采用正则化。正则化的主要作用是加快神经网络的训练速度。
class torch.nn.BatchNorm2d(num_features, eps=1e-05, momentum=0.1, affine=True, track_running_stats=True, device=None, dtype=None)
输入参数:
-
num_features: 形状为(N,C,H,W)
-
其他参数默认即可
# With Learnable Parameters
m = nn.BatchNorm2d(100)
# Without Learnable Parameters
m = nn.BatchNorm2d(100, affine=False)
input = torch.randn(20, 100, 35, 45)
output = m(input)
该函数用得不多
二、其他层简介#
1. Recurrent Layers(Recurrent层)#
内含RNN、LSTM等函数,主要在nlp领域用的比较多
官方文档: Recurrent Layers
2. Transformer Layers#
3. Linear Layers(线性层)#
nn.Linear#
class torch.nn.Linear(in_features, out_features, bias=True, device=None, dtype=None
(1)参数介绍及计算方法
参数介绍:
-
in_features
-
out_features
-
bias(bool)
线性层具体参数解释如下图:
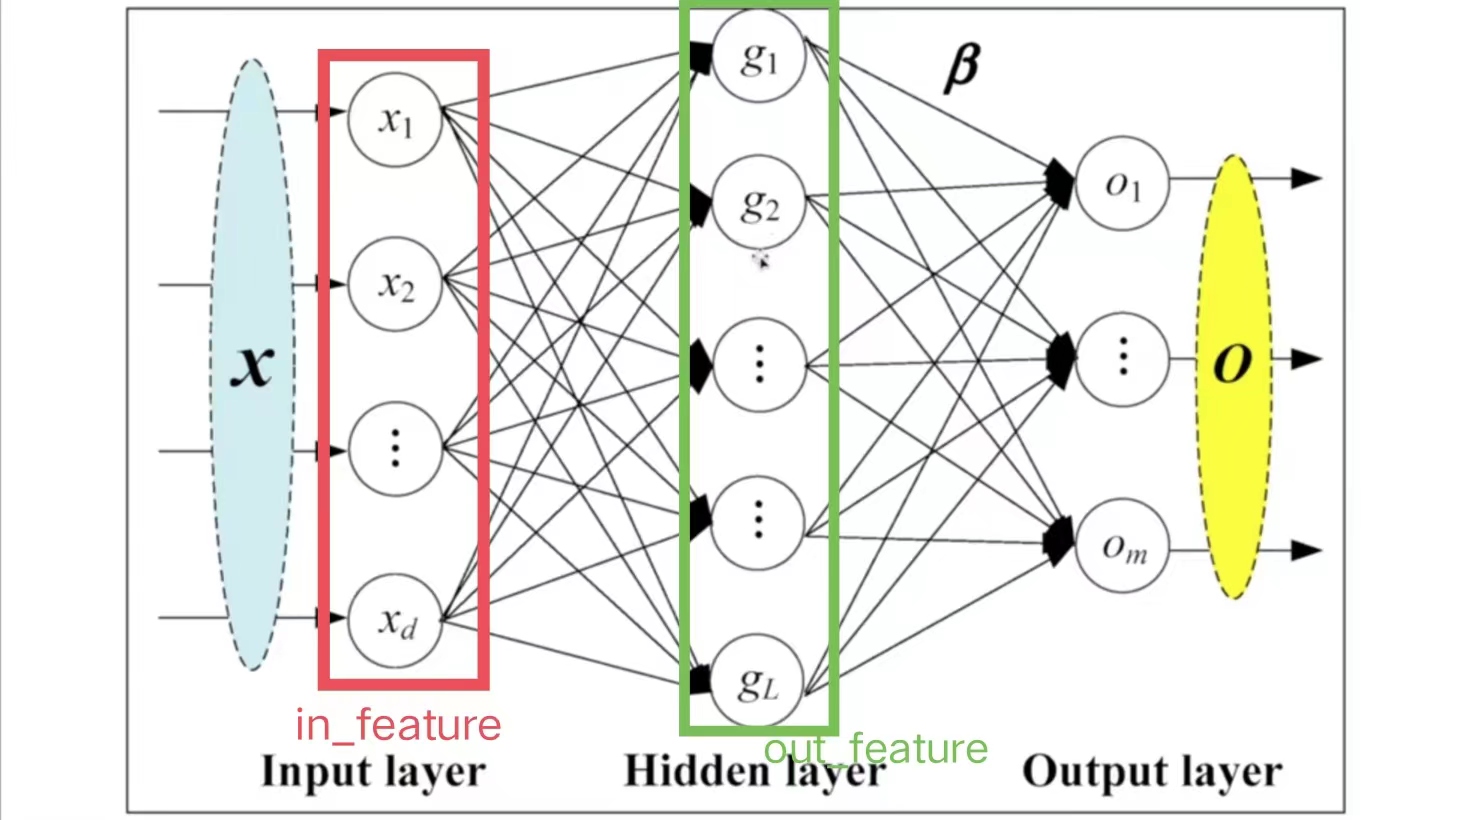
-
in_features=d,即指的是in_features的个数
-
out_features=L,即指的是out_features的个数
计算g的方法(以上图g1为例):
- x1,…,xi,…,xd每个指向g1的箭头上,均有:
-
其中,bi代表偏置,参数bias=True,则加上b;bias=False,则不加b
-
在每次训练神经网络的过程中,均会调整ki、bi的值,直到它变成一个合适的数值
-
由此可得:
(2)代码示例
以典型的VGG16 Model网络结构为例:
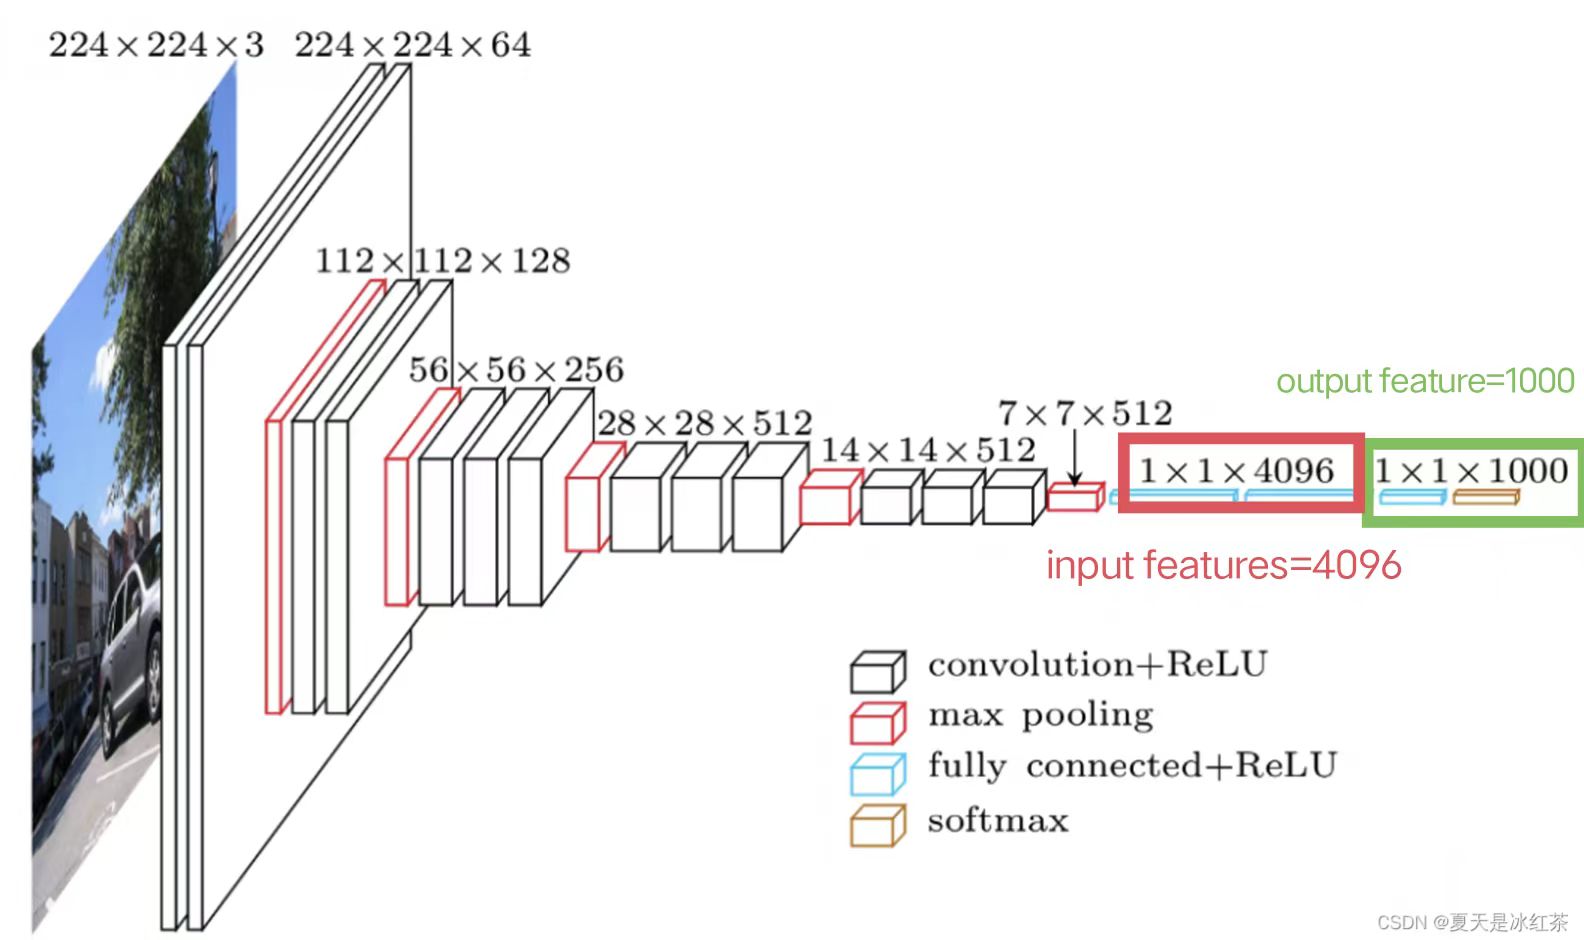
因此,设置in_features=4096; out_feature=1000
- 下面代码以一个尺寸为n×n的图像为例,先将图像展开成一行,即1×n2的尺寸。最后将1×n2尺寸的图像通过线性层,转化为1×10尺寸的图像。
import torch
import torchvision
from torch.utils.data import DataLoader
from torch import nn
from torch.nn import Linear

dataset=torchvision.datasets.CIFAR10("./dataset",train=False,download=True,transform=torchvision.transforms.ToTensor())
dataloder=DataLoader(dataset,batch_size=64)

# for data in dataloder:
#     imgs,targets = data
#     #print(imgs.shape)   #[Run] torch.Size([64, 3, 32, 32])
#
#     #我们的目标是把图像尺寸变成1×1×1×根据前面计算得出的数,下面进行转换
#     output=torch.reshape(imgs,(1,1,1,-1))
#     #print(output.shape)  #[Run] torch.Size([1, 1, 1, 196608])

#根据上面output得出的196608尺寸数据,构造神经网络结构
class Demo(nn.Module):
    def __init__(self):
        super(Demo,self).__init__()
        self.linear1=Linear(in_features=196608,out_features=10)

    def forward(self,input):
        output=self.linear1(input)
        return output

#调用神经网络
demo=Demo()

for data in dataloder:
    imgs,targets=data
    output=torch.reshape(imgs,(1,1,1,-1))

    output=demo.forward(output)
    print(output.shape)  #[Run] torch.Size([1, 1, 1, 10])
由此,成功将1×1×1×196608尺寸的图像转化为1×1×1×10尺寸的图像
注意:
- 可以用torch.flatten() 函数将图像展开成一行,即替换第33行的代码
output=torch.reshape(imgs,(1,1,1,-1)),为:
output=torch.flatten(imgs)
# print(output.shape)  #[Run] torch.Size([196608])
-
torch.flatten() 和torch.reshape() 的区别:
-
torch.flatten更方便,可以直接把图像变成一行
-
torch.reshape功能更强大,可任意指定图像尺寸
-
4. Dropout Layers#
主要作用:在训练的过程中随机把一些input(输入的tensor数据类型)变成0。变成0的概率由p决定
class torch.nn.Dropout(p=0.5, inplace=False)
- 变成0的主要原因是防止过拟合
5. Sparse Layers#
nn.Embedding#
主要用于自然语言处理中
class torch.nn.Embedding(num_embeddings, embedding_dim, padding_idx=None,
      max_norm=None, norm_type=2.0, scale_grad_by_freq=False, sparse=False,
      _weight=None, _freeze=False, device=None, dtype=None)
6.Distance Functions#
主要作用:计算两个值之间的误差,并指定误差的衡量标准
7. Loss Function#
主要作用:计算Loss的误差大小
三、调用pytorch中的网络模型#
现在我们已经学会如何自己搭建神经网络模型了,下面介绍pytorch中神经网络模型的调用方法。根据官方文档,我们可以调用自己需要的网络结构,而不需要自己写代码
1.图像方面的网络结构
官网文档:Models and pre-trained weights — Torchvision 0.15 documentation
2.语音方面的网络结构
Recommend
About Joyk
Aggregate valuable and interesting links.
Joyk means Joy of geeK