
3

Axes Camera Properties for viewing Panorama Images in MATLAB
source link: https://blogs.mathworks.com/matlab/2023/08/16/axes-camera-properties-for-viewing-panorama-images-in-matlab/
Go to the source link to view the article. You can view the picture content, updated content and better typesetting reading experience. If the link is broken, please click the button below to view the snapshot at that time.

Axes Camera Properties for viewing Panorama Images in MATLAB » The MATLAB Blog
This is a guest post by Eric Ludlam, Manager of MATLAB Graphics at MathWorks.
Axes Camera properties are handy when you want detailed control of a 3D scene, but they can be a bit complex to understand the first time you try to use them. In todays blog I'd like to show how to use Camera properties to create a Panorama Image viewer.
To start, lets take a look at the image we'll use as an example. I captured this picture using an Android phone using the Google camera app. The image was taken on the MathWorks Apple Hill campus in the spring of 2023.
P=imread('http://blogs.mathworks.com/matlab/files/2023/08/AppleHill_Quad.PANO_-scaled.jpg');
imshow(P);
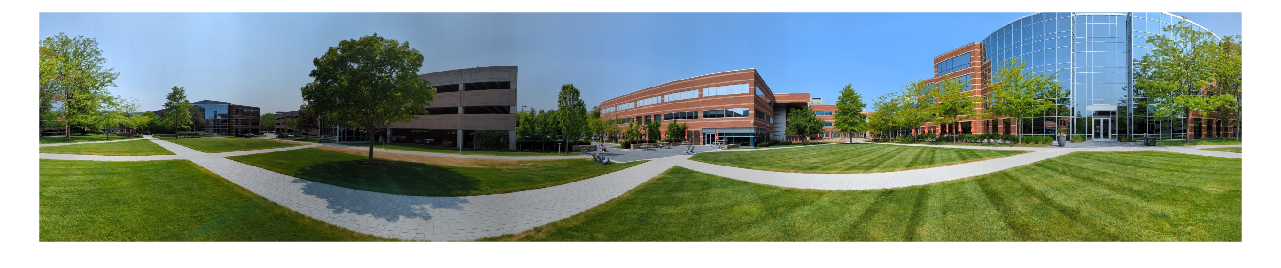
When taking a panorama photo, you stand in one place and slowly scan in a circle. In effect, you're capturing a very wide rectangle of pixels that can be thought of as a cylinder at some radius distance from your camera. To render it, we'll use a texturemapped surface in the shape of a cylinder. Since we are warping the image into this new shape we also need to compute the ratio between the radius and circumference of the cylinder to make sure the pixels stay square. I'm doing this by picking a radius, computing the circumference, and then computing the height by multiplying the circumference by the h/w ratio of the image.
R=2; % Radius
C=2*pi*R; % Circumference
H=C*size(P,1)/size(P,2); % Height of cylinder
[X,Y,Z]=cylinder(R,90); % Cylinder mesh
Z = Z*H; % Scale Z to height
When creating the surface to display the image, we need to flip the pixels around (using rot90) to account for image data 0,0 being on the top left. To simplify positioning the camera, I also offset the cylinder in Z so that it is centered around 0.
figure
surf(X,Y,Z-H/2,rot90(P,2),'FaceColor','texture','EdgeColor','none');
daspect([1 1 1])
axis tight

There are different kinds of panorama images, and in this case the pixels are mapped in a rectilinear manner, so we can use this simplified shape for our display.
But what does it really feel like to be on the Apple Hill Campus? Lets position our camera inside this cylinder and find out! To do this we'll set several camera properties. They are:
- Projection - Set this to perspective so that far-away objects look smaller than nearby objects.
- CameraPosition - We centered our cylinder around the origin, so we'll put our camera there.
- CameraTarget - What the camera is looking at. I selected a start_angle that looks at the entrance to Apple Hill 3.
- CameraViewAngle - This is like using a zoom lens, controlled via an angle in degrees. I picked 50 degrees arbitrarilly.
start_angle=40;
set(gca,'Projection','perspective',...
'CameraPosition',[ 0 0 0 ],...
'CameraTarget',[ cosd(start_angle)*R sind(start_angle)*R 0],...
'CameraViewAngle',50);

This looks like we just cropped the photo, and in some ways we have, but the pixels are actually warped slightly on the sides which will make the scene more immersive when panning, as if your camera is actually looking at this 3D scene.
Lets finish up by panning around so you can see what it looks like. This next code snippet includes several loops which will change camera properties such as the CameraTarget (change what we look at) and CameraViewAngle (change how zoomed in it is.)
step=2;
for A=start_angle:step:260
set(gca,'CameraTarget',[ cosd(A)*H sind(A)*H 0]);
drawnow
step=1;
for VA=50:-step:20
set(gca,'CameraViewAngle',VA);
drawnow
maxel=20;
step=1;
for E=[ 0:step:maxel maxel:-step:-maxel -maxel:step:0 ]
set(gca,'CameraTarget',[ cosd(A)*H sind(A)*H sind(E)*H]);
drawnow
step=1;
for VA=20:step:50
set(gca,'CameraViewAngle',VA);
drawnow
step=2;
for A=260:step:360+start_angle
set(gca,'CameraTarget',[ cosd(A)*H sind(A)*H 0]);
drawnow
If you download and run this code, these last two lines will turn on the camera toolbar, and set the mode to pan. This will let you drag with your mouse to look around the scene. Use the CameraViewAngle button to zoom in and out.
cameratoolbar('show')
cameratoolbar('setmode','pan')
Recommend
About Joyk
Aggregate valuable and interesting links.
Joyk means Joy of geeK