

@Autowired 到底是怎么把变量注入进来的?
source link: http://www.javaboy.org/2023/0714/spring_autowired.html
Go to the source link to view the article. You can view the picture content, updated content and better typesetting reading experience. If the link is broken, please click the button below to view the snapshot at that time.

@Autowired 到底是怎么把变量注入进来的?
[TOC]
以下内容基于 Spring6.0.4。
在 Spring 容器中,当我们想给某一个属性注入值的时候,有多种不同的方式,例如可以通过构造器注入、可以通过 set 方法注入,也可以使用 @Autowired、@Inject、@Resource 等注解注入。
今天松哥就来和小伙伴们聊一聊,@Autowired 到底是如何把数据注入进来的。
@Service
public class AService {
    @Autowired
    BService bService;
}
1. Bean 的创建
这个问题我们就得从 Bean 的创建开始了,本文主要是和小伙伴们聊 @Autowired,所以 Bean 的创建我就不从第一步开始了,咱们直接来看关键的方法,那就是 AbstractAutowireCapableBeanFactory#doCreateBean 方法:
protected Object doCreateBean(String beanName, RootBeanDefinition mbd, @Nullable Object[] args)
		throws BeanCreationException {
    //....
	Object exposedObject = bean;
	try {
		populateBean(beanName, mbd, instanceWrapper);
		exposedObject = initializeBean(beanName, exposedObject, mbd);
	}
	//...
	return exposedObject;
}
在这个方法中,首先会创建原始的 Bean 对象,创建出来之后,会调用一个 populateBean 方法,这个方法就是给 Bean 的各个属性赋值的方法,标注了 @Autowired 注解的属性被自动赋值也是在这个方法中完成的。
2. populateBean
populateBean 方法内容比较多,我们来看一些关键的地方:
protected void populateBean(String beanName, RootBeanDefinition mbd, @Nullable BeanWrapper bw) {
	// Give any InstantiationAwareBeanPostProcessors the opportunity to modify the
	// state of the bean before properties are set. This can be used, for example,
	// to support styles of field injection.
	if (!mbd.isSynthetic() && hasInstantiationAwareBeanPostProcessors()) {
		for (InstantiationAwareBeanPostProcessor bp : getBeanPostProcessorCache().instantiationAware) {
			if (!bp.postProcessAfterInstantiation(bw.getWrappedInstance(), beanName)) {
				return;
			}
		}
	}
	//...
	if (hasInstantiationAwareBeanPostProcessors()) {
		if (pvs == null) {
			pvs = mbd.getPropertyValues();
		}
		for (InstantiationAwareBeanPostProcessor bp : getBeanPostProcessorCache().instantiationAware) {
			PropertyValues pvsToUse = bp.postProcessProperties(pvs, bw.getWrappedInstance(), beanName);
			if (pvsToUse == null) {
				return;
			}
			pvs = pvsToUse;
		}
	}
	boolean needsDepCheck = (mbd.getDependencyCheck() != AbstractBeanDefinition.DEPENDENCY_CHECK_NONE);
	if (needsDepCheck) {
		PropertyDescriptor[] filteredPds = filterPropertyDescriptorsForDependencyCheck(bw, mbd.allowCaching);
		checkDependencies(beanName, mbd, filteredPds, pvs);
	}
	if (pvs != null) {
		applyPropertyValues(beanName, mbd, bw, pvs);
	}
}
这里松哥贴出来的是部分关键代码。
首先来看上面有一个 if,这个 if 主要是判断是否需要后置处理器进行处理,如果不需要,那么就直接 return 掉了,默认情况下,这里并不会 return 掉,而是会继续走后面的流程,因为 postProcessAfterInstantiation 方法默认返回 true。
接下来第二个 if 就是比较关键的一个地方了,在这里会遍历所有相关的后置处理器,尝试通过这些处理器去获取到需要的 value。
负责处理 @Autowired 注解的后置处理器是 AutowiredAnnotationBeanPostProcessor,所以现在,我们就来到 AutowiredAnnotationBeanPostProcessor#postProcessProperties 方法了。
3. postProcessProperties
@Override
public PropertyValues postProcessProperties(PropertyValues pvs, Object bean, String beanName) {
	InjectionMetadata metadata = findAutowiringMetadata(beanName, bean.getClass(), pvs);
	try {
		metadata.inject(bean, beanName, pvs);
	}
	catch (BeanCreationException ex) {
		throw ex;
	}
	catch (Throwable ex) {
		throw new BeanCreationException(beanName, "Injection of autowired dependencies failed", ex);
	}
	return pvs;
}
这个方法其实就两步,第一步 findAutowiringMetadata,第二步 inject,就这两件事。分别来看。
3.1 findAutowiringMetadata
private InjectionMetadata findAutowiringMetadata(String beanName, Class<?> clazz, @Nullable PropertyValues pvs) {
	// Fall back to class name as cache key, for backwards compatibility with custom callers.
	String cacheKey = (StringUtils.hasLength(beanName) ? beanName : clazz.getName());
	// Quick check on the concurrent map first, with minimal locking.
	InjectionMetadata metadata = this.injectionMetadataCache.get(cacheKey);
	if (InjectionMetadata.needsRefresh(metadata, clazz)) {
		synchronized (this.injectionMetadataCache) {
			metadata = this.injectionMetadataCache.get(cacheKey);
			if (InjectionMetadata.needsRefresh(metadata, clazz)) {
				if (metadata != null) {
					metadata.clear(pvs);
				}
				metadata = buildAutowiringMetadata(clazz);
				this.injectionMetadataCache.put(cacheKey, metadata);
			}
		}
	}
	return metadata;
}
这个方法会先尝试从缓存中获取 metadata,如果能够从缓存中获取到,那就直接返回,缓存中没有的话,那么最终会调用到 buildAutowiringMetadata 方法,去重新构建 metadata,并将构建结果存入到缓存中,以备下一次使用。
那么我们来看下 metadata 到底是如何构建出来的。
private InjectionMetadata buildAutowiringMetadata(Class<?> clazz) {
	if (!AnnotationUtils.isCandidateClass(clazz, this.autowiredAnnotationTypes)) {
		return InjectionMetadata.EMPTY;
	}
	List<InjectionMetadata.InjectedElement> elements = new ArrayList<>();
	Class<?> targetClass = clazz;
	do {
		final List<InjectionMetadata.InjectedElement> currElements = new ArrayList<>();
		ReflectionUtils.doWithLocalFields(targetClass, field -> {
			MergedAnnotation<?> ann = findAutowiredAnnotation(field);
			if (ann != null) {
				if (Modifier.isStatic(field.getModifiers())) {
					if (logger.isInfoEnabled()) {
						logger.info("Autowired annotation is not supported on static fields: " + field);
					}
					return;
				}
				boolean required = determineRequiredStatus(ann);
				currElements.add(new AutowiredFieldElement(field, required));
			}
		});
		ReflectionUtils.doWithLocalMethods(targetClass, method -> {
			Method bridgedMethod = BridgeMethodResolver.findBridgedMethod(method);
			if (!BridgeMethodResolver.isVisibilityBridgeMethodPair(method, bridgedMethod)) {
				return;
			}
			MergedAnnotation<?> ann = findAutowiredAnnotation(bridgedMethod);
			if (ann != null && method.equals(ClassUtils.getMostSpecificMethod(method, clazz))) {
				if (Modifier.isStatic(method.getModifiers())) {
					if (logger.isInfoEnabled()) {
						logger.info("Autowired annotation is not supported on static methods: " + method);
					}
					return;
				}
				if (method.getParameterCount() == 0) {
					if (logger.isInfoEnabled()) {
						logger.info("Autowired annotation should only be used on methods with parameters: " +
								method);
					}
				}
				boolean required = determineRequiredStatus(ann);
				PropertyDescriptor pd = BeanUtils.findPropertyForMethod(bridgedMethod, clazz);
				currElements.add(new AutowiredMethodElement(method, required, pd));
			}
		});
		elements.addAll(0, currElements);
		targetClass = targetClass.getSuperclass();
	}
	while (targetClass != null && targetClass != Object.class);
	return InjectionMetadata.forElements(elements, clazz);
}
这个方法比较长,我来和大家说一下核心逻辑。
首先会调用 isCandidateClass 方法判断当前类是否为一个候选类,判断的依据就是 autowiredAnnotationTypes 变量的值,这个变量在该类的构造方法中进行了初始化,大家来看下这个构造方法:
public AutowiredAnnotationBeanPostProcessor() {
	this.autowiredAnnotationTypes.add(Autowired.class);
	this.autowiredAnnotationTypes.add(Value.class);
	try {
		this.autowiredAnnotationTypes.add((Class<? extends Annotation>)
				ClassUtils.forName("jakarta.inject.Inject", AutowiredAnnotationBeanPostProcessor.class.getClassLoader()));
		logger.trace("'jakarta.inject.Inject' annotation found and supported for autowiring");
	}
	catch (ClassNotFoundException ex) {
		// jakarta.inject API not available - simply skip.
	}
	try {
		this.autowiredAnnotationTypes.add((Class<? extends Annotation>)
				ClassUtils.forName("javax.inject.Inject", AutowiredAnnotationBeanPostProcessor.class.getClassLoader()));
		logger.trace("'javax.inject.Inject' annotation found and supported for autowiring");
	}
	catch (ClassNotFoundException ex) {
		// javax.inject API not available - simply skip.
	}
}
小伙伴们看到,autowiredAnnotationTypes 集合中有两个注解是固定的:@Autowired 和 @Value,另外就是如果项目引入了 JSR-330 依赖,则 @Inject 注解也会被加入进来,以前 @Inject 存在于 javax 包中,现在最新版 @Inject 注解存在于 jakarta 包中,这里把两种情况都列出来了。
所以,isCandidateClass 方法实际上就是判断当前类在类、属性、方法等层面上是否存在上述三个注解,如果存在,则就是候选类,否则就不是候选类。如果不是候选类则返回一个空的 InjectionMetadata 对象,否则就继续后面的流程。
后面的流程,首先是一个 do{}while() 结构,通过这个循环把当前类以及当前类的父类中的满足条件的注解都找出来。具体的找法就是首先调用 ReflectionUtils.doWithLocalFields 方法,这个方法会遍历当前类的所有属性,找到那些包含了 autowiredAnnotationTypes 中定义的注解的属性,并将之封装为 AutowiredFieldElement 对象,然后存入到集合中,接下来就是调用 ReflectionUtils.doWithLocalMethods,这个是找到当前类中包含了上述三个注解的方法,然后把找到的满足条件的方法封装为 AutowiredMethodElement 然后存入到集合中。
另外大家需要注意,无论是 AutowiredFieldElement 还是 AutowiredMethodElement,都是 InjectionMetadata.InjectedElement 的子类。
这就是 findAutowiringMetadata 方法所做的事情,整体上来看,就是查找到添加了 @Autowired 或者 @Value 或者 @Inject 注解的属性或者方法,并将之存入到集合中。
3.2 inject
接下来就该调用 metadata.inject 了,我们来看下该方法:
public void inject(Object target, @Nullable String beanName, @Nullable PropertyValues pvs) throws Throwable {
	Collection<InjectedElement> checkedElements = this.checkedElements;
	Collection<InjectedElement> elementsToIterate =
			(checkedElements != null ? checkedElements : this.injectedElements);
	if (!elementsToIterate.isEmpty()) {
		for (InjectedElement element : elementsToIterate) {
			element.inject(target, beanName, pvs);
		}
	}
}
这里就是遍历刚刚上一步收集到的 InjectedElement,然后挨个调用其 inject 方法进行属性注入。以本文一开始的 demo 为例,@Autowired 注解加在属性上面,所以我们这里实际上调用的是 AutowiredFieldElement#inject 方法:
@Override
protected void inject(Object bean, @Nullable String beanName, @Nullable PropertyValues pvs) throws Throwable {
	Field field = (Field) this.member;
	Object value;
	if (this.cached) {
		try {
			value = resolvedCachedArgument(beanName, this.cachedFieldValue);
		}
		catch (NoSuchBeanDefinitionException ex) {
			// Unexpected removal of target bean for cached argument -> re-resolve
			value = resolveFieldValue(field, bean, beanName);
		}
	}
	else {
		value = resolveFieldValue(field, bean, beanName);
	}
	if (value != null) {
		ReflectionUtils.makeAccessible(field);
		field.set(bean, value);
	}
}
这段代码首先会调用 resolvedCachedArgument 方法尝试从缓存中获取想要的对象,如果缓存中存在,则可以直接使用,如果缓存中没有,则调用 resolveFieldValue 方法去获取。获取到之后,通过反射调用 set 方法进行赋值就可以了。所以关键步骤又来到了 resolveFieldValue 方法中。
用缓存的好处就是,获取到对象存入到缓存之后,如果相同的 Bean 在多个类中注入,那么只有第一次需要去加载,以后就直接用缓存中的数据即可。
@Nullable
private Object resolveFieldValue(Field field, Object bean, @Nullable String beanName) {
	//...
	Object value;
	try {
		value = beanFactory.resolveDependency(desc, beanName, autowiredBeanNames, typeConverter);
	}
    //...
	return value;
}
这个方法的核心其实就是通过 beanFactory.resolveDependency 方法获取到想要的 Bean 对象,我们直接来看这个核心方法,由于 BeanFactory 是一个接口,所以这个方法的实现实际上是在 DefaultListableBeanFactory#resolveDependency:
@Nullable
public Object resolveDependency(DependencyDescriptor descriptor, @Nullable String requestingBeanName,
		@Nullable Set<String> autowiredBeanNames, @Nullable TypeConverter typeConverter) throws BeansException {
	descriptor.initParameterNameDiscovery(getParameterNameDiscoverer());
	if (Optional.class == descriptor.getDependencyType()) {
		return createOptionalDependency(descriptor, requestingBeanName);
	}
	else if (ObjectFactory.class == descriptor.getDependencyType() ||
			ObjectProvider.class == descriptor.getDependencyType()) {
		return new DependencyObjectProvider(descriptor, requestingBeanName);
	}
	else if (javaxInjectProviderClass == descriptor.getDependencyType()) {
		return new Jsr330Factory().createDependencyProvider(descriptor, requestingBeanName);
	}
	else {
		Object result = getAutowireCandidateResolver().getLazyResolutionProxyIfNecessary(
				descriptor, requestingBeanName);
		if (result == null) {
			result = doResolveDependency(descriptor, requestingBeanName, autowiredBeanNames, typeConverter);
		}
		return result;
	}
    }
这里一共是四个分支,处理四种不同的情况,分别是 Optional、ObjectFactory、JSR-330 以及其他情况,很明显,文章开头的案例应该属于第四种情况,我们继续来看 doResolveDependency 方法。
3.3 doResolveDependency
这个方法也是比较长,我列出来了一些关键的部分:
@Nullable
public Object doResolveDependency(DependencyDescriptor descriptor, @Nullable String beanName,
		@Nullable Set<String> autowiredBeanNames, @Nullable TypeConverter typeConverter) throws BeansException {
        //...
		Object multipleBeans = resolveMultipleBeans(descriptor, beanName, autowiredBeanNames, typeConverter);
		if (multipleBeans != null) {
			return multipleBeans;
		}
		Map<String, Object> matchingBeans = findAutowireCandidates(beanName, type, descriptor);
		if (matchingBeans.isEmpty()) {
			if (isRequired(descriptor)) {
				raiseNoMatchingBeanFound(type, descriptor.getResolvableType(), descriptor);
			}
			return null;
		}
		String autowiredBeanName;
		Object instanceCandidate;
		if (matchingBeans.size() > 1) {
			autowiredBeanName = determineAutowireCandidate(matchingBeans, descriptor);
			if (autowiredBeanName == null) {
				if (isRequired(descriptor) || !indicatesMultipleBeans(type)) {
					return descriptor.resolveNotUnique(descriptor.getResolvableType(), matchingBeans);
				}
				else {
					// In case of an optional Collection/Map, silently ignore a non-unique case:
					// possibly it was meant to be an empty collection of multiple regular beans
					// (before 4.3 in particular when we didn't even look for collection beans).
					return null;
				}
			}
			instanceCandidate = matchingBeans.get(autowiredBeanName);
		}
		else {
			// We have exactly one match.
			Map.Entry<String, Object> entry = matchingBeans.entrySet().iterator().next();
			autowiredBeanName = entry.getKey();
			instanceCandidate = entry.getValue();
		}
		Object result = instanceCandidate;
		return result;
	}
	finally {
		ConstructorResolver.setCurrentInjectionPoint(previousInjectionPoint);
	}
}
首先是调用 resolveMultipleBeans 方法去查找多个 Bean,这是因为我们在注入的时候,可以注入数组、集合和 Map,例如像下面这样:
@Service
public class AService {
    @Autowired
    BService bService;
    @Autowired
    BService[] bServices;
    @Autowired
    List<BService> bServiceList;
    @Autowired
    Map<String, BService> bServiceMap;
}
具体查找方法如下:
@Nullable
private Object resolveMultipleBeans(DependencyDescriptor descriptor, @Nullable String beanName,
		@Nullable Set<String> autowiredBeanNames, @Nullable TypeConverter typeConverter) {
	Class<?> type = descriptor.getDependencyType();
	if (descriptor instanceof StreamDependencyDescriptor streamDependencyDescriptor) {
		Map<String, Object> matchingBeans = findAutowireCandidates(beanName, type, descriptor);
		//...
		return stream;
	}
	else if (type.isArray()) {
		Class<?> componentType = type.getComponentType();
		ResolvableType resolvableType = descriptor.getResolvableType();
		Map<String, Object> matchingBeans = findAutowireCandidates(beanName, componentType,
				new MultiElementDescriptor(descriptor));
		return result;
	}
	else if (Collection.class.isAssignableFrom(type) && type.isInterface()) {
		Class<?> elementType = descriptor.getResolvableType().asCollection().resolveGeneric();
		Map<String, Object> matchingBeans = findAutowireCandidates(beanName, elementType,
				new MultiElementDescriptor(descriptor));
		return result;
	}
	else if (Map.class == type) {
		ResolvableType mapType = descriptor.getResolvableType().asMap();
		Map<String, Object> matchingBeans = findAutowireCandidates(beanName, valueType,
				new MultiElementDescriptor(descriptor));
		return matchingBeans;
	}
	else {
		return null;
	}
}
这里会首先判断你的数据类型,针对 Stream、数组、集合 以及 Map 分别处理,处理代码都很好懂,以集合为例,首先获取到集合中的泛型,然后调用 findAutowireCandidates 方法根据泛型去查找到 Bean,处理一下返回就行了,其他几种数据类型也都差不多。
至于 findAutowireCandidates 方法的逻辑,我们就不去细看了,我大概和小伙伴们说一下,就是先根据 Bean 的类型,调用 BeanFactoryUtils.beanNamesForTypeIncludingAncestors 方法去当前容器连同父容器中,查找到所有满足条件的 Bean,处理之后返回。
接下来回到本小节一开始的源码中,处理完集合之后,接下来也是调用 findAutowireCandidates 方法去查找满足条件的 Bean,但是这个方法查找出来的 Bean 可能有多个,如果存在多个,则要通过 @Primary 注解或者其他优先级顺序,去确定到底使用哪一个(执行 determineAutowireCandidate 方法),如果查找到一个 Bean,那就把找到的 Bean 返回即可。
这就是 @Autowired 一个完整的解析过程。
4. 时序图
最后,结合如下时序图,我再和小伙伴们梳理一下上面的过程。
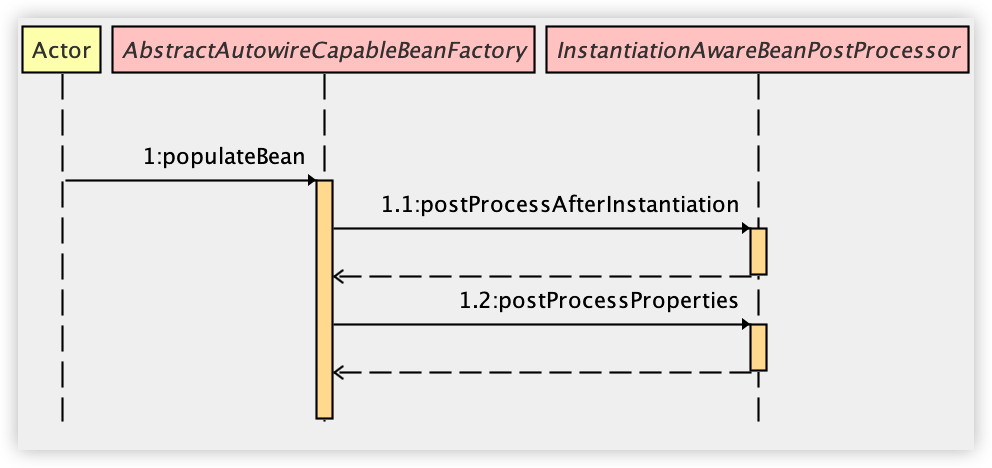
- 在创建 Bean 的时候,原始 Bean 创建出来之后,会调用 populateBean 方法进行 Bean 的属性填充。
- 接下来调用 postProcessAfterInstantiation 方法去判断是否需要执行后置处理器,如果不需要,就直接返回了。
- 调用 postProcessProperties 方法,去触发各种后置处理器的执行。
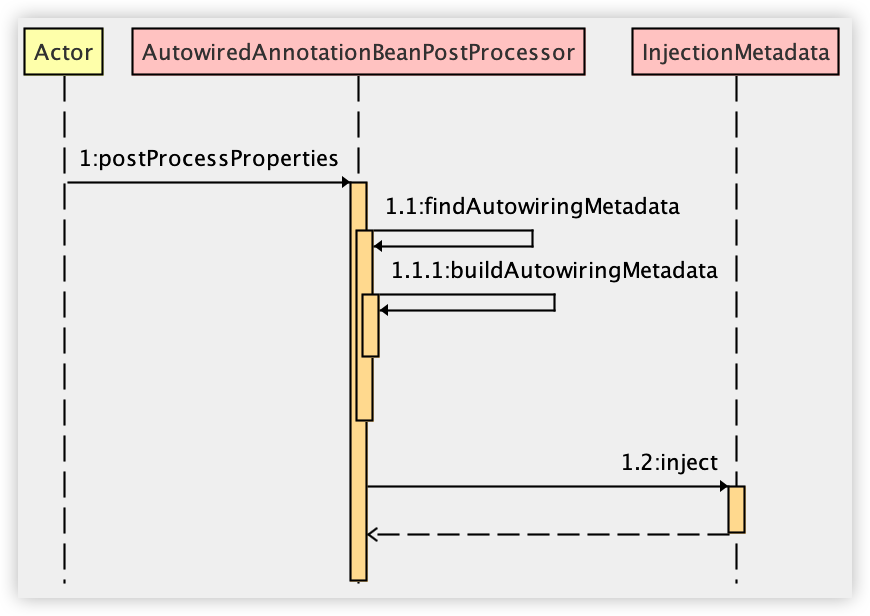
- 在第 3 步的方法中,调用 findAutowiringMetadata,这个方法又会进一步触发 buildAutorwiringMetadata 方法,去找到包含了 @Autowired、@Value 以及 @Inject 注解的属性或者方法,并将之封装为 InjectedElement 返回。
- 调用 InjectedElement#inject 方法进行属性注入。
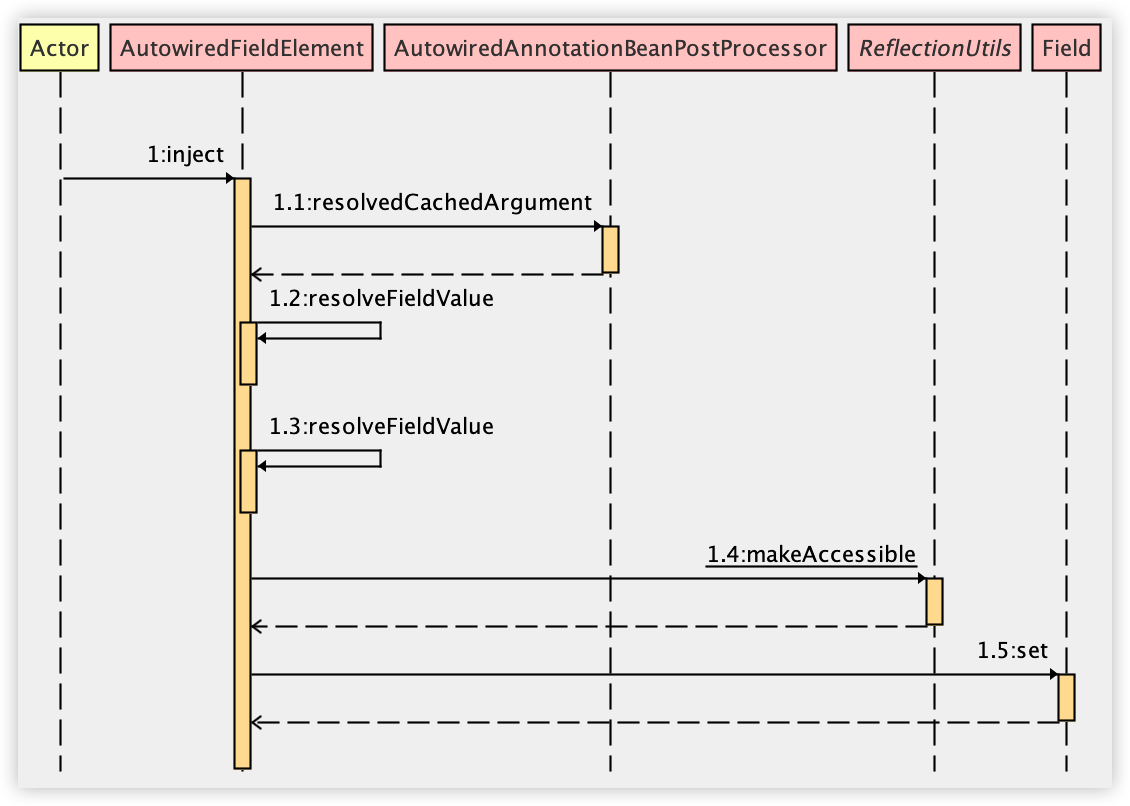
- 接下来执行 resolvedCachedArgument 方法尝试从缓存中找到需要的 Bean 对象。
- 如果缓存中不存在,则调用 resolveFieldValue 方法去容器中找到 Bean。
- 最后调用 makeAccessible 和 set 方法完成属性的赋值。
整体上的流程就是这样,细节小伙伴们参考第二小节内容。
今天内容有点多,小伙伴们周末可以细细 DEBUG 验证一遍~
喜欢这篇文章吗?扫码关注公众号【江南一点雨】,【江南一点雨】专注于 SPRING BOOT+微服务以及前后端分离技术,每天推送原创技术干货,关注后回复 JAVA,领取松哥为你精心准备的 JAVA 干货!

Recommend
About Joyk
Aggregate valuable and interesting links.
Joyk means Joy of geeK