

Stable Diffusion 硬核生存指南:WebUI 中的 CodeFormer
source link: https://soulteary.com/2023/08/02/stable-diffusion-hardcore-survival-guide-codeformer-in-webui.html
Go to the source link to view the article. You can view the picture content, updated content and better typesetting reading experience. If the link is broken, please click the button below to view the snapshot at that time.

Stable Diffusion 硬核生存指南:WebUI 中的 CodeFormer
本篇文章聊聊 Stable Diffusion WebUI 中的核心组件,强壮的人脸图像面部画面修复模型 CodeFormer 相关的事情。
在 Stable Diffusion WebUI 项目中,源码 modules 目录中,有一个有趣的目录叫做 CodeFormer,它就是本文的主角啦。
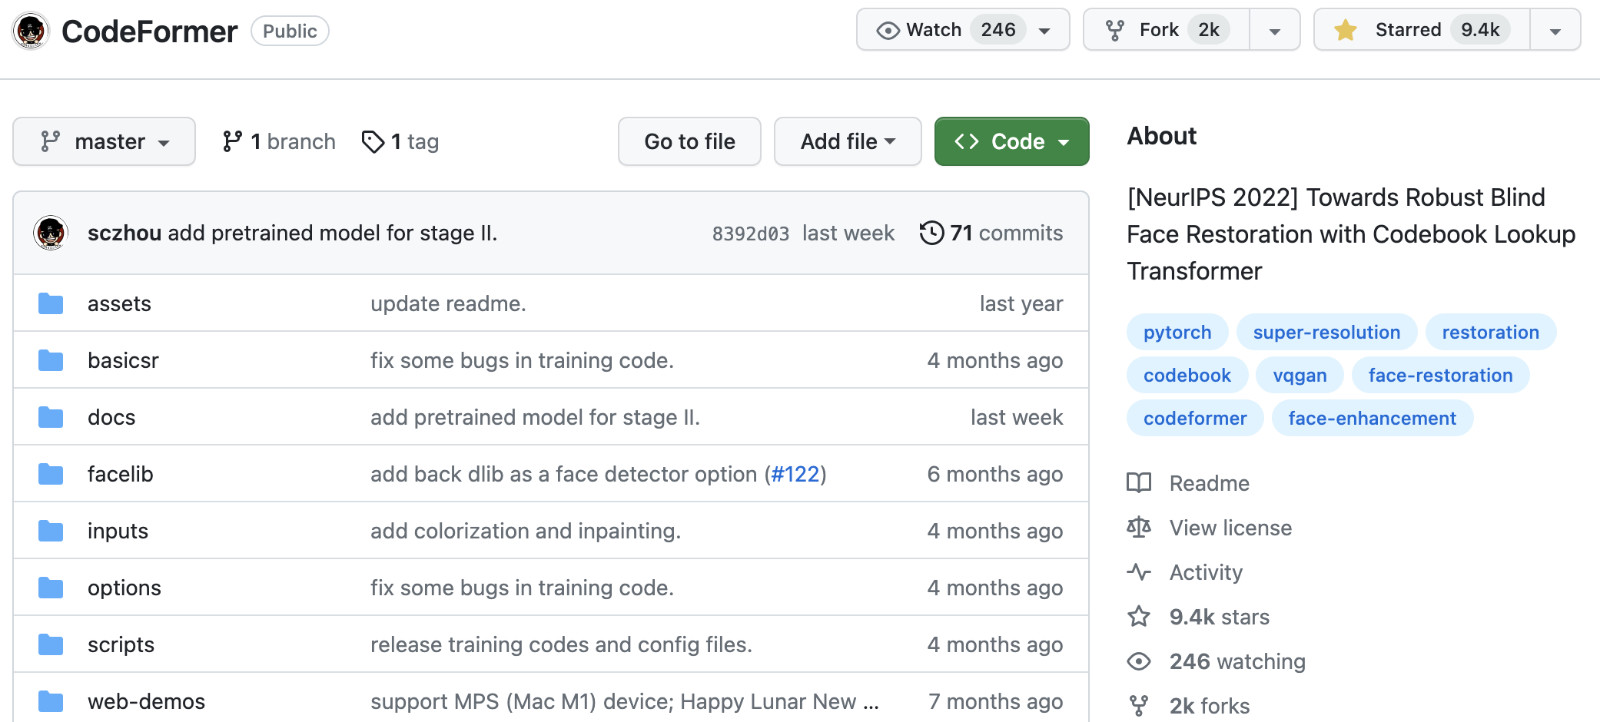
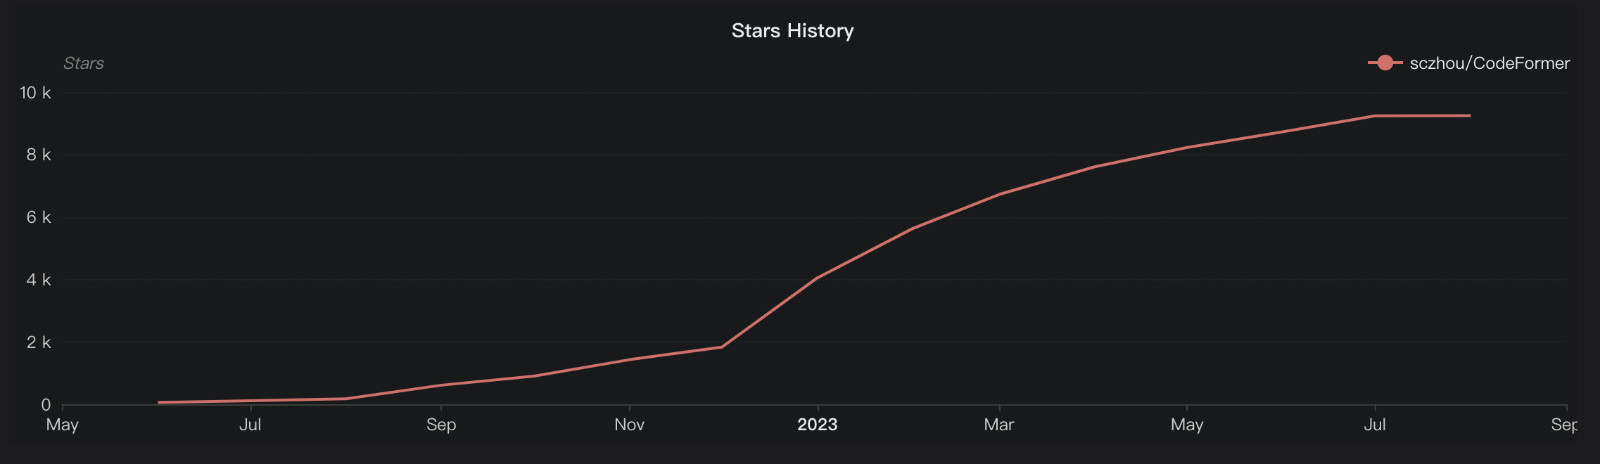
CodeFormer 是一个很棒的开源项目sczhou/CodeFormer,被应用在许多项目中,它的论文(arxiv.org/abs/2206.11253)在 2022 年被 “经信息处理系统大会”(NeurIPS)接收后,自 2022 年 6 月代码开始放出至今的一年出头的时间里,Star 数量迅速升到了接近万星的水平,足见开源社区的认可程度。
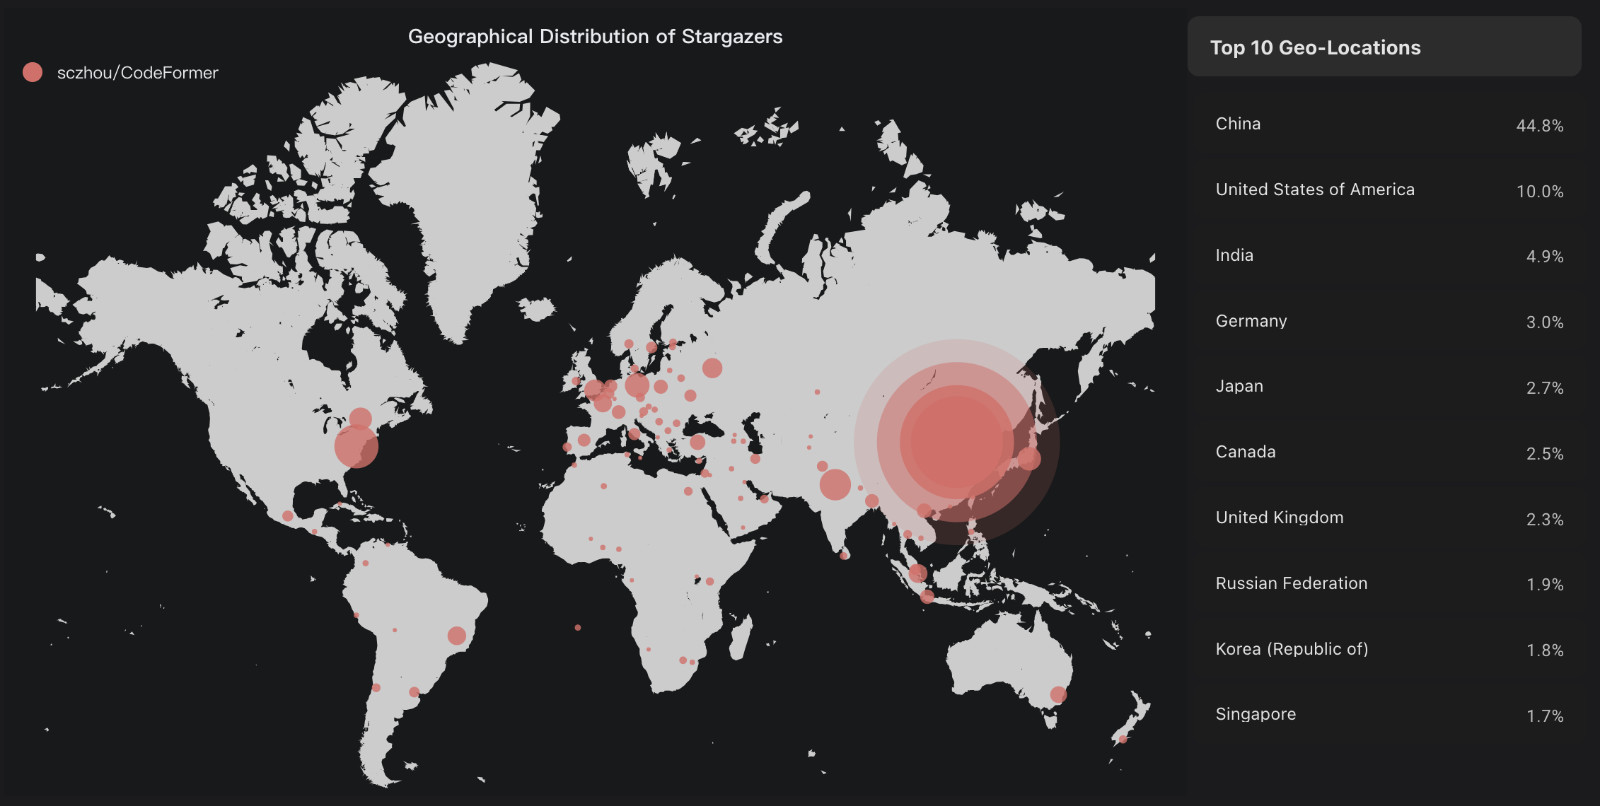
从“点赞”者的地区分布来看,在国内的支持者占了项目近一半的人数。
在展开代码走读之前,先玩一下有助于对项目的理解。和往常一样,我将项目封装成了 Docker 容器,完整的项目,我上传到了 GitHub soulteary/docker-codeformer,自取的时候别忘记“一键三连”。
下面进入热身阶段。
CodeFormer 相关的前置知识
CodeFormer 是一个基于 Transformer 的预测网络,利用 code prediction 根据上下文来优化人脸图像,能够在画面非常模糊、甚至有损坏的情况下,修复出接近原始的、极高质量的图像画面。
项目核心的外部依赖有三个:
ultralytics/yolov5,是目前最受欢迎的目标检测开源项目,在 CodeFormer 中,作者使用了项目中的非常少的一部分代码实现,主要功能为 face_detector.py 人脸检测模块。相关代码位于项目 facelib/detection/yolov5face。
xinntao/facexlib,提供了当前开源人脸相关 STOA 的方法的工具库。项目使用了其中的 detection 、 parsing 和 utils 三个模块,并进行了一些修改和调整。相关代码位于项目根目录的 facelib。
XPixelGroup/BasicSR,开源图像和视频恢复工具箱,能够提供超分辨率、去噪、去模糊等能力,项目包含了非常多的网络: EDSR、RCAN、SRResNet、SRGAN、ESRGAN、EDVR、BasicVSR、SwinIR、ECBSR 等等,并且支持 StyleGAN2、DFDNet。相关代码位于项目根目录的 basicsr。
项目使用的 BasicSR 项目并非原始项目团队发布的版本,而是经过修改的,目前未在发布页面提供的 1.3.2 版本。
相关细节在本文“代码解读部分”,感兴趣可以跳转浏览。
在 Stable Diffusion WebUI 中的使用
在 Stable Diffusion 图片生成过程中,它并不直接参与图片生成工作,而是在图片绘制完毕之后,在“后处理”阶段,进行面部细节恢复操作,这个后处理过程在 Stable Diffusion WebUI 的 process_images_inner 过程中。
因为本文主角是 CodeFormer,所以,我们就先不过多展开不相关的细节啦。有关于 WebUI 和 CodeFormer 相关需要注意的部分,在本文下面的章节中会聊。
准备工作部分,我们还是只需要做两个工作:准备模型文件和模型运行环境。
关于模型运行环境,可以参考之前的文章《基于 Docker 的深度学习环境:入门篇》,如果你是 Windows 环境的用户,可以参考这篇《基于 Docker 的深度学习环境:Windows 篇》。
如果你不熟悉如何在 Docker 环境中使用 GPU,建议仔细阅读。考虑篇幅问题,本文就不赘述相关的话题啦。
只要你安装好 Docker 环境,配置好能够在 Docker 容器中调用显卡的基础环境,就可以进行下一步啦。
快速封装一个 CodeFormer Docker 容器应用
从 Docker CodeFormer 项目下载代码,并进入项目目录:
git clone https://github.com/soulteary/docker-codeformer.git

cd docker-codeformer
执行项目中的镜像构建工具:
scripts/build.sh
耐心等待镜像构建完毕:
# bash scripts/build.sh

[+] Building 0.1s (13/13) FINISHED
 => [internal] load build definition from Dockerfile                                                                                                                                           0.0s
 => => transferring dockerfile: 449B                                                                                                                                                           0.0s
 => [internal] load .dockerignore                                                                                                                                                              0.0s
 => => transferring context: 2B                                                                                                                                                                0.0s
 => [internal] load metadata for nvcr.io/nvidia/pytorch:23.04-py3                                                                                                                              0.0s
 => [internal] load build context                                                                                                                                                              0.0s
 => => transferring context: 387B                                                                                                                                                              0.0s
 => [1/8] FROM nvcr.io/nvidia/pytorch:23.04-py3                                                                                                                                                0.0s
 => CACHED [2/8] RUN pip install gradio==3.39.0 lpips==0.1.4                                                                                                                                   0.0s
 => CACHED [3/8] WORKDIR /app                                                                                                                                                                  0.0s
 => CACHED [4/8] RUN git clone https://github.com/sczhou/CodeFormer.git &&     cd CodeFormer &&     git checkout 8392d0334956108ab53d9439c4b9fc9c4af0d66d                                      0.0s
 => CACHED [5/8] WORKDIR /app/CodeFormer/                                                                                                                                                      0.0s
 => CACHED [6/8] COPY assets ./assets                                                                                                                                                          0.0s
 => CACHED [7/8] COPY src/*.py ./                                                                                                                                                              0.0s
 => CACHED [8/8] RUN python code-fix.py                                                                                                                                                        0.0s
 => exporting to image                                                                                                                                                                         0.0s
 => => exporting layers                                                                                                                                                                        0.0s
 => => writing image sha256:58709f7b295be0a1c32c578e2897f5efa771ce75c19976718d812e7b55d7794d                                                                                                   0.0s
 => => naming to docker.io/soulteary/docker-codeformer
因为项目锁定了 Python 3.8,所以我们暂时只能使用 nvidia/pytorch:23.04-py3 来作为基础镜像。
在完成基础镜像构建之后,可以从网盘下载 weights.zip (如果地址失效,请前往项目 issue 反馈)。模型应用运行需要的所有模型都在这里了,下载完毕后,解压缩模型压缩包,将 CodeFormer、facelib、realesrgan 三个目录放置到 weights 目录中,完整的项目结构这样的:
.
├── LICENSE
├── README.md
├── assets
│   └── image
├── docker
│   └── Dockerfile
├── scripts
│   └── build.sh
├── src
│   ├── app.py
│   └── code-fix.py
└── weights
    ├── CodeFormer
    ├── facelib
    └── realesrgan
准备好模型文件之后,使用下面的命令启动模型应用:
docker run --gpus all --ipc=host --ulimit memlock=-1 --ulimit stack=67108864 --rm -it -v `pwd`/weights/:/app/CodeFormer/weights -p 7860:7860 soulteary/docker-codeformer
稍等片刻,我们将看到类似下面的日志:
Running on local URL:  http://0.0.0.0:7860

To create a public link, set `share=True` in `launch()`.
接着,我们就可以打开浏览器访问 http://localhost:7860 或者 http://你的IP地址:7860 来试试看啦。
完整的代码和 Docker 封装逻辑,都在 soulteary/docker-codeformer 里,因为接下来要聊 CodeFormer 的逻辑,所以我们就不展开啦。
显卡资源使用
CodeFormer 不是我们之前使用的大模型,所以在显卡资源使用上轻量了不少,一般情况只需要 2G 左右的资源,处理过程中会稍微高一些,但也还在 2G 出头的水平:
+-----------------------------------------------------------------------------+
| NVIDIA-SMI 525.125.06   Driver Version: 525.125.06   CUDA Version: 12.0     |
|-------------------------------+----------------------+----------------------+
| GPU  Name        Persistence-M| Bus-Id        Disp.A | Volatile Uncorr. ECC |
| Fan  Temp  Perf  Pwr:Usage/Cap|         Memory-Usage | GPU-Util  Compute M. |
|                               |                      |               MIG M. |
|===============================+======================+======================|
|   0  NVIDIA GeForce ...  Off  | 00000000:01:00.0 Off |                  Off |
| 32%   40C    P2    64W / 450W |   2080MiB / 24564MiB |      0%      Default |
|                               |                      |                  N/A |
+-------------------------------+----------------------+----------------------+

+-----------------------------------------------------------------------------+
| Processes:                                                                  |
|  GPU   GI   CI        PID   Type   Process name                  GPU Memory |
|        ID   ID                                                   Usage      |
|=============================================================================|
|    0   N/A  N/A      1429      G   /usr/lib/xorg/Xorg                167MiB |
|    0   N/A  N/A      1621      G   /usr/bin/gnome-shell               16MiB |
|    0   N/A  N/A      5090      C   python                           1892MiB |
+-----------------------------------------------------------------------------+
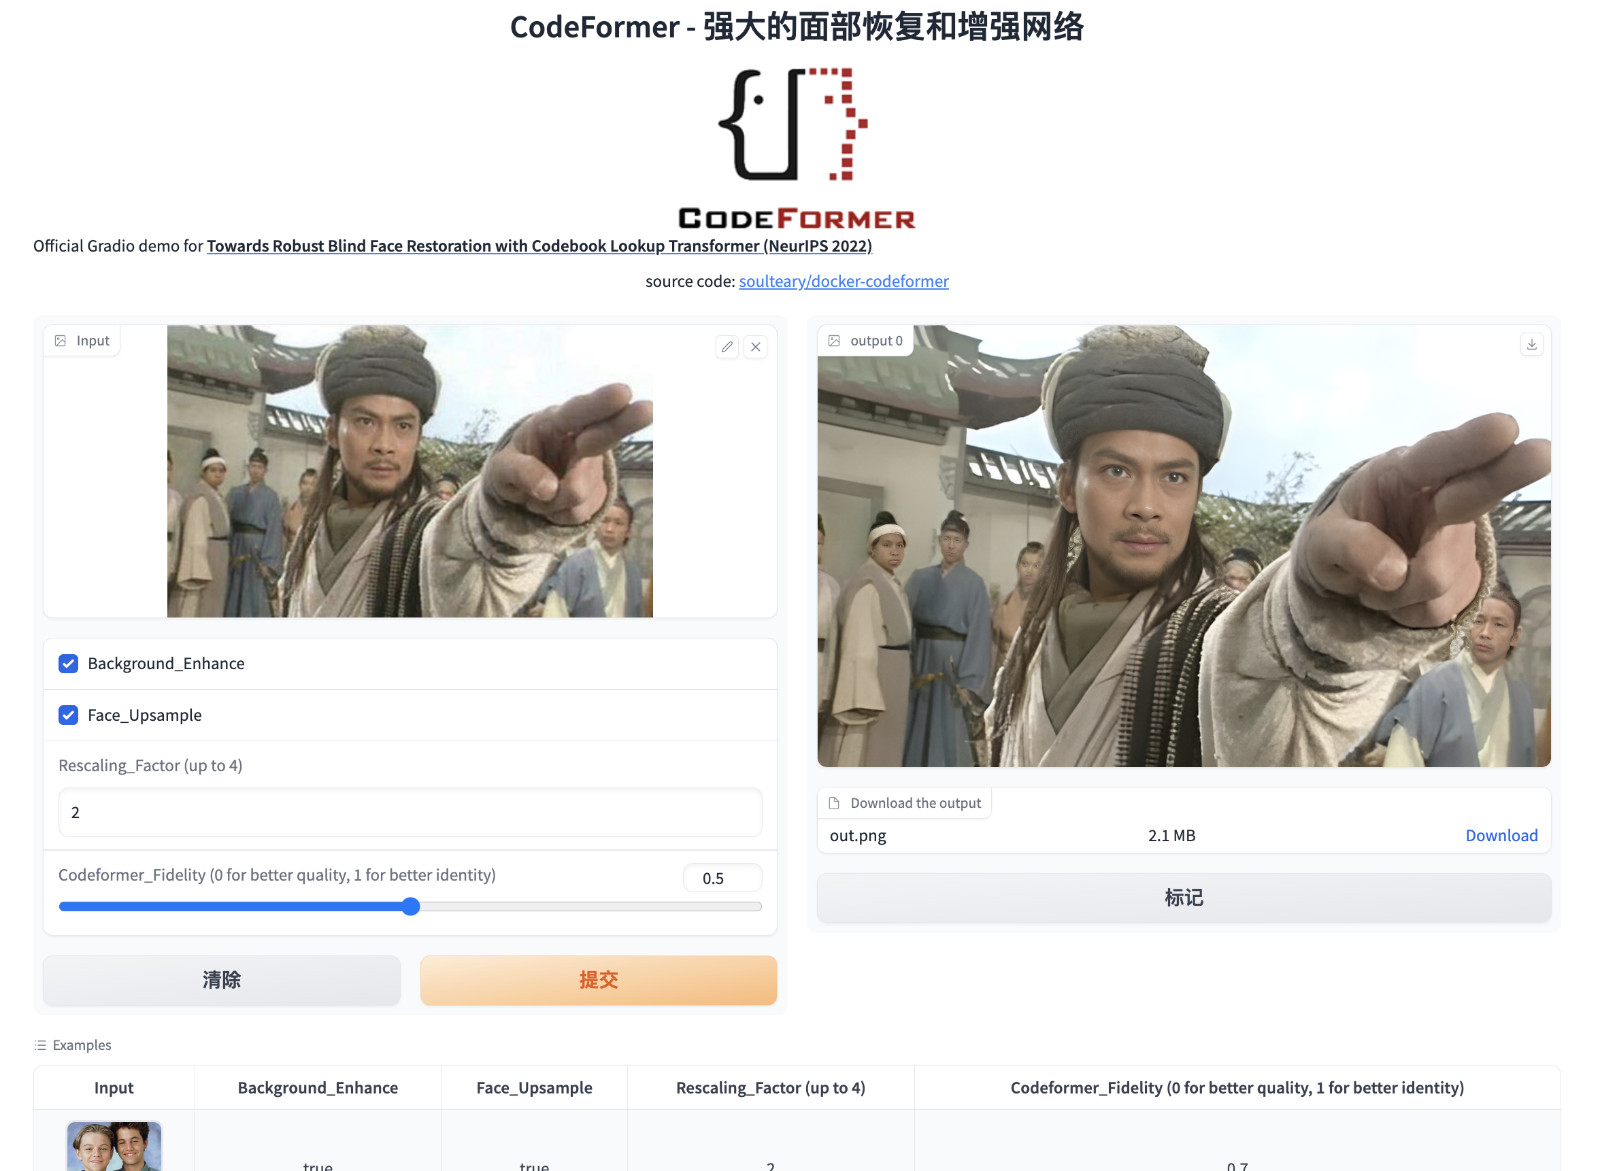
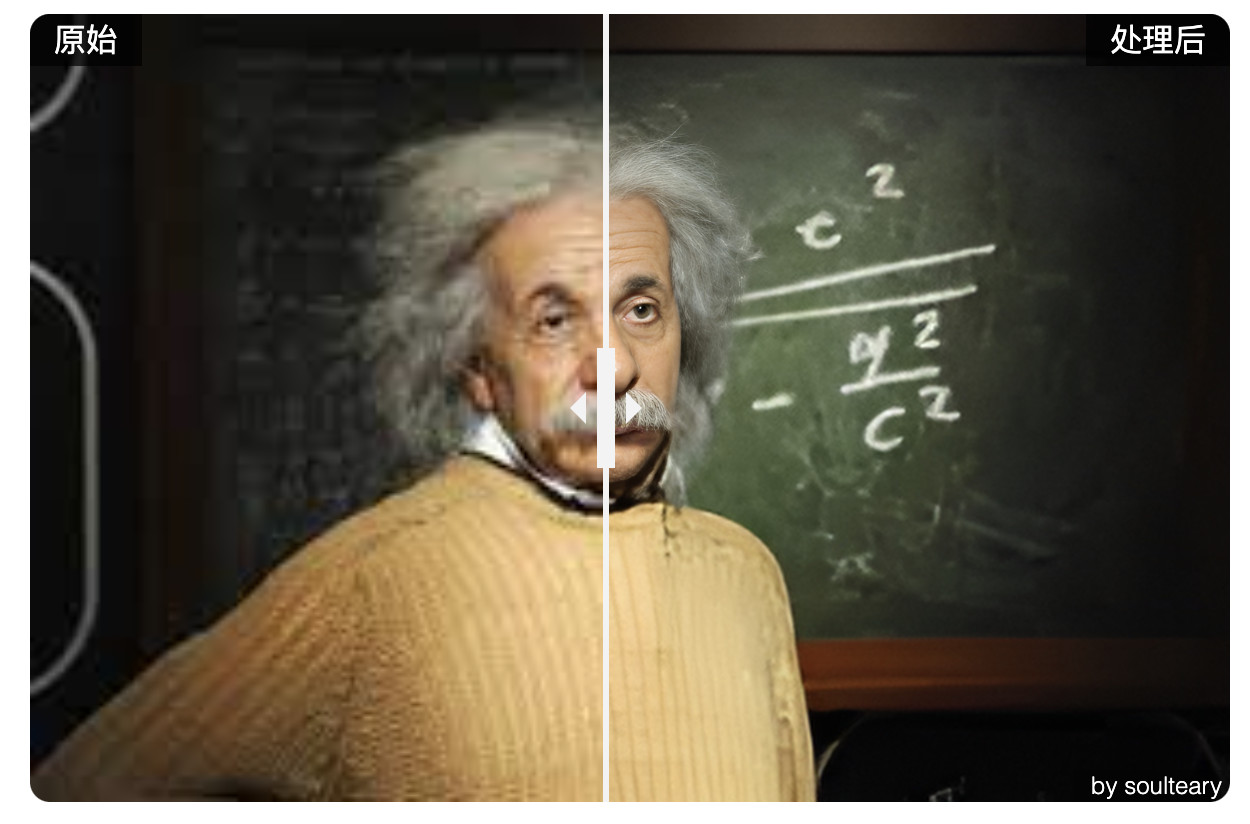
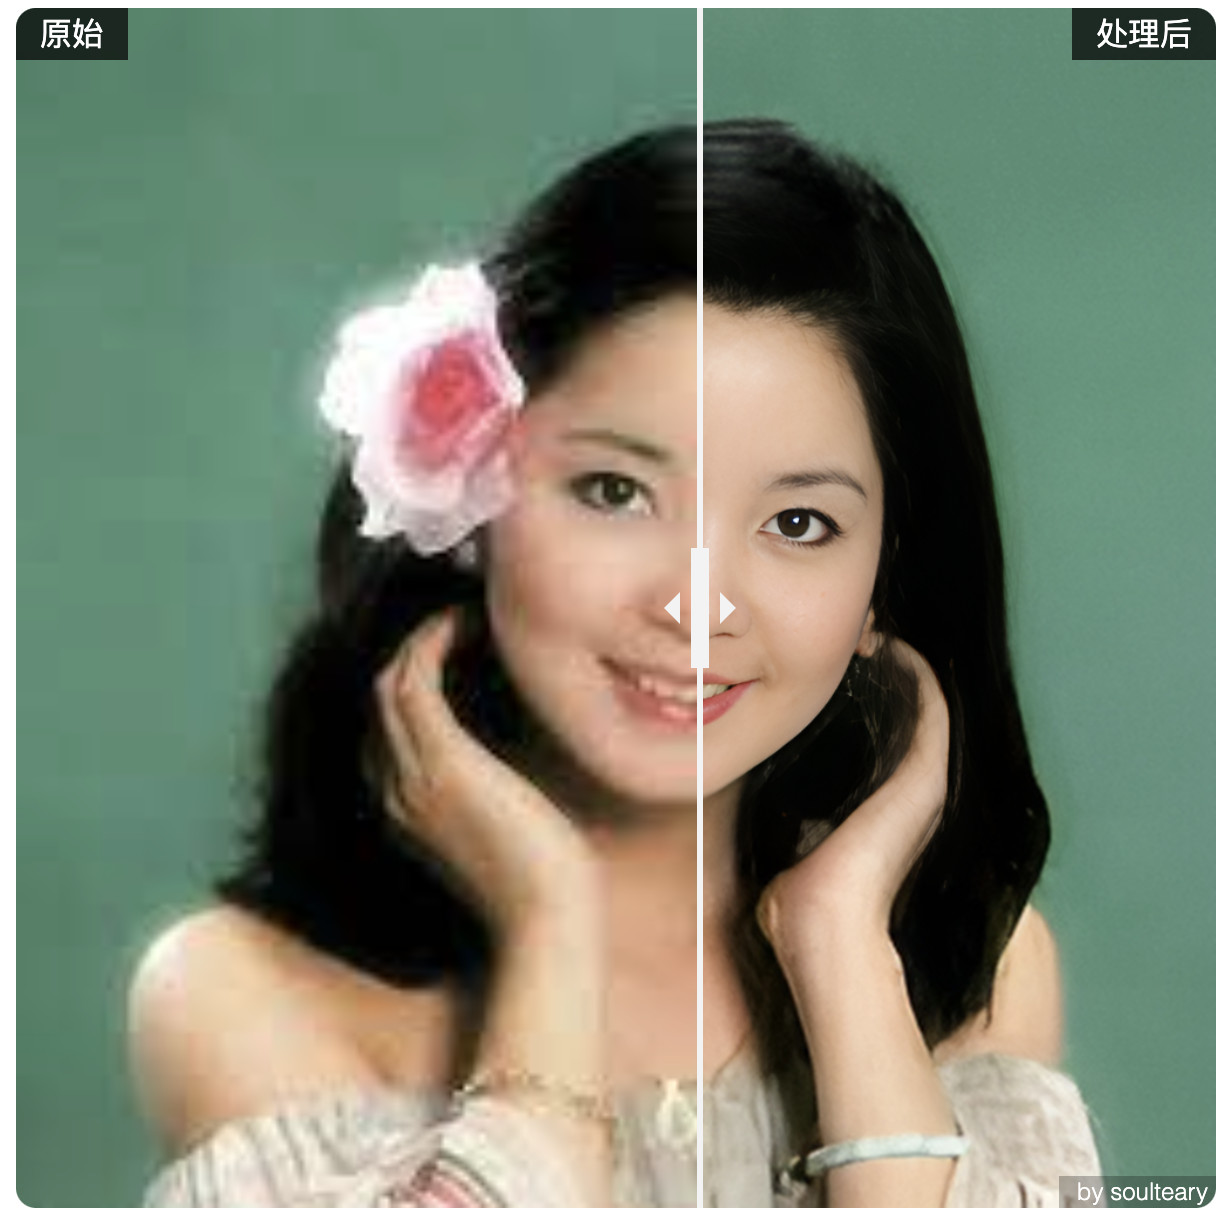
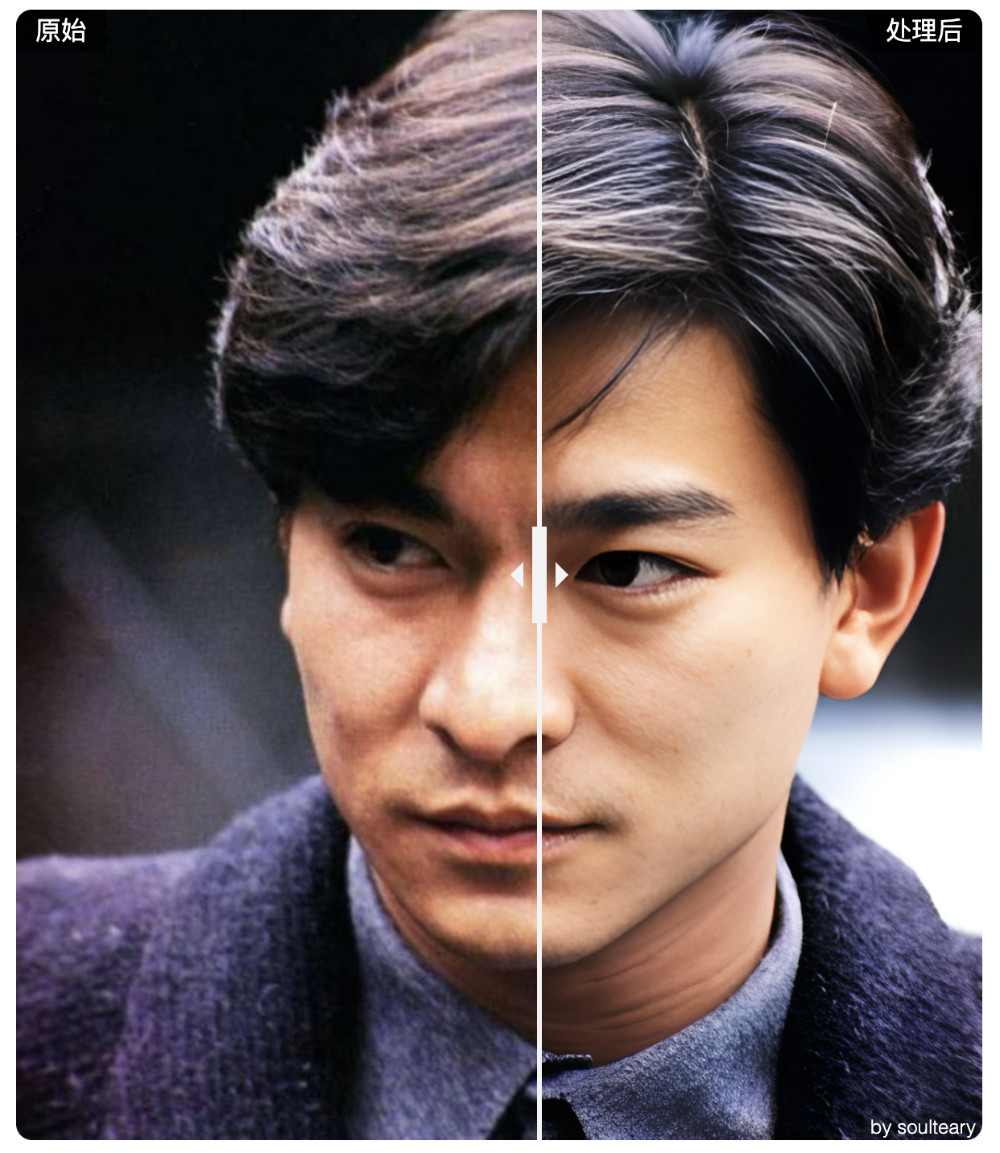
图片处理简单测试对比
我分别选择了三种不同风格,都包含人像,但是原始图片像素、模糊燥点都比较多的图片做了三个测试,能够看到效果还是非常惊艳的。
CodeFormer 代码执行逻辑
CodeFormer 代码执行逻辑非常简单:加载模型,使用模型处理图片,获得处理结果。
加载相关模型
在正式进行 CodeFormer 进行图片处理流程前,需要先调用模型创建三个模型实例。
项目使用 RealESRGAN 创建了一个“增强器”,精简并整理相关代码后,代码实现如下:
from basicsr.archs.rrdbnet_arch import RRDBNet
from basicsr.utils.realesrgan_utils import RealESRGANer

# set enhancer with RealESRGAN
def set_realesrgan():
    model = RRDBNet(num_in_ch=3, num_out_ch=3, num_feat=64, num_block=23, num_grow_ch=32, scale=2)
    upsampler = RealESRGANer(
        model_path="CodeFormer/weights/realesrgan/RealESRGAN_x2plus.pth",
        scale=2, model=model, tile=400, tile_pad=40, pre_pad=0,
    )
    return upsampler

upsampler = set_realesrgan()
使用 BasicSR 注册了一个名为 CodeFormer 的新网络实例,用于后续处理图片,大概代码实现如下:
import torch
from basicsr.utils.registry import ARCH_REGISTRY

def set_codeformer():
    codeformer_net = ARCH_REGISTRY.get("CodeFormer")(dim_embd=512, codebook_size=1024, n_head=8, n_layers=9, connect_list=["32", "64", "128", "256"]).to("cuda")
    codeformer_net.load_state_dict(torch.load("CodeFormer/weights/CodeFormer/codeformer.pth")["params_ema"])
    codeformer_net.eval()
    return codeformer_net

codeformer_net = set_codeformer()
在推理过程中,有许多边边角角的功能需要处理,比如判断图片是否是灰度图片,对齐人脸的特征点等等操作,所以,还需要加载 retinaface_resnet50 模型:
def get_face_helper(upscale):
    face_helper = FaceRestoreHelper(
        det_model="retinaface_resnet50", upscale=upscale,
        face_size=512, crop_ratio=(1, 1), save_ext="png", use_parse=True, device="cuda"
    )
    return face_helper
“工具人(模型)”准备齐了,就可以开始人脸图片的修复和增强处理了。
图片处理流程
第一步,使用模型读取图片,然后解析其中的人脸,并标记和进行人脸对齐:
face_helper.read_image(img)
# get face landmarks for each face
num_det_faces = face_helper.get_face_landmarks_5(
only_center_face=only_center_face, resize=640, eye_dist_threshold=5
)
print(f'\tdetect {num_det_faces} faces')
# align and warp each face
face_helper.align_warp_face()
第二步,依次处理上一步模型识别出的所有人脸:
for idx, cropped_face in enumerate(face_helper.cropped_faces):
对每一张人脸,使用上文中初始化好的 CodeFormer 网络来进行处理,并将处理后的图片进行暂存:
from torchvision.transforms.functional import normalize
from basicsr.utils import img2tensor, tensor2img

# prepare data
cropped_face_t = img2tensor(
    cropped_face / 255.0, bgr2rgb=True, float32=True
)
normalize(cropped_face_t, (0.5, 0.5, 0.5), (0.5, 0.5, 0.5), inplace=True)
cropped_face_t = cropped_face_t.unsqueeze(0).to(device)

try:
    with torch.no_grad():
        output = codeformer_net(
            cropped_face_t, w=codeformer_fidelity, adain=True
        )[0]
        restored_face = tensor2img(output, rgb2bgr=True, min_max=(-1, 1))
    del output
    torch.cuda.empty_cache()
except RuntimeError as error:
    print(f"Failed inference for CodeFormer: {error}")
    restored_face = tensor2img(
        cropped_face_t, rgb2bgr=True, min_max=(-1, 1)
    )

restored_face = restored_face.astype("uint8")
face_helper.add_restored_face(restored_face)
考虑到显存资源有限,在处理过程中,程序还对处理后的临时内容进行了清理,也是很环保了:
del output
torch.cuda.empty_cache()
最后一步,判断是否有尚未人脸对齐的图片,如果有,使用 face_helper 将修复后的图片“复制粘贴”到原图中:
if not has_aligned:
    # upsample the background
    if bg_upsampler is not None:
        # Now only support RealESRGAN for upsampling background
        bg_img = bg_upsampler.enhance(img, outscale=upscale)[0]
    else:
        bg_img = None
    face_helper.get_inverse_affine(None)
    # paste each restored face to the input image
    if face_upsample and face_upsampler is not None:
        restored_img = face_helper.paste_faces_to_input_image(
            upsample_img=bg_img,
            draw_box=draw_box,
            face_upsampler=face_upsampler,
        )
    else:
        restored_img = face_helper.paste_faces_to_input_image(
            upsample_img=bg_img, draw_box=draw_box
        )
上面的一切都搞定后,将图片进行保存就大功告成了。
Stable Diffusion WebUI 中的调用逻辑
在 WebUI 程序入口 webui.py 程序中,能够看到 CodeFormer 在程序初始化时进行了模型的加载:
def initialize():
...
    modules.sd_models.setup_model()
    startup_timer.record("setup SD model")
    codeformer.setup_model(cmd_opts.codeformer_models_path)
    startup_timer.record("setup codeformer")

    gfpgan.setup_model(cmd_opts.gfpgan_models_path)
    startup_timer.record("setup gfpgan")
...
除了默认的位于项目根目录下的 CodeFormer 的目录外,我们可以通过手动指定 --codeformer-models-path 参数,来改变程序加载模型的位置。
虽然程序在启动过程中,会调用modules/launch_utils.py#L271程序中的 prepare_environment 来准备组件代码:
def prepare_environment():
    codeformer_repo = os.environ.get('CODEFORMER_REPO', 'https://github.com/sczhou/CodeFormer.git')

    codeformer_commit_hash = os.environ.get('CODEFORMER_COMMIT_HASH', "c5b4593074ba6214284d6acd5f1719b6c5d739af")

    git_clone(codeformer_repo, repo_dir('CodeFormer'), "CodeFormer", codeformer_commit_hash)

    if not is_installed("lpips"):
        run_pip(f"install -r \"{os.path.join(repo_dir('CodeFormer'), 'requirements.txt')}\"", "requirements for CodeFormer")
相关提交记录在十个月前,为保障程序可运行,并锁定了代码版本。所以如果我们想使用到最新的程序代码,还需要自己进行代码合并和更新。
在 modules/codeformer_model.py 程序中,作者重新实现了一个结构更清晰的 CodeFormer 处理流程,只有一百多行,去掉逻辑,只看架子的话:
import modules.face_restoration
import modules.shared
from modules import shared, errors

codeformer = None

def setup_model(dirname):
    class FaceRestorerCodeFormer(modules.face_restoration.FaceRestoration):
        def name(self):
            return "CodeFormer"

        def __init__(self, dirname):

        def create_models(self):
            return net, face_helper

        def send_model_to(self, device):

        def restore(self, np_image, w=None):
            return restored_img

    global codeformer
    codeformer = FaceRestorerCodeFormer(dirname)
    shared.face_restorers.append(codeformer)
结构非常清晰,包含了初始化模型网络,将模型发送到设备(比如 cpu、cuda、mps 等等),进行图片修复。
WebUI 中 CodeFormer 关键实现保存在 modules/codeformer,包含了两个程序 codeformer_arch.py 和 vqgan_arch.py,这两个文件来自 CodeFormer 项目,就不展开了。
实际调用 CodeFormer 的逻辑在 modules/postprocessing.py 和 scripts/postprocessing_codeformer.py。
后者是借助 modules/scripts_auto_postprocessing.py 程序中的 ScriptPostprocessingForMainUI 函数来调用的,也算是一种有趣的解耦方案了吧。
在 WebUI 中支持两种面部修复方案,CodeFormer 和 GFP GAN,可以根据用户的喜好来选择:
def apply_face_restore(p, opt, x):
    opt = opt.lower()
    if opt == 'codeformer':
        is_active = True
        p.face_restoration_model = 'CodeFormer'
    elif opt == 'gfpgan':
        is_active = True
        p.face_restoration_model = 'GFPGAN'
    else:
        is_active = opt in ('true', 'yes', 'y', '1')

    p.restore_faces = is_active
Stable Diffusion WebUI 中 CodeFormer 的额外注意事项
简单来说,当 CodeFormer 模型加载失败的时候,WebUI 使用会有异常。但在 WebUI 初始化时,我们得不到任何错误提醒。
在 modules/codeformer_model.py 程序中,虽然代码处理流程清晰,但也写了一个坑:
import os
import modules.face_restoration
import modules.shared
from modules import errors

def setup_model(dirname):
    os.makedirs(model_path, exist_ok=True)

    path = modules.paths.paths.get("CodeFormer", None)
    if path is None:
        return

    try:
        ...
    except Exception:
        errors.report("Error setting up CodeFormer", exc_info=True)
如果模型初始化失败,程序会直接 return,没有任何报错。但是实际使用的过程中,WebUI 是需要这个组件的,而这个组件初始化成功的前提,除了设备资源足够初始化网络模型之外,还需要能够成功下载模型文件。
为了避免网络问题,导致模型下载失败,我们可以将模型文件提前下载完毕,放置在 WebUI 模型读取路径中。
这个项目在开源社区无疑是成功的项目之一,它能取得成功离不开许许多多的它基于的开源项目,从本文开头介绍前置知识和 CodeFormer 代码执行逻辑就不难看出来:每一个开源项目都站在了其他开源项目的肩上,然后让项目走的更远。
甚至,非代码之外的项目,也对这个项目的出现提供了非常多的助力,包括 Nvidia Lab 推出的开源的高质量人脸数据集:Flickr-Faces-HQ Dataset (FFHQ)。
本篇文章就先写到这里吧,下一篇文章再见。
Recommend
About Joyk
Aggregate valuable and interesting links.
Joyk means Joy of geeK