

学习QT系列04 - Qt的组件布局
source link: https://blog.devwiki.net/2023/07/16/study-qt-04-qwidget-layout.html#cl-4
Go to the source link to view the article. You can view the picture content, updated content and better typesetting reading experience. If the link is broken, please click the button below to view the snapshot at that time.

本文章是《Qt入门到放弃2023版》的学习的第4章节,
在上一章节中我们学习了应用窗口和控件,除了控件我们还需要把这些控件进行布局,也就是Layout。
在Qt中,QLayoutItem 是布局的抽象类。本章的学习就基于 QLayoutItem 展开。
2. QLayoutItem
在官方文档中,我们可以查看到关于QLayoutItem 的解释:
The QLayoutItem class provides an abstract item that a QLayout manipulates.
This is used by custom layouts.
Pure virtual functions are provided to return information about the layout, including, sizeHint(), minimumSize(), maximumSize() and expanding().
The layout's geometry can be set and retrieved with setGeometry() and geometry(), and its alignment with setAlignment() and alignment().
isEmpty() returns whether the layout item is empty. If the concrete item is a QWidget, it can be retrieved using widget(). Similarly for layout() and spacerItem().
Some layouts have width and height interdependencies. These can be expressed using hasHeightForWidth(), heightForWidth(), and minimumHeightForWidth(). For more explanation see the Qt Quarterly article Trading Height for Width
QLayoutItem类提供了一个抽象的项,用于由QLayout进行操作。这些是用于自定义布局的。提供了纯虚函数来返回有关布局的信息,包括
sizeHint()、minimumSize()、maximumSize()和expanding()。可以使用
setGeometry()和geometry()来设置和获取布局的几何信息,使用setAlignment()和alignment()来设置和获取布局的对齐方式。
isEmpty()函数返回布局项是否为空。如果具体的项是一个QWidget,则可以使用widget()来获取它。类似地,使用layout()和spacerItem()可以获取布局和空白项。一些布局具有宽度和高度之间的相互依赖关系。可以使用
hasHeightForWidth()、heightForWidth()和minimumHeightForWidth()来表达这些依赖关系。更详细的解释可以参考Qt官方季刊文章《Trading Height for Width》。
查看QLayout的继承关系如下:

它们的含义及关系如下:
- QLayout:是所有布局类的基类,用于管理布局中的子项。
- QBoxLayout:是QLayout的子类,用于水平或垂直布局控件。
- QHBoxLayout:是QBoxLayout的子类,用于水平布局控件。
- QVBoxLayout:是QBoxLayout的子类,用于垂直布局控件。
- QGridLayout:是QLayout的子类,用于以网格形式布局控件。
- QFormLayout:是QLayout的子类,用于以表单形式布局控件。
- QStackedLayout:是QLayout的子类,用于堆叠式布局控件,只显示一个控件。
- QSpacerItem:是QLayoutItem的子类,用于在布局中创建空白间隔。
- QWidgetItem:是QLayoutItem的子类,用于将QWidget对象添加到布局中。
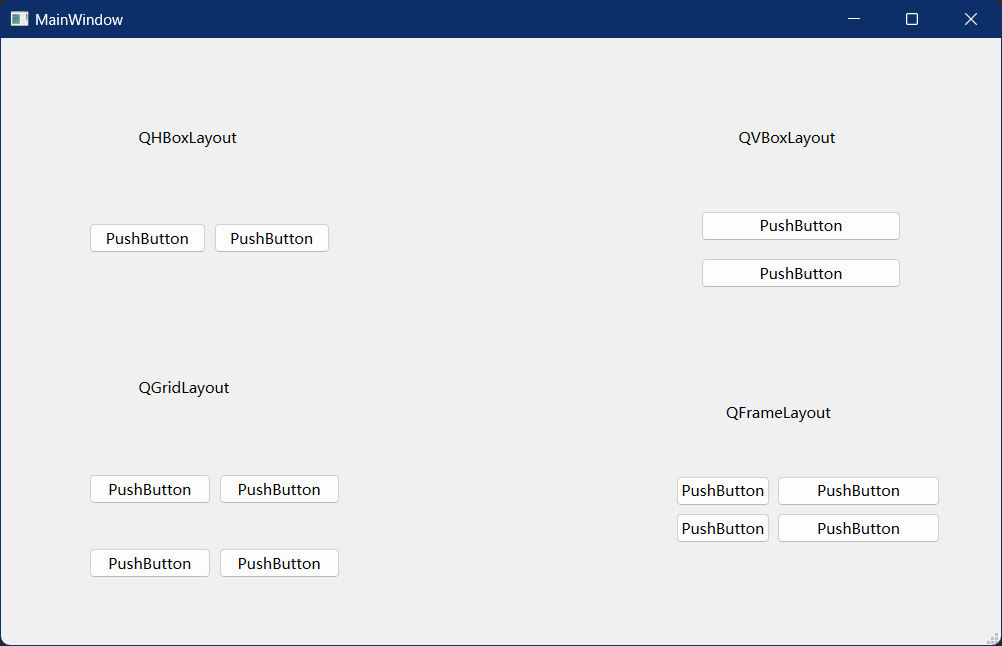
下面我们在一个窗口中使用这些layout代码:
<?xml version="1.0" encoding="UTF-8"?>
<ui version="4.0">
 <class>MainWindow</class>
 <widget class="QMainWindow" name="MainWindow">
  <property name="geometry">
   <rect>
    <x>0</x>
    <y>0</y>
    <width>800</width>
    <height>600</height>
   </rect>
  </property>
  <property name="windowTitle">
   <string>MainWindow</string>
  </property>
  <widget class="QWidget" name="centralwidget">
   <widget class="QWidget" name="verticalLayoutWidget">
    <property name="geometry">
     <rect>
      <x>560</x>
      <y>130</y>
      <width>160</width>
      <height>80</height>
     </rect>
    </property>
    <layout class="QVBoxLayout" name="verticalLayout">
     <item>
      <widget class="QPushButton" name="pushButton">
       <property name="text">
        <string>PushButton</string>
       </property>
      </widget>
     </item>
     <item>
      <widget class="QPushButton" name="pushButton_2">
       <property name="text">
        <string>PushButton</string>
       </property>
      </widget>
     </item>
    </layout>
   </widget>
   <widget class="QWidget" name="horizontalLayoutWidget">
    <property name="geometry">
     <rect>
      <x>70</x>
      <y>120</y>
      <width>193</width>
      <height>80</height>
     </rect>
    </property>
    <layout class="QHBoxLayout" name="horizontalLayout">
     <item>
      <widget class="QPushButton" name="pushButton_4">
       <property name="text">
        <string>PushButton</string>
       </property>
      </widget>
     </item>
     <item>
      <widget class="QPushButton" name="pushButton_3">
       <property name="text">
        <string>PushButton</string>
       </property>
      </widget>
     </item>
    </layout>
   </widget>
   <widget class="QWidget" name="gridLayoutWidget">
    <property name="geometry">
     <rect>
      <x>70</x>
      <y>320</y>
      <width>201</width>
      <height>141</height>
     </rect>
    </property>
    <layout class="QGridLayout" name="gridLayout">
     <item row="0" column="0">
      <widget class="QPushButton" name="pushButton_6">
       <property name="text">
        <string>PushButton</string>
       </property>
      </widget>
     </item>
     <item row="1" column="0">
      <widget class="QPushButton" name="pushButton_5">
       <property name="text">
        <string>PushButton</string>
       </property>
      </widget>
     </item>
     <item row="0" column="1">
      <widget class="QPushButton" name="pushButton_7">
       <property name="text">
        <string>PushButton</string>
       </property>
      </widget>
     </item>
     <item row="1" column="1">
      <widget class="QPushButton" name="pushButton_8">
       <property name="text">
        <string>PushButton</string>
       </property>
      </widget>
     </item>
    </layout>
   </widget>
   <widget class="QWidget" name="formLayoutWidget">
    <property name="geometry">
     <rect>
      <x>540</x>
      <y>350</y>
      <width>211</width>
      <height>101</height>
     </rect>
    </property>
    <layout class="QFormLayout" name="formLayout">
     <item row="0" column="0">
      <widget class="QPushButton" name="pushButton_9">
       <property name="text">
        <string>PushButton</string>
       </property>
      </widget>
     </item>
     <item row="0" column="1">
      <widget class="QPushButton" name="pushButton_10">
       <property name="text">
        <string>PushButton</string>
       </property>
      </widget>
     </item>
     <item row="1" column="0">
      <widget class="QPushButton" name="pushButton_11">
       <property name="text">
        <string>PushButton</string>
       </property>
      </widget>
     </item>
     <item row="1" column="1">
      <widget class="QPushButton" name="pushButton_12">
       <property name="text">
        <string>PushButton</string>
       </property>
      </widget>
     </item>
    </layout>
   </widget>
   <widget class="QLabel" name="label">
    <property name="geometry">
     <rect>
      <x>110</x>
      <y>70</y>
      <width>121</width>
      <height>19</height>
     </rect>
    </property>
    <property name="text">
     <string>QHBoxLayout</string>
    </property>
   </widget>
   <widget class="QLabel" name="label_2">
    <property name="geometry">
     <rect>
      <x>590</x>
      <y>70</y>
      <width>121</width>
      <height>19</height>
     </rect>
    </property>
    <property name="text">
     <string>QVBoxLayout</string>
    </property>
   </widget>
   <widget class="QLabel" name="label_3">
    <property name="geometry">
     <rect>
      <x>110</x>
      <y>270</y>
      <width>121</width>
      <height>19</height>
     </rect>
    </property>
    <property name="text">
     <string>QGridLayout</string>
    </property>
   </widget>
   <widget class="QLabel" name="label_4">
    <property name="geometry">
     <rect>
      <x>580</x>
      <y>290</y>
      <width>121</width>
      <height>19</height>
     </rect>
    </property>
    <property name="text">
     <string>QFrameLayout</string>
    </property>
   </widget>
  </widget>
  <widget class="QMenuBar" name="menubar">
   <property name="geometry">
    <rect>
     <x>0</x>
     <y>0</y>
     <width>800</width>
     <height>24</height>
    </rect>
   </property>
  </widget>
  <widget class="QStatusBar" name="statusbar"/>
 </widget>
 <resources/>
 <connections/>
</ui>
运行效果如下:
3. 使用QWidget布局
除了上述的 QLayoutItem及其子类可以布局以外,还可以使用 QDockWidget和QStackedWidget控件实现布局,以及使用QSplitter 来进行布局分割。
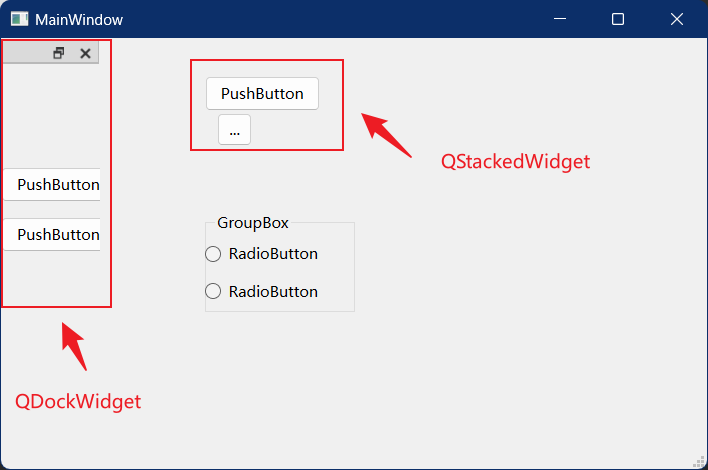
QDockWidget(停靠窗口小部件):
QDockWidget是一个可停靠的窗口小部件,类似于一个浮动面板。它可以放置在主窗口的四个边缘位置(上、下、左、右)或浮动在主窗口内部。主窗口可以包含多个QDockWidget,用户可以通过拖动和停靠操作自由调整它们的位置。通常用于创建面板式的用户界面,例如工具栏、属性面板等。
QStackedWidget(堆叠式容器小部件):
QStackedWidget是一个堆叠式容器小部件,只显示一个子部件。子部件按照堆叠顺序依次叠放在一起,只有当前选中的子部件可见。可以通过切换当前子部件来显示不同的内容。常用于创建多页式的用户界面,例如向导、选项卡等。
QSplitter(可拖动的分割控件):
QSplitter是一个可拖动的分割控件,用于调整子部件的大小。它可以水平或垂直地分割窗口,并在分割条中放置子部件。用户可以通过拖动分割条来调整子部件的大小。常用于创建可调整大小的面板布局,例如编辑器和结果窗口的分割。
上图的代码如下:
<?xml version="1.0" encoding="UTF-8"?>
<ui version="4.0">
 <class>MainWindow</class>
 <widget class="QMainWindow" name="MainWindow">
  <property name="geometry">
   <rect>
    <x>0</x>
    <y>0</y>
    <width>800</width>
    <height>600</height>
   </rect>
  </property>
  <property name="windowTitle">
   <string>MainWindow</string>
  </property>
  <widget class="QWidget" name="centralwidget">
   <widget class="QStackedWidget" name="stackedWidget">
    <property name="geometry">
     <rect>
      <x>70</x>
      <y>10</y>
      <width>120</width>
      <height>80</height>
     </rect>
    </property>
    <widget class="QWidget" name="page">
     <widget class="QPushButton" name="pushButton">
      <property name="geometry">
       <rect>
        <x>10</x>
        <y>20</y>
        <width>92</width>
        <height>28</height>
       </rect>
      </property>
      <property name="text">
       <string>PushButton</string>
      </property>
     </widget>
     <widget class="QToolButton" name="toolButton">
      <property name="geometry">
       <rect>
        <x>20</x>
        <y>50</y>
        <width>28</width>
        <height>26</height>
       </rect>
      </property>
      <property name="text">
       <string>...</string>
      </property>
     </widget>
    </widget>
    <widget class="QWidget" name="page_2"/>
   </widget>
  </widget>
  <widget class="QMenuBar" name="menubar">
   <property name="geometry">
    <rect>
     <x>0</x>
     <y>0</y>
     <width>800</width>
     <height>24</height>
    </rect>
   </property>
  </widget>
  <widget class="QStatusBar" name="statusbar"/>
  <widget class="QDockWidget" name="dockWidget">
   <attribute name="dockWidgetArea">
    <number>1</number>
   </attribute>
   <widget class="QWidget" name="dockWidgetContents">
    <widget class="QPushButton" name="pushButton_2">
     <property name="geometry">
      <rect>
       <x>0</x>
       <y>80</y>
       <width>92</width>
       <height>28</height>
      </rect>
     </property>
     <property name="text">
      <string>PushButton</string>
     </property>
    </widget>
    <widget class="QPushButton" name="pushButton_3">
     <property name="geometry">
      <rect>
       <x>0</x>
       <y>120</y>
       <width>92</width>
       <height>28</height>
      </rect>
     </property>
     <property name="text">
      <string>PushButton</string>
     </property>
    </widget>
   </widget>
  </widget>
 </widget>
 <resources/>
 <connections/>
</ui>
在实际项目中,我们需要灵活运用这些布局来实现我们的界面。且需要减少嵌套以最小的布局实现界面效果。
前四章节我们大致学习了Qt App相关的项目结构,App框架以及窗口和控件布局。后续会逐渐深入的学习这些控件的特性及使用。
如果你觉得本文对你有用,请关注我的公众号:【DevWiki】并点击【在看】,或者添加我的微信【dev-wiki】加入群聊一起学习。
Recommend
About Joyk
Aggregate valuable and interesting links.
Joyk means Joy of geeK