

WWDC 2023 Core Data 有哪些新变化
source link: https://www.fatbobman.com/posts/what's-new-in-core-data-in-wwdc23/
Go to the source link to view the article. You can view the picture content, updated content and better typesetting reading experience. If the link is broken, please click the button below to view the snapshot at that time.

虽然在 WWDC 2023 上,苹果将主要精力放在介绍新的数据框架 SwiftData 上,但作为 SwiftData 的基石,Core Data 也得到了一定程度上的功能增强。本文将介绍今年 Core Data 获得的新功能。
复合属性( Composite attributes)
复合属性是 Core Data 为实体(Entity)提供的一种新的自定义属性(Attribute)。通过它,开发者可以将复杂的数据类型通过自定义的方式封装在一起。
举个例子,我们有一个餐厅(Restaurant)实体:
public class Restaurant:NSManagedObject {
    @NSManaged public var address: String?
    @NSManaged public var name: String?
    @NSManaged public var phoneNumber: String?
    @NSManaged public var rating: Double
}
在复合属性出现之前,我们有三种可选方案来为该餐厅添加其经纬度信息:
- 分别创建经度和纬度属性,并创建一个计算属性 location 以改善代码的可读性。
- 创建一个 Location 实体,包含经度和纬度两个属性,并在 Restaurant 实体与 Location 实体之间创建一对一关系。
- 创建一个 Location 结构,在 Restaurant 实体中将其声明为 Transformable 属性。
这三种方案都有各自的优缺点:
- 方案一:性能最佳,经纬度属性都可以单独作为谓词的判断条件。但当有多个实体都有相同的需求时,需要为每个实体进行重复的设置工作。复合类型(例如:Location)越复杂,需要进行的重复操作也越多。
- 方案二:经纬度属性都可以单独作为谓词的判断条件,但相对于第一种方案,在检索时性能稍有下降。
- 方案三:经纬度不能作为谓词的判断条件(数据已转换为不可检索的状态),在保存和读取数据时,会因编解码而有一定的性能损失。
Composite attributes 为开发者提供了一个全新的选择。
首先我们需要在 Xcode 的 Data Model Editor 中自定义一个 Composite Attributes。
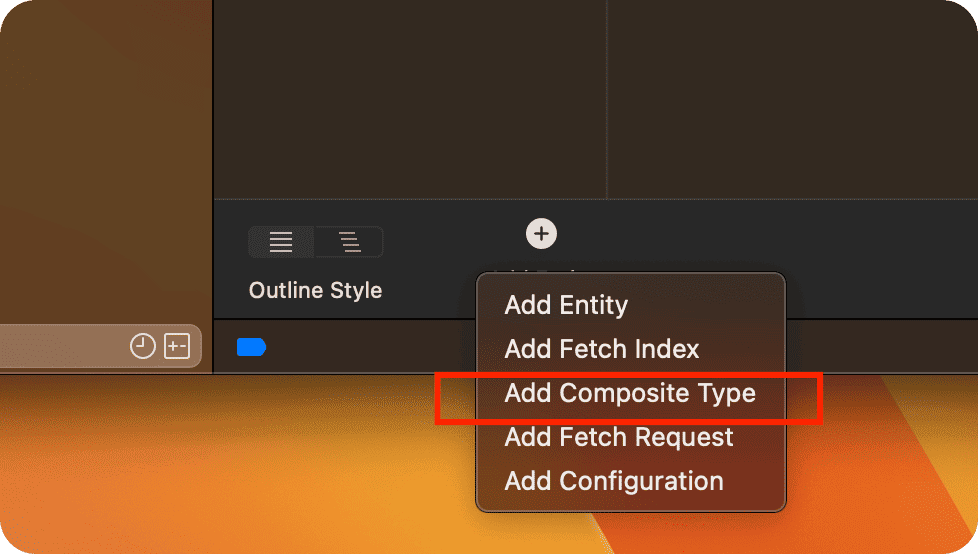
然后,采用与定义 Entity 类似的方式,在自定义的 Composite Attributes 中添加属性。
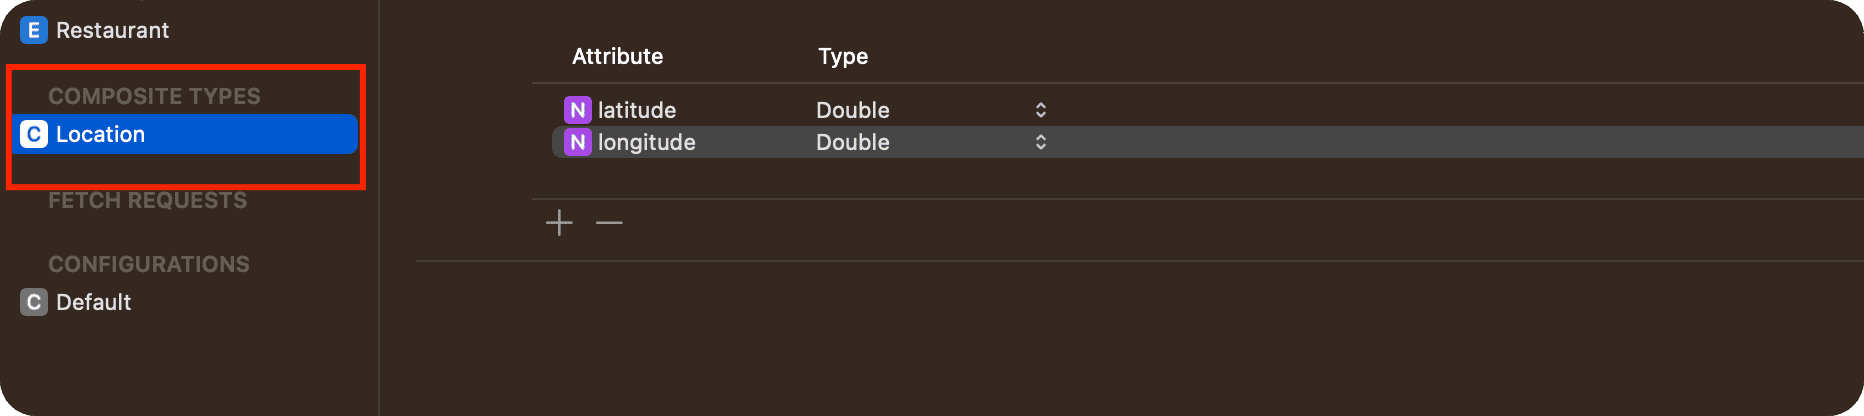
在定义 Composite Attributes 时,我们可以使用 Core Data 为 Entity 提供的任意属性,例如 String、Double、Date 等,同时也可以使用其他已经定义好的 Composite Attributes。支持嵌套也是 Composite Attributes 的一个非常显著的特点。
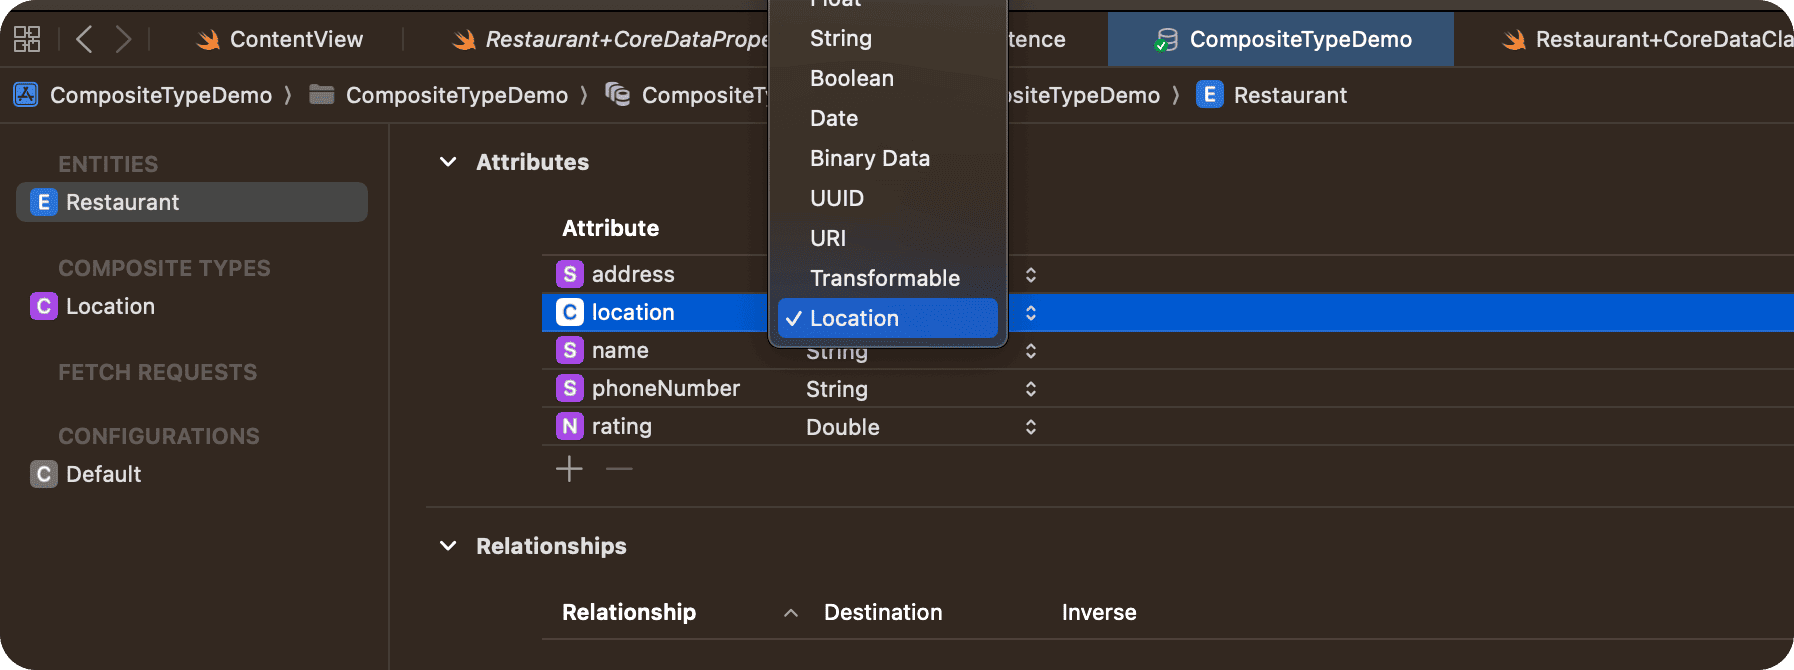
最后,我们便可以在 Entity 中,像使用其他 Core Data 提供的预置属性一样,使用自定义的 Composite Attributes 了。
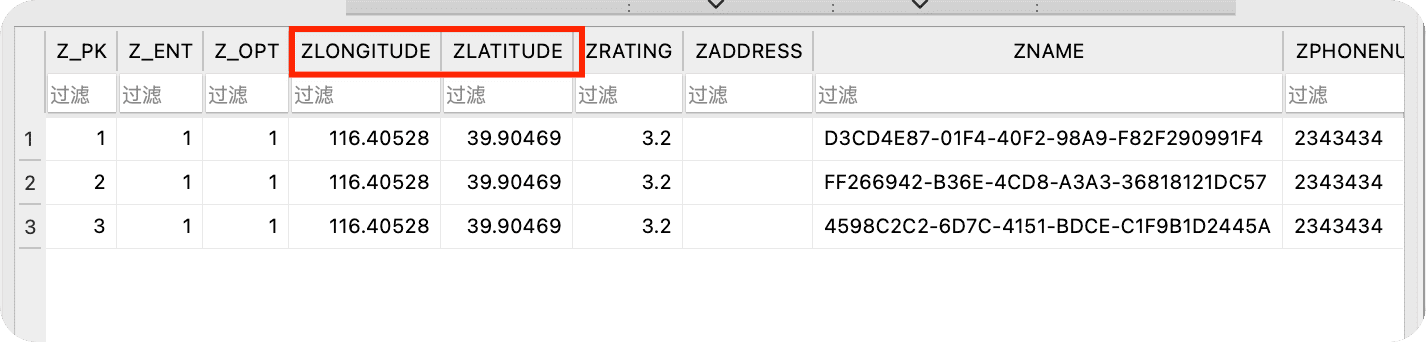
需要注意的是,自定义的 Composite Attributes 只是一种对 Entity 属性类型的抽象描述,Core Data 并不会在代码中为其生成对应的类型。在 SQLite 中,Composite Attributes 采用了与方案一相同的存储模式(在 Entity 对应的表中,将 Composite Attributes 的所有属性展开,并为其创建独立的字段)。
在代码中 Composite Attributes 被声明为 [String:Any]? 类型:
public class Restaurant:NSManagedObject {
    @NSManaged public var address: String?
    @NSManaged public var name: String?
    @NSManaged public var phoneNumber: String?
    @NSManaged public var rating: Double

    @NSManaged public var location: [String: Any]?
}
目前,我们仍需通过字典的方式在托管对象中设置和读取该属性的内容:
let newRestaurant = Restaurant(context: viewContext)
newRestaurant.address = address
newRestaurant.name = name
newRestaurant.phoneNumber = phoneNumber
newRestaurant.rating = rating
newRestaurant.location = [
    "latitude": 39.90469,
    "longitude": 116.40528,
]
然而,在设置谓词时,可以直接使用带有命名空间的 keyPath 方式进行访问:
let predicate = NSPredicate(format:"location.latitude > %f AND location.latitude < %f",31.3,40.0)
提示:在官方有关 Composite Attributes 的 文档 中,出现了如下的演示代码。我们希望在之后的更新中,可以通过这种方式直接访问 Composite Attributes 中的子属性。
// Use property-like setters and getters to manage the underlying attributes directly.
quake.magnitude.richter = 4.6
print(quake.magnitude.richter)
健康笔记是一款智能的数据管理和分析工具,让您完全掌控自己和全家人的健康信息。作为慢性病患者,肘子深知健康管理的重要与难度。创建健康笔记的初心,就是要为您提供一款轻松高效的健康信息记录与分析工具
在 Core Data 中使用新的 Predicate
长久以来,Core Data 开发人员一直希望能够以更加 Swift 的方式创建安全易懂的 Predicate。在今年,这个愿望终于因 Foundation 的 Swift 化得以实现。
开发人员可以通过以下方式为 SwiftData 创建谓词:
let today = Date()
let tripPredicate = #Predicate<Trip> {
    $0.destination == "New York" &&
    $0.name.contains("birthday") &&
    $0.startDate > today
}
庆幸的是,在这次 Predicate 的更新中,Core Data 没有被抛弃。开发者可以通过新的 NSPredicate 构建方法,将 Predicate 转换为 NSPredicate。
let p = #Predicate<Restaurant>{
    $0.rating > 3.5
}

let predicate = NSPredicate(p)
需要注意两点:
- 只有为 NSObject 的子类创建的 Predicate 才能转换为 NSPredicate,也就是说,为 SwiftData 创建的 Predicate 是无法转换成 Core Data 对应的托管对象可用的谓词。
- 目前还无法在 Predicate 中直接通过 keyPath 的方式访问 Composite Attributes 的属性。
VersionChecksum
在今年,NSManagedObjectModel 增加了一个新的属性 versionChecksum。该属性对应该数据模型的 Base64 编码的 128 位模型版本哈希值。
此值也可在版本化模型的
VersionInfo.plist文件和 Xcode 的构建日志中找到。
这个值有两个作用:
- 用于在阶段式迁移中,为不同版本的数据模型创建
NSManagedObjectModelReference,下文中有更多说明。 - 在 SwiftData 与 Core Data 并行的项目中,用于比对两者是否使用相同版本的数据模型。
例如,我们可以通过下面的代码获取 SwiftData 当前使用的模型 versionChecksum 值,然后在 CoreDataStack 中,通过与该值进行比较,就可以知道两者是否使用相同的数据模型。
@main
struct PredicateTestApp: App {
    let container = try! ModelContainer(
        for: Item.self
    )
    var body: some Scene {
        WindowGroup {
            ContentView()
                .onAppear {
                    if let versionChecksum = container.schema.makeManagedObjectModel()?.versionChecksum {
                        print(versionChecksum)
                    }
                }
        }
        .modelContainer(container)
    }
}
延迟迁移(Deferred migration)
在 Core Data 进行数据模型迁移的过程中,如果数据量很大,迁移操作很复杂,应用会出现 UI 无法响应的情况,给用户带来不好的用户体验。
在本次 Core Data 的更新中,苹果为 Core Data 添加了延迟迁移(Deferred migration)的功能,可以在某种程度上缓解因上述原因导致的使用者不适。
注意事项:
- 延迟迁移只能针对轻量级迁移过程中的部分操作。
- 任何可能导致数据模型不兼容的操作都不能被延迟。
- 延迟迁移仅适用于 SQLite 存储类型。
- 延迟迁移具备向后兼容性,可追溯到 iOS 14 以及 Big Sur。
- 延迟迁移同样适用于今年新增的阶段式迁移。
用更容易理解的方式来说:在开启延迟迁移功能后,Core Data 会从轻量级迁移的操作中判断哪些操作即使在迁移的过程中暂不进行,也不会影响应用对最终完成的数据模型版本数据库的操作(例如,更新索引、删除已经不需要的属性,从有序关系更改为非有序关系等操作)。Core Data 将先跳过这些操作,直到开发者在应用中找到合适的时机,通过代码显式地执行这些“善后”操作。
要开启延迟迁移功能,需要在存储选项中将 NSPersistentStoreDeferredLightweightMigrationOptionKey 设置为 true。
let options = [
    NSPersistentStoreDeferredLightweightMigrationOptionKey: true,
    NSMigratePersistentStoresAutomaticallyOption: true,
    NSInferMappingModelAutomaticallyOption: true
]

let store = try coordinator.addPersistentStore(
    ofType: NSSQLiteStoreType,
    configurationName: nil,
    at: storeURL,
    options: options
)
在必要的迁移操作完成后,开发者可以在适当的时机通过调用finishDeferredLightweightMigration方法执行"清理"工作(苹果建议在BGProcessingTask中进行):
let metadata = coordinator.metadata(for: store)
if (metadata[NSPersistentStoreDeferredLightweightMigrationOptionKey] == true) {
    coordinator.finishDeferredLightweightMigration()
}
健康笔记是一款智能的数据管理和分析工具,让您完全掌控自己和全家人的健康信息。作为慢性病患者,肘子深知健康管理的重要与难度。创建健康笔记的初心,就是要为您提供一款轻松高效的健康信息记录与分析工具
阶段式迁移( Staged migration )
在当前版本的 Core Data 中,开发者最常使用以下三种数据迁移方式:
- 轻量级迁移
如果两个数据模型版本之间的更改很简单,Core Data 可以自行推断映射模型,那么无需开发者提供更多的信息,Core Data 将自动在两个版本中进行数据迁移。
- 自定义映射模型
如果开发者对数据模型做了更深层次的调整,导致 Core Data 无法自动推断映射模型,此时,开发者可以通过 Xcode Model Editor 创建一个针对两个特定版本之间的映射模型( Mapping Model),通过自定义映射模型中提供的额外信息,帮助 Core Data 完成在两个版本间的数据迁移操作。
- 自定义实体映射策略
如果自定义映射模型提供的表达式仍无法满足迁移的需求,开发者则需要创建自定义实体映射策略(NSEntityMigrationPolicy 的子类),NSEntityMigrationPolicy 提供了一些方法,用于覆盖默认的数据迁移操作。
虽然 Core Data 本身提供了一种高度可控的渐进式迁移方法,但由于其对开发人员不太友好,需要编写大量代码,因此在实际开发中很少使用。
由于 SwiftData 并不使用 Xcode 的 Model Editor,因此苹果需要为其提供一种不依赖 Mapping Model 文件的迁移方式。同时原有的编写自定义实体映射策略的方式对开发者也不太友好。为此,SwiftData 使用了基于阶段式迁移(Stage migration)的数据迁移方式。作为 SwiftData 的基础,Core Data 自然也新增了该迁移模式。
本文不会对阶段式迁移进行详尽的说明,未来会通过其他文章对其进行深入探讨。
阶段式迁移包含两种迁移模式:轻量级迁移(NSLightweightMigrationStage)和自定义迁移(NSCustomMigrationStage)。它鼓励开发者将非轻量级迁移的迁移任务分解一系列的轻量级迁移的步骤。通过创建多个阶段,用最少的代码量,将数据模型迁移到最新版本。
一般来说,阶段性迁移分为以下几个步骤:
描述数据模型版本的承诺。
通过为分阶段迁移声明多个 NSManagedObjectModelReference 类,描述特定版本的 NSManagedObjectModel 承诺。在迁移期间,Core Data 将实现此承诺。
let v1ModelChecksum = "kk8XL4OkE7gYLFHTrH6W+EhTw8w14uq1klkVRPiuiAk="
let v1ModelReference = NSManagedObjectModelReference(
    modelName: "modelV1"
    in: NSBundle.mainBundle
    versionChecksum: v1ModelChecksum
)

let v2ModelChecksum = "PA0Gbxs46liWKg7/aZMCBtu9vVIF6MlskbhhjrCd7ms="
let v2ModelReference = NSManagedObjectModelReference(
    modelName: "modelV2"
    in: NSBundle.mainBundle
    versionChecksum: v2ModelChecksum
)

let v3ModelChecksum = "iWKg7bxs46g7liWkk8XL4OkE7gYL/FHTrH6WF23Jhhs="
let v3ModelReference = NSManagedObjectModelReference(
    modelName: "modelV3"
    in: NSBundle.mainBundle
    versionChecksum: v3ModelChecksum
)
上述代码为三个不同版本的数据模型创建了承诺。Core Data 会通过检查 versionChecksum 来确保数据版本的正确性。
由于 SwiftData 并不依赖数模模型文件,因此在 SwiftData 中,承诺的方式略有不同(通过代码将每个版本的模型表述出来)。
enum SampleTripsSchemaV1: VersionedSchema {
    static var models: [any PersistentModel.Type] {
        [Trip.self, BucketListItem.self, LivingAccommodation.self]
    }

    @Model
    final class Trip {
        var name: String
        var destination: String
        var start_date: Date
        var end_date: Date

        var bucketList: [BucketListItem]? = []
        var livingAccommodation: LivingAccommodation?
    }

    // Define the other models in this version...
}

enum SampleTripsSchemaV2: VersionedSchema {
    static var models: [any PersistentModel.Type] {
        [Trip.self, BucketListItem.self, LivingAccommodation.self]
    }

    @Model
    final class Trip {
        @Attribute(.unique) var name: String
        var destination: String
        var start_date: Date
        var end_date: Date

        var bucketList: [BucketListItem]? = []
        var livingAccommodation: LivingAccommodation?
    }

    // Define the other models in this version...
}

enum SampleTripsSchemaV3: VersionedSchema {
    static var models: [any PersistentModel.Type] {
        [Trip.self, BucketListItem.self, LivingAccommodation.self]
    }

    @Model
    final class Trip {
        @Attribute(.unique) var name: String
        var destination: String
        @Attribute(originalName: "start_date") var startDate: Date
        @Attribute(originalName: "end_date") var endDate: Date

        var bucketList: [BucketListItem]? = []
        var livingAccommodation: LivingAccommodation?
    }

    // Define the other models in this version...
}
描述所需的迁移阶段
在上文中,我们创建了用于 Core Data 阶段式迁移的三个版本承诺:V1、V2、V3。因此,我们需要描述两个迁移阶段:V1 → V2,V2 → V3。
let lightweightStage = NSLightweightMigrationStage([v1ModelChecksum])
lightweightStage.label = "V1 to V2: Add flightData attribute"

let customStage = NSCustomMigrationStage(
    migratingFrom: v2ModelReference,
    to: v3ModelReference
)

customStage.label = "V2 to V3: Denormalize model with FlightData entity"
在从 V1 迁移到 V2 时,我们认为自动迁移已经可以满足需求,因此不需要提供其他辅助代码。但是在从 V2 迁移到 V3 时,我们考虑到自动迁移无法满足要求,因此需要通过自定义代码来进行迁移。
customStage.willMigrateHandler = { migrationManager, currentStage in
    guard let container = migrationManager.container else {
        return
    }

    let context = container.newBackgroundContext()
    try context.performAndWait {
        let fetchRequest = NSFetchRequest<NSFetchRequestResult>(entityName: "Aircraft")
        fetchRequest.predicate = NSPredicate(format: "flightData != nil")

        do {
           var fetchedResults: [NSManagedObject]
           fetchedResults = try viewContext.fetch(fetchRequest)

           for airplane in fetchedResults {
                let fdEntity = NSEntityDescription.insertNewObject(
                    forEntityName: "FlightData,
                    into: context
                )

                let flightData = airplane.value(forKey: "flightData")
                fdEntity.setValue(flightData, forKey: “data”)
                fdEntity.setValue(airplane, forKey: "aircraft")
                airplane.setValue(nil, forKey: "flightData")
            }
            try context.save()
        } catch {
            // Handle any errors that may occur
        }
    }
}
在上述代码中,我们通过调用 willMigrateHandler 闭包,在执行从 V2 版本迁移到 V3 版本的操作前读取了原有数据的 airplane 属性(该属性为 Transformable 类型)。我们使用 airplane 中的数据创建了新的 FlightData 实体(该实体与 Aircraft 是一对一的关系)。
SwiftData 中也有类似的对应操作:
enum SampleTripsMigrationPlan: SchemaMigrationPlan {
    static var schemas: [any VersionedSchema.Type] {
        [SampleTripsSchemaV1.self, SampleTripsSchemaV2.self, SampleTripsSchemaV3.self]
    }

    static var stages: [MigrationStage] {
        [migrateV1toV2, migrateV2toV3]
    }

    static let migrateV1toV2 = MigrationStage.custom(
        fromVersion: SampleTripsSchemaV1.self,
        toVersion: SampleTripsSchemaV2.self,
        willMigrate: { context in
            let trips = try? context.fetch(FetchDescriptor<SampleTripsSchemaV1.Trip>())

            // De-duplicate Trip instances here...

            try? context.save()
        }, didMigrate: nil
    )

    static let migrateV2toV3 = MigrationStage.lightweight(
        fromVersion: SampleTripsSchemaV2.self,
        toVersion: SampleTripsSchemaV3.self
    )
}
启用阶段式迁移操作
创建一个带有轻量级迁移阶段和自定义迁移阶段的 NSStagedMigrationManager,并将其添加到 NSPersistentStoreDescription 选项中,从而让 Core Data 开启阶段式迁移操作。
let migrationStages = [lightweightStage, customStage]
let migrationManager = NSStagedMigrationManager(migrationStages)

let persistentContainer = NSPersistentContainer(
    path: "/path/to/store.sqlite",
    managedObjectModel: myModel
)

var storeDescription = persistentContainer?.persistentStoreDescriptions.first

storeDescription?.setOption(
    migrationManager,
    forKey: NSPersistentStoreStagedMigrationManagerOptionKey
)

persistentContainer?.loadPersistentStores { storeDescription, error in
    if let error = error {
        // Handle any errors that may occur
    }
}
在 SwiftData 中设置阶段式迁移的代码:
struct TripsApp: App {
    let container = ModelContainer(
        for: Trip.self,
        migrationPlan: SampleTripsMigrationPlan.self
    )

    var body: some Scene {
        WindowGroup {
            ContentView()
        }
        .modelContainer(container)
    }
}
相较于之前的迁移方式,阶段式迁移具有更清晰的条理;实现自定义迁移操作的代码量更少,难度也更低。然而,从另一个方面来说,这也需要开发者对迁移过程有更多的了解,并根据需要及时创建数据模型(将非轻量级迁移的迁移任务及时分解成一系列轻量级迁移步骤)。
作为 SwiftData 的基石,苹果在未来的几年中不论是有意还是无意,仍会持续为 Core Data 添加一些新的 API。考虑到 SwiftData 还需要几年的成熟时间,因此在未来的日子里,许多开发者都需要在一个项目中同时使用 SwiftData 和 Core Data。因此,及时了解 Core Data 的新功能和新动向仍有相当的价值。
欢迎你通过 Twitter、 Discord 频道 或博客的留言板与我进行交流。
订阅下方的 邮件列表,可以及时获得每周最新文章。
Recommend
About Joyk
Aggregate valuable and interesting links.
Joyk means Joy of geeK