
6

Spring Cloud Gateway编码实现任意地址跳转 - 程序员欣宸
source link: https://www.cnblogs.com/bolingcavalry/p/17507693.html
Go to the source link to view the article. You can view the picture content, updated content and better typesetting reading experience. If the link is broken, please click the button below to view the snapshot at that time.

1.Spring Cloud Gateway编码实现任意地址跳转06-27
欢迎访问我的GitHub
这里分类和汇总了欣宸的全部原创(含配套源码):https://github.com/zq2599/blog_demos
- 作为《Spring Cloud Gateway实战》系列的第十四篇,本文会继续发掘Spring Cloud Gateway的潜力,通过编码体验操控网关的乐趣,开发出一个实用的功能:让Spring Cloud Gateway应用在收到请求后,可以按照业务的需要跳转到任意的地址去
一般路由规则
- 先来看一个普通的路由规则,如下所示,意思是将所有/hello/**的请求转发到http://127.0.0.1:8082这个地址去:
spring:
  application:
    name: hello-gateway
  cloud:
    gateway:
      routes:
        - id: path_route
          uri: http://127.0.0.1:8082
          predicates:
          - Path=/hello/**
- 上述规则的功能如下图所示,假设这就是生产环境的样子,192.168.50.99:8082是提供服务的后台应用:

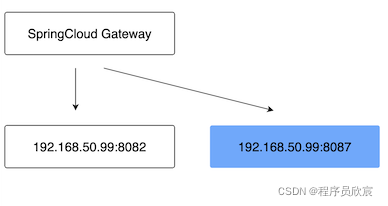
- 以上是常规情况,但也有些特殊情况,要求SpringCloud Gateway把浏览器的请求转发到不同的服务上去
- 如下图所示,在之前的环境中增加了另一个服务(即蓝色块),假设蓝色服务代表测试环境
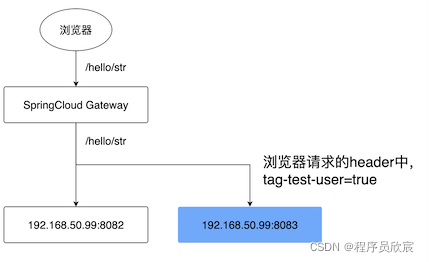
- 浏览器发起的/hello/str请求中,如果header中带有tag-test-user,并且值等于true,此时要求SpringCloud Gateway把这个请求转发到测试环境
- 如果浏览器的请求header中没有tag-test-user,SpringCloud Gateway需要像以前那样继续转发到192.168.50.99:8082
- 很明显,上述需求难以通过配置来实现,因为转发的地址和转发逻辑都是围绕业务逻辑来定制的,这也就是本篇的目标:对同一个请求path,可以通过编码转发到不同的地方去
- 实现上述功能的具体做法是:自定义过滤器
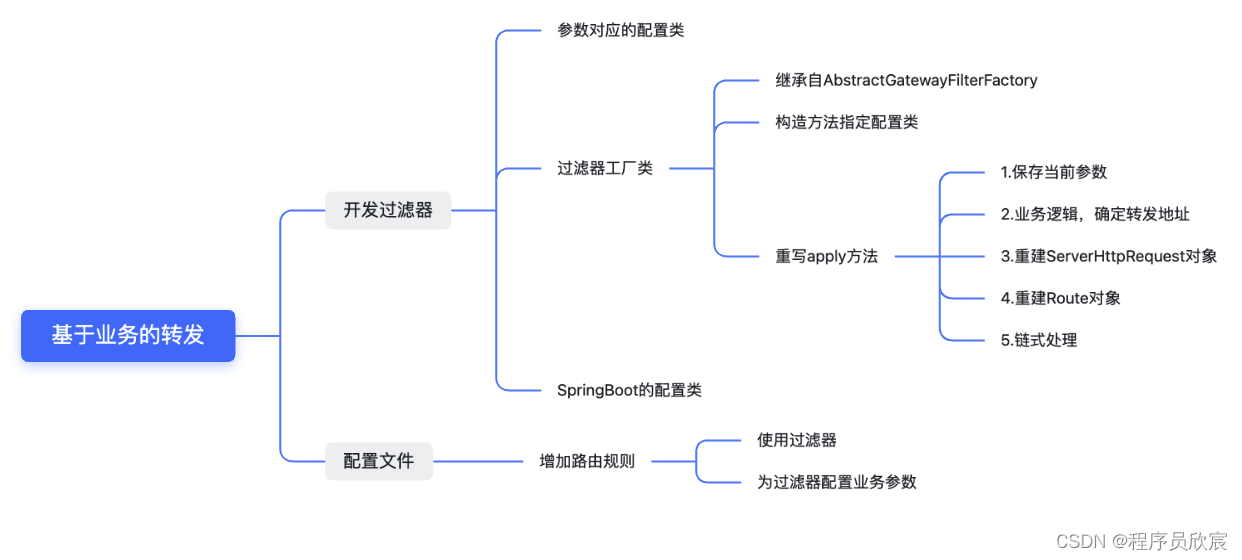
- 编码之前先设计,把关键点想清楚再动手
- 今天咱们要开发一个SpringCloud Gateway应用,里面新增一个自定义过滤器
- 实现这个功能需要三个知识点作为基础,也就是说,您会通过本篇实战掌握以下知识点:
- 自定义过滤器
- 自定义过滤器的配置参数和bean的映射
- 编码构造Route实例
- 用思维导图将具体工作内容展开,如下图所示,咱们就按部就班的实现吧:
- 本篇实战中的完整源码可在GitHub下载到,地址和链接信息如下表所示(https://github.com/zq2599/blog_demos):
| 名称 | 链接 | 备注 |
|---|---|---|
| 项目主页 | https://github.com/zq2599/blog_demos | 该项目在GitHub上的主页 |
| git仓库地址(https) | https://github.com/zq2599/blog_demos.git | 该项目源码的仓库地址,https协议 |
| git仓库地址(ssh) | [email protected]:zq2599/blog_demos.git | 该项目源码的仓库地址,ssh协议 |
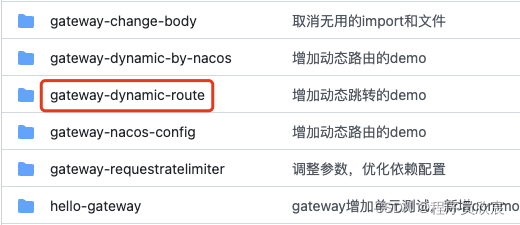
- 这个git项目中有多个文件夹,本篇的源码在spring-cloud-tutorials文件夹下,如下图红框所示:- spring-cloud-tutorials内部有多个子项目,本篇的源码在gateway-dynamic-route文件夹下,如下图红框所示:

- 新建名为gateway-dynamic-route的maven工程,其pom.xml内容如下:
<?xml version="1.0" encoding="UTF-8"?>
<project xmlns="http://maven.apache.org/POM/4.0.0"
         xmlns:xsi="http://www.w3.org/2001/XMLSchema-instance"
         xsi:schemaLocation="http://maven.apache.org/POM/4.0.0 http://maven.apache.org/xsd/maven-4.0.0.xsd">
    <parent>
        <artifactId>spring-cloud-tutorials</artifactId>
        <groupId>com.bolingcavalry</groupId>
        <version>1.0-SNAPSHOT</version>
    </parent>
    <modelVersion>4.0.0</modelVersion>

    <artifactId>gateway-dynamic-route</artifactId>

    <dependencies>
        <dependency>
            <groupId>com.bolingcavalry</groupId>
            <artifactId>common</artifactId>
            <version>${project.version}</version>
        </dependency>
        <dependency>
            <groupId>org.springframework.cloud</groupId>
            <artifactId>spring-cloud-starter-gateway</artifactId>
        </dependency>
    </dependencies>
    <build>
        <plugins>
            <!-- 如果父工程不是springboot,就要用以下方式使用插件,才能生成正常的jar -->
            <plugin>
                <groupId>org.springframework.boot</groupId>
                <artifactId>spring-boot-maven-plugin</artifactId>
                <configuration>
                    <mainClass>com.bolingcavalry.gateway.GatewayDynamicRouteApplication</mainClass>
                </configuration>
                <executions>
                    <execution>
                        <goals>
                            <goal>repackage</goal>
                        </goals>
                    </execution>
                </executions>
            </plugin>
        </plugins>
    </build>
</project>
- 启动类是普通的SpringBoot启动类:
package com.bolingcavalry.gateway;

import org.springframework.boot.SpringApplication;
import org.springframework.boot.autoconfigure.SpringBootApplication;

@SpringBootApplication
public class GatewayDynamicRouteApplication {
    public static void main(String[] args) {
        SpringApplication.run(GatewayDynamicRouteApplication.class,args);
    }
}
- 接下来是本篇的核心,自定义过滤器类,代码中已经添加了详细的注释,有几处要注意的地方稍后会提到:
package com.bolingcavalry.gateway.filter;

import lombok.Data;
import lombok.ToString;
import lombok.extern.slf4j.Slf4j;
import org.springframework.cloud.gateway.filter.GatewayFilter;
import org.springframework.cloud.gateway.filter.factory.AbstractGatewayFilterFactory;
import org.springframework.cloud.gateway.route.Route;
import org.springframework.http.HttpHeaders;
import org.springframework.http.HttpMethod;
import org.springframework.http.server.reactive.ServerHttpRequest;
import org.springframework.stereotype.Component;
import org.springframework.util.MultiValueMap;
import org.springframework.web.util.UriComponentsBuilder;
import java.net.URI;
import static org.springframework.cloud.gateway.support.ServerWebExchangeUtils.GATEWAY_ROUTE_ATTR;

@Component
@Slf4j
public class BizLogicRouteGatewayFilterFactory extends AbstractGatewayFilterFactory<BizLogicRouteGatewayFilterFactory.BizLogicRouteConfig> {

    private static final String TAG_TEST_USER = "tag-test-user";

    public BizLogicRouteGatewayFilterFactory() {
        super(BizLogicRouteConfig.class);
    }

    @Override
    public GatewayFilter apply(BizLogicRouteConfig config) {

        return (exchange, chain) -> {
            // 本次的请求对象
            ServerHttpRequest request =  exchange.getRequest();

            // 调用方请求时的path
            String rawPath = request.getURI().getRawPath();

            log.info("rawPath [{}]", rawPath);

            // 请求头
            HttpHeaders headers = request.getHeaders();

            // 请求方法
            HttpMethod httpMethod = request.getMethod();

            // 请求参数
            MultiValueMap<String, String> queryParams = request.getQueryParams();

            // 这就是定制的业务逻辑,isTestUser等于ture代表当前请求来自测试用户,需要被转发到测试环境
            boolean isTestUser = false;

            // 如果header中有tag-test-user这个key,并且值等于true(不区分大小写),
            // 就认为当前请求是测试用户发来的
            if (headers.containsKey(TAG_TEST_USER)) {
                String tageTestUser = headers.get(TAG_TEST_USER).get(0);

                if ("true".equalsIgnoreCase(tageTestUser)) {
                    isTestUser = true;
                }
            }

            URI uri;

            if (isTestUser) {
                log.info("这是测试用户的请求");
                // 从配置文件中得到测试环境的uri
                uri = UriComponentsBuilder.fromHttpUrl(config.getTestEnvUri() + rawPath).queryParams(queryParams).build().toUri();
            } else {
                log.info("这是普通用户的请求");
                // 从配置文件中得到正式环境的uri
                uri = UriComponentsBuilder.fromHttpUrl(config.getProdEnvUri() + rawPath).queryParams(queryParams).build().toUri();
            }

            // 生成新的Request对象,该对象放弃了常规路由配置中的spring.cloud.gateway.routes.uri字段
            ServerHttpRequest serverHttpRequest = request.mutate().uri(uri).method(httpMethod).headers(httpHeaders -> httpHeaders = httpHeaders).build();

            // 取出当前的route对象
            Route route = exchange.getAttribute(GATEWAY_ROUTE_ATTR);
            //从新设置Route地址
            Route newRoute =
                    Route.async().asyncPredicate(route.getPredicate()).filters(route.getFilters()).id(route.getId())
                            .order(route.getOrder()).uri(uri).build();
            // 放回exchange中
            exchange.getAttributes().put(GATEWAY_ROUTE_ATTR,newRoute);

            // 链式处理,交给下一个过滤器
            return chain.filter(exchange.mutate().request(serverHttpRequest).build());
        };
    }

    /**
     * 这是过滤器的配置类,配置信息会保存在此处
     */
    @Data
    @ToString
    public static class BizLogicRouteConfig {
        // 生产环境的服务地址
        private String prodEnvUri;

        // 测试环境的服务地址
        private String testEnvUri;
    }
}
- 上述代码中要注意的地方如下:
- BizLogicRouteConfig是过滤器的配置类,可以在使用过滤器时在配置文件中配置prodEnvUri和testEnvUri的值,在代码中可以通过这两个字段取得配置值
- 过滤器的工厂类名为BizLogicRouteGatewayFilterFactory,按照规则,过滤器的名字是BizLogicRoute
- 在apply方法中,重新创建ServerHttpRequest和Route对象,它们的参数可以按照业务需求随意设置,然后再将这两个对象设置给SpringCloud gateway的处理链中,接下来,处理链上的其他过滤拿到的就是新的ServerHttpRequest和Route对象了
- 假设生产环境地址是http://127.0.0.1:8082,测试环境地址是http://127.0.0.1:8087,整个SpringCloud Gateway应用的配置文件如下,可见使用了刚刚创建的过滤器,并且为此过滤器配置了两个参数:
server:
  #服务端口
  port: 8086
spring:
  application:
    name: gateway-dynamic-route
  cloud:
    gateway:
      routes:
        - id: path_route
          uri: http://0.0.0.0:8082
          predicates:
          - Path=/hello/**
          filters:
            - name: BizLogicRoute
              args:
                prodEnvUri: http://127.0.0.1:8082
                testEnvUri: http://127.0.0.1:8087
- 至此,编码完成了,启动这个服务
开发和启动后台服务,模拟生产和测试环境
- 接下来开始验证功能是否生效,咱们要准备两个后台服务:
- 模拟生产环境的后台服务是provider-hello,监听端口是8082,其/hello/str接口的返回值是Hello World, 2021-12-12 10:53:09
- 模拟测试环境的后台服务是provider-for-test-user,监听端口是8087,其/hello/str接口的返回值是Hello World, 2021-12-12 10:57:11 (from test enviroment)(和生产环境相比,返回内容多了个(from test enviroment)),对应Controller参考如下:
package com.bolingcavalry.provider.controller;

import com.bolingcavalry.common.Constants;
import org.springframework.web.bind.annotation.*;
import java.text.SimpleDateFormat;
import java.util.Date;
import java.util.Map;

@RestController
@RequestMapping("/hello")
public class Hello {

    private String dateStr(){
        return new SimpleDateFormat("yyyy-MM-dd hh:mm:ss").format(new Date());
    }

    /**
     * 返回字符串类型
     * @return
     */
    @GetMapping("/str")
    public String helloStr() {
        return Constants.HELLO_PREFIX + ", " + dateStr() + " (from test enviroment)";
    }
}
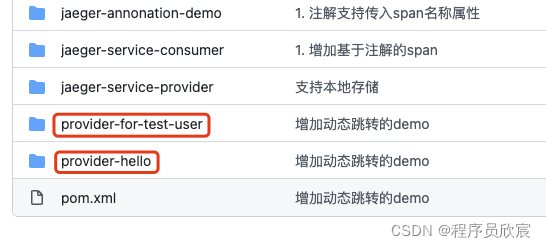
- 以上两个服务,对应的代码都在我的Github仓库中,如下图红框所示:
- 启动gateway-dynamic-route、provider-hello、provider-for-test-user服务
- 此时,SpringCloud gateway应用和两个后台服务都启动完成,情况如下图,接下来验证刚才开发的过滤器能不能像预期那样转发:
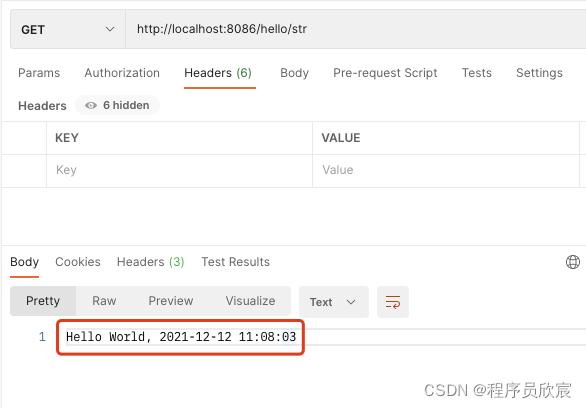
- 用postman工具向gateway-dynamic-route应用发起一次请求,返回值如下图红框所示,证明这是provider-hello的响应,看来咱们的请求已经正常到达:
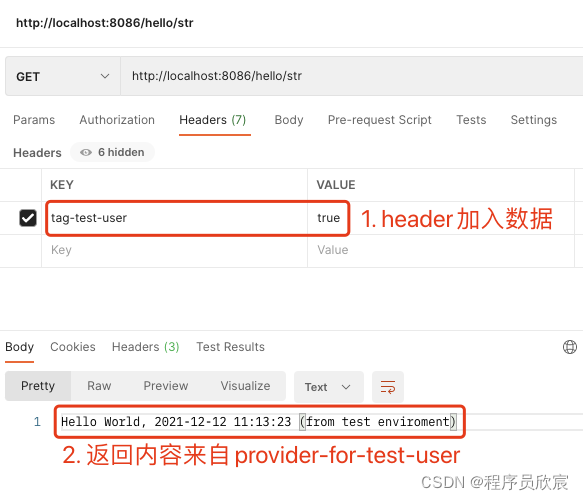
- 再发送一次请求,如下图,这次在header中加入键值对,得到的结果是provider-for-test-user的响应
- 至此,过滤器的开发和验证已经完成,通过编码,可以把外部请求转发到任何咱们需要的地址去,并且支持参数配置,这个过滤器还有一定的可配置下,减少了硬编码的比率,如果您正在琢磨如何深度操控SpringCloud Gateway,希望本文能给您一些参考;
欢迎关注博客园:程序员欣宸
Recommend
About Joyk
Aggregate valuable and interesting links.
Joyk means Joy of geeK