
How to Create ToDo App using React Native ?
source link: https://www.geeksforgeeks.org/how-to-create-todo-app-using-react-native/
Go to the source link to view the article. You can view the picture content, updated content and better typesetting reading experience. If the link is broken, please click the button below to view the snapshot at that time.

How to Create ToDo App using React Native ?
In this article, we’ll see how to create a ToDo app using React Native. An ideal illustration of a basic application that can be developed with React Native is a ToDo app. This app enables users to generate, modify, and remove tasks, assisting them in maintaining organization and concentration.
React Native is a well-known platform for crafting mobile applications that can function on multiple platforms. It enables the development of native mobile apps for iOS and Android by utilizing a single codebase. React Native makes it effortless to create mobile apps that are lively, engaging, and high-performing.
To begin, you will be required to configure your development setup. This entails the installation of Node.js, which serves as the runtime environment for executing JavaScript code beyond the confines of a web browser.
- Installation: In this article, we will use the Expo CLI edition, which offers a more seamless experience for executing your React Native apps. Proceed sequentially through the provided instructions to establish your React native ecosystem.
- Expo is a JavaScript and React-based platform that enables developers to create cross-platform mobile applications for iOS, Android, and the web using a unified codebase. This free and open-source framework offers a range of tools and services that streamline the mobile app development process, empowering developers to construct top-notch applications.
Prerequisites:
Steps to Create React Native Application:
Step 1: Create a react native application by using this command
npx create-expo-app todo-app-in-native
Step 2: After creating your project folder, i.e. todo-app-in-native, use the following command to navigate to it:
cd todo-app-in-native
Project Structure:
.png)
Approach: To develop a React Native todo application, it is crucial to adhere to a systematic method. Commence by specifying the features and functionalities of the app, encompassing tasks like adding, modifying, and removing items. Outline the architecture and data flow of the app, determining the required components and their interactions. Explore options for managing the app’s state using React hooks or a state management library, and select a suitable data storage solution for preserving tasks. Design the user interface by breaking it down into reusable components, and incorporate navigation if necessary. Conduct comprehensive testing, including unit tests for critical functions and components, as well as user testing for obtaining feedback on usability.
Example:
Step 3: Open the App.js file. Simply paste the source code into the App.js file.
- Javascript
import React, { useState } from "react";import {View,Text,TextInput,TouchableOpacity,FlatList,StyleSheet,} from "react-native";const App = () => {const [task, setTask] = useState("");const [tasks, setTasks] = useState([]);const [editIndex, setEditIndex] = useState(-1);const handleAddTask = () => {if (task) {if (editIndex !== -1) {// Edit existing taskconst updatedTasks = [...tasks];updatedTasks[editIndex] = task;setTasks(updatedTasks);setEditIndex(-1);} else {// Add new tasksetTasks([...tasks, task]);}setTask("");}};const handleEditTask = (index) => {const taskToEdit = tasks[index];setTask(taskToEdit);setEditIndex(index);};const handleDeleteTask = (index) => {const updatedTasks = [...tasks];updatedTasks.splice(index, 1);setTasks(updatedTasks);};const renderItem = ({ item, index }) => (<View style={styles.task}><Textstyle={styles.itemList}>{item}</Text><Viewstyle={styles.taskButtons}><TouchableOpacityonPress={() => handleEditTask(index)}><Textstyle={styles.editButton}>Edit</Text></TouchableOpacity><TouchableOpacityonPress={() => handleDeleteTask(index)}><Textstyle={styles.deleteButton}>Delete</Text></TouchableOpacity></View></View>);return (<View style={styles.container}><Text style={styles.heading}>Geeksforgeeks</Text><Text style={styles.title}>ToDo App</Text><TextInputstyle={styles.input}placeholder="Enter task"value={task}onChangeText={(text) => setTask(text)}/><TouchableOpacitystyle={styles.addButton}onPress={handleAddTask}><Text style={styles.addButtonText}>{editIndex !== -1 ? "Update Task" : "Add Task"}</Text></TouchableOpacity><FlatListdata={tasks}renderItem={renderItem}keyExtractor={(item, index) => index.toString()}/></View>);};const styles = StyleSheet.create({container: {flex: 1,padding: 40,marginTop: 40,},title: {fontSize: 24,fontWeight: "bold",marginBottom: 20,},heading: {fontSize: 30,fontWeight: "bold",marginBottom: 7,color: "green",},input: {borderWidth: 3,borderColor: "#ccc",padding: 10,marginBottom: 10,borderRadius: 10,fontSize: 18,},addButton: {backgroundColor: "green",padding: 10,borderRadius: 5,marginBottom: 10,},addButtonText: {color: "white",fontWeight: "bold",textAlign: "center",fontSize: 18,},task: {flexDirection: "row",justifyContent: "space-between",alignItems: "center",marginBottom: 15,fontSize: 18,},itemList: {fontSize: 19,},taskButtons: {flexDirection: "row",},editButton: {marginRight: 10,color: "green",fontWeight: "bold",fontSize: 18,},deleteButton: {color: "red",fontWeight: "bold",fontSize: 18,},});export default App; |
Step 5: To run the react native application, open the Terminal and enter the command listed below.
npx expo start
To run on Android:
npx react-native run-android
To run on Ios:
npx react-native run-ios
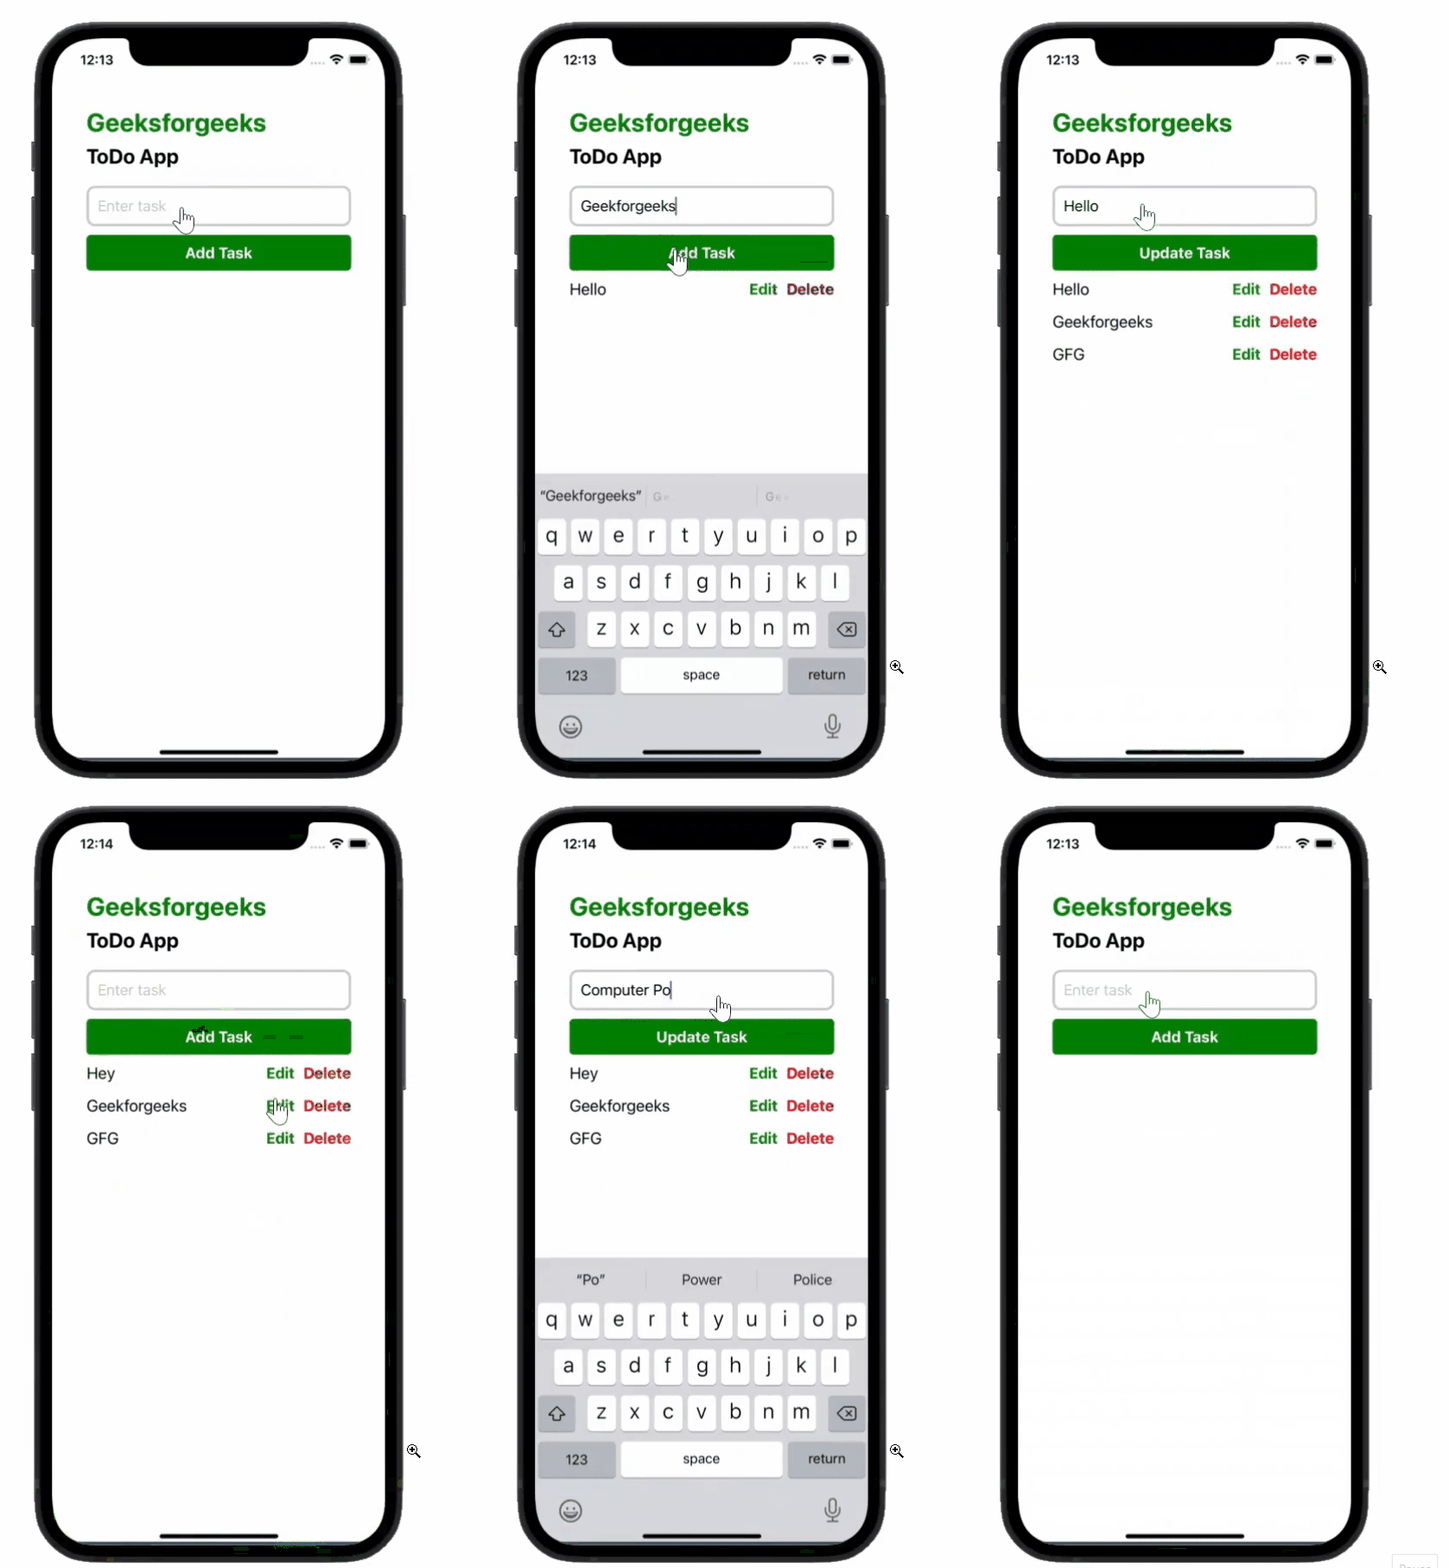
Output:

Recommend
About Joyk
Aggregate valuable and interesting links.
Joyk means Joy of geeK