

Localized Application in Blazor WebAssembly
source link: https://www.dotnetcurry.com/aspnet-core/blazor-webassembly-localization
Go to the source link to view the article. You can view the picture content, updated content and better typesetting reading experience. If the link is broken, please click the button below to view the snapshot at that time.
Localized Application in Blazor WebAssembly
Posted by: Mahesh Sabnis , on 6/3/2023, in Category ASP.NET Core
Blazor is a framework that allows for the creation of interactive client-side user interfaces (UI) using .NET. It provides an end-to-end FullStack application development experience. Blazor employs the C# programming language in place of JavaScript, enabling code sharing from server-side to client-side. It renders the UI as HTML and CSS, with broad browser support. Many end-users naturally demand UI in localized languages, matching their respective regions. Thankfully, Microsoft has facilitated localization support within .NET.
Localization is the process of customizing applications to display and operate in a specific language UI. This can be implemented in Blazor WebAssembly using the IStringLocalizer and IStringLocalizer<T> interfaces.
Save months of development time with one set of UI controls
Telerik UI for Blazor offers 100+ native components that provide flexible data visualization and manipulation, rich API, professional looks and a way to satisfy any design requirement.
Localization utilizes Resource Files to store localized strings for various cultures in string format. In .NET, we can access localized strings based on the CultureInfo class, which provides information on a specific culture, such as culture names, calendar, and strings.
To implement localization in your application, the Microsoft.Extensions.Localization NuGet package is needed. This package provides an application localization service and offers a default implementation based on the Resource Manager to load localized assembly resources. It also provides a LocalizationServiceCollection with an extension method named AddLocalization(). An essential project configuration for localization in a Blazor WebAssembly application ensures the project can dynamically change cultures using BlazorWebAssemblyLoadAllGlobalizationData. This setting allows the application to modify cultures when loaded in a browser. The selected culture information can then be stored in the browser’s storage.
Creating a Blazor WebAssembly Project
Step 1: Open Visual Studio 2022 and create a new Blazor WebAssembly project targeted to .NET 6 or 7. Name this project Blazor_MultiLanguage. In this project, add the NuGet Package named Microsoft.Extensions.Localization.
Step 2: As the selected culture will be stored in the browser’s LocalStorage, add the following package to the project: Blazored.LocalStorage. This package provides an extension method to access LocalStorage in a Blazor WebAssembly application.
Step 3: In this application, we will target English, German, and French localized cultures. To display strings for the selected localized culture, create resource files with strings. In the Shared folder, add a new folder named Resources. Add a new Resource file named Resources.resx in this folder. In this file, add constant strings for the US English localized culture, as shown in the figure below.

Figure 1: The US English Culture Strings
Copy the Resources.resx file and paste it into the same folder, renaming it to Resources.fr.resx. In this file, add French culture strings for Person Info using Google Translate.
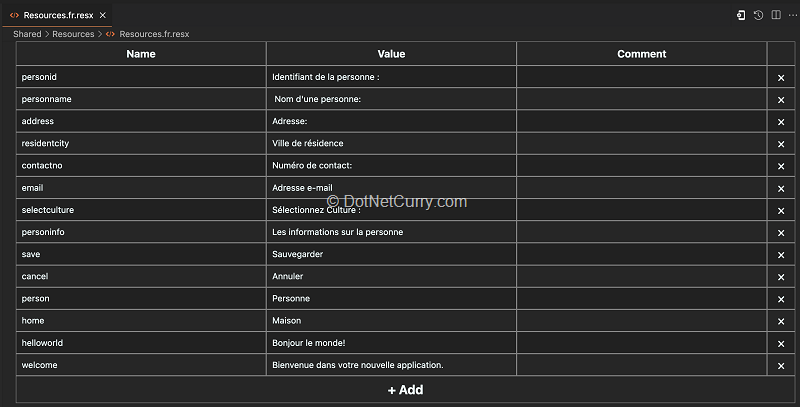
Similarly, create a Resources.de.resx file from the Resources.resx file, and use Google Translate to create German Strings for Person Info.
Step 4: In the project, add a new folder named Models. In this folder, add a new class file to contain the code for the PersonInfo class.
public class PersonInfo{public int PersonId { get; set; }public string? PersonName { get; set; }public string? Address { get; set; }public string? ResidentCity { get; set; }public int ContactNumber { get; set; }public string? Email { get; set; }} |
Step 5: Modify the _Imports.razor file to define global imports. Note that we are importing Localization extensions, LocalStorage, and other namespaces. The Resources namespaces will be used to read resource files to access the localized culture resources files created in Step 3.
@using Blazor_MultiLanguage.Shared.Resources@using Microsoft.Extensions.Localization@using Blazor_MultiLanguage.Models@using Microsoft.AspNetCore.Components@using System.Globalization@using Blazored.LocalStorage |
When the application runs in a browser, we need to load the culture for displaying strings on the UI in the localized culture from LocalStorage. Otherwise, the default culture will be en-US. To do this, add a new class file in the project, named CultureExtensions.
public static class CultureExtensions{public async static Task SetDefaultUICulture(this WebAssemblyHost host){// 1. Read the ILocalStorageService to read the LocalStoragevar localStorage = host.Services.GetRequiredService<ILocalStorageService>();// 2. Read the current value for the Culture from the// LocalStorage var result = await localStorage.GetItemAsync<string>("currentcuture");CultureInfo culture;if (result != null)// 3.a. Set the selected Cultureculture = new CultureInfo(result);else// 3.b. else the default culture will be en-USculture = new CultureInfo("en-US");// Set the cukture to applicationCultureInfo.DefaultThreadCurrentCulture = culture;CultureInfo.DefaultThreadCurrentUICulture = culture;}} |
The CultureExtensions class has following specifications:
a. The LocalStorage service registered in the dependency injection container will be read so that the culture name stored in LocalStorage can be read.
b. The value of the currentculture key from the LocalStorage will be read.
c. If the value for the currentculture is null, then the default culture will be set as en-US else the culture read from the LocalStorage will be applied.
Step 6: Modify the Program.cs file to register LocalStorage, add localization services, and set the default culture.
// 1. Add the LocalStorage Servicesbuilder.Services.AddBlazoredLocalStorage();// 2. Add the Localization Servicebuilder.Services.AddLocalization();var host = builder.Build();// 3. Set the Default UI Cultureawait host.SetDefaultUICulture();await builder.Build().RunAsync(); |
Step 7: In the Shared folder, add a new Razor Component and name it as SelectUICulture.razor. In this component we will create a user interface using which the local culture can be chosen by the end-user. As mentioned above we will be focusing on English (US), French, and German. The code in Listing 5 shows the component.
@inject NavigationManager NavManager@inject IStringLocalizer<Resources.Resources> localizer@inject ILocalStorageService _localstorage<table class="table table-bordered table-striped"><tbody><tr><td>@*Placeholder for the Constant String for specific Culture read from Resources files*@@localizer["selectculture"]</td><td><select class="form-control" @bind="UICulture" style="width:400px; margin-left:10px;">@foreach (var culture in uicultutes){<option value="@culture">@culture.DisplayName</option>}</select></td></tr></tbody></table>@code {CultureInfo[] uicultutes = new[]{// default cultures supported by the applciationnew CultureInfo("en-US"),new CultureInfo("de-DE"),new CultureInfo("fr-FR")};CultureInfo UICulture{get => CultureInfo.CurrentCulture;set{if (CultureInfo.CurrentCulture != value){// Set the culture in LocalStorage_localstorage.SetItemAsync("currentcuture", value.Name);// Load the Current URLNavManager.NavigateTo(NavManager.Uri, forceLoad: true);}}}} |
The component defines an array of CultureInfo class.
The UICulture property will write the selected culture in the LocalStorage. The component is injected with the IStringLocalizer type to read localized resources files and the localization will be applied based on the culture that is stored and read from the LocalStorage. The UI of the component contains the HTML select element that shows list of cultures.
One important point to note in the UI is that we have used following placeholder to show the label for HTML element based in culture specific string read from the resource’s files.
@localizer[“selectculture”]
Step 8: In the “Pages” folder, add a new Razor component and name it “Person.razor”. This component will display the user interface for entering person information. We will use localized strings to display labels for this information. Here’s the component’s code.
@page "/person"@inject IStringLocalizer<Resources> localizer<h1>@localizer["personinfo"]</h1><EditForm Model="@person" OnValidSubmit="@savePerson"><table class="table table-bordered table-striped"><tbody><tr><td>@localizer["personid"]</td><td><InputNumber @bind-Value="person.PersonId" class="form-control"></InputNumber></td></tr><tr><td>@localizer["personname"]</td><td><InputText @bind-Value="person.PersonName" class="form-control"></InputText></td></tr><tr><td>@localizer["address"]</td><td><InputText @bind-Value="person.Address" class="form-control"></InputText></td></tr><tr><td>@localizer["residentcity"]</td><td><InputText @bind-Value="person.ResidentCity" class="form-control"></InputText></td></tr><tr><td>@localizer["contectno"]</td><td><InputNumber @bind-Value="person.ContactNumber" class="form-control"></InputNumber></td></tr><tr><td>@localizer["email"]</td><td><InputText @bind-Value="person.Email" class="form-control"></InputText></td></tr></tbody><tfoot><tr><td><button type="submit" class="btn btn-danger">@localizer["cancel"]</button></td><td><button class="btn btn-success">@localizer["save"]</button></td></tr></tfoot></table></EditForm>@code {private PersonInfo person = new PersonInfo();protected override void OnInitialized(){base.OnInitialized();}void savePerson(){……..}} |
As shown in Listing 6, the component class employs the “PersonInfo” class for binding with UI elements. All labels, headers, and button texts use placeholders to display localized strings. Please note that the code for the “savePerson()” method is not included here, as the focus of this code is on Localization.
Step 9: Modify the code in “NavMenu.razor” to display a navigation link for the Person Component, as shown here.
……….<div class="nav-item px-3"><NavLink class="nav-link" href="person"><span class="oi oi-list-rich" aria-hidden="true"></span> @localizer["person"]</NavLink></div>……… |
Take note that the localized string placeholder is used for the Person link. Amend the “MainLayout.razor” component to display the UI for the “SelectUICulture” component, as shown in Listing 8.
…..<div class="top-row px-4"><SelectUICulture></SelectUICulture></div>……. |
We will also adjust the “Index.razor” component to display a localized string for the welcome message.
Step 10: The crucial step is to ensure that the application allows dynamic cultural changes when loaded in the browser. We must add the “BlazorWebAssemblyLoadAllGlobalizationData” configuration by modifying the project file, as shown in Listing 9, to enable dynamic culture changes.
<PropertyGroup><TargetFramework>net7.0</TargetFramework><BlazorWebAssemblyLoadAllGlobalizationData>true</BlazorWebAssemblyLoadAllGlobalizationData><Nullable>enable</Nullable><ImplicitUsings>enable</ImplicitUsings></PropertyGroup> |
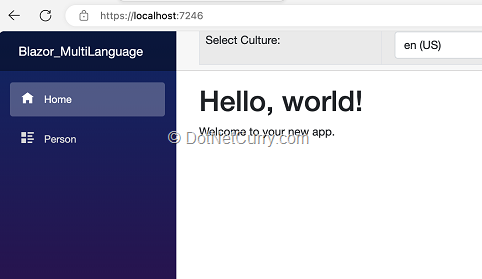
Running the application will display the default en-US culture, as shown in the Figure.
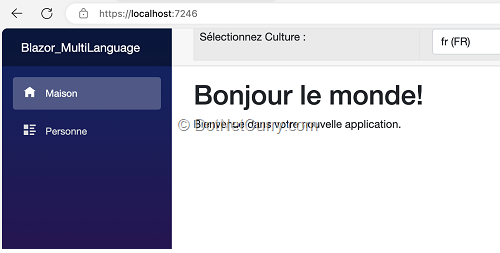
Change the culture to French (fr-FR), and the French greeting for “Hello, world!” will be displayed as shown in the Figure below.
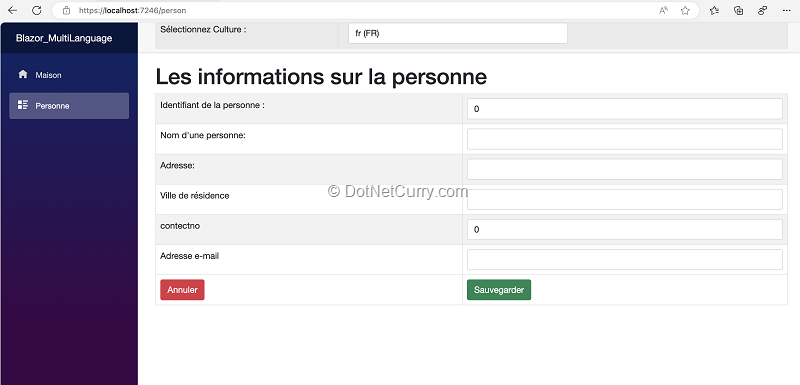
Click on the “Personne” link (the French translation of “Person”), and the Person component will be displayed as shown here.
So, we have localized output for the application!
Conclusion
Localization is a critical feature for any application targeting a global audience.
Understanding and implementing localization in a Blazor WebAssembly application enables the delivery of a user-friendly interface in various languages. By leveraging the built-in localization support in .NET, developers can build applications that cater to a wider, more diverse audience.
By following the steps outlined in this article, developers can easily integrate localization into their own Blazor WebAssembly applications, improving their application’s reach and user experience. The dynamic culture change feature enhances the application’s adaptability, allowing it to cater to a diverse range of users seamlessly.
This article has been editorially reviewed by Suprotim Agarwal.

C# and .NET have been around for a very long time, but their constant growth means there’s always more to learn.
We at DotNetCurry are very excited to announce The Absolutely Awesome Book on C# and .NET. This is a 500 pages concise technical eBook available in PDF, ePub (iPad), and Mobi (Kindle).
Organized around concepts, this Book aims to provide a concise, yet solid foundation in C# and .NET, covering C# 6.0, C# 7.0 and .NET Core, with chapters on the latest .NET Core 3.0, .NET Standard and C# 8.0 (final release) too. Use these concepts to deepen your existing knowledge of C# and .NET, to have a solid grasp of the latest in C# and .NET OR to crack your next .NET Interview.
Click here to Explore the Table of Contents or Download Sample Chapters!
Recommend
About Joyk
Aggregate valuable and interesting links.
Joyk means Joy of geeK