

[MAUI程序设计] 用Handler实现自定义跨平台控件 - 林晓lx
source link: https://www.cnblogs.com/jevonsflash/p/17456091.html
Go to the source link to view the article. You can view the picture content, updated content and better typesetting reading experience. If the link is broken, please click the button below to view the snapshot at that time.

[MAUI程序设计] 用Handler实现自定义跨平台控件
今天来谈一谈MAUI跨平台技术的核心概念——跨平台控件。
无论是MAUI,Xamarin.Forms还是其它的跨平台技术,他们是多个不同平台功能的抽象层,利用通用的方法实现所谓“一次开发,处处运行”。
跨平台框架需要考虑通用方法在各平台的兼容,但由于各原生平台(官方将原生称为本机)功能的差异,可能不能满足特定平台的所有功能。
比如,众所周知,MAUI的手势识别器没有提供长按(LongPress)手势的识别, TapGestureRecognizer也仅仅是按下和抬起的识别,没有提供长按的识别。
这时候就需要开发者自己实现特定平台的功能,这就是自定义控件。
要想重写控件,或增强默认控件的功能或视觉效果,最基础的功能就是要拿到跨平台控件,和本机控件。
通过跨平台控件定义的属性传递到本机控件,在本机控件中响应和处理自定义属性的变化。达到自定义控件的目的。
接下来介绍在MAUI新增的特性:控制器(Handler),好用但知道的人不多 。
Handler
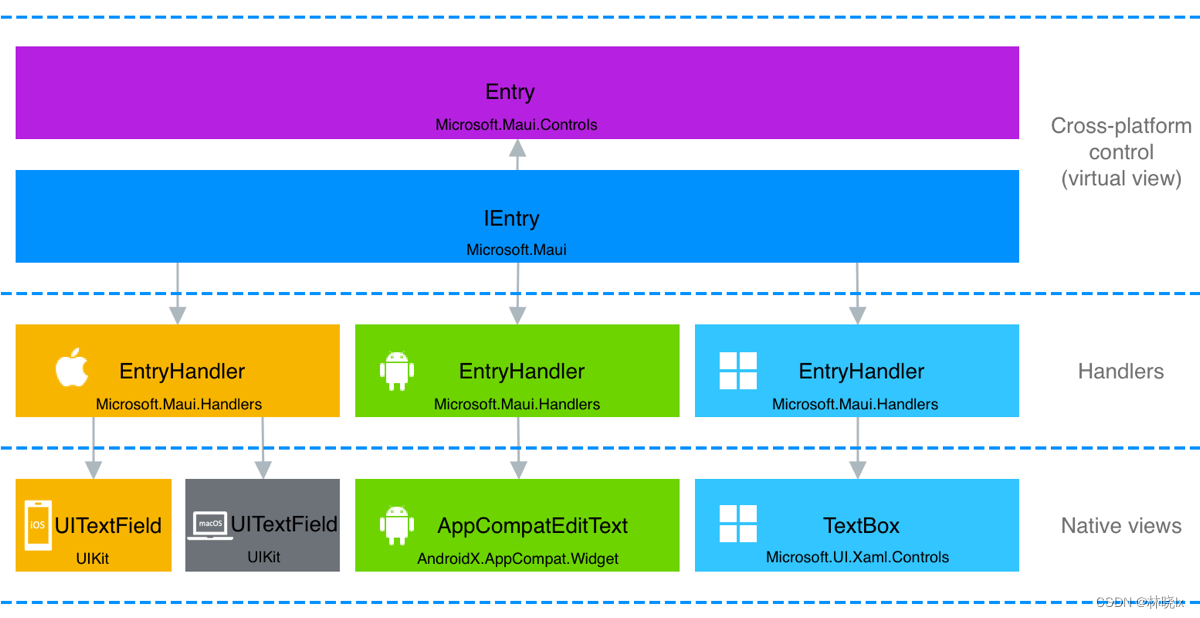
因为跨平台控件的实现由本机视图在每个平台上提供的,MAUI为每个控件创建了接口用于抽象控件。 实现这些接口的跨平台控件称为 虚拟视图。 处理程序 将这些虚拟视图映射到每个平台上的控件,这些控件称为 本机视图。
在VisualElement中的Handler对象是一个实现了IElementHandler接口的类,通过它可以访问 虚拟视图和 本机视图。
public interface IViewHandler : IElementHandler
{
    bool HasContainer { get; set; }
    object? ContainerView { get; }
    IView? VirtualView { get; }

    Size GetDesiredSize(double widthConstraint, double heightConstraint);
    void PlatformArrange(Rect frame);
}
每个控件有各自的Handler以及接口,请查看官方文档。
它可以通过注册全局的映射器,作为特定本机平台上实现自定义控件的功能的入口。
然后结合.NET 6 条件编译的语言特性,可以更加方便在但文件上,为每个平台编写自定义处理程序。
Entry是实现IEntry接口的单行文本输入控件,它对应的Handler是EntryHandler。
如果我们想要在Entry控件获取焦点时,自动全选文本。
  Microsoft.Maui.Handlers.EntryHandler.Mapper.AppendToMapping("MyCustomization", (handler, view) =>
        {
#if ANDROID
            handler.PlatformView.SetSelectAllOnFocus(true);
#elif IOS || MACCATALYST
            handler.PlatformView.EditingDidBegin += (s, e) =>
            {
                handler.PlatformView.PerformSelector(new ObjCRuntime.Selector("selectAll"), null, 0.0f);
            };
#elif WINDOWS
            handler.PlatformView.GotFocus += (s, e) =>
            {
                handler.PlatformView.SelectAll();
            };
#endif
        });
或者,可以使用分部类将代码组织到特定于平台的文件夹和文件中。 有关条件编译的详细信息,请参考官方文档。
与Xamarin.Forms实现的区别
在Xamarin.Forms时代,已经提供了一套自定义控件的机制,呈现器(Renderer)。
Xamarin.Forms的控件,比如Entry是通过在封装于特定平台下的EntryRenderer的类中渲染的。
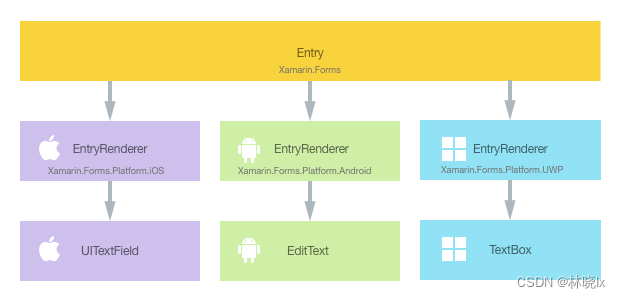
通过重写控件默认Renderer,可以完全改变控件的外观和行为方式。
- Element,Xamarin.Forms 元素
- Control,本机视图、小组件或控件对象
为什么要用Handler代替Renderer
虽然Renderer功能非常强大,但是绝大部分场景来说,不是每次都需要重写控件,而仅仅是给控件添加一些特定平台的增强功能,如果还需要重写OnElementPropertyChanged 将跨平台控件的属性值传输到本机控件,这种方式太过于复杂。
以我的理解,Handler是对Renderer的一种优化,它解决了Renderer的这些问题:Renderer和跨平台控件的耦合,对自定义控件的生命周期管理,和对自定义控件的更细粒度控制。
在Xamarin.Froms的Render中,要想拿到跨平台控件的属性,需要通过直接引用跨平台类型,这样就导致了Renderer和跨平台控件的耦合。
在MAUI中,处理程序会将平台控件与框架分离。平台控件只需处理框架的需求。这样的好处是处理程序也适用于其他框架(如 Comet 和 Fabulous)重复使用。
生命周期管理
可以通过处理程序的映射器(Mapper)在应用中的任意位置进行处理程序自定义。 自定义处理程序后,它将影响在应用中任意位置的该类型所有控件。
可以通过控件HandlerChanged 和HandlerChanging,管理Handler的生命周期,通过其参数可以获取控件挂载、移除Handler的时机,可以在这里做一些初始化和清理工作。
更细粒度的控制
因为实现了全局映射器注册,这样的好处还有不用重写子类控件,我们可以通过获取跨平台控件的某属性,或注解属性,拿到需要进行处理的控件。实现自由的面向切面的过滤。
用Effect来实现呢?
或者我们仅仅想更改控件外观,可以通过Effect来实现。但无论是Effect还是Renderer,他们只能是全局的,在需要状态维护的业务逻辑中,比如长按,实际上是按下,抬起的过程,没有按下的控件不要响应抬起,正因为这样要记录哪些控件已经按下,可能需要用一个字典维护所有的自定义控件。
而MAUI的自定义映射器实际上就是一个字典,减少了代码的复杂度。
在MAUI中,官方建议迁移到Handler。Renderer虽仍然可以在MAUI中使用,但是它们属于兼容方案(Compatibility命名空间),并且不提供ExportRenderer标签,需要在CreateMauiApp中手动添加:
.ConfigureMauiHandlers((handlers) =>
        {
#if ANDROID
            handlers.AddHandler(typeof(PressableView), typeof(XamarinCustomRenderer.Droid.Renderers.PressableViewRenderer));
#elif IOS
            handlers.AddHandler(typeof(PressableView), typeof(XamarinCustomRenderer.iOS.Renderers.PressableViewRenderer));
#endif
        });
从Renderer迁移到Handler的详细步骤,请参考官方文档
刚才说到,MAUI缺少长按的手势控制,
所谓长按(LongPress),实际上是将手指接触屏幕到离开屏幕的动作分解。当手指接触屏幕时,触发按下(Pressed)事件,当手指离开屏幕时,触发抬起(Released)事件。如果在按下和抬起之间的时间间隔超过一定的时间,就认为是长按。
对于这样简单的功能,MAUI团队并不打算将它加入到手势识别中。可能将这个需求下放给社区来实现,我在CommunityToolkit找到了这个issue(https://github.com/CommunityToolkit/Maui/issues/86)但是到目前为止,官方仅有的只是用Effect实现的手势识别案例(https://docs.microsoft.com/xamarin/xamarin-forms/app-fundamentals/effects/touch-tracking)
那么我们参考这个官方案例,在MAUI上实现一个长按的手势控制吧
自定义手势监听控件
定义可以监听的手势类别,分别是按下、移动、抬起、取消、进入、退出
 public enum TouchActionType
    {
        Entered,
        Pressed,
        Moved,
        Released,
        Exited,
        Cancelled
    }
添加手势监听器TouchRecognizer,它将提供一个事件OnTouchActionInvoked,用触发手势动作。
public partial class TouchRecognizer: IDisposable
{
    public event EventHandler<TouchActionEventArgs> OnTouchActionInvoked;
    public partial void Dispose();
}
EventArg类TouchActionEventArgs,用于传递手势动作的参数
public long Id { private set; get; }

public TouchActionType Type { private set; get; }

public Point Location { private set; get; }

public bool IsInContact { private set; get; }
在各平台上实现TouchRecognizer
使用分布类(partial class)的方式,创建TouchRecognizer.iOS.cs、TouchRecognizer.Android.cs和TouchRecognizer.Windows.cs文件,分别在各平台上实现TouchRecognizer。在各平台上的实现代码不会混在一起,便于维护。
iOS中的实现
public partial class TouchRecognizer : UIGestureRecognizer, IDisposable
{
    UIView iosView;

    public TouchRecognizer(UIView view)
    {
        this.iosView = view;
    }

    public override void TouchesBegan(NSSet touches, UIEvent evt)
    {
        base.TouchesBegan(touches, evt);

        foreach (UITouch touch in touches.Cast<UITouch>())
        {
            long id = touch.Handle.Handle.ToInt64();
            InvokeTouchActionEvent(this, id, TouchActionType.Pressed, touch, true);
        }


    }

    public override void TouchesMoved(NSSet touches, UIEvent evt)
    {
        base.TouchesMoved(touches, evt);

        foreach (UITouch touch in touches.Cast<UITouch>())
        {
            long id = touch.Handle.Handle.ToInt64();

            InvokeTouchActionEvent(this, id, TouchActionType.Moved, touch, true);

        }
    }

    public override void TouchesEnded(NSSet touches, UIEvent evt)
    {
        base.TouchesEnded(touches, evt);

        foreach (UITouch touch in touches.Cast<UITouch>())
        {
            long id = touch.Handle.Handle.ToInt64();

            InvokeTouchActionEvent(this, id, TouchActionType.Released, touch, false);

        }
    }

    public override void TouchesCancelled(NSSet touches, UIEvent evt)
    {
        base.TouchesCancelled(touches, evt);

        foreach (UITouch touch in touches.Cast<UITouch>())
        {
            long id = touch.Handle.Handle.ToInt64();

            InvokeTouchActionEvent(this, id, TouchActionType.Cancelled, touch, false);

        }
    }


    void InvokeTouchActionEvent(TouchRecognizer recognizer, long id, TouchActionType actionType, UITouch touch, bool isInContact)
    {
        var cgPoint = touch.LocationInView(recognizer.View);
        var xfPoint = new Point(cgPoint.X, cgPoint.Y);
        OnTouchActionInvoked?.Invoke(this, new TouchActionEventArgs(id, actionType, xfPoint, isInContact));
    }
}
Android中的实现
public partial class TouchRecognizer : IDisposable
{
    Android.Views.View androidView;
    Func<double, double> fromPixels;
    int[] twoIntArray = new int[2];
    private Point _oldscreenPointerCoords;

    public TouchRecognizer(Android.Views.View view)
    {
        this.androidView = view;
        if (view != null)
        {
            fromPixels = view.Context.FromPixels;
            view.Touch += OnTouch;
        }
    }

    public partial void Dispose()
    {
        androidView.Touch -= OnTouch;
    }

    void OnTouch(object sender, Android.Views.View.TouchEventArgs args)
    {
        var senderView = sender as Android.Views.View;
        var motionEvent = args.Event;
        var pointerIndex = motionEvent.ActionIndex;
        var id = motionEvent.GetPointerId(pointerIndex);
        senderView.GetLocationOnScreen(twoIntArray);
        var screenPointerCoords = new Point(twoIntArray[0] + motionEvent.GetX(pointerIndex),
                                                twoIntArray[1] + motionEvent.GetY(pointerIndex));


        switch (args.Event.ActionMasked)
        {
            case MotionEventActions.Down:
            case MotionEventActions.PointerDown:
                InvokeTouchActionEvent(this, id, TouchActionType.Pressed, screenPointerCoords, true);
                break;

            case MotionEventActions.Move:
                for (pointerIndex = 0; pointerIndex < motionEvent.PointerCount; pointerIndex++)
                {
                    id = motionEvent.GetPointerId(pointerIndex);


                    senderView.GetLocationOnScreen(twoIntArray);

                    screenPointerCoords = new Point(twoIntArray[0] + motionEvent.GetX(pointerIndex),
                                                    twoIntArray[1] + motionEvent.GetY(pointerIndex));


                    if (IsOutPit(senderView, screenPointerCoords))
                    {
                        if (_oldscreenPointerCoords != default)
                        {
                            InvokeTouchActionEvent(this, id, TouchActionType.Exited, screenPointerCoords, true);
                            _oldscreenPointerCoords=default;
                        }

                    }
                    else
                    {
                        if (_oldscreenPointerCoords == default
                                                    ||screenPointerCoords!= _oldscreenPointerCoords)
                        {
                            _oldscreenPointerCoords=screenPointerCoords;
                            InvokeTouchActionEvent(this, id, TouchActionType.Moved, screenPointerCoords, true);
                        }
                    }


                }
                break;

            case MotionEventActions.Up:
            case MotionEventActions.Pointer1Up:
                InvokeTouchActionEvent(this, id, TouchActionType.Released, screenPointerCoords, false);
                break;

            case MotionEventActions.Cancel:

                InvokeTouchActionEvent(this, id, TouchActionType.Cancelled, screenPointerCoords, false);
                break;
        }
    }

    private bool IsOutPit(Android.Views.View senderView, Point screenPointerCoords)
    {
        return (screenPointerCoords.X<twoIntArray[0]||screenPointerCoords.Y<twoIntArray[1])
                                    ||(screenPointerCoords.X>twoIntArray[0]+senderView.Width||screenPointerCoords.Y>twoIntArray[1]+senderView.Height);
    }

    void InvokeTouchActionEvent(TouchRecognizer touchEffect, int id, TouchActionType actionType, Point pointerLocation, bool isInContact)
    {
        touchEffect.androidView.GetLocationOnScreen(twoIntArray);
        double x = pointerLocation.X - twoIntArray[0];
        double y = pointerLocation.Y - twoIntArray[1];
        var point = new Point(fromPixels(x), fromPixels(y));
        OnTouchActionInvoked?.Invoke(this, new TouchActionEventArgs(id, actionType, point, isInContact));
    }

}
Windows中的实现
public partial class TouchRecognizer : IDisposable
{
    FrameworkElement windowsView;

    public TouchRecognizer(FrameworkElement view)
    {
        this.windowsView = view;
        if (this.windowsView != null)
        {
            this.windowsView.PointerEntered += View_PointerEntered;
            this.windowsView.PointerPressed += View_PointerPressed;
            this.windowsView.Tapped +=View_Tapped;
            this.windowsView.PointerMoved += View_PointerMoved;
            this.windowsView.PointerReleased += View_PointerReleased;
            this.windowsView.PointerExited += View_PointerExited;
            this.windowsView.PointerCanceled += View_PointerCancelled;
        }
    }

    public partial void Dispose()
    {
        windowsView.PointerEntered -= View_PointerEntered;
        windowsView.PointerPressed -= View_PointerPressed;
        windowsView.Tapped -=View_Tapped;
        windowsView.PointerMoved -= View_PointerMoved;
        windowsView.PointerReleased -= View_PointerReleased;
        windowsView.PointerExited -= View_PointerEntered;
        windowsView.PointerCanceled -= View_PointerCancelled;
    }
    private void View_Tapped(object sender, TappedRoutedEventArgs args)
    {
        //var windowsPoint = args.GetPosition(sender as UIElement);
        //Point point = new Point(windowsPoint.X, windowsPoint.Y);
        //InvokeTouchActionEvent(TouchActionType.Pressed, point, 0, true);

    }
    private void View_PointerEntered(object sender, PointerRoutedEventArgs args)
    {
        Point point = GetPoint(sender, args);
        var id = args.Pointer.PointerId;
        var isInContact = args.Pointer.IsInContact;
        InvokeTouchActionEvent(TouchActionType.Entered, point, id, isInContact);
    }

    private void View_PointerPressed(object sender, PointerRoutedEventArgs args)
    {
        Point point = GetPoint(sender, args);
        var id = args.Pointer.PointerId;
        var isInContact = args.Pointer.IsInContact;
        InvokeTouchActionEvent(TouchActionType.Pressed, point, id, isInContact);
        (sender as FrameworkElement).CapturePointer(args.Pointer);
    }

    private void View_PointerMoved(object sender, PointerRoutedEventArgs args)
    {
        Point point = GetPoint(sender, args);
        var id = args.Pointer.PointerId;
        var isInContact = args.Pointer.IsInContact;
        InvokeTouchActionEvent(TouchActionType.Moved, point, id, isInContact);
    }

    private void View_PointerReleased(object sender, PointerRoutedEventArgs args)
    {
        Point point = GetPoint(sender, args);
        var id = args.Pointer.PointerId;
        var isInContact = args.Pointer.IsInContact;
        InvokeTouchActionEvent(TouchActionType.Released, point, id, isInContact);
    }

    private void View_PointerExited(object sender, PointerRoutedEventArgs args)
    {
        Point point = GetPoint(sender, args);
        var id = args.Pointer.PointerId;
        var isInContact = args.Pointer.IsInContact;
        InvokeTouchActionEvent(TouchActionType.Exited, point, id, isInContact);
    }

    private void View_PointerCancelled(object sender, PointerRoutedEventArgs args)
    {
        Point point = GetPoint(sender, args);
        var id = args.Pointer.PointerId;
        var isInContact = args.Pointer.IsInContact;
        InvokeTouchActionEvent(TouchActionType.Cancelled, point, id, isInContact);
    }

    private void InvokeTouchActionEvent(TouchActionType touchActionType, Point point, uint id, bool isInContact)
    {
        OnTouchActionInvoked?.Invoke(this, new TouchActionEventArgs(id, touchActionType, point, isInContact));

    }

    private static Point GetPoint(object sender, PointerRoutedEventArgs args)
    {
        var pointerPoint = args.GetCurrentPoint(sender as UIElement);
        Windows.Foundation.Point windowsPoint = pointerPoint.Position;
        Point point = new Point(windowsPoint.X, windowsPoint.Y);
        return point;
    }
}
创建手势监听控件TouchContentView,它继承于ContentView。
注意:尽量避免在构造函数中调用ViewHandler.ViewMapper.AppendToMapping,它将导致从页面的XAML根元素开始,递归遍历所有IView虚拟视图子元素,将其添加到ViewMapper中
我们用HandlerChanging监听Handler改变,当OldHandler属性不为空时,表示即将从跨平台控件中删除现有的本机控件,此时我们需要将TouchRecognizer移除,以免内存泄漏。
public class TouchContentView : ContentView
{
    private TouchRecognizer touchRecognizer;

    public event EventHandler<TouchActionEventArgs> OnTouchActionInvoked;


    public TouchContentView()
    {
        this.HandlerChanged+=TouchContentView_HandlerChanged;
        this.HandlerChanging+=TouchContentView_HandlerChanging;
    }


    private void TouchContentView_HandlerChanged(object sender, EventArgs e)
    {

        var handler = this.Handler;
        if (handler != null)
        {
#if WINDOWS
            touchRecognizer = new TouchRecognizer(handler.PlatformView as Microsoft.UI.Xaml.FrameworkElement);
            touchRecognizer.OnTouchActionInvoked += TouchRecognizer_OnTouchActionInvoked;
#endif
#if ANDROID
            touchRecognizer = new TouchRecognizer(handler.PlatformView as Android.Views.View);
            touchRecognizer.OnTouchActionInvoked += TouchRecognizer_OnTouchActionInvoked;

#endif

#if IOS|| MACCATALYST
            touchRecognizer = new TouchRecognizer(handler.PlatformView as UIKit.UIView);
            touchRecognizer.OnTouchActionInvoked += TouchRecognizer_OnTouchActionInvoked;

            (handler.PlatformView as UIKit.UIView).UserInteractionEnabled = true;
            (handler.PlatformView as UIKit.UIView).AddGestureRecognizer(touchRecognizer);
#endif
        }

    }

    private void TouchContentView_HandlerChanging(object sender, HandlerChangingEventArgs e)
    {


        if (e.OldHandler != null)
        {
            var handler = e.OldHandler;

#if WINDOWS
            touchRecognizer.OnTouchActionInvoked -= TouchRecognizer_OnTouchActionInvoked;
#endif
#if ANDROID
            touchRecognizer.OnTouchActionInvoked -= TouchRecognizer_OnTouchActionInvoked;

#endif

#if IOS|| MACCATALYST
            touchRecognizer.OnTouchActionInvoked -= TouchRecognizer_OnTouchActionInvoked;

            (handler.PlatformView as UIKit.UIView).UserInteractionEnabled = false;
            (handler.PlatformView as UIKit.UIView).RemoveGestureRecognizer(touchRecognizer);
#endif


        }
    }

    private void TouchRecognizer_OnTouchActionInvoked(object sender, TouchActionEventArgs e)
    {
        OnTouchActionInvoked?.Invoke(this, e);
        Debug.WriteLine(e.Type + " is Invoked, position:" + e.Location);
    }
}
在Xaml中引用TouchContentView所在的命名空间
xmlns:controls="clr-namespace:Lession2.TouchRecognizer;assembly=Lession2"
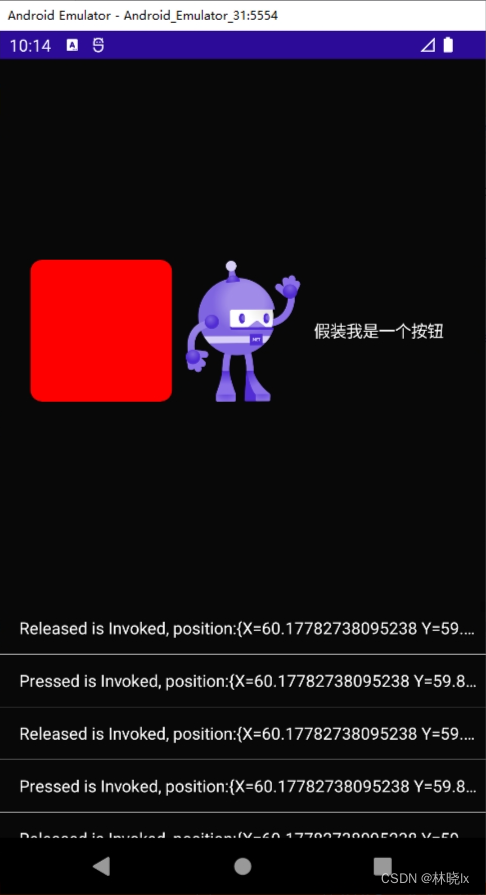
将你的控件放在TouchContentView中,然后监听TouchContentView的OnTouchActionInvoked事件即可。
注意:对于Button这样的点击控件,点击事件不会向下传递,因此如果包裹了Button,那么OnTouchActionInvoked事件将不会被触发。
<controls:TouchContentView Style="{StaticResource HoldDownButtonStyle}"

                            Grid.Column="0"
                            OnTouchActionInvoked="TouchContentView_OnTouchActionInvoked">
    <BoxView CornerRadius="10" Color="Red"></BoxView>

</controls:TouchContentView>


<controls:TouchContentView Style="{StaticResource HoldDownButtonStyle}"

                            Grid.Column="1"
                            OnTouchActionInvoked="TouchContentView_OnTouchActionInvoked">
    <Image Source="./dotnet_bot.svg"></Image>

</controls:TouchContentView>


<controls:TouchContentView Style="{StaticResource HoldDownButtonStyle}"

                            Grid.Column="2"
                            OnTouchActionInvoked="TouchContentView_OnTouchActionInvoked">
    <Label Text="假装我是一个按钮"></Label>

</controls:TouchContentView>
在控件中将应用手势监听。
Recommend
-
10
Android 自定义控件 优雅实现元素间的分割线 (支持3.0以下) 转...
-
9
Android 自定义控件 轻松实现360软件详情页_Hongyang-CSDN博客_android 自定义控件 转载请标明出处: http...
-
2
Android自定义控件:下拉菜单的实现与优化 – Android开发中文站你的位置:Android开发中文站 > Android开发 >
-
8
这篇将介绍如何写一个简单的基于Vue+Element的文件上传控件。 控件将具有 1. 上传队列的列表,显示文件名称,大小等信息,可以显示上传进度实时刷新 2. 取消上传
-
3
Android 心率动画自定义控件实现 2023年2月9日 | 最近更新于 下午2:36 Android心率曲线平移动画自定义控件实现详解,并附上GitHub完整实现仓库资源。 项目上需要实现一个心率曲线波动的自定...
-
4
.NET MAUI 跨平台框架包含了识别平移手势的功能,在之前的博文
-
3
.NET MAUI 实现界面多态有很多种方式,今天主要来说说在日常开发中常见的需求该如何应对。需求一:在不同设备上使用不同 UI 外观 .NET MAUI是一个跨平台的UI框架,可在一个项目中开发Android、...
-
1
今天来说说怎样在.NET MAUI 中制作一个灵动的类标签页控件,这类控件常用于页面中多个子页面的导航功能。比如在手机版的Chrome中...
-
4
[MAUI]写一个跨平台富文本编辑器 富文本编辑...
-
7
[MAUI]弧形进度条与弧形滑块的交互实现 进度...
About Joyk
Aggregate valuable and interesting links.
Joyk means Joy of geeK