

Unreal Engine 5 UI Tutorial [FREE]
source link: https://www.kodeco.com/38238361-unreal-engine-5-ui-tutorial
Go to the source link to view the article. You can view the picture content, updated content and better typesetting reading experience. If the link is broken, please click the button below to view the snapshot at that time.

Unreal Engine 5 UI Tutorial
In this Unreal Engine 5 UI tutorial, you’ll learn how to create, display and update a HUD.
By Ricardo Santos.
During gameplay, it’s common to need to communicate with the player either by displaying information such as health, score or ammo through text or graphics or by allowing players to make selections or communicate preferences through buttons or lists. This is the User Interface (UI) of the game.
In Unreal Engine 5, you can use Unreal Motion Graphics (UMG) to create User Interfaces. UMG allows you to construct a UI easily by dragging and dropping UI elements such as buttons and text labels, creating both Screen Space UI, which displays on top of the game view or a World Space UI, which appears as an in-game element for weapons or giving information about enemies, for instance.
In this tutorial, you’ll learn how to:
- Create a heads-up display (HUD) that displays a counter and a timer.
- Display the HUD.
- Update the counter and timer to display variable values.
This tutorial is aimed at a beginner level but assumes some familiarity with the Unreal Editor. In case you need some refreshing, please refer to the following:
The above tutorials show the basis of the Unreal Engine Editor, how to create new Blueprints, how to work with blueprint nodes, variables and functions. If you feel at a loss at any time, please refer to them before going forward with this tutorial.
Getting Started
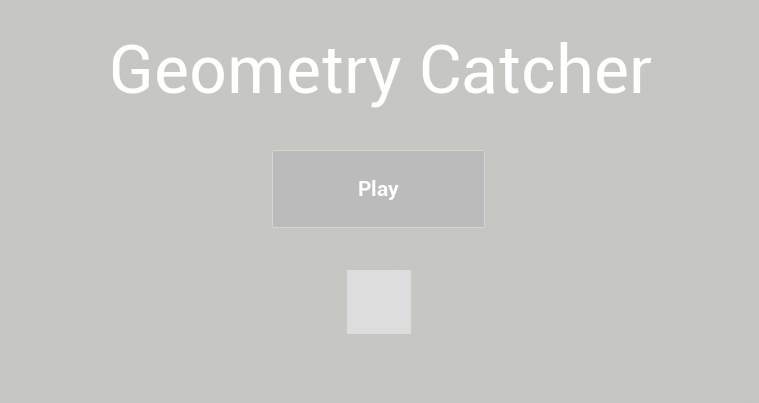
Download the starter project by clicking the Download Materials link at either the top or bottom of this tutorial and unzip it. To open the project, go to the starter project folder and open GeometryCatcher.uproject.
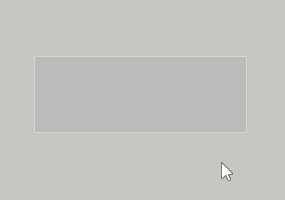
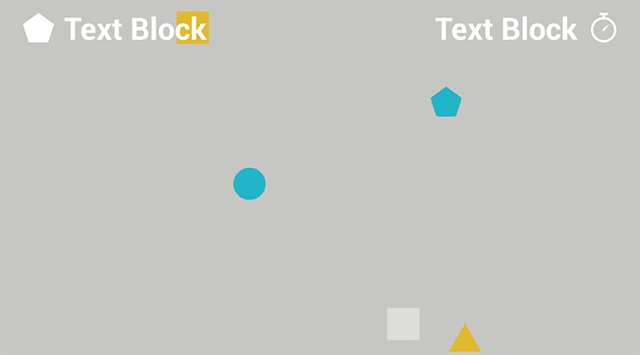
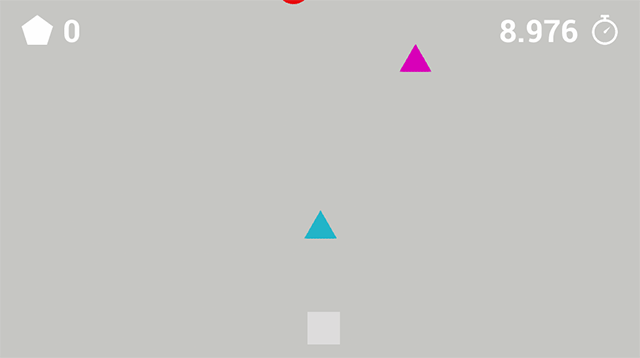
Press Play to control a white cube and try to catch the falling shapes. You can move the catcher horizontally by moving your mouse. After ten seconds, the shapes will stop spawning.

The first thing you’ll do is create a HUD that displays two things:
- A counter that tracks how many shapes the player has collected.
- A timer that displays how many seconds remain until the shapes stop spawning.
You need to use widgets to create all of these.
Using Widgets
A widget is a UI element that provides visual functionality to the UI. For example, a Button widget provides an object that the user can see and click.
The widget itself doesn’t have to be visible. For example, a Grid Panel widget divides its space evenly between its contents. The user can’t see the Grid Panel but can see its effect.

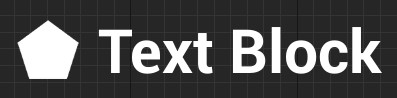
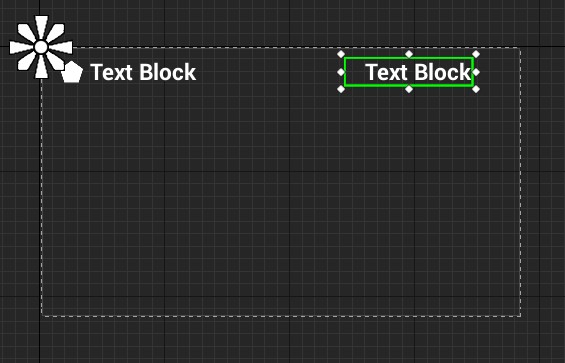
Widgets can also contain other widgets. Here’s an example of a custom widget that contains a Text widget and a Text Box widget:

You can even construct a widget to be an entire interface, such as a menu screen. Below is an example of a widget constructed to look like a title screen. All the UI elements are also widgets and are contained within the title screen widget.
Now that you know what widgets are, it’s time to create one for the HUD.
Creating a Widget
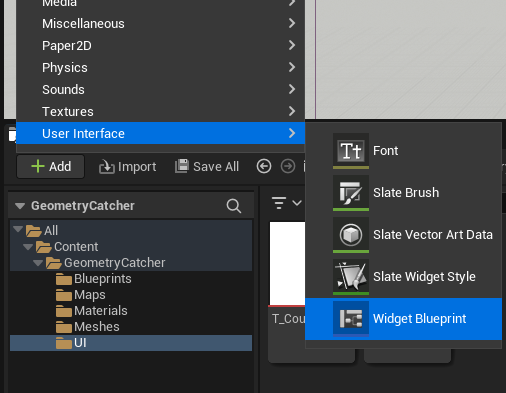
Go to the Content Browser and navigate to the UI folder. Click Add New and select User Interface\Widget Blueprint.
After selecting this option, Unreal will display a window asking you what widget class you’d like to create. Click the button User Widgets and rename the new asset to WBP_HUD.
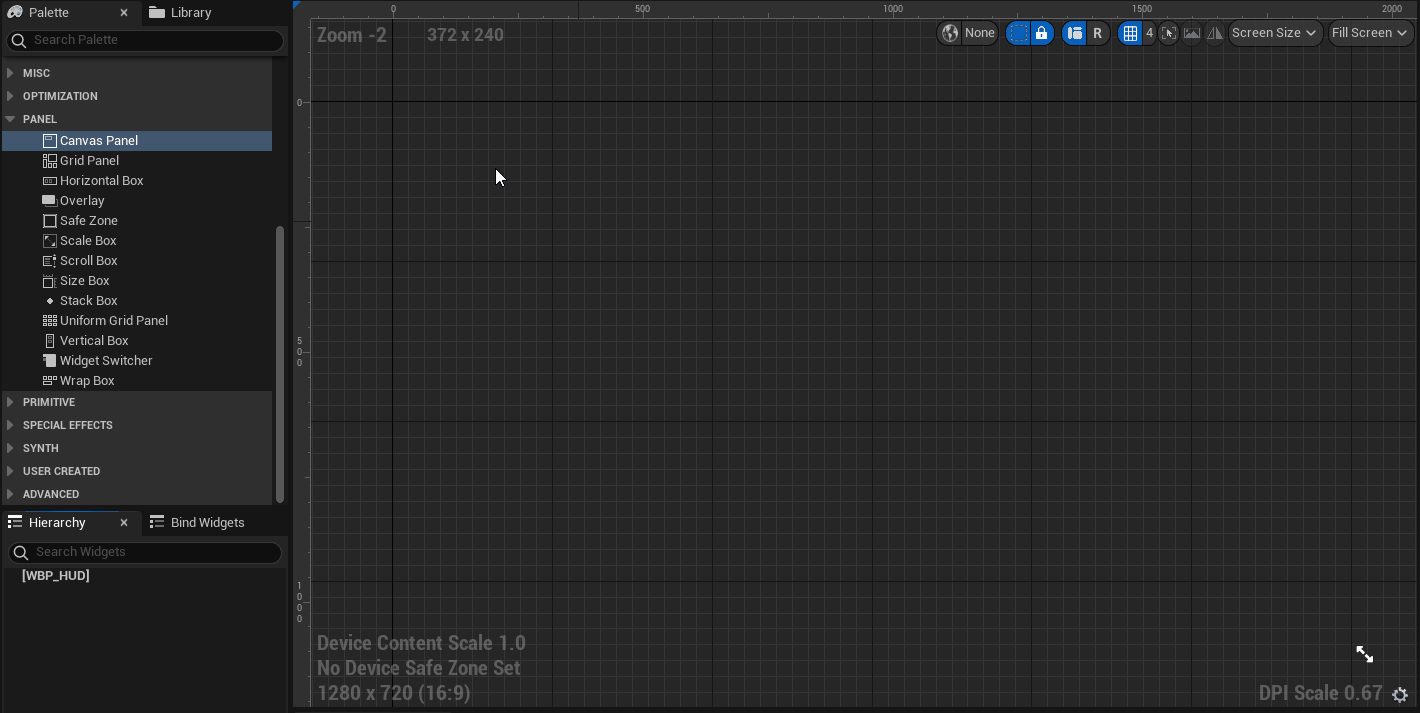
Double-click WBP_HUD to open it in the UMG UI Designer.
The UMG UI Designer
Seven main elements compose the UMG UI Designer:
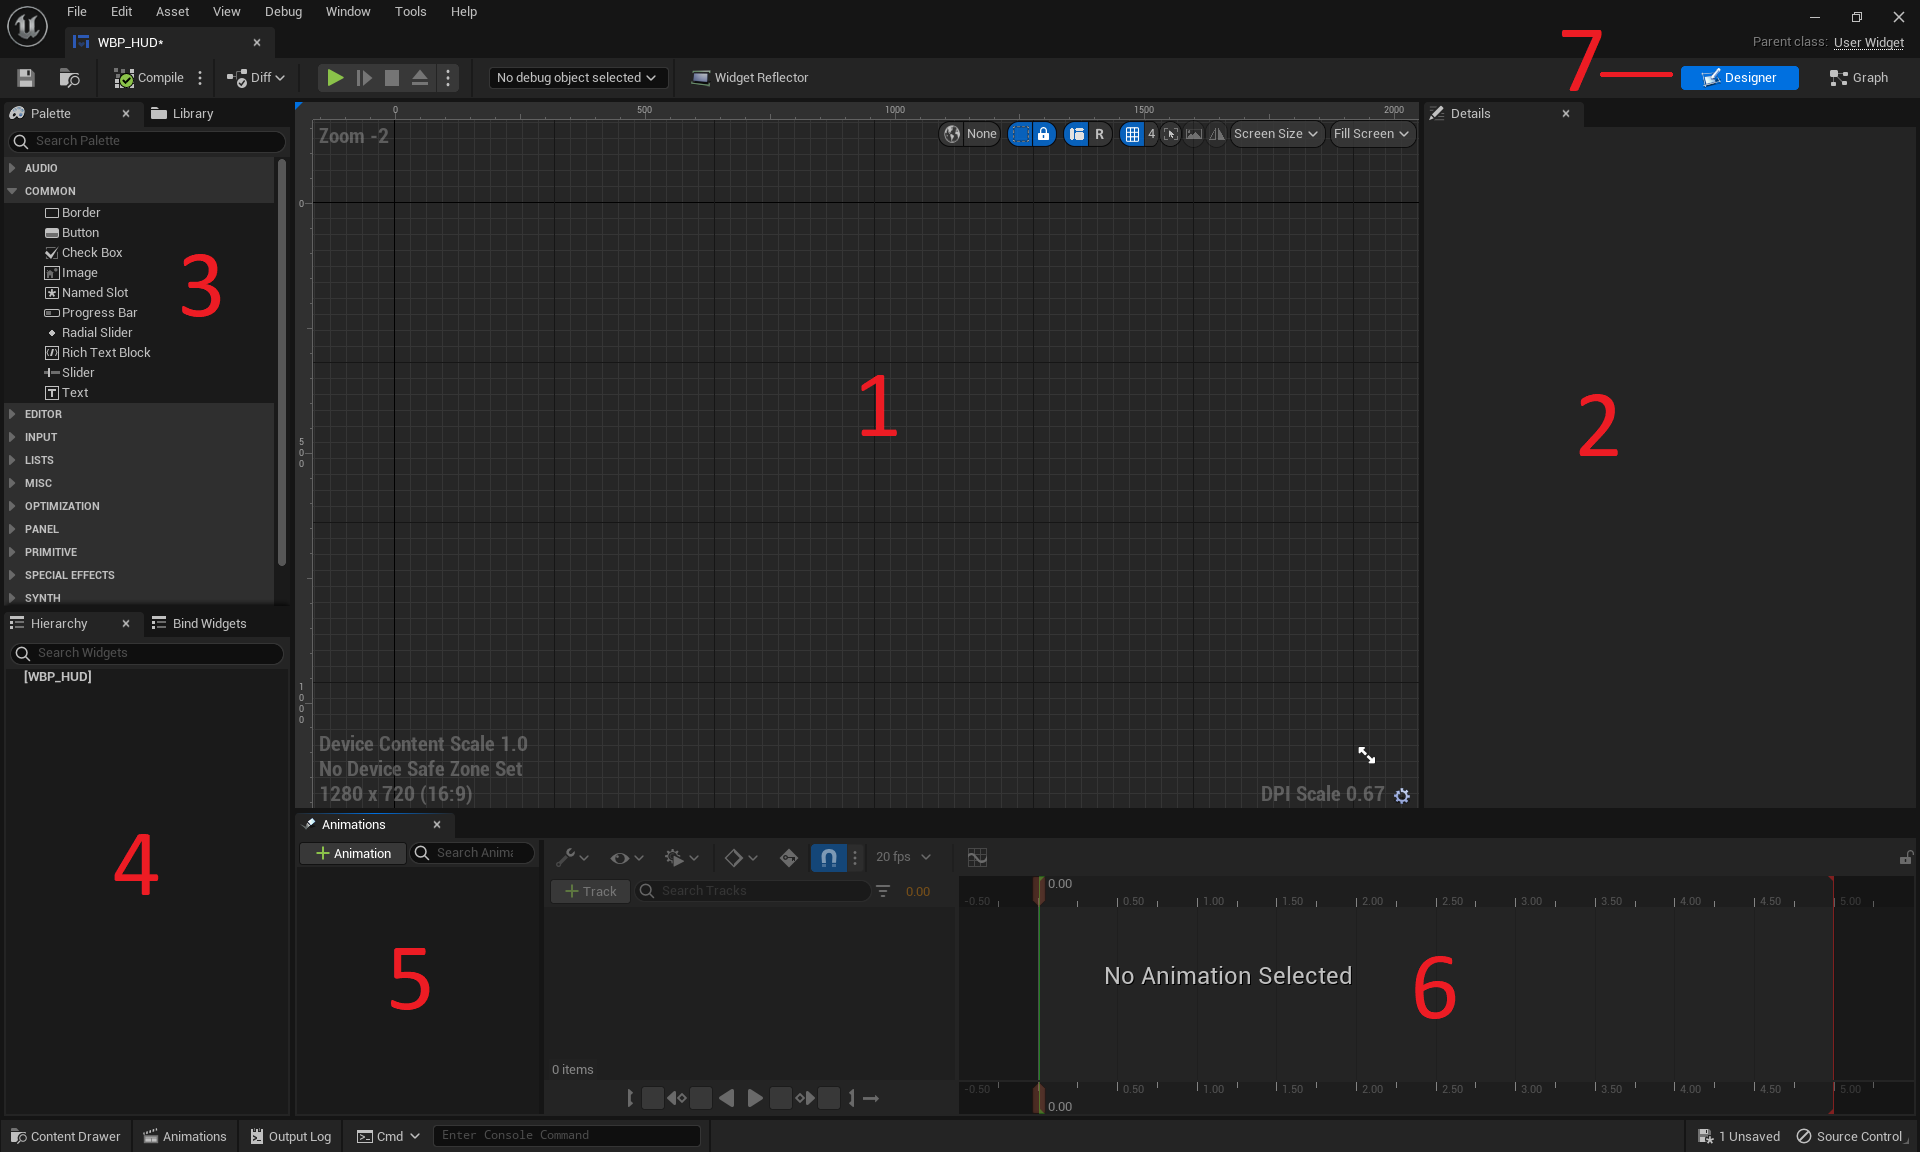
- Designer: This area contains the visual representation of your widget. Pan by holding right-click and moving your mouse. Zoom by scrolling your mouse wheel.
- Details: Any widget you select will have its properties displayed here.
- Palette: A list of all the widgets you can use. Any user-created widgets will also appear here.
- Hierarchy: A list of all the widgets you are currently using.
- Animations: Widgets can have certain properties animated, such as position and size. This panel lists all your animations.
- Timeline: When you select an animation, this panel will display the animated properties and keyframes.
- Editor Mode: Here, you can switch between the Designer and Graph modes. The Graph mode is almost identical to a Blueprint’s Event Graph.
Creating a Text Widget
Text widgets are perfect for displaying numerical information, such as the counter and timer.
As of UE5, the UMG editor does not provide a default container for acting as the root of the UI, so you need a container to fill this role. If you try to insert a Text Widget without a container, the Text Widget will become the root, and the behavior won’t be as expected.
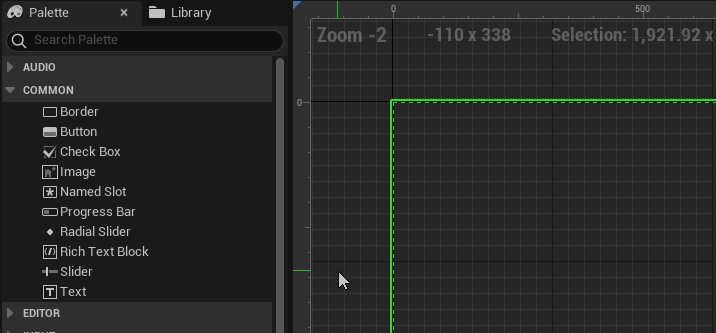
Go to the Palette panel, search for the Canvas Panel widget, and add it to the Designer panel.
Now, go to the Palette panel and search for the Text widget. Add the widget by holding left-click< and dragging it into the Canvas Panel you placed previously.
Don’t worry about the text content for now, you’ll replace it later.
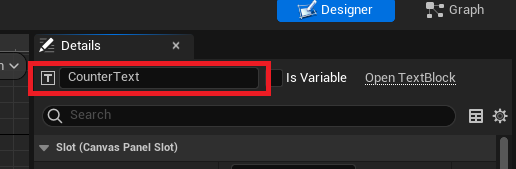
Rename the widget to CounterText. You can do this by selecting the Text widget and going to the Details panel. Type in CounterText into the text box located at the top.
You can move widgets by left-clicking and dragging the widget in the Designer.
You can also resize widgets by left-clicking and dragging the handles. Resizing allows you to set the bounds for the widget. Unreal won’t render anything outside the bounds.

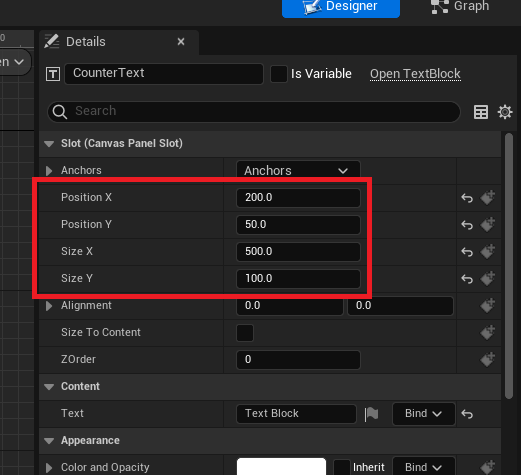
Alternatively, you can set the position and size by modifying the values in the Details panel. Set the following properties and values for CounterText:
- Position X: 200
- Position Y: 50
- Size X: 500
- Size Y: 100
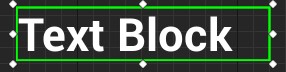
Currently, the text only takes up a small portion of the box.

You can increase the font size by going to the Details panel and navigating to the Appearance section. There is a text box to set the font size at the right of the Font property.
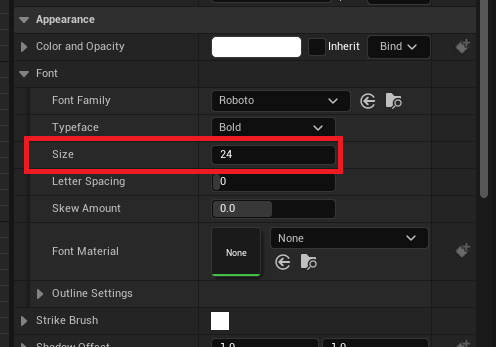
Set the font size to 68.
Let’s make the counter look nicer by adding an icon next to it.
Creating an Image Widget
Image widgets are an easy way to display graphics in your UI, such as icons.
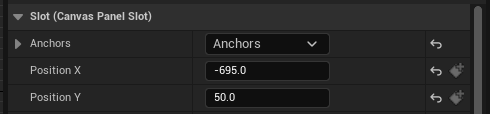
Add an Image widget by dragging it from the Palette window and name it CounterIcon. Set Position X to 75 and Position Y to 50. This will place it next to CounterText.
To set an image, go to the Details panel and the Appearance section. Expand the Brush property and then click the drop-down for Image. Select T_Counter. Next set the Image Size to 100 by 100.

The image will look stretched because the widget has a different size to the image.

Instead of resizing the widget, you can use the Size To Content option. This option will automatically resize a widget to accommodate its contents.
While still in the Details panel, go to the Slot (Canvas Panel Slot) section. Check the checkbox next to Size To Content.
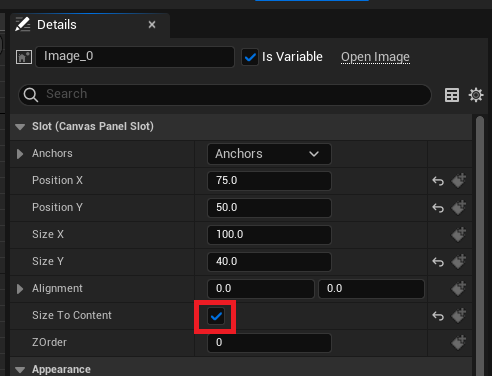
The widget will resize itself to fit the image.
When playing the game across different screen sizes, the UI needs to move its widgets accordingly. To maintain the layout of your UI, you can use anchors.
Using Anchors
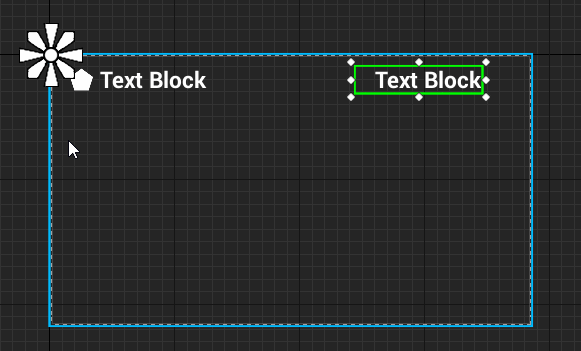
An anchor point defines where a widget’s position is relative to. By default, widgets have their anchor set to the top-left of their parent. So, when you’re setting a widget’s position, you’re actually setting its position relative to that anchor point.
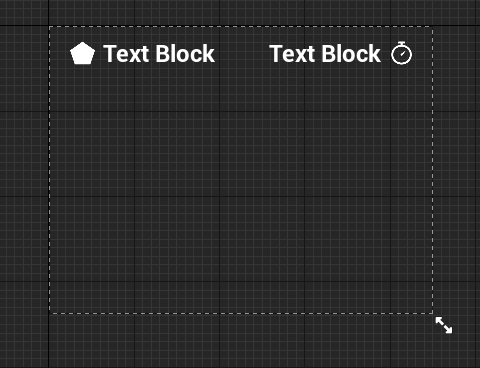
In the example below, each image is anchored to a single point, the nearest corner.
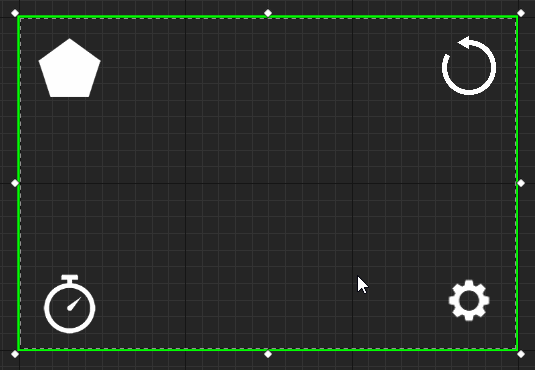
Notice how each image maintains its position relative to its anchor. Using anchors can ensure your UI has the same layout across different screen sizes.
You can also use anchors to resize widgets automatically. When anchoring to two or more points, the widget will resize itself to maintain its relative size.
In the example below, the bar is anchored to the top-left and top-right corners.
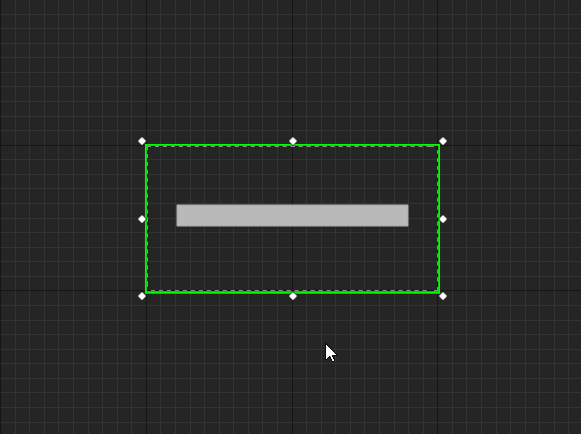
Vertically, the bar moves but does not resize. This is because it only has one anchor on the Y-axis, the top. However, the bar resizes horizontally because it has two anchor points on the X-axis.
The Anchor Medallion represents the location of your anchor. It will appear whenever you have a widget selected.

The anchors for CounterText and CounterIcon are already in the correct position, so you don’t need to set them.
Next, you’ll create another Text and Image widget for the timer. However, this time you’ll place them on the right-hand side.
Creating the Timer
First, create a Text widget and name it TimerText. Set the following properties:
- Position X: 1225
- Position Y: 50
- Size X: 500
- Size Y: 100
- Font Size: 68
- Justification: Align Text Right; this will align the text to the right side of the widget.
Next, you’ll set the anchor to the top-right. You can do this by left-clicking and dragging the circle on the Anchor Medallion. Move the Anchor Medallion to the top-right corner.
Notice how the position has updated to be relative to the anchor.
Create an Image widget and name it TimerIcon. Set the following properties:
- Position X: 1750
- Position Y: 50
- Size To Content: Checked
- Brush\Image: T_Timer
- Brush\Image Size: 100 | 100
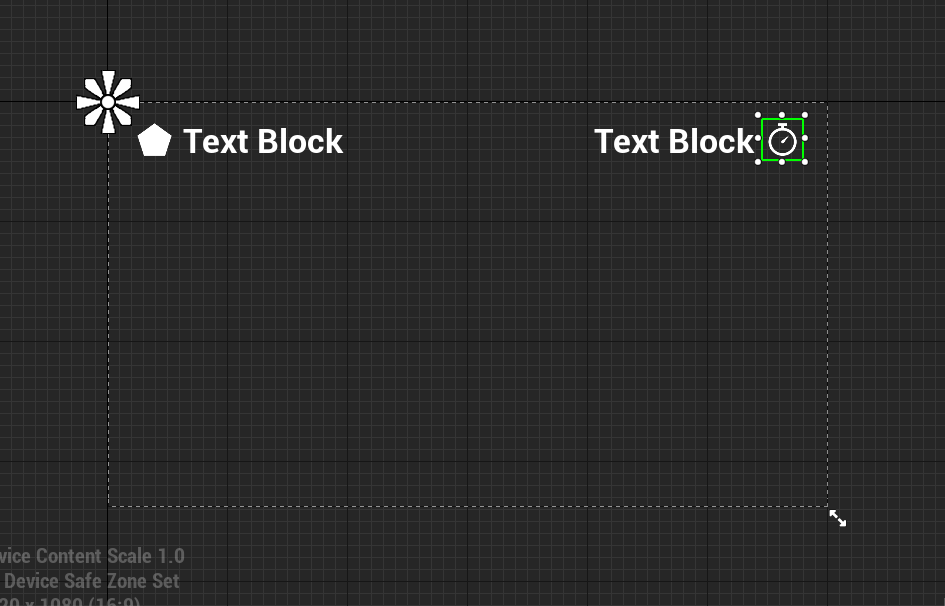
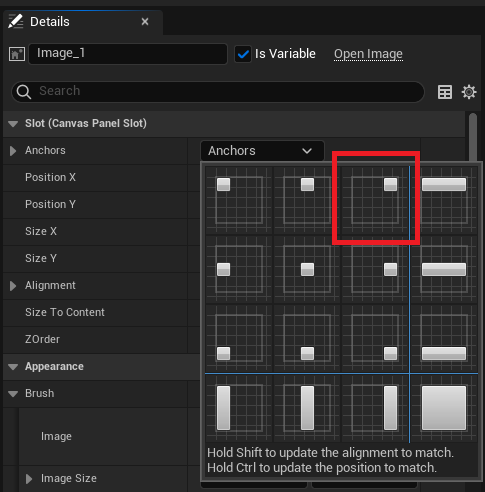
Instead of setting the anchor using the Anchor Medallion, you can use presets. Go to the Details panel and click the drop-down next to Anchors to display the presets. Select the third preset, the one with the square at the top-right.
The layout for the UI is now complete. You can see the anchors working by emulating different screen sizes. Go to the Designer panel and click the Screen Size drop-down.

Selecting an option will change the size of WBP_HUD to match the option. Below is how the HUD would look on an iPad Mini 5. Notice how the widgets are closer together.
In the next section, you’ll learn how to display the WBP_HUD widget.
Displaying the HUD
Click Compile and return to the main editor. Navigate to the Blueprints folder and double-click BP_GameManager to open it.
The HUD should be visible as soon as the game starts. You can use the Event BeginPlay node to do this.
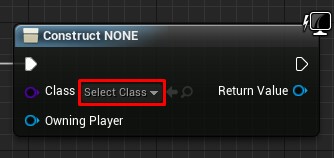
Find the Event BeginPlay node, and then add a Create Widget node to the end of the chain. This node will create an instance of the specified widget.

Click the drop-down next to Class and select WBP_HUD.
You need to use an Add to Viewport node to display the HUD. Left-click and drag the Create Widget node’s Return Value pin. Release left-click on an empty space to bring up the context menu. Add an Add to Viewport node.

Let’s go over the order of events:
- Once Unreal spawns BP_GameManager, the Restart and SetUpCamera functions will execute. These functions set up a few variables and the camera. If you don’t know what a function is, don’t worry, the tutorial will cover them soon.
- The Create Widget node creates an instance of WBP_HUD.
- The Add to Viewport node displays WBP_HUD.
Click Compile and then return to the main editor. Press Play to play the game with your new HUD.
You’ll need the variables holding that information to display the values for the counter and timer. These variables are found in BP_GameManager.

To use these variables, you need a way to access BP_GameManager from WBP_HUD. You can do this by storing a reference to BP_GameManager in a variable.
Storing References
Storing a reference is useful because you can easily access a specific instance.
Imagine you had a single box with a ball in it. If you wanted to find and examine the ball, it’d be easy because there’s only one box.
Now, imagine you had one hundred boxes, but only one contains a ball. You would have to check each box until you found the box with the ball.

Whenever you want to examine the ball, you would you have to perform this operation. This would quickly lead to performance issues.
Using references, you can keep track of the box with the ball. This way, you don’t have to check every box.
Creating the Variable
Open WBP_HUD and switch to Graph mode by going to the Editor Mode and selecting Graph.

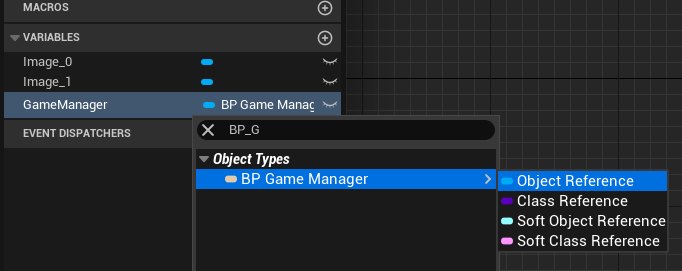
You’ll notice that the Palette panel was replaced by the My Blueprint tab. Navigate to it and create a new variable called GameManager.
Go to the Details panel and click the drop-down next to Variable Type. Search for BP_GameManager and select BP Game Manager\Object Reference.
Setting the Reference
Click Compile and then open BP_GameManager.
Locate the Create Widget node and then left-click and drag the Return Value pin. Release left-click on an empty space and then select Set Game Manager from the menu.
Afterward, link the Add to Viewport node to the Set Game Manager node.
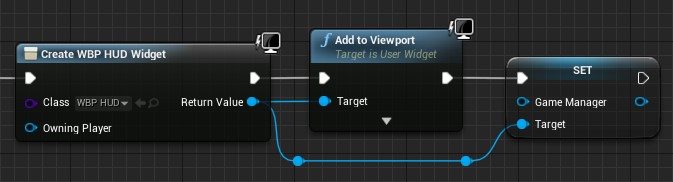
Next, create a Self node and connect it to the left pin of the Set Game Manager node. The Self node will be listed as Get a reference to self.
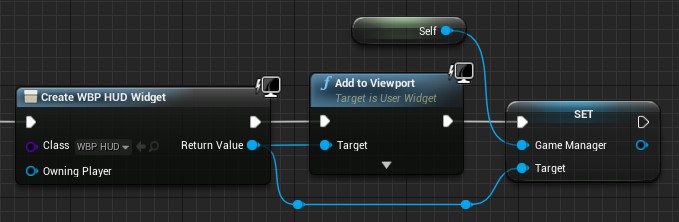
Now, when WBP_HUD is created, it will have a reference to BP_GameManager.
In the next section, you’ll learn how to update a widget with the help of functions.
Functions
In Blueprints, functions are graphs similar to the Event Graph. Unlike the Event Graph, you can call a function using a node. But why would you want to do this? Read on to find out!

Organizing
One of the reasons to use functions is organization. By using functions, you can collapse multiple nodes into a single node.
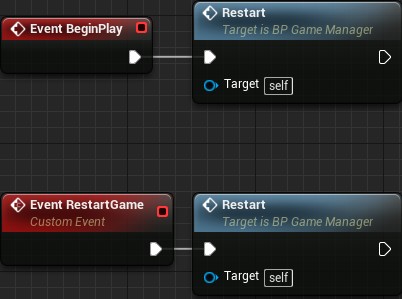
Take a look at the Event BeginPlay section of BP_GameManager. There are two functions: Restart and SetUpCamera.

Here’s what that section would look like without functions:

As you can see, it looks a lot cleaner using functions.
Reusability
Another reason to use functions is reusability. For example, if you wanted to reset the counter and timer, you could easily do so using the Restart function.
This saves you the work of having to recreate the nodes every time you want to reset those variables.
Now that you know what functions are, you’ll use one to update the CounterText widget.
Updating a Widget
By default, Text widgets are not accessible from Blueprints. This means you won’t be able to set their Text property. Luckily, this is an easy fix.
Click Compile and then open WBP_HUD. Switch to Designer mode.
Select CounterText and then go to the Details panel. Check the Is Variable checkbox located at the very top.
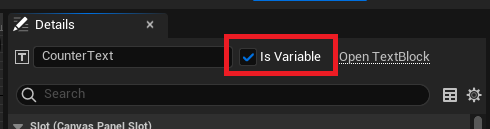
Now, you’ll be able to update CounterText. The next step is to create a function to update the text.
Creating the Update Function
Switch back to Graph mode and then go to the My Blueprint tab. Click the + sign to the right of the Functions section.
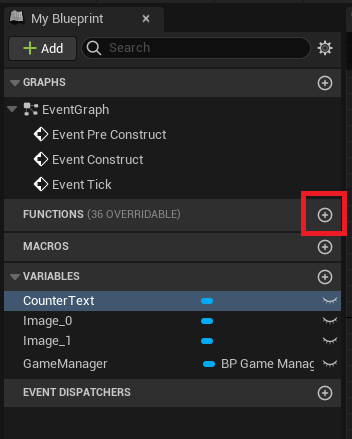
This will create a new function and take you to its graph. Rename the function to UpdateCounterText.
By default, the graph will contain an Entry node. When the function executes, this is where it will start.

To make CounterText display the ShapesCollected variable, you’ll need to link them.
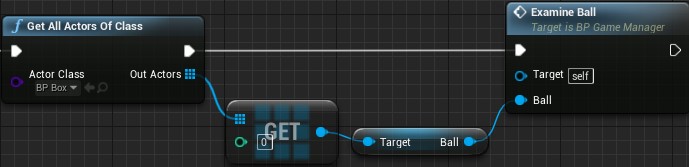
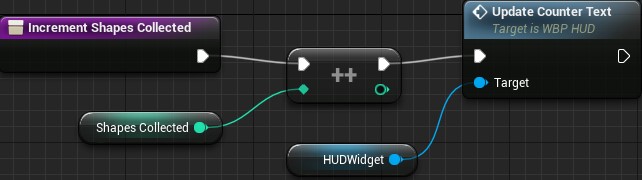
Drag the GameManager variable into the graph. Left-click and drag its pin and then release left-click on an empty space. Select Get Shapes Collected from the menu.
![]()
To set the text, you’ll use the SetText (Text) node. Drag the CounterText variable into the graph. Left-click and drag its pin and then release left-click on an empty space. From the menu, add a SetText (Text) node.

The SetText (Text) only accepts an input of type Text. However, the ShapesCollected variable is of type Integer. Luckily, Unreal will do the conversion automatically when you try to plug an Integer into a Text input.
Connect the ShapesCollected variable to the In Text pin for the Set Text (Text) node. Unreal will automatically create a ToText (int) node for you.
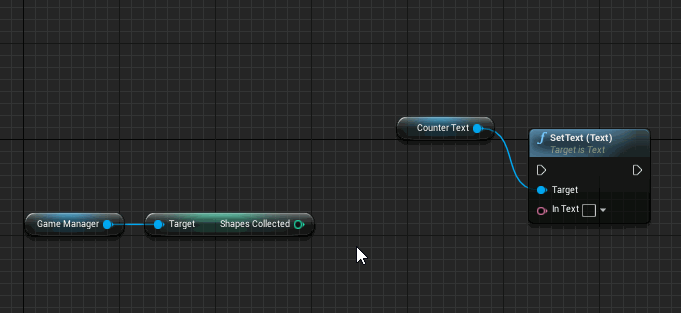
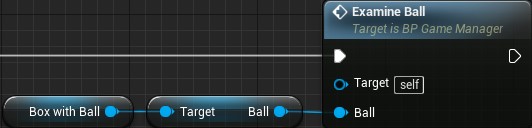
To complete the function, connect the Entry node to the Set Text (Text) node.

Order of events:
- When you call UpdateCounterText, the function will get the ShapesCollected variable from BP_GameManager.
- The ToText (int) node converts the value of ShapesCollected to a Text type.
- SetText (Text) will set the text for CounterText to the value from ToText (int).
Next, you have to call UpdateCounterText whenever the player collects a shape.
Calling the Update Function
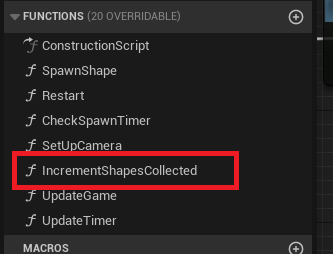
The best place to call UpdateCounterText is right after the game increments ShapesCollected. I’ve created a function called IncrementShapesCollected that increments the counter for you. The shapes call this function whenever they overlap the player.
Click Compile and then go back to BP_GameManager.
Before you can call UpdateCounterText, you need a reference to WBP_HUD. See if you can store a reference by yourself first. If you get stuck, read on!
- Locate the section where you created and displayed the WBP_HUD.
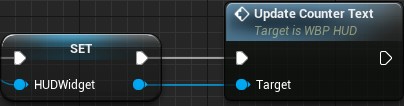
- Left-click and drag the Return Value pin of the Create Widget node.
- Release left-click on an empty space and then select Promote to variable from the menu.
- Add the new node to the end of the node chain.
Once you have created the variable, rename it to HUDWidget.

Next, drag-click the right pin of the Set HUDWidget node and release on an empty space. Add an UpdateCounterText node. This will make sure CounterText displays the value of ShapesCollected when the game starts.
Afterward, navigate to the My Blueprint panel and go to the Functions section. Double-click on IncrementShapesCollected to open its graph.
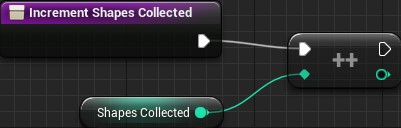
Drag the HUDWidget variable into the graph. Left-click and drag its pin and release on an empty space. Add an UpdateCounterText node and connect it like so:
Now, whenever IncrementShapesCollected executes, it will increment ShapesCollected and then call UpdateCounterText. This function will then update CounterText to the value of ShapesCollected.
Click Compile and then close BP_GameManager. Press Play and collect some shapes to see the CounterText widget update.
In the next section, you’ll update the TimerText widget using a different method called binding.
Bindings
Bindings allow you to update certain widget properties automatically. The property must have the Bind drop-down to be bindable.

You can bind properties to a function or variable contained within the widget. The binding will constantly obtain a value from the function or variable. It will then set the bound property to that value.
You might be wondering why you shouldn’t just use bindings all the time. Bindings are inefficient because they are constantly updating. This means the game wastes time updating the property even if there isn’t any new information. Compare it to the previous method, where the widget only updates when needed.
That said, bindings are great for frequently changing elements, such as the timer. Let’s go ahead and create a binding for TimerText.
Creating a Binding
Open WBP_HUD and switch to Designer mode.
Select TimerText and then go to the Content section in the Details panel. You’ll see that the Text property is bindable. Click the Bind drop-down and select Create Binding.
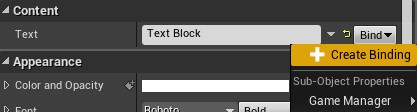
This will create a new function for you and take you to its graph. Rename the function to UpdateTimerText.
The function will have a Return node with a Return Value pin of type Text. TimerText will display whatever text you plug into this pin.

Drag GameManager into the graph and then get the TimeRemaining variable from it.
Connect the TimeRemaining variable to the Return Value of the Return node. Like last time, Unreal will automatically add a conversion node for you.

Summary:
- The binding will constantly call the UpdateTimerText function.
- The function will get the TimeRemaining variable from BP_GameManager.
- The ToText (float) node will convert the value from TimeRemaining to a Text type.
- The converted value is then outputted to the Return node.
Well done! The HUD is finally complete.
Click Compile and then close WBP_HUD. Press Play to see the final results, it looks great.
Where to Go From Here?
You can download the completed project files by clicking Download Materials at the top or bottom of the tutorial.
Now that you know the basics of UMG, building more complex interfaces is relatively easy. Try to experiment with other widgets and try out the panel widgets. Feeling confident? Why not try building another Widget Blueprint to act as a New Game menu!
For a deeper understanding of the UMG and its resources, you can try the Unreal Engine 5 UMG courses. Here you will find information and complete courses for creating interfaces for your games.

Recommend
About Joyk
Aggregate valuable and interesting links.
Joyk means Joy of geeK