
7

富文本编辑器 VUE-QUILL-EDITOR 使用教程 (最全) - 李云蹊
source link: https://www.cnblogs.com/liyunxi/p/17396003.html
Go to the source link to view the article. You can view the picture content, updated content and better typesetting reading experience. If the link is broken, please click the button below to view the snapshot at that time.

VUE-QUILL-EDITOR 基于 QUILL、适用于 VUE 的富文本编辑器,支持服务端渲染和单页应用,非常高效简洁。
一.基础用法
1、NPM 导入 VUE-QUILL-EDITOR
npm install vue-quill-editor --save2、引入 VUE-QUILL-EDITOR
在全局中引入
import Vue from 'vue'
import VueQuillEditor from 'vue-quill-editor'

// 引入样式
import 'quill/dist/quill.core.css'
import 'quill/dist/quill.snow.css'
import 'quill/dist/quill.bubble.css'

Vue.use(VueQuillEditor, /* { 默认全局 } */)
在指定的 vue 文件中引入
// 引入样式
import 'quill/dist/quill.core.css'
import 'quill/dist/quill.snow.css'
import 'quill/dist/quill.bubble.css'

import { quillEditor } from 'vue-quill-editor'

export default {
  components: {
    quillEditor
  }
}
3、在 VUE 中使用
<template>
<quill-editor
v-model="content"
ref="myQuillEditor"
:options="editorOption"
@blur="onEditorBlur($event)"
@focus="onEditorFocus($event)"
@change="onEditorChange($event)">
</quill-editor>
</template>
<script>
export default {
data() {
return {
content: `<p>这是 vue-quill-editor 的内容!</p>`, //双向数据绑定数据
editorOption: {}, //编辑器配置项
}
},
methods: {
onEditorBlur() {}, // 失去焦点触发事件
onEditorFocus() {}, // 获得焦点触发事件
onEditorChange() {}, // 内容改变触发事件
}
}
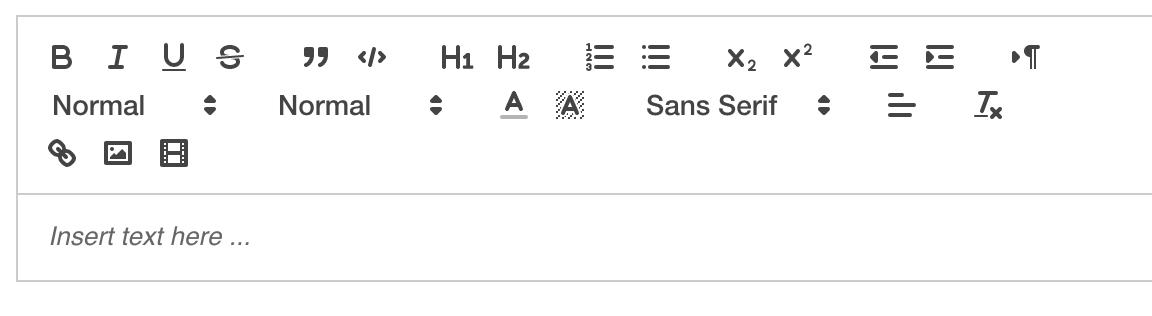
</script>到这里一个默认的富文本编辑器已经导入使用了,如下图所视!
二.升级用法
一般的,我们在使用的时候并不需要这么多功能,可以适当的对编辑器配置项进行配置。
 editorOption: {
       modules:{
         toolbar: [
             ['bold', 'italic', 'underline', 'strike'], //加粗,斜体,下划线,删除线
             ['blockquote', 'code-block'], //引用,代码块
             [{'header': 1}, {'header': 2}], // 标题,键值对的形式;1、2表示字体大小
             [{'list': 'ordered'}, {'list': 'bullet'}], //列表
             [{'script': 'sub'}, {'script': 'super'}], // 上下标
             [{'indent': '-1'}, {'indent': '+1'}], // 缩进
             [{'direction': 'rtl'}], // 文本方向
             [{'size': ['small', false, 'large', 'huge']}], // 字体大小
             [{'header': [1, 2, 3, 4, 5, 6, false]}], //几级标题
             [{'color': []}, {'background': []}], // 字体颜色,字体背景颜色
             [{'font': []}], //字体
             [{'align': []}], //对齐方式
             ['clean'], //清除字体样式
             ['image', 'video'] //上传图片、上传视频
            ]
         },
         placeholder: "输入内容..."
     }, //编辑器配置项
可以根据自己的实际需求,保留相应的工具栏。
三.图片上传
vue-quill-editor 默认的是以 base64 保存图片,会直接把图片 base64 和内容文本一起以字符串的形式提交到后端。这样小图片还行,如果要上传大图片会提示上传失败,优秀的前端打字员显然不会这样做。
- 可以先将图片上传至服务器,再将图片链接插入到富文本中显示
- 图片上传可以自定义一个组件或者使用 iview 的上传图片的组件(我在项目中使用的是自定义的组件,这里演示使用 iview 组件上传)
- 上传图片的组件需要隐藏,点击图片上传时调用 iview 的图片上传,上传成功后返回图片链接。
-
在编辑器项中配置配置项
editorOption: { modules: { toolbar: { container: toolbarOptions, // 工具栏 handlers: { 'image': function(value) { if (value) { alert('点击了上传图片') } else { this.quill.format('image', false); } } } } placeholder: "输入内容..." }, //编辑器配置项 }, -
调用 iview 的上传组件。
HTML:
<Upload
    :show-upload-list="false"
    :on-success="handleSuccess"
    :format="['jpg','jpeg','png','gif']"
    :max-size="2048"
    multiple
    action="/file/upload"
    >
</Upload>
<quill-editor
    v-model="content"
    :options="editorOption"
    ref="quillEditor">
</quill-editor>
.ivu-upload { display: none; }data () { return { content: '', editorOption: { modules: { toolbar: { container: toolbarOptions, // 工具栏 handlers: { 'image': function (value) { if (value) { // 调用iview图片上传 document.querySelector('.ivu-upload .ivu-btn').click() } else { this.quill.format('image', false); } } } } } } } }, methods: { handleSuccess (res) { // 获取富文本组件实例 let quill = this.$refs.myQuillEditor.quill // 如果上传成功返回图片URL if (res) { // 获取光标所在位置 let length = quill.getSelection().index; // 插入图片,res为服务器返回的图片链接地址 quill.insertEmbed(length, 'image', res) // 调整光标到最后 quill.setSelection(length + 1) } else { // 提示信息,需引入Message Message.error('图片插入失败') } }, }这样就完成了图片上传的功能。
四.调整图片大小
1.在原本的quill-editor能正常使用的情况下,安装quill-image-drop-module和quill-image-resize-module
npm install quill-image-drop-module -S
npm install quill-image-resize-module -S
2.我是在全局注册的quill-editor,在main.js中加入以下代码
//富文本编辑器
import VueQuillEditor, { Quill } from 'vue-quill-editor';
import 'quill/dist/quill.core.css';
import 'quill/dist/quill.snow.css';
import 'quill/dist/quill.bubble.css';
import imageResize from 'quill-image-resize-module' // 调整大小组件。
import { ImageDrop } from 'quill-image-drop-module'; // 拖动加载图片组件。
Quill.register('modules/imageResize', imageResize );
Quill.register('modules/imageDrop', ImageDrop);
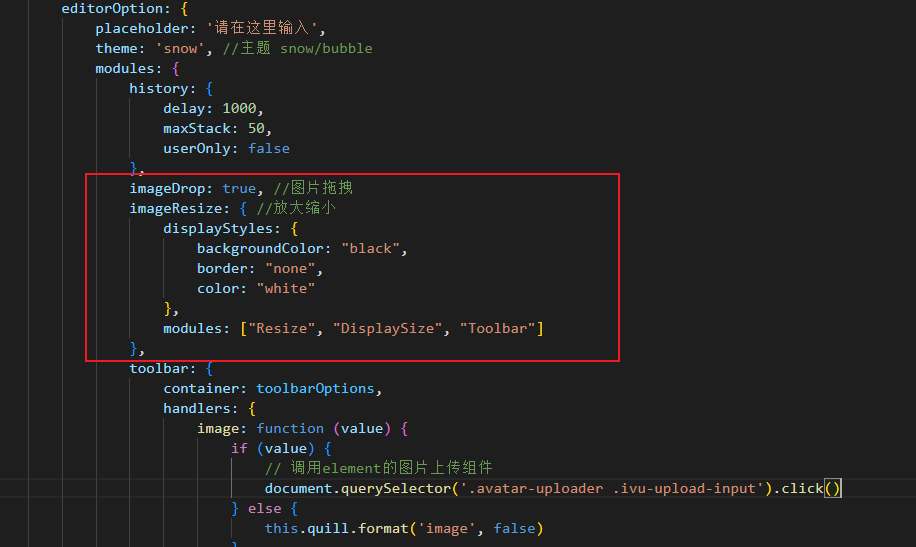
Vue.use(VueQuillEditor);3.在 editorOption 中添加配置 在modules中与 history/toolbar平级
imageDrop: true, //图片拖拽
imageResize: { //放大缩小
   displayStyles: {
      backgroundColor: "black",
      border: "none",
      color: "white"
   },
   modules: ["Resize", "DisplaySize", "Toolbar"]
},
4.在项目文件 vue.config.js 加上配置。(这一步很重要,如果不配置会报错!)
const webpack = require('webpack'); //导入 webpack 模块
//在模块中加入
configureWebpack: {
plugins: [
new webpack.ProvidePlugin({
'window.Quill': 'quill/dist/quill.js',
'Quill': 'quill/dist/quill.js'
})
],
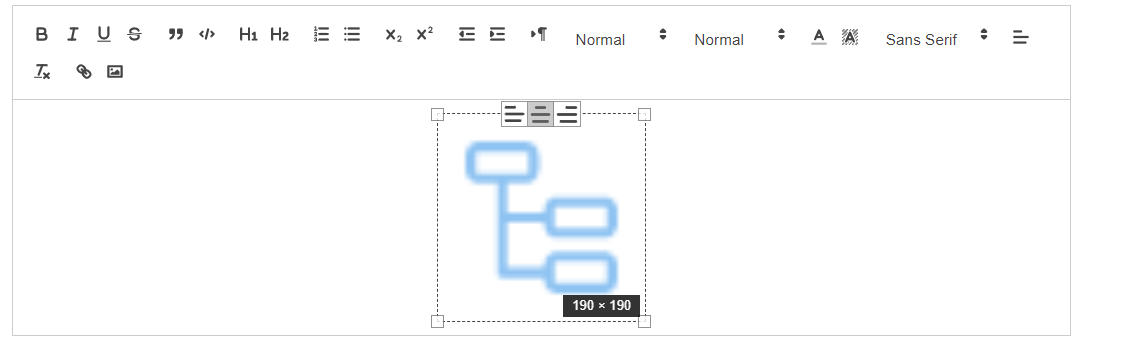
},这样就导入完成了,如下图所示
本文作者:李云蹊
本文链接:https://www.cnblogs.com/liyunxi/p/17396003.html
版权声明:本作品采用知识共享署名-非商业性使用-禁止演绎 2.5 中国大陆许可协议进行许可。
Recommend
About Joyk
Aggregate valuable and interesting links.
Joyk means Joy of geeK