

Debug iOS app in Visual Studio Code
source link: https://yrom.net/blog/2023/04/22/debug-ios-app-in-vscode/
Go to the source link to view the article. You can view the picture content, updated content and better typesetting reading experience. If the link is broken, please click the button below to view the snapshot at that time.

vscode 调试 ios app 代码
VSCode 有个插件 ios-debug 支持在iPhone模拟器和真机调试iOS app。其实它是基于另一个插件 CodeLLDB 之上做的 iOS 的支持。
配置 .vscode/tasks.json,定义一个编译iOS app 的 task build ios,供 vscode 使用:
{
    "version": "2.0.0",
    "tasks": [
        {
            "label": "build ios",
            "type": "shell",
            "command": "bazel build '//:HelloWorld'; test -f bazel-bin/HelloWorld.ipa; test -d out/HelloWorld.dir && rm -rf out/HelloWorld.dir; mkdir -p out/HelloWorld.dir; unzip bazel-bin/HelloWorld.ipa -d out/HelloWorld.dir"
        }
    ]
}
ps. 这里使用的是 bazel 构建系统,测试代码来自 rules_apple
配置 launch.json 的 configurations,添加一个 VSCode 启动项, 因为需要调试,这里配置为由CodeLLDB 插件所定义的type lldb :
{
    "version": "0.2.0",
    "configurations": [
        {
            "type": "lldb",
            "request": "launch",
            "name": "Debug ios",
            "program": "${workspaceFolder}/out/HelloWorld.dir/Payload/HelloWorld.app",
            "iosBundleId": "com.example.hello-world",
            "iosTarget": "last-selected",
            "cwd": "${workspaceFolder}",
            "internalConsoleOptions": "openOnSessionStart",
            "console": "internalConsole",
            "sourceMap": {
                "./": "${workspaceFolder}"
            },
            "preLaunchTask": "build ios"
        }
    ]
}
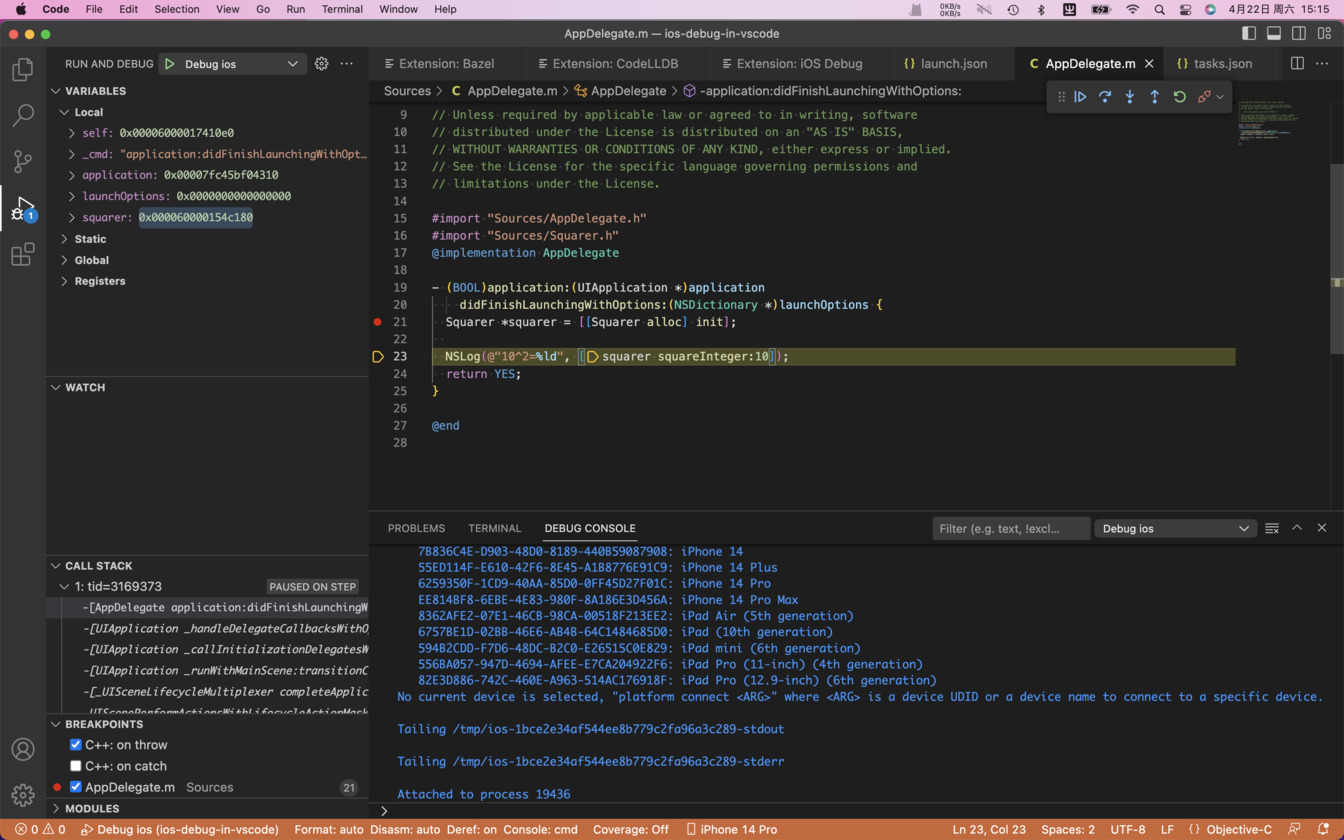
配置好之后,在源码需要的位置下断点,执行 F5 (Start debugging),等待 ios-debug插件自动安装app、启动debugserver、启动调试器… 如果一切正常将触发断点,如下图:
如果发现iOS app 能启动,lldb 调试器也正常启动,但是断点不触发,且提示 “Resolved locations: 0”,大概率是符号路径与vscode 中不匹配。
在 lldb 控制台中确认断点列表:
(lldb) br list
Current breakpoints:
1: file = 'Sources/AppDelegate.m', line = 21, exact_match = 0, locations = 0 (pending)

(lldb) script print(lldb.target.module['HelloWorld'].GetCompileUnitAtIndex(0).file.fullpath)
None
pending 代表确实没有加载到 debug 符号 >﹏<
用 dsymutil 查看 symbol table:
dsymutil -s HelloWorld.app/HelloWorld | grep 'N_OSO'
[    34] 0000066b 66 (N_OSO        ) 00     0001   0000000000000000 '/private/var/tmp/_bazel_wangyongrong/297b0f28c164f78200b31511dd41bff4/sandbox/darwin-sandbox/13/execroot/_main/bazel-out/ios-arm64-min11.0-applebin_ios-ios_arm64-dbg-ST-2967bd56a867/bin/libSources.a(AppDelegate.o)'
[    75] 00000aff 66 (N_OSO        ) 00     0001   0000000000000000 '/private/var/tmp/_bazel_wangyongrong/297b0f28c164f78200b31511dd41bff4/sandbox/darwin-sandbox/13/execroot/_main/bazel-out/ios-arm64-min11.0-applebin_ios-ios_arm64-dbg-ST-2967bd56a867/bin/libSources.a(main.o)'
[    83] 00000be9 66 (N_OSO        ) 00     0001   0000000000000000 '/private/var/tmp/_bazel_wangyongrong/297b0f28c164f78200b31511dd41bff4/sandbox/darwin-sandbox/13/execroot/_main/bazel-out/ios-arm64-min11.0-applebin_ios-ios_arm64-dbg-ST-2967bd56a867/bin/libSquarerLib.a(Squarer.o)'
破案了,debug symbol object 路径不对,这是 bazel sandbox 路径,并不是真正的路径(直接访问是找不到文件的)。
直接禁用 sandbox :
build --spawn_strategy=standalone
build --genrule_strategy=standalone
让我们重来!
这回可以了:
(lldb) br list
Current breakpoints:
1: file = 'Sources/AppDelegate.m', line = 21, exact_match = 0, locations = 1, resolved = 1, hit count = 1

1.1: where = HelloWorld`-[AppDelegate application:didFinishLaunchingWithOptions:] + 96 at AppDelegate.m:21:23, address = 0x0000000104ada638, resolved, hit count = 1
...
(lldb) script print(lldb.target.module['HelloWorld'].GetCompileUnitAtIndex(0).file.fullpath)
Sources/AppDelegate.m
如何调试 XCTest 呢?
配置 .vscode/tasks.json,定义一个编译iOS 单元测试 的 task build xctest,供 vscode 使用:
{
    "tasks": [
        {
            "label": "build SquarerTests.xctest",
            "type": "shell",
            "command": "./build-xctest.sh '//:SquarerTests'"
        }
    ]
}
编写 build-xctest.sh,将xctest bundle 输出到 out/XCTestBundle 目录下
set -e
target=$1
bazel build $target
# 获取 xctest bundle 路径
archive_path=$(bazel cquery $target --output=starlark --starlark:expr="(providers(target)['@rules_apple~2.2.0//apple:providers.bzl%AppleBundleInfo'].archive.path)")
xctest_bundle_dir=out/XCTestBundle
if [[ -d $xctest_bundle_dir ]]; then
    rm -rf $xctest_bundle_dir
fi
mkdir -p $xctest_bundle_dir
unzip $archive_path -d $xctest_bundle_dir
这个时候,不能直接用 ios-debug 插件封装的调试配置了,我们需要直接用 CodeLLDB的custom 启动模式来直接控制 lldb 执行调试命令,在launch.json的configurations中添加配置如下:
{
    "type": "lldb",
    "request": "custom",
    "name": "Debug SquarerTests.xctest",
    "cwd": "${workspaceFolder}",
    "internalConsoleOptions": "openOnSessionStart",
    "console": "internalConsole",
    "initCommands": [
        "settings set target.inherit-env false",
        "platform select ios-simulator",
    ],
    "targetCreateCommands": [
        "file /Applications/Xcode.app/Contents/Developer/Platforms/iPhoneSimulator.platform/Developer/Library/Xcode/Agents/xctest",
        "target module add ${workspaceFolder}/out/XCTestBundle/SquarerTests.xctest",
    ],
    "processCreateCommands": [
        "platform connect ${command:ios-debug.targetUDID}",
        "br set -E Objective-C",
        "run -XCTest All ${workspaceFolder}/out/XCTestBundle/SquarerTests.xctest"
    ],
    "sourceMap": {
        "./": "${workspaceFolder}"
    },
    "preLaunchTask": "build SquarerTests.xctest"
}
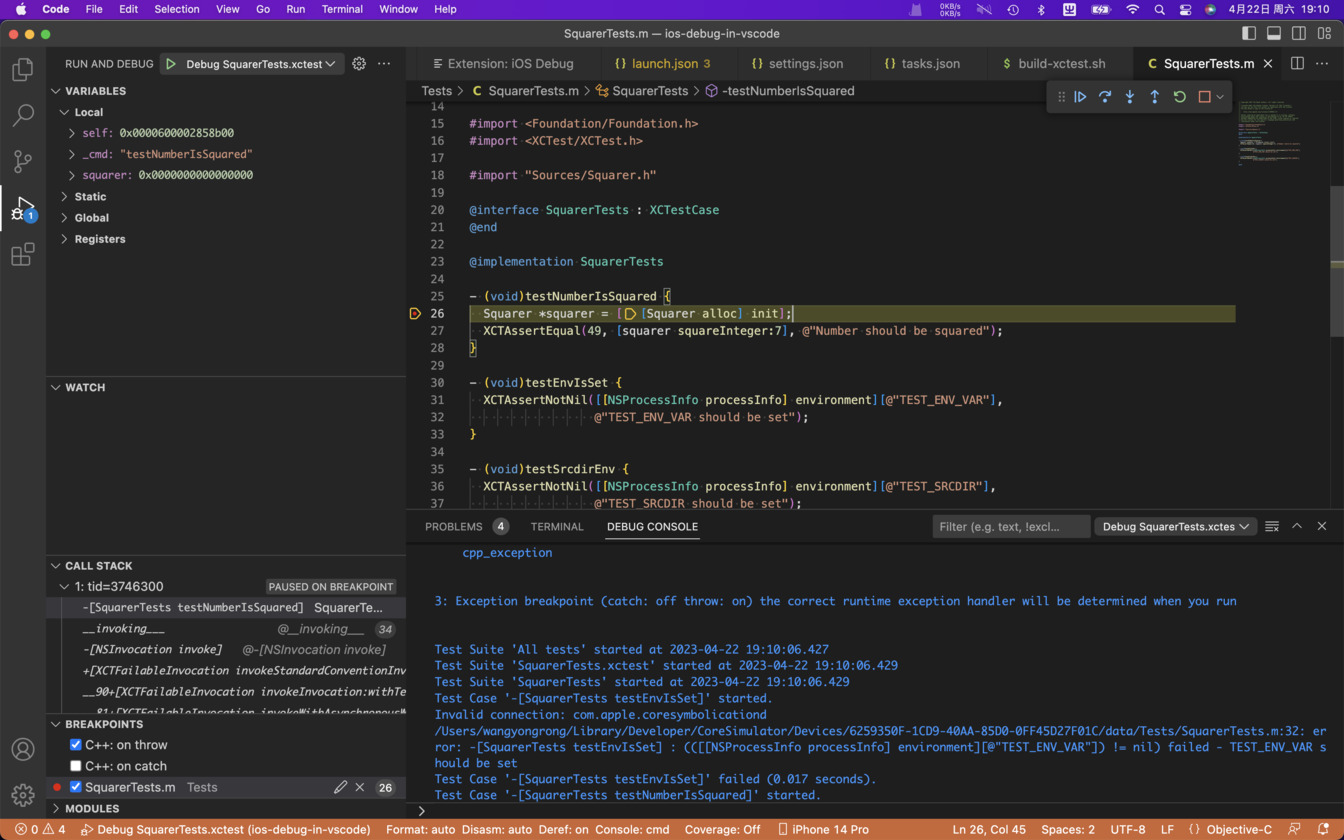
配好后,使用ios-debug 选择模拟器,在需要的位置下断点,F5 开始调试,如下图:
原理:
通过 lldb 直接调用 XCode iPhoneSimulator sdk 里的可执行程序 /Developer/Library/Xcode/Agents/xctest,间接启动编译好的 xctest产物。
platform select ios-simulator 旨在让 lldb 选择ios-simulator平台
platform connect ${command:ios-debug.targetUDID} 则是让 lldb 连上我们用ios-debug插件选好的 iPhone Simulator
file .../Xcode/Agents/xctest 设置 lldb 启动目标
run -XCTest All ... 就是让 lldb 带上启动参数执行我们设定好的目标 Xcode/Agents/xctest
那么,又如何调试带宿主的 XCTest 呢?
这种 XCTest 需要执行 host app 中的逻辑,所以需要将 xctest bundle 打到包里一起跟着宿主加载启动。
在苹果系统中,有一个/usr/lib/dyld 用于给程序加载动态库。
他存在一个很神奇的feature,可以根据环境变量 DYLD_INSERT_LIBRARIES 给程序注入 一个外部(没有被link的)dylib ,并让这个 dylib 先于程序被加载和执行,详见文章:Simple code injection using DYLD_INSERT_LIBRARIES 和 DYLD_INSERT_LIBRARIES DYLIB injection in macOS / OSX。
ps. 这个 dyld 甚至是开源的,你就说苹果开不开放吧
你猜的没错,iOS 也支持DYLD_INSERT_LIBRARIES。
XCTest 其实就是通过这个来实现的在宿主启动。
先使用 Xcode 编译一个XCTest(使用代码 https://github.com/FeiHuang93/XCTest-Demo)。可以看到通过 Xcode 编译的带 XCTest的Payload 如下:
testXCTest.app
├── Base.lproj
│   ├── LaunchScreen.storyboardc
│   └── Main.storyboardc
├── Frameworks
│   ├── XCTAutomationSupport.framework
│   ├── XCTest.framework
│   ├── XCTestCore.framework
│   ├── XCTestSupport.framework
│   ├── XCUIAutomation.framework
│   ├── XCUnit.framework
│   ├── libXCTestBundleInject.dylib
│   └── libXCTestSwiftSupport.dylib
├── Info.plist
├── PkgInfo
├── PlugIns
│   └── testXCTestTests.xctest
│       ├── Info.plist
│       ├── testXCTestTests
│       └── xcbaselines
├── _CodeSignature
└── testXCTest
其中有两个 dylib, libXCTestBundleInject.dylib 和 libXCTestSwiftSupport.dylib就是用来插入到宿主程序的。
给这个 XCTest 配置一个lldbinit 配置文件,用来调试 Xcode 是如何启动 xctest 的:
cat > ~/.lldbinit-Xcode << EOF
settings set target.process.stop-on-sharedlibrary-events 1
EOF
ps. 如果 ~/.lldbinit-Xcode 文件有内容记得先备份。mv ~/.lldbinit-Xcode ~/.lldbinit-Xcode.bak
pps. 在调试完毕后将 /.lldbinit-Xcode 恢复,不然你用 Xcode 调试其它app时有惊喜 rm ~/.lldbinit-Xcode && mv ~/.lldbinit-Xcode.bak ~/.lldbinit-Xcode
记得在Xcode 中编辑 Test scheme,启用 debugger。
程序启动后,可以看到马上触发了我们设置的断点:
此时,可以用lldb image list 查看加载的 modules,可以看到其实没有libXCTestBundleInject.dylib(因为确实没被直接link):
(lldb) image list
[  0] DBE5F99C-BC66-3507-8649-3277628180A3 0x000000010101c000 /Users/wangyongrong/Library/Developer/Xcode/DerivedData/testXCTest-btutvxyajiwigcbkzbzwfhtftckk/Build/Products/Debug-iphonesimulator/testXCTest.app/testXCTest
[  1] 7B87A986-A153-33C4-8470-D56410B7F9D5 0x000000010a23d000 /usr/lib/dyld
[  2] 638F8A1F-2A32-396D-8389-8D7A60B96B8D 0x0000000101254000 /Applications/Xcode.app/Contents/Developer/Platforms/iPhoneOS.platform/Library/Developer/CoreSimulator/Profiles/Runtimes/iOS.simruntime/Contents/Resources/RuntimeRoot/usr/lib/dyld_sim
经过单步调试跟踪,可以探知 XCTestCase 被执行的路径:
libXCTestBundleInject.dylib 被dyld加载并启动后,__XCTestBundleInject被执行,接着又会调用 XCTestCore 的_XCTestMain, 最终通过 +[XCTestDriver testBundleURLFromEnvironment] 从环境变量 XCTestBundlePath 中读取 xctest 路径并调用 XCTestDriver run,从而执行 xctest bundle 中带的 XCTestCase。
可以给获取环境变量的 NSProcessInfo 下断点:br s -n '-[NSProcessInfo environment],在断点触发时,dump 环境变量,如下:
(lldb) br s -n '-[NSProcessInfo environment]
(lldb) po [[NSProcessInfo processInfo] environment]
{
    ...
    "DYLD_INSERT_LIBRARIES" = "/Users/wangyongrong/Library/Developer/Xcode/DerivedData/testXCTest-btutvxyajiwigcbkzbzwfhtftckk/Build/Products/Debug-iphonesimulator/testXCTest.app/Frameworks/libXCTestBundleInject.dylib";
    ...
    XCInjectBundleInto = unused;
    XCTestBundlePath = "PlugIns/testXCTestTests.xctest";
    XCTestConfigurationFilePath = "";
    XCTestSessionIdentifier = "C3896D40-71F2-43DF-9205-C158ED0D893E";
    ...
}
了解完原理之后回到vscode中。由于 bazel 的 rules_apple 的 ios_unit_test rule 并不会打出上面形式的带有 XCTest bundle 的 Payload,尝试手动拼装出类似的包,喂给ios-debug,在 lldb 中配置类似的环境变量如下:
{
    "type": "lldb",
    ...
    "env": {
        "DYLD_LIBRARY_PATH":"/Applications/Xcode.app/Contents/Developer/Platforms/iPhoneSimulator.platform/Developer/usr/lib",
        "DYLD_INSERT_LIBRARIES": "libXCTestBundleInject.dylib",
        "XCTestBundlePath": "SquarerTests.xctest",
        "XCTestConfigurationFilePath":"",
        "XCInjectBundleInto": "unused",
        "OS_ACTIVITY_DT_MODE": "YES",
    },
}
能够启动app,但发现并没有如预期那样执行 testcase,反而在控制台中丢下一段日志后直接退出了:
HelloWorld[3031:605149] Unable to load a test configuration. Exiting.
尝试在 _XCTestMain 下断点:
(lldb) br s -n _XCTestMain
重新启动,发现能够成功断到,说明libXCTestBundleInject.dylib的 inject 逻辑已经被执行。
通过 image lookup 也确实证明 XCTestCore 被加载了:
(lldb) image lookup --symbol '_XCTestMain'
2 symbols match '_XCTestMain' in ~/Payload/HelloWorld.app/Frameworks/XCTest.framework/XCTest:

1 symbols match '_XCTestMain' in ~/Payload/HelloWorld.app/Frameworks/XCTestCore.framework/XCTestCore:
        Address: XCTestCore[0x0000000000008318] (XCTestCore.__TEXT.__text + 3480)
        Summary: XCTestCore`_XCTestMain
但可能什么隐藏配置不对,猜测是 XCTestConfigurationFilePath 和 XCTestSessionIdentifier 环境变量有关 >﹏<,可能用于创建 XCTestSuite ……
时间有限,就不再继续研究了(因为大部分时间都要去反汇编XCTest相关Framework,意义不大~~
那么换个思路,自己写一个dylib 喂给 /usr/lib/dylb,在这个dylib中执行 XCTestCase行不行?
当然可以:通过反射或者 dlsym 直接调用 XCTestCore 等私有 Framework 的符号。。
代码可以参考 gist XCTHarness.swift。
好了,这个当课后作业留给你自己试一下了~
通过本文,你学会了 vscode 如何自定义 tasks 和 launch configurations,应该已经可以直接手撸 lldb 调试各种程序了(包括别人编译好的app),同时也了解了 dyld 苹果系统里这个神奇的东西(千万别去试着注入别人的 app 然后说从我这学的),对XCTest 启动原理也有所了解(没用的知识增加了)~
Recommend
About Joyk
Aggregate valuable and interesting links.
Joyk means Joy of geeK