

源码分析 golang bigcache 高性能无 GC 开销的缓存设计实现原理
source link: https://xiaorui.cc/archives/7385
Go to the source link to view the article. You can view the picture content, updated content and better typesetting reading experience. If the link is broken, please click the button below to view the snapshot at that time.

源码分析 golang bigcache 高性能无 GC 开销的缓存设计实现原理 – 峰云就她了
源码分析 golang bigcache 高性能无 GC 开销的缓存设计实现原理
bigcache 是 golang 编写的高性能的缓存库,其设计很巧妙,通过数据分片解决高并发下锁竞争的问题,通过把数据存到 ringbuffer 来规避 golang gc 的开销。
bigcache 内部使用分片来存储数据,每个分片内又使用 hashmap 存储key 的索引,而真正的数据通过编码后放在 ringbuffer 里。bigcache 没有使用主流的 lru 和 lfu 缓存淘汰算法,而是使用覆盖写来覆盖老数据,在 ringbuffer 已满时,先删除老数据,再尝试插入新数据。另外还通过 gc 垃圾回收期删掉过期的数据。
由于 bigcache 里数据是存在 []byte 类型的 ringbuffer 里,所以传入的 value 只能 []byte,不能存储其他类型。这样应用场景很是受限,毕竟业务上缓存的对象较为复杂,如果每次存取都需要序列化和反序列化,那么在一定量级下 CPU 开销会很可观。
bigcache 的实现原理跟 freecache、fastcache 大同小异,都使用了 ringbuffer 存放数据,可以很大程度降低 GC 的开销。这里的 ringbuffer 当然可以使用有名或匿名的 mmap 来构建,俗称堆外内存,但对于 golang gc 来说,mmap 和直接申请
[]byte的 gc 开销没大区别。如果使用文件 mmap 映射,当系统一直有文件读写,势必会对 page cache 进行 page 淘汰,这样基于 mmap 构建的 ringbuffer,必然会受之影响。
bigcache 高级用法
import (
    "log"
    "fmt"

    "github.com/allegro/bigcache/v3"
)

func main() {
    config := bigcache.Config {
            // 预设多少个数据分片,其大小必须是 2 的幂次方,因为这里使用位运算取摸,而非使用 %.
            Shards: 1024,

            // 缓存对象的生命周期,也就是过期时长
            LifeWindow: 10 * time.Minute,

            // 垃圾回收的运行周期,每隔 5 分钟尝试进行一次垃圾回收.
            CleanWindow: 5 * time.Minute,

            // rps * lifeWindow, used only in initial memory allocation
            MaxEntriesInWindow: 1000 * 10 * 60,

            // 设定的 value 的大小
            MaxEntrySize: 500,

            // bigcache 缓存的大小,单位是 MB.
            // 注意这是总大小,每个分片的大小则需要除以分片数,当为 0 时不限制。
            HardMaxCacheSize: 8192,
    }

    // 构建 bigcache 缓存对象
    cache, initErr := bigcache.New(context.Background(), config)
    if initErr != nil {
        log.Fatal(initErr)
    }

    // 写数据
    cache.Set("my-unique-key", []byte("value"))

    // 读数据
    if entry, err := cache.Get("my-unique-key"); err == nil {
        fmt.Println(string(entry))
    }
}
bigcache 实现原理
这里简述下 bigcache 读写数据实现原理,写操作是把数据写到 ringbuffer 里,然后在 hashmap 里记录 key 和 ringbuffer 索引的关系,读取的时候,自然是从 hashmap 里获取 key 的 ringbuffer index 索引值,然后从 ringbuffer 获取数据。
bigcache 中数据结构及布局
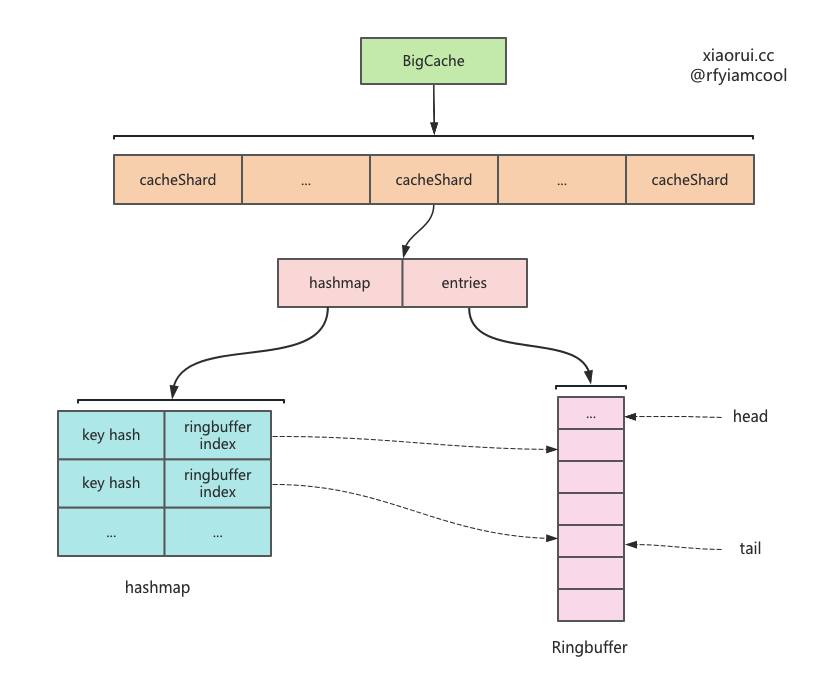
BigCache 数据结构.
type BigCache struct {
    // 数据分片
    shards     []*cacheShard

    // 缓存对象的生存时长, 也就是 ttl
    lifeWindow uint64

    // 时钟对象
    clock      clock

    // bigcahe 只实现了 fnv hash 算法
    hash       Hasher
    config     Config

    // 用来实现取摸位运算
    shardMask  uint64
    close      chan struct{}
}
cacheShard 数据分片的结构.
type cacheShard struct {
    // key 为 key hashcode, value 为 ringbuffer 的 offset
    hashmap     map[uint64]uint32

    // 使用 ringbuffer 构建的队列
    entries     queue.BytesQueue
    lock        sync.RWMutex

    // 对象复用
    entryBuffer []byte

    // 删除的回调方法
    onRemove    onRemoveCallback

    // 缓存对象的生存时长, 也就是 ttl
    lifeWindow   uint64
}
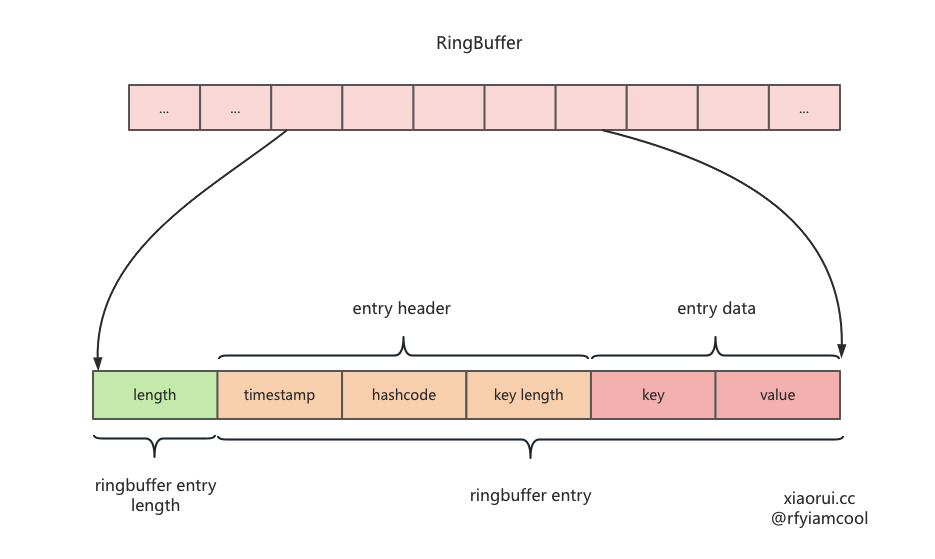
数据在 ringbuffer 中的编码.
关于取摸的计算, 想来大家可以一般使用 x%len 公式,但这个性能相对低效,而像 java jdk 和 redis 中的取模公式为 x&(len-1),当 hashtable 的长度是 2 的幂的情况下,这两者是等价的。
通过汇编可以看到,& 的汇编为 3mov+1and+1sub, % 的汇编为 2mov+1cdp+1idiv 。
根据 intel asm 的文档资料,& 操作只需 5 个 CPU 周期,而 % 最少需要 20 个 CPU 周期,显而易见,如果在意性能我们应该使用前者。
Set 写流程
Set 用来添加数据到指定的 shard 分片里。bigcache 预设了 1024 个分片,社区中高性能的 cache 库会实现分片的方法来解决锁竞争的问题。
// Set saves entry under the key
func (c *BigCache) Set(key string, entry []byte) error {
    // 通过 fnv hash 算法计算出 key 的 hashcode
    hashedKey := c.hash.Sum64(key)

    // 通过位运算得出 key 对应的 shard 分片
    shard := c.getShard(hashedKey)

    // 在 shard 里添加数据
    return shard.set(key, hashedKey, entry)
}
set 用来把数据写到 shard 的 ringbuffer 里,并设置 hashmap 索引,其流程如下。
- 获取当前的秒级别的时间戳,这里抽象了 clock 方法,只要是为了方便的后面的单元测试 ;
- 在 hashmap 里获取 key 以前的 ringbuffer 的 index 位置信息,如果不为 0,且在 ringbuffer 又可拿到该 entry,则进行删除 ;
- 编码待写入 ringbuffer 里的结构 ;
- 尝试把编码的数据写到 ringbuffer 里,如果空间小于 max 值,则会扩容,当无法扩容时,写入失败,说明无空闲空间,则尝试剔除最老的数据,然后再进行写入。
func (s *cacheShard) set(key string, hashedKey uint64, entry []byte) error {
    // 获取当前的秒级别的时间戳,这里抽象了 clock 方法,只要是为了方便的后面的单元测试.
    currentTimestamp := uint64(s.clock.Epoch())

    // 加锁,并发安全
    s.lock.Lock()

    // 在 hashmap 里获取 key 以前的 ringbuffer 的 index 位置信息.
    if previousIndex := s.hashmap[hashedKey]; previousIndex != 0 {
        // 如果不为 0,且在 ringbuffer 又可拿到该 entry,则进行删除
        if previousEntry, err := s.entries.Get(int(previousIndex)); err == nil {
            resetKeyFromEntry(previousEntry)
            delete(s.hashmap, hashedKey)
        }
    }

    // 编码待写入 ringbuffer 里的结构
    w := wrapEntry(currentTimestamp, hashedKey, key, entry, &s.entryBuffer)

    for {
        // 尝试把编码的数据写到 ringbuffer 里.
        if index, err := s.entries.Push(w); err == nil {
            // 如果成功写入,更新 hashmap 索引后,放锁返回.
            s.hashmap[hashedKey] = uint32(index)
            s.lock.Unlock()
            return nil
        }

        // 写入失败说明, 无空间,则尝试剔除最老的数据,然后再进行写入.
        if s.removeOldestEntry(NoSpace) != nil {
            s.lock.Unlock()
            return fmt.Errorf("entry is bigger than max shard size")
        }
    }
}
removeOldestEntry 在过期扫描部分再分析其实现.
resetKeyFromEntry 把 entry 中 hashcode 置为 0.
entry 的 [8:16] 字节存储了数据的 key hashcode,通过 resetKeyFromEntry 方法则可以把 hashcode 置为 0.
func resetKeyFromEntry(data []byte) {
    binary.LittleEndian.PutUint64(data[timestampSizeInBytes:], 0)
}
对数据进行编码
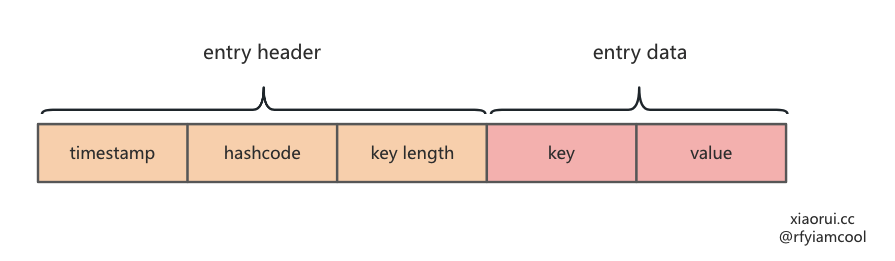
把要写到 []byte ringbuffer 的数据进行编码。
- 第一个字段为 8 字节,表明时间戳
- 第二个字段为 8 字节,是用 fnv(key) 拿到的 hashcode
- 第三个子弹为 2 字节,表明 key length
GC 垃圾回收通过时间戳来判断是否过期,通过 iterator 遍历缓存数据时,会过滤掉 hashcode 为 0 的数据,当delete 删除数据时,会重置 hashcode 为 0。通过 key length 拿到 key。
那么如何拿到 key 的 value ? 这是因为存到 ringbuffer 时,还会加一个总大小的 length。那么获取 value 的方法显而易见了。
const (
    timestampSizeInBytes = 8                                                       // Number of bytes used for timestamp
    hashSizeInBytes      = 8                                                       // Number of bytes used for hash
    keySizeInBytes       = 2                                                       // Number of bytes used for size of entry key
    headersSizeInBytes   = timestampSizeInBytes + hashSizeInBytes + keySizeInBytes // Number of bytes used for all headers
)

func wrapEntry(timestamp uint64, hash uint64, key string, entry []byte, buffer *[]byte) []byte {
    keyLength := len(key)
    blobLength := len(entry) + headersSizeInBytes + keyLength

    if blobLength > len(*buffer) {
        *buffer = make([]byte, blobLength)
    }
    blob := *buffer

    binary.LittleEndian.PutUint64(blob, timestamp)
    binary.LittleEndian.PutUint64(blob[timestampSizeInBytes:], hash)
    binary.LittleEndian.PutUint16(blob[timestampSizeInBytes+hashSizeInBytes:], uint16(keyLength))
    copy(blob[headersSizeInBytes:], key)
    copy(blob[headersSizeInBytes+keyLength:], entry)

    return blob[:blobLength]
}
ringbuffer 写时扩容
第一种库容的场景.
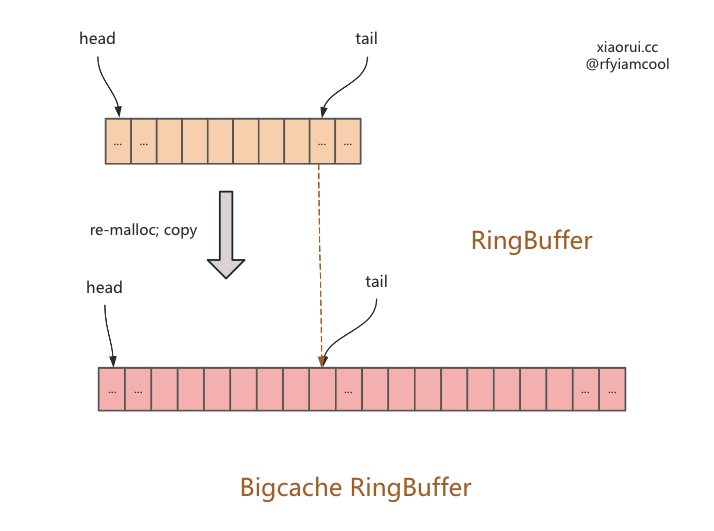
第二种库容的场景.

ringbuffer 扩容代码
func (q *BytesQueue) Push(data []byte) (int, error) {
    // 计算出 size
    neededSize := getNeededSize(len(data))

    // 如果没有足够空间插入
    if !q.canInsertAfterTail(neededSize) {
        // 回绕
        if q.canInsertBeforeHead(neededSize) {
            q.tail = leftMarginIndex
        } else if q.capacity+neededSize >= q.maxCapacity && q.maxCapacity > 0 {
            // 超过最大限制,不进行扩容,返回失败
            return -1, &queueError{"Full queue. Maximum size limit reached."}
        } else {
            // 进行扩容
            q.allocateAdditionalMemory(neededSize)
        }
    }

    index := q.tail

    // 写入数据
    q.push(data, neededSize)
    return index, nil
}

func (q *BytesQueue) allocateAdditionalMemory(minimum int) {
    start := time.Now()
    if q.capacity < minimum {
        q.capacity += minimum
    }

    // 默认两倍进行扩容
    q.capacity = q.capacity * 2
    if q.capacity > q.maxCapacity && q.maxCapacity > 0 {
        // 避免超过 max 值
        q.capacity = q.maxCapacity
    }

    // 实例化新的 []byte 数组.
    oldArray := q.array
    q.array = make([]byte, q.capacity)

    // 如果不相等
    if leftMarginIndex != q.rightMargin {
        // 把旧 ringbuffer 数据拷贝到新 ringbuffer.
        copy(q.array, oldArray[:q.rightMargin])

        // 出现了回绕
        if q.tail <= q.head {
            if q.tail != q.head {
                q.push(make([]byte, q.head-q.tail), q.head-q.tail)
            }

            // 重置指针位置
            q.head = leftMarginIndex
            q.tail = q.rightMargin
        }
    }

    q.full = false
}
Get 读取流程
Get 用来获取数据,计算 hashcode,获取对应的 shard,然后调用 get() 读取。
func (c *BigCache) Get(key string) ([]byte, error) {
    hashedKey := c.hash.Sum64(key)
    shard := c.getShard(hashedKey)
    return shard.get(key, hashedKey)
}
get 用来从 shard 里获取数据,其流程是先从 ringbuffer 里获取编码过的数据,然后通过解码获取 value。
func (s *cacheShard) get(key string, hashedKey uint64) ([]byte, error) {
    s.lock.RLock()
    // 从 hashmap 里获取 key hashcode 对应的 ringbuffer 索引,然后从 ringbuffer 读取到数据.
    wrappedEntry, err := s.getWrappedEntry(hashedKey)
    if err != nil {
        s.lock.RUnlock()
        return nil, err
    }

    // 从数据中解码得到 key,判断 key 是否一致,因为 hashmap 的 key 使用 fnv hash 计算,有冲突的概率,所以需要判断是否一致,不一致说明 hashcode 冲突,返回不存在的错误
    if entryKey := readKeyFromEntry(wrappedEntry); key != entryKey {
        s.lock.RUnlock()
        // 统计冲突的 metrics
        s.collision()
        return nil, ErrEntryNotFound
    }

    // 解码获取 value
    entry := readEntry(wrappedEntry)
    s.lock.RUnlock()

    // 统计缓存命中 metrics
    s.hit(hashedKey)
    return entry, nil
}
不习惯 bigcache 的命名,key 的值可以为 value,这里用来 entry 这个单词。
getWrappedEntry 从 ringbuffer 获取数据 wrappedEntry
func (s *cacheShard) getWrappedEntry(hashedKey uint64) ([]byte, error) {
    // 获取 ringbuffer 的索引
    itemIndex := s.hashmap[hashedKey]
    // ringbuffer 起始位是 1,所以 0 必然是为空.
    if itemIndex == 0 {
        s.miss()
        return nil, ErrEntryNotFound
    }

    // 从 ringbuffer 的指定位置里, 获取编码过的数据.
    wrappedEntry, err := s.entries.Get(int(itemIndex))
    if err != nil {
        s.miss()
        return nil, err
    }

    return wrappedEntry, err
}
readEntry 解码获取 key 的 value
func readEntry(data []byte) []byte {
    length := binary.LittleEndian.Uint16(data[timestampSizeInBytes+hashSizeInBytes:])

    // copy on read
    dst := make([]byte, len(data)-int(headersSizeInBytes+length))
    copy(dst, data[headersSizeInBytes+length:])

    return dst
}
Delete 删除 kv 流程
Delete 用来删除数据,先获取 key hashcode 对应分片,再执行分片的 del 进行数据删除。
func (c *BigCache) Delete(key string) error {
    hashedKey := c.hash.Sum64(key)
    shard := c.getShard(hashedKey)
    return shard.del(hashedKey)
}
del 用来在分片中删除数据,其流程如下。
- 预先使用读锁检查值是否存在,如果存在走删除流程 ;
- 根据 key hashcode 获取 ringbuffer index ;
- 从 ringbuffer 里获取编码过的 entry ;
- 删除 key hashcode 对应的位置 ;
- 把 entry 的 hash 值编码成 0。
这里先使用读锁来预检查 key 是否存在,存在后,再使用写锁来数据删除。首先 bigcache 已经分成了 1024 分片,避免了大量锁竞争问题,又因为删除的多是已知存在需删除的场景,预检查可能是徒劳的,虽然 cache 是读多写少的场景,但还是怀疑其优化是否有效。
func (s *cacheShard) del(hashedKey uint64) error {
    // 预先使用读锁检查值是否存在,如果存在走删除流程.
    s.lock.RLock()
    {
        itemIndex := s.hashmap[hashedKey]
        // ringbuffer 起始位是 1
        if itemIndex == 0 {
            s.lock.RUnlock()
            s.delmiss()
            return ErrEntryNotFound
        }

        if err := s.entries.CheckGet(int(itemIndex)); err != nil {
            s.lock.RUnlock()
            s.delmiss()
            return err
        }
    }
    s.lock.RUnlock()

    // 这里用写锁操作执行数据的删除.
    s.lock.Lock()
    {
        // 根据 key hashcode 获取 ringbuffer index
        itemIndex := s.hashmap[hashedKey]

        if itemIndex == 0 {
            s.lock.Unlock()
            s.delmiss()
            return ErrEntryNotFound
        }

        // 从 ringbuffer 里获取编码过的 entry.
        wrappedEntry, err := s.entries.Get(int(itemIndex))
        if err != nil {
            s.lock.Unlock()
            s.delmiss()
            return err
        }

        // 删除 key hashcode 对应的位置.
        delete(s.hashmap, hashedKey)
        // 尝试执行回调
        s.onRemove(wrappedEntry, Deleted)

        // 把 entry 的 hash 值编码成 0.
        resetKeyFromEntry(wrappedEntry)
    }
    s.lock.Unlock()

    // 删除命中统计
    s.delhit()
    return nil
}
GC 垃圾回收的设计
bigcache 的 gc 垃圾回收是指淘汰清理过期数据,其实现很简单,从头到尾遍历数据,看到过期就淘汰,不过期就中断 gc 任务。
需要注意的是 bigcache 的过期时间为固定的,不像 redis、ristretto 可随意配置不同的过期时间。bigcache 是按照 fifo 先进先出来存储的,所以先入 ringbuffer 的对象必然要比后进来的先淘汰。
bigcache 实例化 cache 对象时,会启动一个协程来进行垃圾回收。每隔一段时间进行一次垃圾回收,默认时长为 1 秒。
if config.CleanWindow > 0 {
    go func() {
        // 定时器,默认为 1秒
        ticker := time.NewTicker(config.CleanWindow)
        defer ticker.Stop()

        for {
            select {
            case <-ctx.Done():
                return
            case t := <-ticker.C:
                // 执行垃圾回收.
                cache.cleanUp(uint64(t.Unix()))
            case <-cache.close:
                return
            }
        }
    }()
}
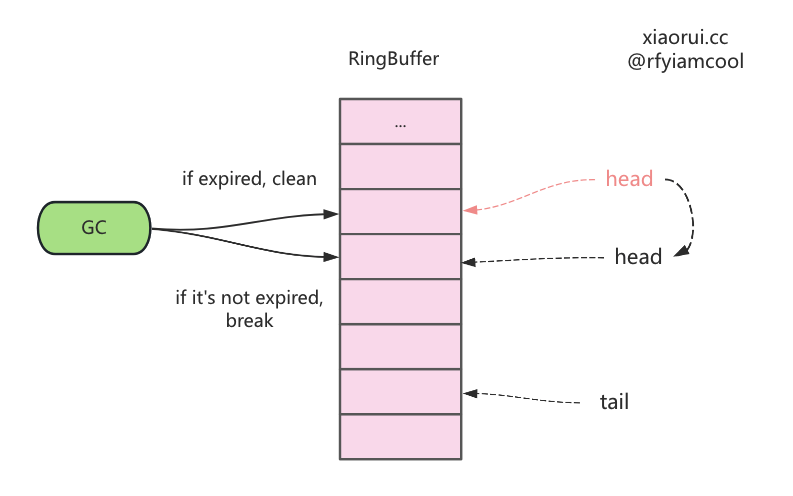
下面为垃圾回收的具体的实现,由于 bigcache 预设了 1024 个数据分片,那么进行垃圾回收时,自然需要遍历每个 shard 分片。清理的原理如下。
- 从 ringbuffer 的 head 头部指针获取最先入队的对象,这里是 get,不是 pop 操作 ;
- 从数据中获取数据的插入时间,通过
( 当前的时间 - 写入时间 ) > lifeWindow判断是否过期 ; - 如过期,则把 ringbufer 中头部的数据,也就是最老的数据干掉 ;
- 如没过期,则直接中断本地的垃圾回收任务。
简单说,每次判断 shard ringbuffer 中最老数据是否过期,过期则删掉,直到遍历到不过期的数据为止。这里的删除其实移动了 ringbuffer 的 header 偏移量位置指针。
lifeWindow 参数来控制过期的时长,当太小时,缓存数据很快会被 gc 清理掉。bigcache 的 delete 只是标记删除,数据依然在 ringbuffer 中。
那么被删除的数据什么时候会被清理掉,这里有两个时机。
- 写操作,当 ringbuffer 已满,又无法扩容时,则先删掉老数据,再把新数据写进去。
- 垃圾回收,从头开始进行过期判断,只要过期就清理。当满足 ringbuffer 的空闲阈值时,ringbuffer 也会回收空间。
func (c *BigCache) cleanUp(currentTimestamp uint64) {
    // 每个 shard 都需要执行清理.
    for _, shard := range c.shards {
        shard.cleanUp(currentTimestamp)
    }
}

func (s *cacheShard) cleanUp(currentTimestamp uint64) {
    s.lock.Lock()
    for {
        // 从 ringbuffer 的 head 获取最先入队的对象,这里是 get,不是 pop 操作.
        if oldestEntry, err := s.entries.Peek(); err != nil {
            // err 不为空,中断.
            break
        } else if evicted := s.onEvict(oldestEntry, currentTimestamp, s.removeOldestEntry); !evicted {
            // 判断是否过期,如过期则把 ringbufer 中头部的数据删掉,也就是最老的数据删掉.
            break
        }
    }
    s.lock.Unlock()
}

func (s *cacheShard) onEvict(oldestEntry []byte, currentTimestamp uint64, evict func(reason RemoveReason) error) bool {
    // 如果已过期,则执行回调把最老的数据删掉.
    if s.isExpired(oldestEntry, currentTimestamp) {
        evict(Expired)
        return true
    }
    return false
}
isExpired 用来判断是否过期,当 ( 当前的时间 - 写入时间 ) > lifeWindow 时,说明该 entry 已过期。
func (s *cacheShard) isExpired(oldestEntry []byte, currentTimestamp uint64) bool {
    // 从 entry 中获取插入的时间
    oldestTimestamp := readTimestampFromEntry(oldestEntry)
    if currentTimestamp <= oldestTimestamp {
        return false
    }
    // ( 当前的时间 - 写入时间 ) > lifeWindow 为已过期.
    return currentTimestamp-oldestTimestamp > s.lifeWindow
}
bigcache 是 golang 编写的高性能的缓存库,其设计很巧妙,通过数据分片解决高并发下锁竞争的问题,通过把数据存到 ringbuffer 来规避 golang gc 的开销。
但 bigcache 不太适合业务上的缓存对象,原因有两个。
其一 bigcache 不支持 lru / lfu 这类缓存淘汰算法,而使用 fifo 淘汰旧数据,这样势必影响缓存命中率和缓存效果。
其二 bigcache 不能支持除了 []byte 以外的数据结构,毕竟业务上的对象多为自定义 struct。大家存取时不能每次都进行 encode、decode 编解码吧?毕竟使用社区中有一堆黑科技的 sonic json 库,序列化小对象也至少几十个 us,反序列化更是序列化的两倍。
个人更推荐使用 ristretto 构建业务的进程内缓存,其实现原理文章如下。

Recommend
About Joyk
Aggregate valuable and interesting links.
Joyk means Joy of geeK