
在 SwiftUI 视图中打开 URL 的若干方法
source link: https://www.fatbobman.com/posts/open_url_in_swiftUI/
Go to the source link to view the article. You can view the picture content, updated content and better typesetting reading experience. If the link is broken, please click the button below to view the snapshot at that time.

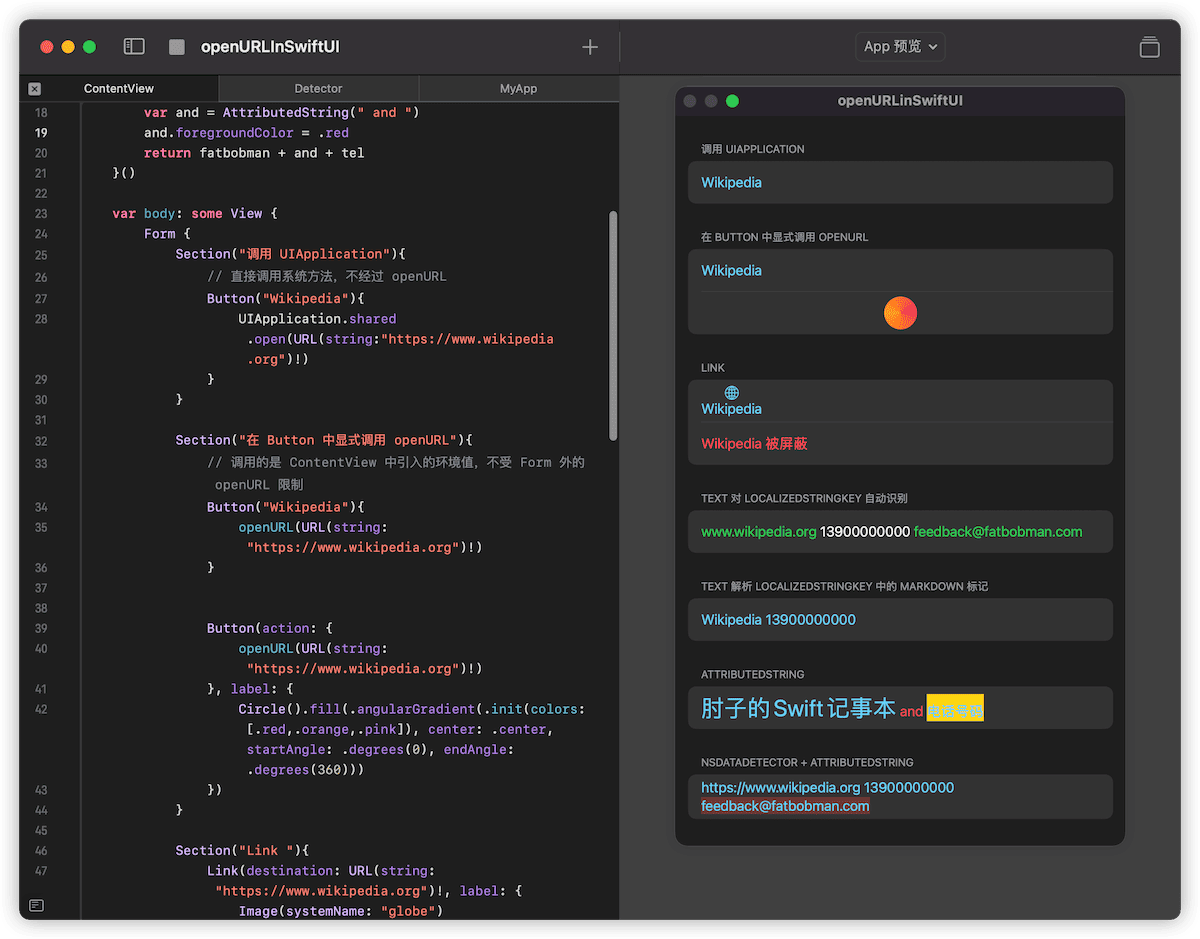
本文将介绍在 SwiftUI 视图中打开 URL 的若干种方式,其他的内容还包括如何自动识别文本中的内容并为其转换为可点击链接,以及如何自定义打开 URL 前后的行为等。
本文的范例代码是在 Swift Playgrounds 4.1 ( macOS 版本 )中完成的,可在 此处下载。了解更多有关 Swift Playgrounds 的内容,可以参阅 Swift Playgrounds 4 娱乐还是生产力 一文。

SwiftUI 1.0( iOS 13、Catalina )
在视图中,开发者通常需要处理两种不同的打开 URL 的情况:
- 点击一个按钮( 或类似的部件 )打开指定的 URL
- 将文本中的部分内容变成可点击区域,点击后打开指定的 URL
遗憾的是,1.0 时代的 SwiftUI 还相当稚嫩,没有提供任何原生的方法来应对上述两种场景。
对于第一种场景,常见的做法为:
// iOS
Button("Wikipedia"){
    UIApplication.shared.open(URL(string:"https://www.wikipedia.org")!)
}

// macOS
Button("Wikipedia"){
    NSWorkspace.shared.open(URL(string:"https://www.wikipedia.org")!)
}
而第二种场景实现起来就相当地麻烦,需要包装 UITextView( 或 UILabel )并配合 NSAttributedString 一起来完成,此时 SwiftUI 仅被当作一个布局工具而已。
健康笔记适用于任何有健康管理需求的人士。提供了强大的自定义数据类型功能,可以记录生活中绝大多数的健康项目数据。你可以为每个家庭成员创建各自的记录笔记,或者针对某个特定项目、特定时期创建对应的笔记。
SwiftUI 2.0( iOS 14、Big sur )
SwiftUI 2.0 为第一个场景提供了相当完美的原生方案,但仍无法通过原生的方式来处理第二种场景。
openURL
openURL 是 SwiftUI 2.0 中新增的一个环境值( EnvironmentValue ),它有两个作用:
- 通过调用它的 callFunction 方法,实现打开 URL 的动作
此时在 Button 中,我们可以直接通过 openURL 来完成在 SwiftUI 1.0 版本中通过调用其他框架 API 才能完成的工作。
struct Demo: View {
    @Environment(\.openURL) private var openURL // 引入环境值

    var body: some View {
        Button {
            if let url = URL(string: "https://www.example.com") {
                openURL(url) { accepted in  //  通过设置 completion 闭包,可以检查是否已完成 URL 的开启。状态由 OpenURLAction 提供
                    print(accepted ? "Success" : "Failure")
                }
            }
        } label: {
            Label("Get Help", systemImage: "person.fill.questionmark")
        }
    }
}
- 通过提供 OpenURLAction ,自定义通过 openURL 打开链接的行为(后文中详细说明)
SwiftUI 2.0 提供了一个结合 Button 和 openURL 的 Link 控件,帮助开发者进一步简化代码:
Link(destination: URL(string: "mailto://[email protected]")!, label: {
    Image(systemName: "envelope.fill")
    Text("发邮件")
})
SwiftUI 3.0( iOS 15、Monterey )
3.0 时代,随着 Text 功能的增强和 AttributedString 的出现,SwiftUI 终于补上了另一个短板 —— 将文本中的部分内容变成可点击区域,点击后打开指定的 URL。
Text 用例 1 :自动识别 LocalizedStringKey 中的 URL
通过支持 LocalizedStringKey 的构造方法创建的 Text ,会自动识别文本中的网址( 开发者无须做任何设定),点击后会打开对应的 URL 。
Text("www.wikipedia.org 13900000000 [email protected]") // 默认使用参数类型为 LocalizedStringKey 的构造器

此种方法只能识别网络地址( 网页地址、邮件地址等 ),因此代码中的电话号码无法自动识别。
请注意,下面的代码使用的是参数类型为 String 的构造器,因此 Text 将无法自动识别内容中的 URL :
let text = "www.wikipedia.org 13900000000 [email protected]" // 类型为 String
Text(text) // 参数类型为 String 的构造器不支持自动识别
Text 用例 2 :识别 Markdown 语法中的 URL 标记
SwiftUI 3.0 的 Text ,当内容类型为 LocalizedStringKey 时,Text 可以对部分 Markdown 语法标记进行解析 :
Text("[Wikipedia](https://www.wikipedia.org) ~~Hi~~ [13900000000](tel://13900000000)")
在这种方式下,我们可以使用任何种类的 URI (不限于网络),比如代码中的拨打电话。

Text 用例 3 :包含 link 信息的 AttributedString
在 WWDC 2021 上,苹果推出了 NSAttributedString 的值类型版本 AttributedString, 并且可以直接使用在 Text 中。通过在 AttributedString 中为不同位置的文字设置不同的属性,从而实现在 Text 中打开 URL 的功能。
let attributedString:AttributedString = {
    var fatbobman = AttributedString("肘子的 Swift 记事本")
    fatbobman.link = URL(string: "https://www.fatbobman.com")!
    fatbobman.font = .title
    fatbobman.foregroundColor = .green // link 不为 nil 的 Run,将自动屏蔽自定义的前景色和下划线
    var tel = AttributedString("电话号码")
    tel.link = URL(string:"tel://13900000000")
    tel.backgroundColor = .yellow
    var and = AttributedString(" and ")
    and.foregroundColor = .red
    return fatbobman + and + tel
}()

Text(attributedString)

更多有关 AttributedString 的内容,请参阅 AttributedString——不仅仅让文字更漂亮
Text 用例 4 :识别字符串中的 URL 信息,并转换成 AttributedString
上述 3 个用例中,除了用例 1可以自动识别文字中的网络地址外,其他两个用例都需要开发者通过某种方式显式添加 URL 信息。
开发者可以通过使用 NSDataDetector + AttributedString 的组合,从而实现类似系统信息、邮件、微信 app 那样,对文字中的不同类型的内容进行自动识别,并设置对应的 URL。
NSDataDetector 是 NSRegularExpression 的子类,它可以检测自然语言文本中的半结构化信息,如日期、地址、链接、电话号码、交通信息等内容,它被广泛应用于苹果提供的各种系统应用中。
let text = "https://www.wikipedia.org 13900000000 [email protected]"
// 设定需要识别的类型
let types = NSTextCheckingResult.CheckingType.link.rawValue | NSTextCheckingResult.CheckingType.phoneNumber.rawValue
// 创建识别器
let detector = try! NSDataDetector(types: types)
// 获取识别结果
let matches = detector.matches(in: text, options: [], range: NSRange(location: 0, length: text.count))
// 逐个处理检查结果
for match in matches {
    if match.resultType == .date {
        ...
    }
}
你可以将 NSDataDetector 视为拥有极高复杂度的正则表达式封装套件。
完整的代码如下:
extension String {
    func toDetectedAttributedString() -> AttributedString {

        var attributedString = AttributedString(self)

        let types = NSTextCheckingResult.CheckingType.link.rawValue | NSTextCheckingResult.CheckingType.phoneNumber.rawValue

        guard let detector = try? NSDataDetector(types: types) else {
            return attributedString
        }

        let matches = detector.matches(in: self, options: [], range: NSRange(location: 0, length: count))

        for match in matches {
            let range = match.range
            let startIndex = attributedString.index(attributedString.startIndex, offsetByCharacters: range.lowerBound)
            let endIndex = attributedString.index(startIndex, offsetByCharacters: range.length)
            // 为 link 设置 url
            if match.resultType == .link, let url = match.url {
                attributedString[startIndex..<endIndex].link = url
                // 如果是邮件,设置背景色
                if url.scheme == "mailto" {
                attributedString[startIndex..<endIndex].backgroundColor = .red.opacity(0.3)
                }
            }
            // 为 电话号码 设置 url
            if match.resultType == .phoneNumber, let phoneNumber = match.phoneNumber {
                let url = URL(string: "tel:\(phoneNumber)")
                attributedString[startIndex..<endIndex].link = url
            }
        }
        return attributedString
    }
}

Text("https://www.wikipedia.org 13900000000 [email protected]".toDetectedAttributedString())

自定义 Text 中链接的颜色
遗憾的是,即使我们已经为 AttributedString 设置了前景色,但当某段文字的 link 属性非 nil 时,Text 将自动忽略它的前景色和下划线设定,使用系统默认的 link 渲染设定来显示。
目前可以通过设置着色来改变 Text 中全部的 link 颜色:
Text("www.wikipedia.org 13900000000 [email protected]")
    .tint(.green)

Link("Wikipedia", destination: URL(string: "https://www.wikipedia.org")!)
    .tint(.pink)

相较 Text 中链接的固定样式,可以用 Button 或 Link 创建可以自由定制外观的链接按钮:
Button(action: {
    openURL(URL(string: "https://www.wikipedia.org")!)
}, label: {
    Circle().fill(.angularGradient(.init(colors: [.red,.orange,.pink]), center: .center, startAngle: .degrees(0), endAngle: .degrees(360)))
})

自定义 openURL 的行为
在 Button 中,我们可以通过在闭包中添加逻辑代码,自定义开启 URL 之前与之后的行为。
Button("打开网页") {
            if let url = URL(string: "https://www.example.com") {
                // 开启 URL 前的行为
                print(url)
                openURL(url) { accepted in  //  通过设置 completion 闭包,定义点击 URL 后的行为
                    print(accepted ? "Open success" : "Open failure")
                }
            }
}
但在 Link 和 Text 中,我们则需要通过为环境值 openURL 提供 OpenURLAction 处理代码的方式来实现自定义打开链接的行为。
Text("Visit [Example Company](https://www.example.com) for details.")
    .environment(\.openURL, OpenURLAction { url in
        handleURL(url)
        return .handled
    })
OpenURLAction 的结构如下:
public struct OpenURLAction {
    @available(iOS 15.0, macOS 12.0, tvOS 15.0, watchOS 8.0, *)
    public init(handler: @escaping (URL) -> OpenURLAction.Result)

    public struct Result {
        public static let handled: OpenURLAction.Result  // 当前的代码已处理该 URL ,调用行为不会再向下传递
        public static let discarded: OpenURLAction.Result  // 当前的处理代码将丢弃该 URL ,调用行为不会再向下传递
        public static let systemAction: OpenURLAction.Result  // 当前代码不处理,调用行为向下传递( 如果外层没有用户的自定义 OpenURLAction ,则使用系统默认的实现)
        public static func systemAction(_ url: URL) -> OpenURLAction.Result  // 当前代码不处理,将新的 URL 向下传递( 如果外层没有用户的自定义 OpenURLAction ,则使用系统默认的实现)
    }
}
Text("www.fatbobman.com [email protected] 13900000000".toDetectedAttributedString()) // 创建三个链接 https mailto tel
    .environment(\.openURL, OpenURLAction { url in
        switch url.scheme {
        case "mailto":
            return .discarded // 邮件将直接丢弃,不处理
        default:
            return .systemAction // 其他类型的 URI 传递到下一层(外层)
        }
    })
    .environment(\.openURL, OpenURLAction { url in
        switch url.scheme {
        case "tel":
            print("call number \(url.absoluteString)") // 打印电话号码
            return .handled  // 告知已经处理完毕,将不会继续传递到下一层
        default:
            return .systemAction // 其他类型的 URI 当前代码不处理,直接传递到下一层
        }
    })
    .environment(\.openURL, OpenURLAction { _ in
        .systemAction(URL(string: "https://www.apple.com")!) // 由于在本层之后我们没有继续设定 OpenURLAction , 因此最终会调用系统的实现打开苹果官网
    })
这种通过环境值层层设定的处理方式,给了开发者非常大的自由度。在 SwiftUI 中,采用类似逻辑的还有 onSubmit ,有关 onSubmit 的信息,请参阅 SwiftUI TextField 进阶 —— 事件、焦点、键盘。
handler 的返回结果 handled 和 discarded 都将阻止 url 继续向下传递,它们之间的不同只有在显式调用 openURL 时才会表现出来。
// callAsFunction 的定义
public struct OpenURLAction {
  public func callAsFunction(_ url: URL, completion: @escaping (_ accepted: Bool) -> Void)
}

// handled 时  accepted 为 true , discarded 时 accepted 为 false
openURL(url) { accepted in
      print(accepted ? "Success" : "Failure")
}
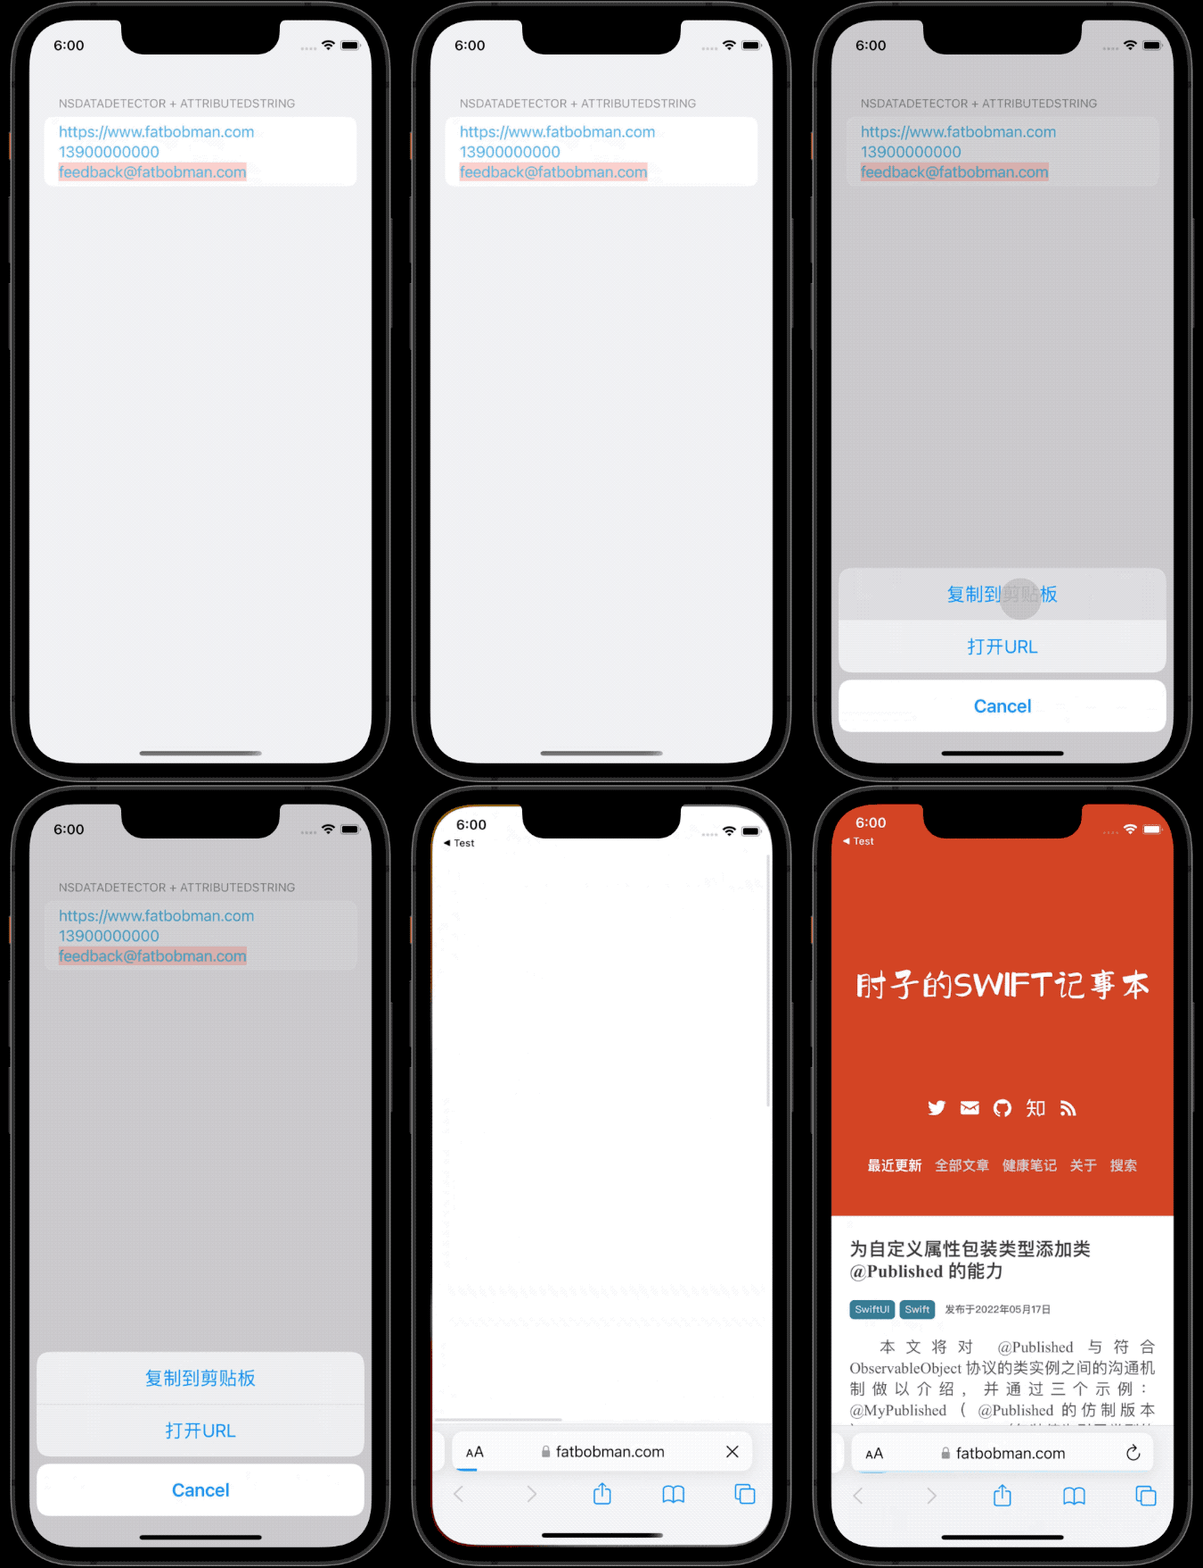
结合上面的介绍,下面的代码将实现:在点击链接后,用户可以选择是打开链接还是将链接复制在粘贴板上:
struct ContentView: View {
    @Environment(\.openURL) var openURL
    @State var url:URL?
    var show:Binding<Bool>{
        Binding<Bool>(get: { url != nil }, set: {_ in url = nil})
    }

    let attributedString:AttributedString = {
        var fatbobman = AttributedString("肘子的 Swift 记事本")
        fatbobman.link = URL(string: "https://www.fatbobman.com")!
        fatbobman.font = .title
        var tel = AttributedString("电话号码")
        tel.link = URL(string:"tel://13900000000")
        tel.backgroundColor = .yellow
        var and = AttributedString(" and ")
        and.foregroundColor = .red
        return fatbobman + and + tel
    }()

    var body: some View {
        Form {
            Section("NSDataDetector + AttributedString"){
                // 使用 NSDataDetector 进行转换
                Text("https://www.fatbobman.com 13900000000 [email protected]".toDetectedAttributedString())
            }
        }
        .environment(\.openURL, .init(handler: { url in
            switch url.scheme {
            case "tel","http","https","mailto":
                self.url = url
                return .handled
            default:
                return .systemAction
            }
        }))
        .confirmationDialog("", isPresented: show){
            if let url = url {
                Button("复制到剪贴板"){
                    let str:String
                    switch url.scheme {
                    case "tel":
                        str = url.absoluteString.replacingOccurrences(of: "tel://", with: "")
                    default:
                        str = url.absoluteString
                    }
                    UIPasteboard.general.string = str
                }
                Button("打开 URL"){openURL(url)}
            }
        }
        .tint(.cyan)
    }
}

虽说本文的主要目的是介绍在 SwiftUI 视图中打开 URL 的几种方法,不过读者应该也能从中感受到 SwiftUI 三年来的不断进步,相信不久后的 WWDC 2022 会为开发者带来更多的惊喜。
希望本文能够对你有所帮助。同时也欢迎你通过 Twitter、 Discord 频道或下方的留言板与我进行交流。
Recommend
About Joyk
Aggregate valuable and interesting links.
Joyk means Joy of geeK