

An example of LLM prompting for programming
source link: https://martinfowler.com/articles/2023-chatgpt-xu-hao.html
Go to the source link to view the article. You can view the picture content, updated content and better typesetting reading experience. If the link is broken, please click the button below to view the snapshot at that time.

An example of LLM prompting for programming
Xu Hao uses chain of thought and general knowledge prompting with ChatGPT when writing self-testing code
My account of an internal chat with Xu Hao, where he shows how he drives ChatGPT to produce useful self-tested code. His initial prompt primes the LLM with an implementation strategy (chain of thought prompting). His prompt also asks for an implementation plan rather than code (general knowledge prompting). Once he has the plan he uses it to refine the implementation and generate useful sections of code.

Xu Hao is Thoughtworks's Head of Technology for China. He is the host speaker of a popular Chinese tech vlog (Ba Cha Shuo). Coder, foodie, classical guitar luthier and collector.
Recently I watched a fascinating call on Zoom. Xu Hao, Thoughtworks's Head of Technology in China, explained his explorations in using ChatGPT to help build Self Testing Code. He went through the kind of interaction that works for him.
He starts with a prompt that sets the context for the application and how he wants the code to be structured.
The current system is an online whiteboard system. Tech stack:
typescript, react, redux, konvajs and react-konva. And vitest, react
testing library for model, view model and related hooks, cypress component
tests for view.

All codes should be written in the tech stack mentioned above.
Requirements should be implemented as react components in the MVVM
architecture pattern.

There are 2 types
of view model in the system.

1. Shared view model. View model that represents states shared among
local and remote users.

2. Local view model. View model that represents states only applicable
to local user

Here are the common implementation strategy:

1. Shared view model is implemented as Redux store slice. Tested in
vitest.

2. Local view model is implemented as React component props or states(by
useState hook), unless for global local view model, which is also
implemented as Redux store slice. Tested in vitest.

3. Hooks are used as the major view helpers to retrieve data from shared
view model. For most the case, it will use ‘createSelector’ and
‘useSelector’ for memorization. Tested in vitest and react testing
library.

4. Don’t dispatch action directly to change the states of shared view
model, use an encapsulated view model interface instead. In the interface,
each redux action is mapped to a method. Tested in vitest.

5. View is consist of konva shapes, and implemented as react component via
react-konva. Tested in cypress component tests

Here are certain patterns should be followed when implement and test
the component

1. When write test, use `describe` instead of `test`

2. Data-driven tests are preferred.

3. When test the view component, fake view model via the view model
interface

Awareness Layer

Requirement:

Display other users’ awareness info(cursor, name and online
information) on the whiteboard.

AC1: Don’t display local user

AC2: When remote user changes cursor location, display the change in
animation.

Provide an overall solution following the guidance mentioned above.
Hint, keep all awareness information in a Konva layer, and an awareness
info component to render cursor, and name. Don’t generate code. Describe
the solution, and breaking the solution down as a task list based on the
guidance mentioned above. And we will refer this task list as our master
plan.
There's a lot going on with this prompt, so he highlighted a few points.
He's using a generic application example in here: one thing to be wary of when interacting with ChatGPT and the like is that we should never put anything that may be confidential into the prompt, as that would be a security risk. Business rules, any code from a real project - all these must not enter the interaction with ChatGPT.
Most of the prompt is setting out the design guidelines that he wants ChatGPT's generated code to follow. He refined this by putting prompts into ChatGPT, looking at the result, and crafting the prompt to make it generate in the style he wanted. Once he has context working, he can paste it into every session he has with ChatGPT, and share it with the rest of the team.
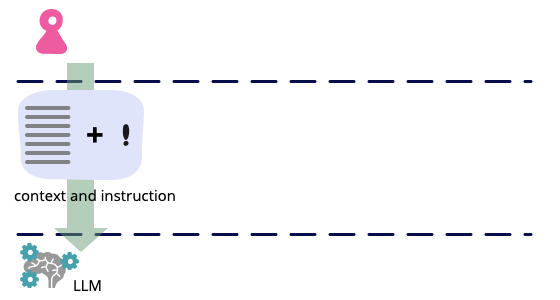
Xu Hao begins his session by prompting the ChatGPT LLM with context as well as the instruction to generate a plan
Even though the final goal of this session is to generate code and its
tests, at this stage he specifically said Don’t generate code.
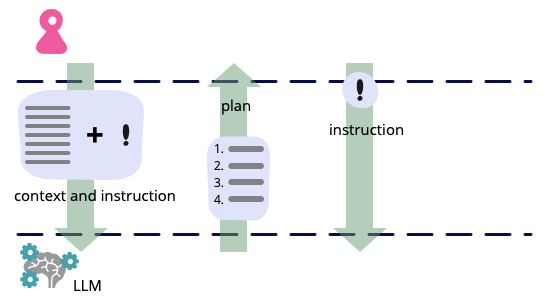
At this point he wants ChatGPT to outline its approach before we look to any
code generation. This is a prompt technique called Generated Knowledge.
A common way of interacting with an LLM is to give it a problem and ask it to generate some final product, whether than be prose or (in this case) code. With Generated Knowledge we split our interaction into separate steps: first ask the LLM to generate some useful information about the problem, and then we feed that information back into the LLM to generate the final product.
The most interesting part of the prompt is the “implementation strategy” section which combines two styles of prompt:
- Instruction prompting provides instructions for the LLM to follow
- Chain of Thought prompting encourages the LLM to explain its reasoning.
In the Implementation Strategy section, Xu Hao described the desired architecture pattern as an expected “Chain of Thought instructions” for ChatGPT to follow. Then he instructed ChatGPT to build a task list (the generated knowledge) based on this chain of thought.
Solution:
To implement the awareness layer feature, we can follow the guidelines mentioned in the problem statement and use the existing tech stack.
Task List:
Create a new component named "AwarenessInfo" to render cursor and name for remote users.
Create a new Konva layer to hold all the "AwarenessInfo" components.
Add the Konva layer to the main whiteboard component.
Create a new Redux slice to store the awareness information for remote users.
Create an encapsulated view model interface for the awareness Redux slice.
Implement the "AwarenessInfo" component to retrieve and display the awareness information for each remote user from the view model.
Implement a method in the encapsulated view model interface to update the awareness information for each remote user.
When a remote user changes the cursor location, dispatch the update method in the encapsulated view model interface to update the corresponding awareness information.
In the "AwarenessInfo" component, use the new location to animate the cursor change.
Write tests for the new "AwarenessInfo" component, including data-driven tests to ensure it properly displays the awareness information for all remote users.
Write tests for the encapsulated view model interface to ensure it properly updates the awareness information for remote users.
Write end-to-end Cypress tests to ensure the awareness layer is properly displayed and updated when remote users change their cursor location.
By following these tasks, we can implement the awareness layer feature in the online whiteboard system.
The response from ChatGPT is non-deterministic, so this result is just one run. If you (or I) put this prompt in again, we'll get a different response.
The key element of the response is an ordered task list, with numbers for each step. We can use these numbers to refer to these tasks for the rest of the session.
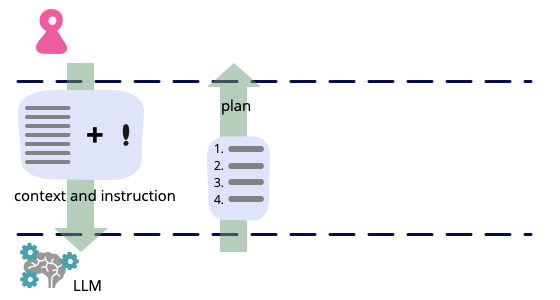
The LLM responds with a plan.
Xu Hao can now look at the master plan and see if it makes sense. If there are problems with it, he can ask ChatGPT to re-write some of the tasks or the entire master plan by providing more information.
For example, the current master plan was not grouped by different types of components. One possible prompt might be:
Rewrite the master plan, and group tasks as model, view model and view.
This could be useful to verify the alignment between the architecture vision and master plan.
These tweaks could be added to the initial prompt to get an overall better response.For this particular prompt, the following instruction was not in the initial prompt, but were added in later iteration:
4. Don’t dispatch action directly to change the states of shared view
    model, use an encapsulated view model interface instead. In the interface,
    each redux action is mapped to a method. Tested in vitest.
Once the master plan looks reasonable, Xu Hao asks to regenerate it with names for the program elements.
Sure, here's a revised master plan with detailed component names, methods, and props:
Task List:
Create a new component named "AwarenessInfo" to render cursor and name for remote users. This component will receive props such as user name, cursor position, and online status.
Create a new Konva layer named "AwarenessLayer" to hold all the "AwarenessInfo" components.
Add the "AwarenessLayer" to the main whiteboard component.
Create a new Redux slice named "awareness" to store the awareness information for remote users.
Create an encapsulated view model interface named "AwarenessViewModel" for the "awareness" Redux slice. This interface will contain a method named "updateUserAwarenessInfo" to update the awareness information for each remote user.
Implement the "AwarenessInfo" component to retrieve and display the awareness information for each remote user from the view model. The component will use the "useSelector" hook to retrieve the relevant information.
Implement the "updateUserAwarenessInfo" method in the "AwarenessViewModel" interface to dispatch a Redux action to update the awareness information for each remote user. This method will be called by the "MainWhiteboard" component.
When a remote user changes the cursor location, dispatch the "updateUserAwarenessInfo" method in the "AwarenessViewModel" interface to update the corresponding awareness information.
In the "AwarenessInfo" component, use the new location to animate the cursor change. This can be accomplished using the Konva "Tween" animation.
Write tests for the new "AwarenessInfo" component, including data-driven tests to ensure it properly displays the awareness information for all remote users. The tests will be written using the React Testing Library.
Write tests for the encapsulated view model interface to ensure it properly updates the awareness information for remote users. These tests will use the Vitest framework.
Write end-to-end Cypress tests to ensure the awareness layer is properly displayed and updated when remote users change their cursor location. The tests will simulate user interactions with the whiteboard and verify the state of the "AwarenessLayer" and "AwarenessInfo" components.
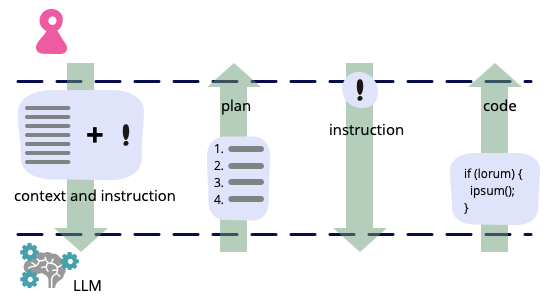
At this point, Xu Hao is ready to ask ChatGPT to provide code for one of the steps
Sure, let's start with writing tests for the awareness slice and AwarenessViewModel:

Test for Awareness Slice:

describe('awareness slice', () => {
  let store: MockStore;
  beforeEach(() => {
    store = configureMockStore()(initialState);
  });

  it('should set the cursor location', () => {
    store.dispatch(setCursorLocation({ x: 100, y: 200 }));
    const state = store.getState().awareness;
    expect(state.cursorLocation).toEqual({ x: 100, y: 200 });
  });

  it('should set the name', () => {
    store.dispatch(setName('John Doe'));
    const state = store.getState().awareness;
    expect(state.name).toBe('John Doe');
  });

  it('should set the online status', () => {
    store.dispatch(setOnline(true));
    const state = store.getState().awareness;
    expect(state.isOnline).toBe(true);
  });
});
Test for AwarenessViewModel:

describe('AwarenessViewModel', () => {
  let store: MockStore;
  let awarenessViewModel: AwarenessViewModel;
  beforeEach(() => {
    store = configureMockStore()(initialState);
    awarenessViewModel = new AwarenessViewModel(store);
  });

  it('should set the cursor location', () => {
    awarenessViewModel.setCursorLocation({ x: 100, y: 200 });
    const state = store.getState().awareness;
    expect(state.cursorLocation).toEqual({ x: 100, y: 200 });
  });

  it('should set the name', () => {
    awarenessViewModel.setName('John Doe');
    const state = store.getState().awareness;
    expect(state.name).toBe('John Doe');
  });

  it('should set the online status', () => {
    awarenessViewModel.setOnline(true);
    const state = store.getState().awareness;
    expect(state.isOnline).toBe(true);
  });
});
Now, let's implement the Awareness slice and AwarenessViewModel:

Awareness slice:

interface AwarenessState {
  cursorLocation: { x: number; y: number };
  name: string;
  isOnline: boolean;
}

const initialState: AwarenessState = {
  cursorLocation: { x: 0, y: 0 },
  name: '',
  isOnline: false,
};

const awarenessSlice = createSlice({
  name: 'awareness',
  initialState,
  reducers: {
    setCursorLocation: (state, action: PayloadAction<{ x: number; y: number }>) => {
      state.cursorLocation = action.payload;
    },
    setName: (state, action: PayloadAction) => {
      state.name = action.payload;
    },
    setOnline: (state, action: PayloadAction) => {
      state.isOnline = action.payload;
    },
  },
});

export const { setCursorLocation, setName, setOnline } = awarenessSlice.actions;

export default awarenessSlice.reducer;
AwarenessViewModel:

class AwarenessViewModel {
  private store: Store;

  constructor(store: Store) {
    this.store = store;
  }

  setCursorLocation(cursorLocation: { x: number; y: number }) {
    this.store.dispatch(setCursorLocation(cursorLocation));
  }

  setName(name: string) {
    this.store.dispatch(setName(name));
  }

  setOnline(isOnline: boolean) {
    this.store.dispatch(setOnline(isOnline));
  }
}

Note: In this implementation, I assumed that the AwarenessViewModel is used to
set the values in the store. If it is also used to retrieve the values from the
store, we can add corresponding methods to the AwarenessViewModel class
(I've removed the styling from ChatGPT's response.)
Overall this code is neither bad nor perfect. It won't run as it stands.
It's missing a configureMockStore and assumes it uses
redux-mock-store, which isn't part of the tech stack. Xu Hao can fix these
problems by asking the LLM to progressively tweak the code through a
sequence of rewrites. Here's one to get rig of redux-mock-store.
Sure, here's an example implementation of the tests for the AwarenessViewModel and the awareness slice without using redux-mock-store:
import { createAwarenessSlice, AwarenessState, updateAwareness } from './awarenessSlice';
import { AwarenessViewModel } from './AwarenessViewModel';

describe('AwarenessViewModel', () => {
  const mockDispatch = jest.fn();
  const initialState: AwarenessState = {
    users: {
      'user1': {
        name: 'User 1',
        cursorPosition: { x: 0, y: 0 },
        online: true,
      },
      'user2': {
        name: 'User 2',
        cursorPosition: { x: 100, y: 100 },
        online: true,
      },
    },
  };
  let viewModel: AwarenessViewModel;

  beforeEach(() => {
    viewModel = new AwarenessViewModel(initialState, mockDispatch);
  });

  describe('getUserNames', () => {
    it('returns the list of user names', () => {
      const names = viewModel.getUserNames();
      expect(names).toEqual(['User 1', 'User 2']);
    });
  });

  describe('getCursorPosition', () => {
    it('returns the cursor position for a given user ID', () => {
      const cursorPosition = viewModel.getCursorPosition('user1');
      expect(cursorPosition).toEqual({ x: 0, y: 0 });
    });

    it('returns undefined for an unknown user ID', () => {
      const cursorPosition = viewModel.getCursorPosition('unknown');
      expect(cursorPosition).toBeUndefined();
    });
  });

  describe('updateCursorPosition', () => {
    it('dispatches the updateAwareness action with the new cursor position', () => {
      viewModel.updateCursorPosition('user1', { x: 50, y: 50 });
      expect(mockDispatch).toHaveBeenCalledWith(updateAwareness({
        user: 'user1',
        cursorPosition: { x: 50, y: 50 },
      }));
    });
  });
});
And here's an example implementation of the awarenessSlice without using redux-mock-store:
import { createSlice, PayloadAction } from '@reduxjs/toolkit';

export type CursorPosition = { x: number, y: number };

export type UserAwareness = {
  name: string;
  cursorPosition: CursorPosition;
  online: boolean;
};

export type AwarenessState = {
  users: Record<string, UserAwareness>;
};

const initialState: AwarenessState = {
  users: {},
};

const awarenessSlice = createSlice({
  name: 'awareness',
  initialState,
  reducers: {
    updateAwareness: (state, action: PayloadAction<{ user: string, cursorPosition: CursorPosition }>) => {
      const { user, cursorPosition } = action.payload;
      state.users[user].cursorPosition = cursorPosition;
    },
    setOnline: (state, action: PayloadAction<{ user: string, online: boolean }>) => {
      const { user, online } = action.payload;
      state.users[user].online = online;
    },
  },
});

export const { updateAwareness, setOnline } = awarenessSlice.actions;
export const awarenessReducer = awarenessSlice.reducer;
Note that since we're not using redux-mock-store, we need to pass a mock dispatch function to the view model constructor, and in the test for updateCursorPosition we need to check that the correct action was dispatched using jest.fn().
Further rewrites can fit in more adjustments, such as asking it to
Use `configureTestingStore(‘awareness’, initialState)` to initialize
    the test store
can get it to fit in with the team's test idioms. Then
with some path adjustments and a small amount of glue for the reducers, the
code can run just fine.
Once this is working, Xu Hao can repeat the process for the rest of the tasks in the master plan.
My take away from this discussion was that using chain of thought and generated knowledge prompting approaches can be a significantly useful tool for programming. In particular it shows that to use LLMs well, we need to learn how to construct prompts to get the best results. This experience suggests that it's useful to interact with the LLM like a junior partner, starting them with architectural guidelines, asking them to show their reasoning, and tweaking their outputs as we go.
Recommend
About Joyk
Aggregate valuable and interesting links.
Joyk means Joy of geeK