

How I Made Twitter Back-end
source link: https://dev.to/leoantony72/twitter-back-end-design-274b
Go to the source link to view the article. You can view the picture content, updated content and better typesetting reading experience. If the link is broken, please click the button below to view the snapshot at that time.

1. Introduction
I am designing a back-end for Twitter using a micro-service architecture. This design is based on the implementation by Twitter's engineers, and I had made some slight modifications to enhance scalability and improve performance. I will be coding and implementing this design as I progress.
GitHub Project Link: Twitter Backend
2.Prerequisite
Basic system Design concepts like:
- Caching
- load balancer
- Message Queue/Bus
- Service Registry
3.Features
- User signup/Login - JWT
- User should be able to tweet.
- User can Delete Tweet
- User can see other user's tweet timeline(with retweets).
- User can get their Home timeline.
- User can follow/unfollow others.
- System should be Scalable.
4.Challenges we face
Twitters high volume of daily tweets can be challenging for scaling the platform. Twitter by nature is a Read Heavy application compared to writes. meaning there are far more users consuming tweets than users actively tweeting. Twitter still produce 5800 tweets per/second btw😬.
Since being a Read Heavy application the database will experience heavy load. We can reduce the heavy load by using a cache like Redis.
When a tweet is tweeted it is send to queue so it might take a bit to show up on user's Home Page, It's okay but we have to make sure not to increase this time gap.
Jwt key sharing among other service for authentication
5.Database Design

In this Users table have One to Many relations with Tweets,Likes,Retweets,User_follows.
6.Implementation
Auth Service
Using session would require to make a call to the database every time a request comes in. Since we are following microservice architecture we will be using JWT to reduce database calls.
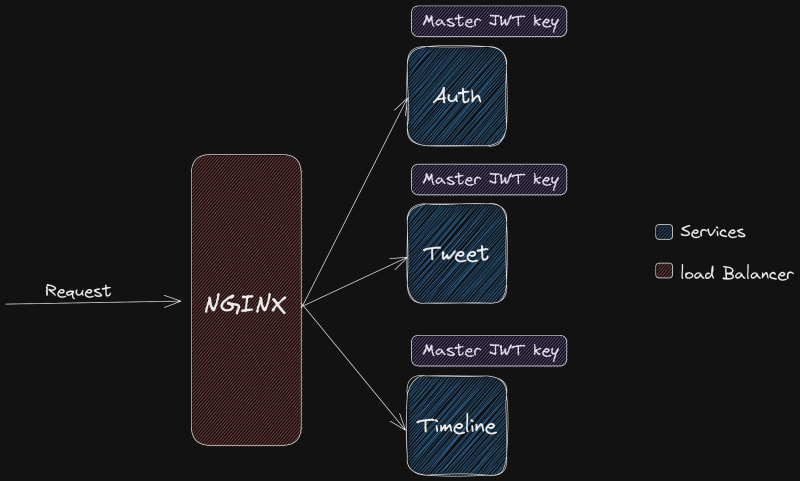
For Verifying these Jwt token we would have to share the master key to every service which is not the best practice. What's the solutions Asymmetric Key!. Basically Asymmetric key means that we will Encrypt with a key and Decrypt with another key.

The master key will be used to make the tokens and slave key can only be used for verifying these tokens. For Creating Asymmetric token we need to generate a RSA key then we create a private & public certificate.
// generate key
privatekey, err := rsa.GenerateKey(rand.Reader, 2048)
if err != nil {
    fmt.Printf("Cannot generate RSA key\n")
    os.Exit(1)
}
publickey := &privatekey.PublicKey
Then we dump this key to private.pem file for further use in generating jwt tokens
// dump private key to file
    var privateKeyBytes []byte = x509.MarshalPKCS1PrivateKey(privatekey)
    privateKeyBlock := &pem.Block{
        Type:  "RSA PRIVATE KEY",
        Bytes: privateKeyBytes,
    }
    privatePem, err := os.Create("private.pem")
    if err != nil {
        fmt.Printf("error when create private.pem: %s \n", err)
        os.Exit(1)
    }
do this for the public.pem certificate, we use this certificate to verify jet token.
// dump public key to file
    publicKeyBytes, err := x509.MarshalPKIXPublicKey(publickey)
    if err != nil {
        fmt.Printf("error when dumping publickey: %s \n", err)
        os.Exit(1)
    }
    publicKeyBlock := &pem.Block{
        Type:  "PUBLIC KEY",
        Bytes: publicKeyBytes,
    }
    publicPem, err := os.Create("../public.pem")
    if err != nil {
        fmt.Printf("error when create public.pem: %s \n", err)
        os.Exit(1)
    }
Code for generating Jwt token with private.pem cerificate
func GenerateAccessToken(name, Id string) (string, error) {
    privateKey, err := ioutil.ReadFile("private.pem")
    if err != nil {
        log.Fatal(err)
    }
    rsaprivateKey, err := jwt.ParseRSAPrivateKeyFromPEM(privateKey)
    if err != nil {
        log.Fatal(err)
    }


    token := jwt.NewWithClaims(jwt.SigningMethodRS256, jwt.MapClaims{
        "name": name,
        "ID":   Id,
        "exp":  time.Now().Add(10 * time.Minute).Unix(),
    })


    tokenString, err := token.SignedString(rsaprivateKey)
    if err != nil {
        return "", errors.New("failed to create Token")
    }
    return tokenString, nil
}
We can now verify the jwt token with public.pem certificate. We can further make a middleware functions to verify jwt token.
func ValidateJwt(signedToken string) (*jwt.Token, jwt.MapClaims, error) {
    // Load the RSA public key from a file
    publicKey, err := ioutil.ReadFile("../public.pem")
    if err != nil {
        log.Fatal(err)
    }
    rsaPublicKey, err := jwt.ParseRSAPublicKeyFromPEM(publicKey)
    if err != nil {
        log.Fatal(err)
    }

    // Parse the signed JWT and verify it with the RSA public key
    token, err := jwt.Parse(signedToken, func(token *jwt.Token) (interface{}, error) {
        if _, ok := token.Method.(*jwt.SigningMethodRSA); !ok {
            return nil, fmt.Errorf("unexepcted signing method: %v", token.Header["alg"])
        }
        return rsaPublicKey, nil
    })

    claims, ok := token.Claims.(jwt.MapClaims)
    if ok && token.Valid {
        return token, claims, nil
    }
    return nil, nil, err
}
Tweet Service
The Tweet Service is responsible for posting tweets and pushing them to a message queue for consumption by the timeline service. Additionally, the service is responsible for handling tweet interactions such as retweeting and liking. Retweets are also pushed to the message queue to ensure that followers can see them.

By utilizing a Message Queue, tweets can be processed efficiently and in real-time. RabbitMq was used as the message queue in the development of this project.
Prior to sending tweets to the message queue, they are stored in Postgres and Redis. Redis is used to store a copy of the tweet, along with information about users who liked and retweeted the tweet. User tweets are stored in a sorted set with a key format of "users:${username}:tweets", facilitating efficient data organization and retrieval.
Timeline Service

The Timeline service is tasked with fetching both the user timeline and home timeline. To handle incoming tweets obtained from the MQ, we will utilize a separate goroutine. Our approach will involve iterating through each new message, and if the author's number of followers is below x, we will employ the Push method. Otherwise, we will opt for the Pull method.
Push Method
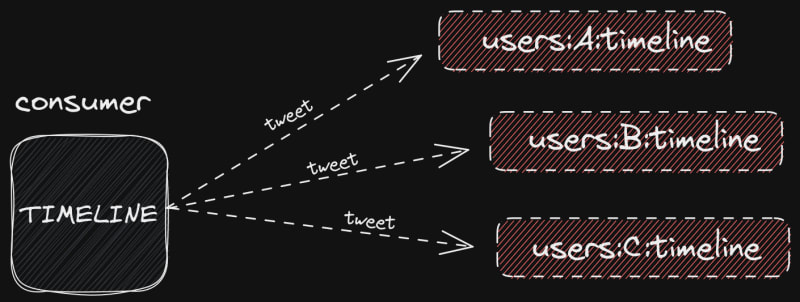
In this approach the tweet will be send to every followers of the author. This will be stored in followers timeline in Redis with a key similar to "users:${username}:timeline".
- What is the problem with this approach?
Suppose a tweet author has 1,000,000 followers so with this approach timeline service would have to send this tweet to 1million users. Even for the Blazing fast Redis that will take time to finish. In this scenario we opt for Pull method.
Pull Method
When the number of followers exceeds x, the Pull method is more efficient, and Twitter uses it for handling tweets from celebrities. If a user requests to load their timeline, we will first check if they follow any celebrities this can be done by maintaining a list of celebrity a user follows. If they do, we will pull the latest tweets from the celebrities and merge them with the user's timeline, returning the resulting tweets. This approach ensures that only active users receive the data, like a request and serve mechanism. In contrast, the Push method pushes tweets to both active and inactive users, resulting in wasted bandwidth.
Load Balancer
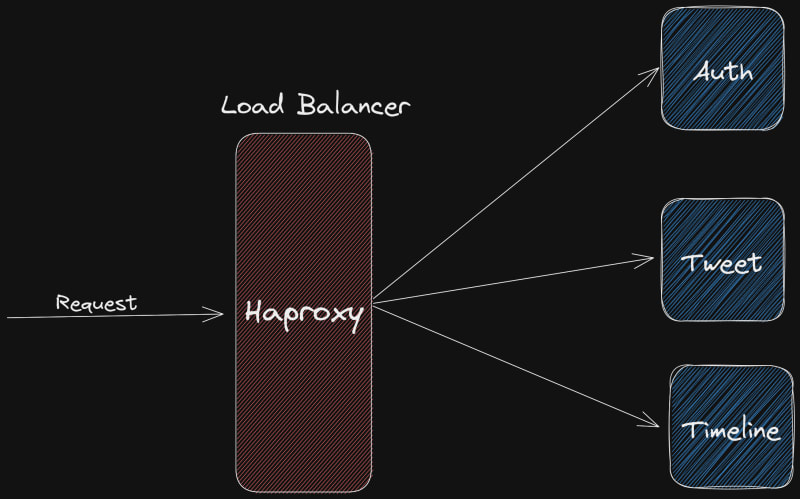
Since we have multiple services we want to a way to direct the request to each service, here comes the load balancer. Haproxy is used as the load Balancer in the development of this project. Haproxy directs the request it gets to appropriate services.
Service Registry
Every Service on startup register itself to service register In this case I've used Consul as the service registry. I configured consul in a way that after every 10s it makes a request to particular endpoint if it failed to respond it means our service is down. Consul provides us a Web interface where we can see if the services are online or not.
Web Interface: localhost:8500
Docker
My Twitter-Backend has been dockerized so you run it with just one command. Docker helped me setup this project easily. For those who don't know docker enables you to run any database, load balancer or cache with just 1-2 commands. You can also dockerize your application to ship it to production.
Conclusion
This project was fun to do and I've learned a lot by building this project hope you have learned something new. Do tell me any mistakes I made or how it can be improved. Be sure to check out my project on GitHub (Documentation available) and also check out thread I made on Twitter🙂.
Github: https://github.com/leoantony72/twitter-backend
Twitter: https://twitter.com/serpico_z/status/1605899167439757312
Recommend
About Joyk
Aggregate valuable and interesting links.
Joyk means Joy of geeK